Looking for a good camera for dental photography? This guide breaks down the best mirrorless and DSLR options, essential macro lenses, and affordable lighting gear so you can produce clinic‑ready photos every time. Read on for practical tips, budget‑friendly recommendations, and a step‑by‑step workflow that even beginners can master.
Key Takeaways
- Sensor size matters: APS‑C and full‑frame sensors deliver the detail needed for intra‑oral shots.
- Macro lenses are essential: A 60‑105 mm macro lens gives the right working distance and sharpness.
- Ring flash or twin‑lite: Consistent, shadow‑free lighting is critical for accurate color reproduction.
- Workflow shortcuts: Using tethered capture and RAW + JPEG saves time and ensures quality.
- Budget options exist: Mirrorless cameras paired with affordable macro lenses can match DSLR performance.
- Accessories count: A good tripod, silicone bite‑blocks, and a reliable SD card keep the process smooth.
- Future‑proofing: Choose a system with a growing lens lineup and firmware updates.
📑 Table of Contents
- Introduction: Why Dental Photography Needs Its Own Camera
- 1. Core Camera Features to Look For
- 2. Top Camera Recommendations
- 3. The Magic of Macro Lenses
- 4. Lighting Essentials for Dental Photography
- 5. Essential Accessories for a Smooth Workflow
- 6. Step‑by‑Step Workflow: From Setup to Final Image
- Conclusion: Choose Wisely, Shoot Confidently
Introduction: Why Dental Photography Needs Its Own Camera
Dental photography isn’t just about taking pretty pictures; it’s a clinical tool. High‑quality images help you document cases, communicate with labs, educate patients, and market your practice. Unlike landscape or portrait work, dental shots demand extreme detail, true color, and a shallow depth of field that captures the tiny textures of enamel and gum tissue.
That’s why picking a good camera for dental photography is different from buying a hobbyist camera. You need a system that handles macro work, offers reliable autofocus at close range, and integrates smoothly with lighting accessories. In the next sections we’ll walk through the most important features, recommend specific models, and share workflow tips that turn a simple snap into a diagnostic‑grade image.
1. Core Camera Features to Look For
Sensor Size and Resolution
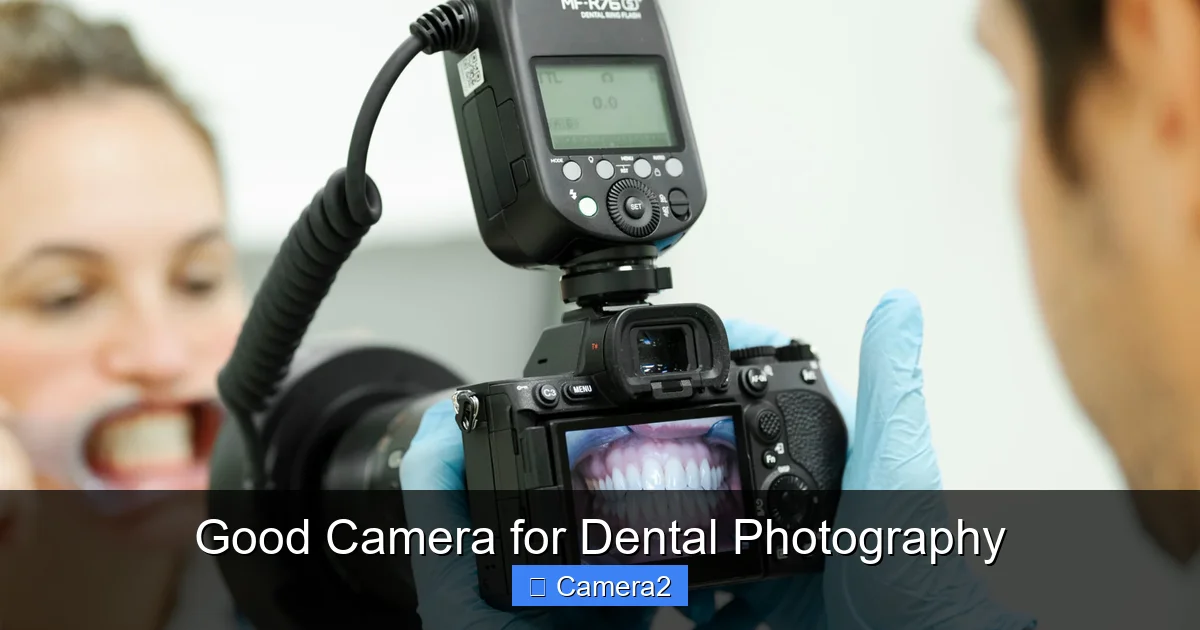
Most dental photographers favor APS‑C (also called “crop”) or full‑frame sensors. APS‑C gives a 1.5× crop factor, which effectively extends the focal length of macro lenses—useful when you need a little extra working distance. Full‑frame sensors, on the other hand, provide superior low‑light performance and a wider dynamic range, which can be handy in a dim operatory.
Visual guide about Good Camera for Dental Photography
Image source: media.londondentalinstitute.com
Resolution matters, but don’t chase 50 MP for the sake of it. A 20–24 MP sensor already captures enough detail for 8 × 10 prints and digital case records. Higher megapixels also mean larger files, which can slow down tethered shooting.
Autofocus Performance at Close Range
Dental work often requires focus distances of 3–6 inches. Look for cameras with dedicated macro AF modes or on‑sensor phase‑detect points that cover the center of the frame. Continuous AF isn’t as crucial as precise single‑shot focus, but a quick lock‑on saves time between patients.
Ergonomics and Controls
Since you’ll be working with gloved hands, a camera with a comfortable grip, tactile buttons, and a customizable function dial is a must. A top‑mount LCD that flips up helps you compose shots while standing over a patient’s chair.
Connectivity for Tethered Shooting
Most dental offices tether the camera to a laptop or tablet to instantly review images. Wi‑Fi, Bluetooth, or a USB‑C tethering port makes this seamless. Some software even lets you control exposure and focus from the computer, reducing the need to touch the camera mid‑procedure.
2. Top Camera Recommendations
Best Overall: Canon EOS R10 (Mirrorless, APS‑C)
The Canon EOS R10 offers a 24.2 MP APS‑C sensor, fast Dual Pixel AF, and a compact body that fits easily on a dental cart. Its eye‑detect AF works at close distances, and the built‑in Wi‑Fi lets you tether with Canon’s Camera Connect app. Pair it with the Canon RF 100 mm f/2.8 L Macro lens for superb sharpness.
Visual guide about Good Camera for Dental Photography
Image source: themoviedb.org
Best DSLR Option: Nikon D5600
If you prefer an optical viewfinder, the Nikon D5600 remains a solid choice. Its 24.2 MP sensor, articulated screen, and excellent battery life make it reliable for long clinic days. Combine it with the Nikon AF‑S VR 105 mm f/2.8G IF‑ED macro lens for a comfortable working distance.
Budget Friendly: Sony α6400 (Mirrorless, APS‑C)
The Sony α6400 packs a 24.2 MP sensor, quick 425‑point AF, and a high‑resolution electronic viewfinder. It’s lightweight and works well with the Sony FE 90 mm f/2.8 Macro G OSS lens. The camera’s real‑time eye AF is surprisingly accurate even at macro distances.
Full‑Frame Pro: Fujifilm X‑T4 (APS‑C but with superb color science)
While technically APS‑C, the X‑T4’s X‑Trans sensor delivers film‑like color rendition that many dentists love for natural tooth tones. Its in‑body image stabilization (IBIS) helps when shooting handheld, and the 77‑mm f/2.8 macro lens offers a 1.0× magnification.
Specialty Choice: Panasonic Lumix GH5 (Micro‑Four‑Thirds)
For those who also record video case studies, the GH5’s video capabilities are unmatched. Pair it with the Panasonic Lumix G 45 mm f/2.8 Macro lens for a compact macro setup.
3. The Magic of Macro Lenses
Why Macro, Not Standard?
Standard lenses can focus close, but macro lenses are engineered to reproduce life‑size (1:1) or greater magnification with minimal distortion. This is essential for capturing the fine details of enamel cracks, restorative margins, and soft‑tissue lesions.
Visual guide about Good Camera for Dental Photography
Image source: cbu01.alicdn.com
Focal Length Considerations
For APS‑C bodies, 60‑105 mm lenses give you 8‑12 inches of working distance—enough to avoid casting shadows on the tooth while still staying close enough for sharp focus. Full‑frame users often opt for 90‑105 mm lenses to maintain a similar distance.
Top Macro Lens Picks
- Canon RF 100 mm f/2.8 L Macro: Excellent sharpness, weather‑sealed, and works flawlessly with the EOS R10.
- Nikon AF‑S VR 105 mm f/2.8G IF‑ED: Vibration reduction is a boon for handheld shots.
- Sony FE 90 mm f/2.8 Macro G OSS: Built‑in optical stabilization and a smooth focus ring.
- Tamron SP 90 mm f/2.8 Di VC USD Macro: Affordable, with excellent image quality for both Canon and Nikon mounts.
4. Lighting Essentials for Dental Photography
Ring Flash vs. Twin‑Lite
Ring flashes are popular because they provide even, shadow‑free illumination directly in front of the lens. However, they can cause a “flat” look and may create a red‑eye effect on reflective surfaces. Twin‑lite setups (two small flash heads placed on either side of the lens) deliver more natural shading and better color rendering.
Recommended Flash Units
- Canon Speedlite 600EX II‑RT: Works with the EOS R10 via wireless radio; its high guide number handles the small apertures needed for depth of field.
- Nikon SB‑910: A versatile flash that can be positioned on a custom bracket for twin‑lite configurations.
- Godox V860II‑C (for Canon) / V860II‑N (for Nikon): Affordable, with built‑in 2.4 GHz wireless control.
Other Lighting Aids
Consider a small LED ring light that clips onto the lens for continuous illumination during video case recordings. A diffuser or softbox helps soften harsh shadows when using a twin‑lite.
5. Essential Accessories for a Smooth Workflow
Tripod or Mini‑Stand
A stable base eliminates camera shake. Look for a compact, tabletop tripod with a quick‑release plate. The Manfrotto Pixi mini‑tripod is a favorite among dentists.
Intra‑Oral Mirrors and Bite‑Blocks
Silicone bite‑blocks keep the camera steady and protect the patient’s teeth. They also provide a consistent reference point for repeatable shots.
SD Card Selection
Fast, reliable storage is a must. Choose a UHS‑II or UHS‑III SD card with at least 64 GB capacity to handle RAW files. For more details on picking the right card, see our guide on SD Card For Trail Camera.
Monitor for Review
Having a larger monitor on the dental cart lets you review images instantly. A 12‑inch USB‑C monitor that supports 4K resolution works well with most tethering setups. Learn more about choosing a screen in our article Monitor For Rear View Camera.
Camera Bag and Backpack
Protect your gear with a padded bag that has dedicated compartments for lenses, flashes, and accessories. If you travel between clinics, a sturdy good camera backpack for hiking can double as a clinic bag.
6. Step‑by‑Step Workflow: From Setup to Final Image
1. Prepare the Patient and Equipment
Explain the process to the patient, position the intra‑oral mirror, and place a silicone bite‑block. Turn on the flash and set it to manual power (usually 1/8 to 1/4 power).
2. Camera Settings
- Aperture: f/22–f/32 for maximum depth of field.
- ISO: 100–200 to keep noise low.
- Shutter Speed: Sync speed of the flash (typically 1/200 s).
- White Balance: Use a custom preset or “Flash” mode; fine‑tune in post if needed.
- File Format: Shoot RAW + JPEG for flexibility.
3. Tethered Capture
Connect the camera to a laptop via USB‑C and launch your preferred software (e.g., Capture One or free tools like DigicamControl). This lets you see a full‑resolution preview and adjust exposure on the fly.
4. Focus and Shoot
Switch to single‑shot AF, place a focus point on the tooth’s incisal edge, and half‑press the shutter. Verify focus on the laptop screen, then fully press to capture.
5. Immediate Review and Retake if Needed
Because the image appears on a larger monitor, you can spot any blur or color shift instantly. Minor adjustments to flash power or aperture are often all that’s required.
6. Post‑Processing Basics
In Lightroom or Capture One, apply a basic preset: adjust exposure, correct white balance, and sharpen lightly. Export a JPEG for the patient file and keep the RAW for the lab.
Conclusion: Choose Wisely, Shoot Confidently
Investing in a good camera for dental photography pays off in clearer case documentation, happier patients, and stronger marketing material. Whether you opt for a mirrorless powerhouse like the Canon EOS R10 or a reliable DSLR such as the Nikon D5600, the key is pairing it with a true macro lens, consistent lighting, and a streamlined workflow. With the accessories and tips outlined above, you’ll be able to capture crisp, color‑accurate images that showcase the quality of your dental work—every single time.
Frequently Asked Questions
What sensor size is best for dental photography?
APS‑C sensors give a useful crop factor for macro work, while full‑frame offers better low‑light performance. Both can produce excellent results; choose based on budget and lens availability.
Do I need a dedicated macro lens?
Yes. A true macro lens provides 1:1 (life‑size) magnification and minimal distortion, which is essential for capturing fine dental details.
Can I use a smartphone camera for dental images?
Smartphones can capture decent photos, but they lack macro capability, consistent flash output, and tethered workflow, making them unsuitable for professional documentation.
How important is flash power in intra‑oral photography?
Flash power controls exposure and helps avoid shadows. Using a ring flash or twin‑lite at low power (1/8–1/4) with a small aperture yields even illumination without overexposure.
What file format should I shoot in?
Shoot RAW for maximum flexibility in post‑processing, and enable JPEG capture simultaneously for quick sharing with patients or labs.
How often should I clean my macro lens?
Clean the front element before each patient using a microfiber cloth and lens cleaning solution. Keep the rear element dust‑free with a blower brush to maintain image quality.