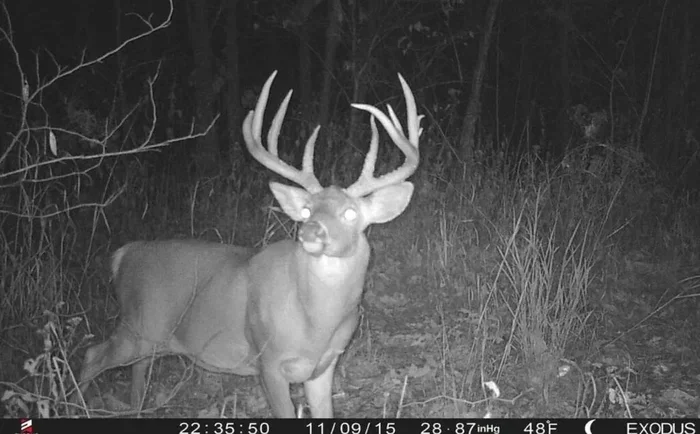
Pictures of Big Bucks on Trail Cameras
Capturing pictures of big bucks on trail cameras requires patience, strategy, and the right gear. You will learn exactly where to place your camera, how to set it up without spooking deer, and what settings produce the clearest images. We also cover battery choices, memory card tips, and seasonal patterns that help you snap trophy photos. By the end, you will know how to turn your trail camera into a reliable buck-hunting tool.
Key Takeaways
- Smart placement matters most: Position your camera near game trails, scrapes, and feeding areas to increase your chances of capturing pictures of big bucks on trail cameras.
- Minimize spooking deer: Use low-glare mounts, face the camera north or south, and test your setup so you do not scare wary bucks away.
- Choose the right batteries: Lithium batteries perform better in cold weather and last longer, which helps your camera stay ready for trophy shots.
- Mind your memory card: A quality SD card with enough space prevents missed photos during busy deer activity.
- Tune your settings: Adjust PIR sensitivity, trigger speed, and burst mode to match your target area and deer movement patterns.
- Time it right: Early fall, the rut, and dawn or dusk hours often produce the best pictures of big bucks on trail cameras.
- Check and maintain regularly: Visit your cameras often enough to swap batteries and cards, but not so often that you disturb the area.
📑 Table of Contents
Introduction
Every hunter and wildlife enthusiast dreams of snapping crisp pictures of big bucks on trail cameras. There is nothing quite like checking your card and seeing a mature buck stepping into frame. The good news is that you do not need fancy equipment to get great results. You just need a smart setup and a little patience.
In this guide, we will walk through everything you need to know. We will cover placement, settings, batteries, memory cards, and ways to avoid spooking deer. You will also learn how seasonal patterns affect buck movement and how to read your photos for better results. Let’s get started.
Where to Place Your Camera for Best Results
Location is everything when you want pictures of big bucks on trail cameras. A great camera in the wrong spot will sit idle while the bucks walk past. Start by looking for signs of deer activity. Fresh tracks, rubs, scrapes, and bedding areas all tell a story. Follow those clues to find natural travel corridors.
Focus on Game Trails and Funnel Points
Deer often use the same paths day after day. These game trails are perfect for camera placement. Look for narrow funnels where woods, fields, or terrain force deer to move through a specific area. Funnels are excellent because they concentrate movement. A buck that would normally spread out may pass your camera in a funnel.
Watch Scrapes and Rubs
Scrapes and rubs signal that bucks are in the area. A scrape is a cleared spot on the ground where a buck leaves scent. A rub is a tree or shrub with bark stripped away. Both can be strong indicators of mature buck activity. Place your camera a short distance away so you can catch the buck as it approaches or checks the sign.
Keep a Low Profile
Big bucks are cautious. If your camera sticks out or smells like human hands, it may change deer behavior. Use natural cover when possible. Trim only what you need. Try to mount the camera at a height that matches the target animal. For bucks, chest height on a tree or post is often a good starting point.
Quick Tip: If you want more pictures of big bucks on trail cameras, place one camera near a food source and another near a travel corridor. Compare the results and adjust as needed.
How to Avoid Spooking Deer During Setup
One of the biggest mistakes people make is scaring deer during setup or maintenance. A spooked buck may avoid the area for days or weeks. That means fewer pictures of big bucks on trail cameras and a lot of frustration. The good news is that a few simple habits can help.
Mind the Sun and Glare
Glare can make your photos blurry or washed out. It can also make the camera more noticeable. Try to face the camera north or south when possible. This reduces direct sunlight hitting the lens. If you must face east or west, use a slight angle or natural shade to soften the light.
Use a Low-Glare Mount
A low-glare mount helps reduce reflection from the camera body. It also helps the camera blend into the tree or post. Some hunters even use a small piece of camouflage tape around the edges. The goal is to make the setup feel like part of the landscape.
Limit Your Visits
Every visit leaves scent and disturbs the area. Plan your checks carefully. Bring everything you need so you do not have to return too often. When you do check the camera, move quietly and avoid leaving obvious trails. If the area is already sensitive, consider checking less often and relying on remote options when available.
Test Before You Leave
Take a few test shots before you walk away. Make sure the angle captures the trail or scrape properly. Check that the trigger response feels right. A quick test can save you from coming back to blank images later.
Best Camera Settings for Clear Buck Photos
Settings make a huge difference in image quality. A fast trigger and good sensitivity help you catch quick movements. The right burst mode can give you multiple chances to get one great shot. If you want pictures of big bucks on trail cameras that actually show the animal clearly, tune these settings with care.
Trigger Speed and PIR Sensitivity
Trigger speed is how fast the camera reacts after motion is detected. Faster is usually better for deer because they move quickly. PIR sensitivity controls how small a movement must be before the camera fires. In busy areas, a balanced setting can reduce false triggers. In quiet areas, higher sensitivity may help you catch a cautious buck.
Burst Mode and Delay Settings
Burst mode takes several photos in a row. This can be helpful when a buck is moving fast or only partially enters the frame. A short delay between shots can also help you capture a sequence. Just remember that more shots use more battery and card space. Find a balance that fits your goals.
Resolution and Image Quality
Higher resolution gives you more detail. That matters when you want to see antler shape, body size, and other details. If your camera supports it, choose a setting that balances clarity with storage needs. A sharp image is worth more than a blurry one, even if the blurry one was taken first.
Night Vision and Flash Type
Night images can be just as valuable as daytime shots. Some cameras use a white flash, while others use lower-glow or no-glow options. Lower-glow setups may be less noticeable to deer. No-glow setups can be even more discreet. If you are worried about spooking deer, consider a setting that reduces visible flash.
Expert Insight: If your area has lots of small animals, adjust PIR sensitivity to reduce false triggers. That saves battery and keeps your card full of useful images of big bucks on trail cameras instead of empty triggers.
Batteries and Memory Cards That Keep You Shooting
Great settings do not matter if your camera shuts down early. Power and storage are the backbone of every successful setup. Choosing the right batteries and SD card helps you stay ready for that unexpected mature buck.
Lithium vs Alkaline Batteries
Lithium batteries usually perform better in cold weather and tend to last longer in trail cameras. Alkaline batteries can work well in milder conditions, but they may fade faster when temperatures drop. If you hunt in cold regions or leave cameras out for long periods, lithium is often the safer choice.
Match Batteries to Your Camera
Not every camera uses batteries in the same way. Some models are sensitive to voltage differences between battery types. Always check the camera instructions before mixing battery types. Using the same type across all slots helps the camera run evenly.
Pick the Right SD Card
A reliable SD card prevents headaches. Choose a card that matches your camera’s recommended capacity and speed. If you expect lots of photos, pick a larger card so you do not miss important moments. A card that is too slow can also cause delays or failed writes. When in doubt, use a quality card from a trusted brand.
Keep a Spare Card and Backup Batteries
It is smart to carry a spare card and extra batteries during checks. That way, you can swap things out quickly and keep the camera running. This is especially useful if you are managing multiple cameras across different spots.
Common Mistake: Using old or mixed batteries can cause power problems. Another common mistake is waiting too long to check the card, which can lead to a full card and missed pictures of big bucks on trail cameras.
Seasonal Patterns and Timing for Trophy Shots
Deer behavior changes throughout the year. If you understand those changes, you can predict where bucks may appear. That makes it easier to capture pictures of big bucks on trail cameras at the right time.
Early Season Patterns
In early fall, bucks often stick to familiar areas. They may feed regularly and move through the same trails. This is a good time to learn their patterns. Set up near food sources or transition areas and watch for consistent movement.
The Rut Brings Movement
During the rut, bucks travel more than usual. They search for does and cover a lot of ground. That means your camera may see new animals more often. Place cameras near pinch points, scrape lines, and areas where deer naturally cross.
Weather and Time of Day
Deer often move more around dawn and dusk. Weather can also affect movement. A temperature drop, wind shift, or incoming front may change activity levels. If you notice a pattern in your area, adjust your expectations and check times accordingly.
Use Time-Lapse When Helpful
Sometimes a standard motion trigger misses important moments. Time-lapse can fill in the gaps by taking photos at set intervals. This can be useful in areas with unpredictable movement. If you want to learn more about this feature, see our guide on what is time-lapse on a trail camera.
Quick Tip: Keep a simple log of when bucks appear. Over time, you may notice repeat patterns that help you get more pictures of big bucks on trail cameras with less guesswork.
Reading Photos and Improving Your Setup Over Time
A good photo is more than a cool picture. It is information. Each image can tell you about buck size, travel timing, and area use. When you review your photos carefully, you can make better decisions for future setups.
Look for Repeat Visitors
Some bucks may show up often. Others may pass through once and disappear. If the same buck returns, note the time and location. That can help you understand which areas are most valuable.
Check the Frame and Angle
If the buck is only partly in frame, adjust the camera angle or height. If the trail is too close or too far, move the camera slightly. Small changes can make a big difference.
Compare Day and Night Images
Day and night shots may reveal different behavior. A buck that feeds at night may use the same area differently during the day. Comparing both can help you build a clearer picture of local movement.
Keep Your Setup Clean and Current
Over time, vegetation grows and trails shift. Check your camera angle and clear any obstructions. A clean frame means better photos and fewer missed opportunities.
Key Takeaway: The best pictures of big bucks on trail cameras come from a setup that is well placed, carefully tuned, and checked with care. Small improvements add up fast.
Conclusion
Getting pictures of big bucks on trail cameras is not about luck alone. It is about paying attention to placement, settings, power, storage, and deer behavior. When you combine those pieces, your camera becomes a powerful tool for watching mature bucks move through your area.
Start with one or two well-chosen locations. Set your camera thoughtfully. Use reliable batteries and a good SD card. Then review your photos and make small adjustments over time. With patience, you will likely see better images and more consistent buck activity. Keep learning from each setup, and your next trophy photo may be closer than you think.
Frequently Asked Questions
What is the best place to put a trail camera for big bucks?
The best place is usually near a game trail, scrape, rub, or funnel where deer naturally travel. Look for fresh sign and mount the camera at a height that matches the target area. A careful angle and low-profile setup can help you capture more pictures of big bucks on trail cameras.
Do trail cameras scare deer away?
They can if the setup is obvious, noisy, or heavily scent-covered. To reduce this risk, use a low-glare mount, face the camera away from direct sun, and keep visits quiet and minimal. For more detail, you can read our article on do trail cameras scare deer.
Which batteries are better for trail cameras in cold weather?
Lithium batteries usually handle cold weather better and often last longer than alkaline batteries. They are a strong choice if you plan to leave the camera out during fall or winter. Always use the same battery type in all slots unless the camera instructions say otherwise.
How many pictures can a trail camera store?
That depends on the SD card size and how often the camera takes photos. A larger card gives you more room for high-resolution images and burst shots. If you want help choosing storage, check our guide on how many pictures can 32gb hold on a digital camera.
What settings help capture clearer buck photos?
Faster trigger speed, balanced PIR sensitivity, and a sensible burst mode usually work well. Higher resolution can also improve detail, while night flash settings affect how discreet the camera feels. Adjust these based on how much movement and false triggering you see in your area.
How often should I check my trail camera?
Check it often enough to swap batteries and cards before they run out, but not so often that you disturb the area. Many people start with regular checks and then adjust based on battery life and deer activity. If you want fewer disturbances, consider learning how do trail cameras work without internet so you can plan smarter checks.