How to Hook Up Rca to Speakers Wire
Connecting RCA outputs to speaker wire inputs can seem tricky, but it is simple with the right tools. You will learn how to use RCA to speaker wire adapters and avoid common wiring mistakes. This guide ensures you get clear audio without damaging your equipment.
Key Takeaways
- Understand the difference: RCA carries low-voltage signals, while speaker wire carries high-power audio to drivers.
- Use the right adapter: An RCA to speaker wire adapter or converter box is essential for safe connections.
- Check impedance: Match your speaker impedance with your amplifier to prevent damage.
- Mind the polarity: Connect positive to positive and negative to negative for proper sound phase.
- Avoid direct splicing: Never splice RCA cables directly into speaker wire without a converter.
- Test before finalizing: Always test your audio setup at low volume before securing connections.
- Consider wireless options: Wireless speaker adapters can simplify connections if wiring is too complex.
📑 Table of Contents
Understanding How to Hook Up RCA to Speakers Wire
Many people want to upgrade their audio system. You might have a new amplifier or a vintage receiver. Sometimes, the connections do not match. You may ask how to hook up rca to speakers wire. This is a common question for car audio fans and home theater lovers.
RCA cables carry line-level signals. Speaker wire carries amplified power. You cannot connect them directly without help. Doing so can damage your gear. We will show you the safe way to make this work.
Getting the connection right matters. Good wiring means clear sound. Bad wiring means distortion or broken parts. This guide covers everything you need. We will talk about adapters, converters, and best practices. You will learn how to keep your system safe.
What Is RCA and Speaker Wire
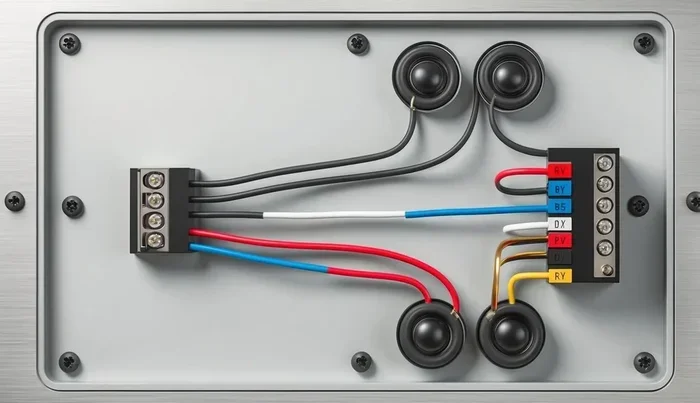
Visual guide about audio speaker wire connection
Image source: cdn.shopify.com
Before you start, know what you are working with. RCA stands for Radio Corporation of America. These are the small red and white plugs. They carry audio signals from sources like phones or TVs.
Speaker wire is different. It is usually thick copper wire. It connects amplifiers to speakers. It carries the power needed to move speaker cones. The voltage is much higher than RCA signals.
Key differences include:
- Signal Type: RCA is line level. Speaker wire is amplified.
- Voltage: RCA has low voltage. Speaker wire has high voltage.
- Connectors: RCA uses plugs. Speaker wire uses bare ends or connectors.
You need a bridge between these two types. This bridge is usually an adapter or a converter box. Understanding this helps you choose the right gear.
Why You Need an Adapter or Converter
You might think you can just twist the wires together. This is a bad idea. RCA outputs are not built to power speakers. They lack the current needed to drive speaker cones.
If you connect RCA directly to speaker wire, you will hear very quiet sound. Worse, you might burn out the RCA output stage. This is why an RCA to speaker wire adapter is crucial.
There are two main ways to handle this:
- Passive Adapters: These change the connector type. They do not boost power.
- Active Converters: These use power to boost the signal. They are better for driving speakers.
Passive adapters work if your amplifier has a dedicated speaker output that accepts RCA-style plugs. This is rare. Most of the time, you need an active converter. This box takes the RCA signal and amplifies it for the speaker wire.
Safety first. Always check the power ratings. Make sure your converter can handle the wattage your speakers need.
How to Wire RCA to Speaker Wire
Now let us look at the steps. You will need some tools. You will also need the right parts. Gather everything before you start. This makes the job easier.
Tools and parts you need:
- RCA to speaker wire adapter or converter box
- Speaker wire (16 gauge or 14 gauge is common)
- Wire strippers
- Electrical tape or heat shrink tubing
- Screwdriver
- Multimeter (optional but helpful)
Step 1: Prepare the Speaker Wire
Cut your speaker wire to the length you need. Use wire strippers to remove the insulation. Expose about half an inch of copper. Separate the positive and negative strands.
Positive wires often have a stripe or a mark. Negative wires are usually solid color. Keep them separate. Do not let them touch each other.
Step 2: Connect to the Adapter
Take your RCA to speaker wire adapter. Most adapters have screw terminals. Loosen the screws. Place the positive wire under the positive terminal. Place the negative wire under the negative terminal.
Tighten the screws firmly. Loose connections cause bad sound. They can also cause sparks. Check that the wires are secure.
Step 3: Connect the RCA End
Plug the RCA end into your source. This could be a phone, tablet, or media player. Make sure the plug fits snugly. A loose plug can crackle or cut out.
If you are using a converter box, connect the RCA input to the box. Then connect the speaker wire output to your speakers. Follow the labels on the box. Input goes to source. Output goes to speakers.
Step 4: Test the Connection
Turn on your source at low volume. Play some music. Listen for clarity. Check both left and right channels. If one side is quiet, check your wiring.
Polarity matters. If you swap positive and negative, the speaker will be out of phase. This makes bass sound weak. It can also make the sound feel weird. Swap the wires if needed.
Common Mistakes to Avoid
Even simple jobs have pitfalls. Avoiding these mistakes saves time and money. Here are the most common errors people make.
Mistake 1: Direct Splicing
Never cut an RCA cable and splice it into speaker wire. RCA cables are shielded. Speaker wire is not. This creates noise and interference. It also risks damage.
Mistake 2: Ignoring Impedance
Speakers have an impedance rating, usually 4 ohms or 8 ohms. Amplifiers are matched to this. If you use the wrong setup, you can overload the amp. Check your speaker specs before connecting.
Mistake 3: Loose Connections
Loose wires cause static. They can also disconnect while playing. Tighten all screws. Use quality connectors. Good contact means good sound.
Mistake 4: Wrong Wire Gauge
Thin wire can resist power flow. This wastes energy as heat. For long runs, use thicker wire. 16 gauge is good for short distances. 14 gauge is better for longer runs.
Mistake 5: Skipping the Test
Do not seal everything up immediately. Test the sound first. Turn the volume up slowly. Listen for distortion. Fix issues before hiding wires.
Expert Tips for Better Sound
You can get great sound with the right approach. Here are some tips from experienced audio techs. These small details make a big difference.
Tip 1: Use Quality Cable
Cheap wire can degrade sound. Look for oxygen-free copper wire. It resists corrosion better. It also conducts electricity well. Good cable lasts longer too.
Tip 2: Keep Wires Separate
Do not run speaker wire next to power cables. This causes hum and noise. Keep them at least a few inches apart. If they must cross, cross at a 90-degree angle.
Tip 3: Label Your Wires
Use tape or tags to label each wire. Mark left and right. Mark positive and negative. This helps if you need to troubleshoot later.
Tip 4: Secure the Runs
Loose wires can get pulled or tripped over. Use clips or ties to secure them. Keep them away from heat sources. Protect them from sharp edges.
Tip 5: Consider Wireless Options
Sometimes wiring is too hard. Wireless speaker adapters can help. They receive RCA signals and send them wirelessly to speakers. This reduces cable clutter.
When to Seek Professional Help
Some jobs are too complex for DIY. If you are unsure, ask for help. This protects your equipment and your ears.
Signs you need help:
- You hear buzzing or humming after connecting.
- Your amplifier overheats quickly.
- You are unsure about impedance matching.
- You need to run wires through walls or cars.
Professional installers have the right tools. They know how to hide wires neatly. They can also test impedance and signal levels. This ensures everything works safely.
Maintaining Your Audio Setup
Once everything is connected, take care of it. Good maintenance keeps sound quality high. It also extends the life of your gear.
Regular checks:
- Inspect wires for wear or damage.
- Clean connectors with contact cleaner.
- Check screw terminals for tightness.
- Keep vents clear on amplifiers and converters.
Dust can cause heat buildup. Heat damages electronics. Wipe down your equipment regularly. Keep liquids away from your audio setup. Spills can ruin circuits instantly.
Conclusion
Learning how to hook up rca to speakers wire is useful. It lets you use different devices with your speakers. You just need the right adapter or converter. Safety is the most important part.
Remember to match your impedance. Check your polarity. Test your sound before finishing. Avoid direct splicing at all costs. With care, you can enjoy great audio.
Take your time. Rushing leads to mistakes. Follow these steps carefully. You will get clear, loud, and safe sound. Enjoy your music and movies with confidence.
Frequently Asked Questions
Can I connect RCA directly to speaker wire?
No, you cannot connect RCA directly to speaker wire. RCA carries a low-level signal, while speaker wire needs amplified power. You must use an RCA to speaker wire adapter or converter box to boost the signal safely.
What is the best adapter for RCA to speaker wire?
The best adapter is an active converter box that amplifies the signal. Passive adapters only change the connector shape and do not provide enough power. Look for a converter with good reviews and matching power ratings for your speakers.
Will using the wrong wire gauge affect sound quality?
Yes, using the wrong wire gauge can affect sound quality and power delivery. Thin wire can cause resistance, leading to power loss and heat. For most setups, 16 gauge is fine, but longer runs may need 14 gauge for better performance.
How do I check polarity on speaker wire?
You can check polarity by looking for markings on the wire. The positive wire often has a stripe or a plus sign. You can also use a multimeter to test continuity. Connecting positive to positive ensures proper phase and sound quality.
Can I use this setup for car audio?
Yes, you can use this setup for car audio, but you must match the impedance and power levels. Car speakers often have different impedance ratings than home speakers. Always check your amplifier and speaker specs before connecting to avoid damage.
What if I hear a humming noise after connecting?
Humming noise often comes from ground loops or interference. Try separating your audio cables from power cables. You can also use a ground loop isolator. If the noise persists, check your connections and ensure all grounds are secure.