How to Mount Speakers to Wall
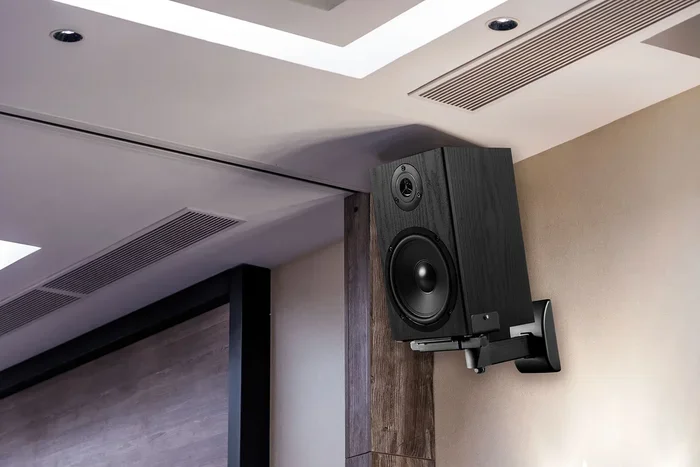
Mounting your speakers to the wall can transform your listening experience by saving space and improving sound direction. This guide walks you through every step, from choosing the right wall mount to securing your gear without damaging your home. You will learn pro tips for placement, wiring, and safety so your audio setup sounds amazing. Get ready to enjoy better sound without the clutter.
Key Takeaways
- Choose the right mount: Match your speaker weight and size to a sturdy wall mount rated for the load.
- Find studs first: Always anchor into wall studs or use heavy-duty anchors for drywall safety.
- Plan your placement: Position speakers at ear level for the best stereo imaging and room coverage.
- Mind the wiring: Plan cable routes early and consider guides on how to wire component speakers or connect multiple speakers to a receiver.
- Test before tightening: Hold the mount in place and check angles before drilling any holes.
- Avoid common mistakes: Skip cheap hardware, ignore stud locations, and forget to secure loose cables.
- Keep it safe: Use a level, double-check screws, and never exceed the mount’s weight rating.
📑 Table of Contents
- How to Mount Speakers to Wall for Better Sound
- Choose the Right Wall Mount for Your Speakers
- Find the Best Spot and Prepare the Wall
- Gather Tools and Prepare the Speakers
- Install the Mount and Secure the Speakers
- Manage Cables and Connect Your Audio Gear
- Common Mistakes and Safety Tips
- Final Checks and Listening Test
- Expert Insights for a Better Result
- Key Takeaways
How to Mount Speakers to Wall for Better Sound
Upgrading your audio setup does not always mean buying bigger boxes. Sometimes, the smartest move is learning how to mount speakers to wall surfaces around your room. Wall mounting clears floor space, reduces vibration, and helps aim sound where you want it. It can also make a small room feel larger and more open.
Many people worry about drilling holes or damaging drywall. The good news is that a careful plan makes the job simple. You just need the right hardware, a few basic tools, and a clear idea of where your sound should go. In this guide, we will walk through the whole process in plain language. You will learn how to pick a mount, find solid anchor points, run cables neatly, and avoid common mistakes.
Whether you are setting up a home theater, a stereo pair, or background music in a bedroom, the principles stay the same. Let’s get your speakers off the shelf and onto the wall.
Choose the Right Wall Mount for Your Speakers
Not all mounts are built the same. Some hold small bookshelf speakers. Others support larger PA-style boxes or surround speakers. The first step in learning how to mount speakers to wall units is matching the mount to your gear.
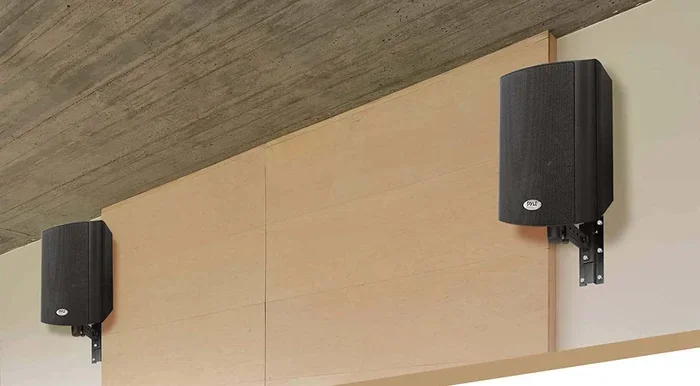
Visual guide about mounted speakers on wall
Image source: goonproducts.com
Start by checking the weight and dimensions of each speaker. Look for a mount with a weight rating that leaves some extra room. A little margin is safer than pushing the limit. Also think about the mounting pattern on the back of your speaker. Some models use keyhole slots. Others use screw holes or a bracket plate.
Keyhole Mounts vs Bracket Mounts
Keyhole mounts are simple. You slide the speaker onto a plate with matching slots. This style works well for lighter speakers and quick installs. Bracket mounts use a separate frame that screws into the wall and the speaker. They often give you more adjustability and a stronger hold.
If you have larger surround speakers or PA boxes, a sturdy bracket style usually makes more sense. For a clean, low-profile look with smaller speakers, a keyhole plate can be enough. No matter which you choose, make sure the hardware feels solid and the moving parts are smooth.
Match the Mount to Your Room and Use
Think about how you will use the space. A living room setup may need subtle adjustability so you can aim sound across the seating area. A home gym or party room may need a tougher mount that handles bumps and movement. If you are placing speakers near a TV, you might also consider a tv wall mount with speakers for a tidy, all-in-one look.
Quick tip: if your speakers will face a wide seating area, choose a mount with tilt or swivel options. Small angle changes can make a big difference in clarity.
Find the Best Spot and Prepare the Wall
Placement changes everything. Before you drill, decide where the sound should land. For stereo pairs, aim for symmetry. For surround setups, place speakers slightly behind or to the sides of your listening position. For background music, higher placement can spread sound more evenly across the room.
A good rule of thumb is to mount speakers near ear level when seated. If that is not possible, a slight downward tilt can help. If you want to learn more about positioning options, check out this guide on wall mount for surround speakers for placement ideas that work in many room layouts.
Locate Studs and Solid Anchor Points
This step matters a lot. Drywall alone cannot safely hold heavier speakers for the long term. Use a stud finder to locate wooden studs behind the wall. Mark the centers clearly with a pencil. If your mount does not line up perfectly with a stud, you may need heavy-duty toggle anchors or a mount that spans two studs.
If you are unsure about your wall type, test a small area first. Plaster, concrete, and brick all need different anchors. The goal is simple: give your speakers a strong home that will not shift over time.
Mark the Holes Carefully
Hold the mount against the wall and use a level. Measure twice, then mark your drill points. A small mistake here can throw off the whole install. If your mount has adjustable holes, use the widest setting first so you have some room to fine-tune later.
Pro tip: place a piece of painter’s tape on the wall before marking. It helps prevent drill bits from slipping and makes cleanup easier.
Gather Tools and Prepare the Speakers
A smooth install starts with the right tools. You do not need a huge workshop, just the basics. Here is a simple list to keep nearby:
- Stud finder
- Level
- Power drill with matching bits
- Screwdriver
- Measuring tape
- Pencil
- Wall anchors and screws matched to your wall type
- Cable clips or raceway, if you want a clean wire path
- Optional: helper to hold the speaker while you secure it
Before mounting, inspect the back of each speaker. Make sure the mounting points are clear and the screw holes are not stripped. If your speaker has removable brackets, attach them now. It is much easier to work on the speaker on the floor than on the wall.
If you are planning to connect these speakers to an amplifier or receiver, it helps to think about wiring at the same time. For example, you may want to review how to wire component speakers so your connections are neat and correct before you lock everything in place.
Install the Mount and Secure the Speakers
Now comes the main part. Take your time here. A careful install protects your speakers and your wall.
Step 1: Drill and Anchor
Drill pilot holes at your marked spots. Use a bit that matches your anchors or screws. If you are drilling into studs, wood screws are usually enough. For drywall without studs, insert anchors first so the screws have something solid to grip.
Do not overtighten. Snug is good. Too much force can crack drywall or strip the anchor.
Step 2: Attach the Mount
Screw the mount plate or bracket into place. Check the level again after the first screw is tight. Then secure the remaining screws. If the mount has adjustable arms or tilting joints, leave them loose enough to move until the speaker is attached.
Step 3: Hang or Secure the Speaker
For keyhole mounts, lift the speaker and slide it into place. For bracket mounts, connect the speaker to the wall bracket according to the hardware instructions. If the speaker is heavy, have a helper support it while you tighten the final fasteners.
Once the speaker is secure, gently test it. There should be no wobble or pull away from the wall. If anything feels loose, stop and recheck the anchor points.
If you are working with PA-style boxes or larger speakers, a strong wall mount for pa speakers can give you extra confidence because it is designed for heavier loads and frequent use.
Manage Cables and Connect Your Audio Gear
Loose wires can ruin a clean install. They can also get snagged or pull on your speakers over time. Plan your cable route before you finish mounting.
The simplest path is usually along the wall to a nearby receiver or amp. Use cable clips, raceways, or a small conduit if you want a tidy look. Avoid running audio cables parallel to power cords for long distances, since that can add noise. If you need to cross them, do so at a right angle when possible.
Keep Connections Clean and Correct
Good connections matter. Make sure your wire ends are stripped neatly and attached securely. If you are using a receiver, you may find it helpful to read up on how to connect multiple speakers to a receiver so your setup matches your gear and your listening goals.
If your speakers have separate woofer and tweeter connections, or if you are using a more advanced wiring plan, you might also want to look at how to wire speakers with 4 terminals for a clearer understanding of bi-wiring and terminal use.
Quick Cable Tips
- Label both ends of each cable before you hide them.
- Leave a little slack near the speaker so the wire does not tug when the mount is adjusted.
- Use gentle curves instead of sharp bends.
- Secure cables every few inches so they do not sag.
- Keep spare length hidden but accessible in case you move the speaker later.
Common Mistakes and Safety Tips
Even a simple project can go sideways if you rush. Here are the most common issues and how to avoid them.
Mistake 1: Skipping the Stud Check
Drywall alone may not hold heavier speakers safely. Always verify where the studs are. If you cannot hit a stud, use anchors rated for the load and understand their limits.
Mistake 2: Using the Wrong Hardware
Screws that are too short or anchors that are too weak create problems later. Match the hardware to the wall material and speaker weight. When in doubt, choose a stronger anchor rather than a weaker one.
Mistake 3: Drilling Without a Level
A tilted mount is easy to notice once the speaker is up. Use a level at the mount stage, not after the speaker is attached. Small adjustments are much easier before the final screws go in.
Mistake 4: Pulling Cables Too Tight
Tight wires can stress speaker terminals and mount joints. Leave a little slack and secure the cable path so nothing tugs on the speaker.
Mistake 5: Ignoring Weight and Vibration
Some speakers vibrate more than others, especially at higher volumes. A solid mount and solid anchor points reduce movement. If your speaker is heavy or you play loudly often, choose a sturdier bracket and check the install periodically.
Safety note: if you are drilling near electrical outlets or switches, proceed carefully and avoid areas where wiring may run horizontally. When unsure, move your mount a few inches and choose a safer spot.
Final Checks and Listening Test
Before you call the job done, give everything a final review. Confirm that the mount is level, the screws are snug, and the speaker sits firmly. Check the cable path one more time. Make sure no wire is pinched behind the speaker or mount.
Then play some music you know well. Listen from your normal seating position. If the sound feels off, try small adjustments in angle or height. Sometimes a tiny tilt changes the stereo image in a good way. If one side sounds weaker, double-check your connections and make sure the speaker is not partially loose.
If you notice distortion or a weak output, the issue may not be the mount at all. It could be a wiring problem or a speaker that needs attention. In that case, it can help to learn how to check if speakers are blown so you know whether the hardware is healthy or needs service.
A clean wall-mounted setup should look neat and sound steady. Once you get the placement right, you will likely enjoy the space more because the room feels open and the sound feels intentional.
Expert Insights for a Better Result
Here are a few practical ideas that can make your install even better.
- Think long term: Choose hardware you will not mind seeing for years. A sturdy mount is better than a fancy one that feels flimsy.
- Plan for changes: If you might move speakers later, leave a bit of extra cable and use removable cable management where possible.
- Use symmetry when it helps: For stereo listening, balanced placement usually gives a more natural soundstage.
- Keep the wall in mind: In rental spaces, consider lighter speakers and non-damaging solutions if drilling is not allowed.
- Recheck after a few weeks: Anchors and screws can settle. A quick look later helps you catch loose hardware early.
If you are building a larger system, think about the whole signal chain. A good mount is only one part of the puzzle. Clean wiring, proper connections, and sensible placement all work together. For more ideas on connecting gear, you can also explore how to wire 4 speakers to 2 channel amp setups if you are expanding beyond a simple pair.
Key Takeaways
- Mount with confidence: Use a mount that matches your speaker weight and your wall type.
- Anchor into studs when possible: Strong support prevents shifting and keeps your setup safe.
- Place for listening: Aim speakers toward your seating area and keep them near ear level when practical.
- Plan cables early: Neat wire management protects connections and improves the look of the install.
- Test before you relax: Check stability, level, and sound after installation, then make small adjustments.
Learning how to mount speakers to wall surfaces is really about planning, patience, and the right hardware. Do those three things well, and you will end up with a cleaner room and a more focused sound. Take your time, mark carefully, and enjoy the upgrade.
Frequently Asked Questions
What do I need to mount speakers to the wall?
You usually need a stud finder, a level, a drill, screws or anchors, a measuring tape, and a mount rated for your speaker weight. A helper is useful for larger speakers.
Can I mount speakers on drywall without studs?
Yes, but only with heavy-duty anchors that are rated for the weight and used correctly. For heavier speakers, hitting a stud is the safer choice.
Where should I place wall-mounted speakers?
Place them near ear level when seated if possible. For surround sound, position them to the sides or slightly behind the listening area. For stereo, keep the pair balanced and aimed at the seating space.
How do I keep speaker wires neat after mounting?
Use cable clips, raceways, or a wall conduit to guide wires along the wall to your receiver or amp. Leave a little slack near the speaker and avoid sharp bends.
How do I know if the mount is strong enough?
Check the mount’s weight rating and compare it to your speaker’s weight. Also make sure the wall anchors or stud screws are appropriate for your wall material and the load.
What if my speaker sounds weak after mounting?
First check that the speaker is secure and the connections are correct. If the sound is still weak or distorted, test the speaker and wiring to see whether the issue is with the gear rather than the mount.