Checking your laptop’s RAM is a simple yet powerful way to understand its performance capabilities. You can quickly see total memory using built-in system tools on any operating system. For detailed specs like type, speed, and slot usage, free third-party software provides a full breakdown. Knowing your RAM helps with upgrades, troubleshooting slowdowns, and buying a compatible machine.
Have you ever felt your laptop lagging when you have too many browser tabs open or a few programs running? That frustrating slowdown is often your system’s RAM (Random Access Memory) crying out for help. But before you think about buying a new laptop or spending money on an upgrade, the first and most important step is to know exactly what you’re working with. Learning how to check RAM on a laptop is a fundamental skill for any computer user. It’s the key to diagnosing performance issues, planning a cost-effective upgrade, or simply understanding the true capabilities of your machine. This guide will walk you through every method, from the fastest one-click solutions to the hands-on approach, ensuring you become your laptop’s own memory expert.
We’ll start with the simplest, quickest ways using the tools already on your computer. Then, we’ll dive into the free, powerful software that gives you the full, technical picture of your memory modules. For the adventurous and compatible models, we’ll cover how to safely open your laptop and inspect the physical sticks. You’ll also learn how to interpret all this information—what DDR4 and DDR5 mean, why speed in MHz matters, and how to figure out if you can even add more RAM. By the end, you won’t just know how to check; you’ll know why it matters and what to do with the information you find.
Key Takeaways
- Every OS has a built-in way to see total RAM: Use Task Manager on Windows, About This Mac on macOS, or free/used commands on Linux for a quick capacity check.
- For detailed specs, use a trusted system info tool: Programs like CPU-Z, Speccy, or HWiNFO reveal RAM type (DDR4/DDR5), speed (MHz), and manufacturer details.
- Physical inspection is the final verification method: Opening the laptop’s service panel (if possible) lets you see the actual sticks, but always power down and discharge static first.
- Understanding RAM matters for upgrades and troubleshooting: Knowing your current max supported RAM, slot count, and existing module specs is essential before purchasing more memory.
- Not all RAM is user-upgradable: Many modern laptops solder RAM to the motherboard. Checking your model’s specifications online is crucial before attempting any physical check.
- Slow performance isn’t always a RAM issue: While low free RAM can cause slowdowns, always check CPU and storage (SSD/HDD) health as well for a complete diagnosis.
📑 Table of Contents
- Why Check Your Laptop’s RAM? Understanding the “Why” Before the “How”
- Method 1: The Quick & Easy Built-in OS Tools (No Software Needed)
- Method 2: The Detailed Diagnostic – Free Third-Party System Information Tools
- Method 3: The Hands-On Approach – Physically Checking the RAM Modules
- Method 4: Using Manufacturer & Third-Party Scanner Tools
- Interpreting Your RAM Specs: From Numbers to Meaning
- Strong Conclusion: Knowledge is Power (and Performance)
Why Check Your Laptop’s RAM? Understanding the “Why” Before the “How”
Before we jump into the mechanics, let’s establish why this knowledge is so valuable. RAM is your laptop’s short-term workspace. When you open an application or a file, it gets loaded from your slower storage drive (SSD or HDD) into the fast, volatile RAM. The more RAM you have, the more stuff you can have “open” and ready to go simultaneously without your system needing to constantly shuffle data back and forth to the disk, a process that causes noticeable lag.
Diagnosing Performance Bottlenecks
The most common reason to check RAM is to diagnose a slowdown. If your laptop feels sluggish during everyday tasks like web browsing with multiple tabs, working with large spreadsheets, or having a few apps open, it might be running out of available RAM. Checking your usage in real-time can confirm this. If your free RAM is consistently below 15-20% of your total, it’s a strong indicator that an upgrade could provide a significant real-world performance boost.
Planning an Upgrade
If you’ve decided an upgrade is the solution, you cannot just buy any RAM stick. Laptops have strict requirements. You need to know:
- Current Capacity & Configuration: How many slots are used? Are you running one 16GB stick or two 8GB sticks in dual-channel mode (which is faster)?
- RAM Type: Is it DDR3, DDR4, or the newer DDR5? They are not physically compatible.
- Speed (MHz): Your RAM operates at a specific frequency, like 2666MHz or 3200MHz. Mixing speeds usually causes all modules to run at the speed of the slowest one.
- Maximum Supported RAM: Your laptop’s motherboard and processor have a hard limit, often 32GB, 64GB, or even 128GB. Your current modules might not be the maximum possible.
Checking your current RAM gives you the baseline to buy the perfect, compatible upgrade.
Buying a Used or Refurbished Laptop
When purchasing a second-hand laptop, the listed specs might not tell the full story. A seller might say “8GB RAM,” but is that one stick or two? What’s the speed? Checking yourself with the methods below verifies the actual hardware inside, protecting you from misrepresented listings.
Satisfying Curiosity & Tech Savviness
Simply put, knowing what’s inside your device is empowering. Understanding that your laptop has, for example, 16GB of DDR4-3200 RAM gives you a concrete benchmark for its multitasking muscle. It moves you from a vague sense of “my computer is okay” to a specific understanding of “my computer has X amount of fast memory.”
Method 1: The Quick & Easy Built-in OS Tools (No Software Needed)
Every major operating system has a native, built-in utility to tell you the most important number: total installed RAM. This is your fastest, zero-download option. We’ll cover Windows, macOS, and Linux.
Visual guide about How to Check Ram on Laptop
Image source: robots.net
For Windows Users: Task Manager & System Properties
Windows provides two incredibly simple methods. The most informative is the Task Manager.
- Using Task Manager (Recommended): Press Ctrl + Shift + Esc on your keyboard to open Task Manager immediately. Alternatively, press Ctrl + Alt + Delete and select Task Manager. Click the “Performance” tab. On the left sidebar, select “Memory”. At the top right, you’ll see a large number (e.g., “16.0 GB”). That’s your total installed RAM. Below it, you’ll see “In use (XX GB)” and “Available (XX GB),” which is perfect for real-time monitoring of usage. The graph shows usage over time.
- Using System Properties: Right-click on the Start button and select “System”. Under “Device specifications,” look for “Installed RAM”. This shows the total. It’s less detailed than Task Manager but gets the job done in one click.
Pro Tip: In Task Manager’s Memory tab, look at the bottom for “Speed” and “Form factor.” On many modern Windows laptops, this will actually show you the speed (e.g., 3200 MHz) and that it’s “SODIMM” (the form factor for laptops). However, this information is not always reliably populated by all system manufacturers, so don’t rely on it for definitive specs.
For macOS Users: About This Mac & System Report
Apple makes it beautifully simple.
- About This Mac: Click the Apple menu () in the top-left corner of your screen and select “About This Mac.” The window that pops up prominently displays “Memory” with your total capacity (e.g., “16 GB”). This is the quick answer.
- System Report for Details: To see if your RAM is upgradeable and get more specs, click the “System Report…” button in the About This Mac window. In the new window, under the “Hardware” section, select “Memory.” This page will list each memory slot, the type (e.g., “DDR4”), the speed (e.g., “2667 MHz”), and the status (e.g., “OK”). Crucially, it will also state if the memory is “Upgradable” or “Not Upgradable”. This is the single most important piece of information for a Mac user considering an upgrade.
For Linux Users: The Terminal is Your Friend
Linux is all about the command line for this. Open your terminal application (Ctrl+Alt+T is a common shortcut). The most common command is free.
- Type free -h and press Enter. The -h flag stands for “human-readable,” showing sizes in GB instead of bytes. Look at the “Mem:” row in the “total” column. That’s your total RAM. The “used” and “available” columns show current usage.
- For slightly more detail, you can use cat /proc/meminfo. This dumps a lot of information. The first line, “MemTotal,” is your total RAM in kB.
- To see details about each DIMM (memory stick), install and use dmidecode. You’ll likely need
sudo dmidecode -t memory. This will output a detailed report for each memory slot, including type, size, speed, and manufacturer. This is the Linux equivalent of a detailed system info tool.
Note: The exact commands might vary slightly between distributions (Ubuntu, Fedora, etc.), but free -h is universal.
Method 2: The Detailed Diagnostic – Free Third-Party System Information Tools
While the built-in tools tell you “how much,” the dedicated system information tools tell you “what kind, how fast, and who made it.” These free, safe utilities are the gold standard for anyone doing serious diagnostics or planning an upgrade. They read the System Management BIOS (SMBIOS) data directly from your motherboard’s firmware.
Visual guide about How to Check Ram on Laptop
Image source: cdn.mos.cms.futurecdn.net
CPU-Z: The Industry Standard for Hardware Details
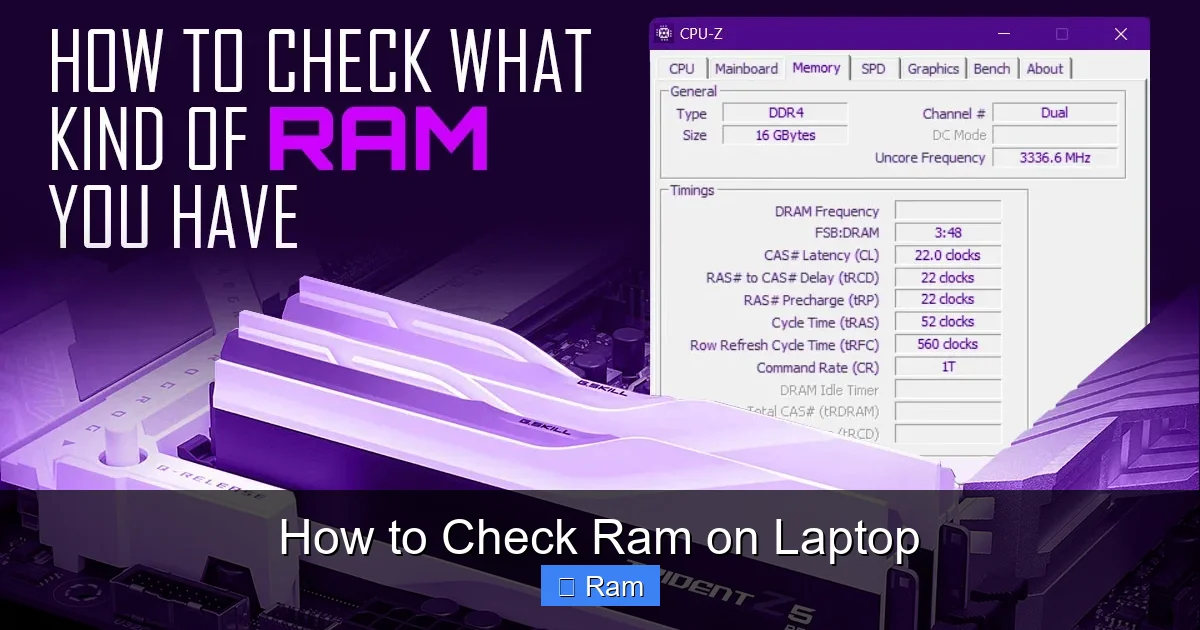
CPU-Z from CPUID is a lightweight, trusted, and completely free tool used by enthusiasts and professionals worldwide. It’s not just for CPUs.
- Download & Run: Download the portable version (no installation needed) from the official CPUID website. Run the executable file.
- Navigate to the “Memory” Tab: This shows general RAM information: Type (DDR4, etc.), Size (Total and per channel), and Channel # (usually Dual).
- Navigate to the “SPD” Tab: This is the treasure trove. “SPD” stands for Serial Presence Detect. Click on each slot in the drop-down menu (Slot #1, Slot #2, etc.). For each physical slot, you will see:
- Module Size: Capacity of that specific stick (e.g., 8192 MB = 8GB).
- Module Type: DDR4, DDR5, etc.
- Module Name: The manufacturer’s part number (e.g., “HMT451S6BFR8A-PB”).
- Manufacturer: Who made the chip (Samsung, Micron, Hynix, etc.).
- Speed: The rated speed in MHz (e.g., 2666, 3200).
- Timings: The CAS Latency (CL) and other timings (e.g., CL19). This matters for high-performance tuning.
CPU-Z gives you the exact, stick-by-stick breakdown you need to match modules for an upgrade.
Speccy: The User-Friendly Overview from Piriform (CCleaner)
If you want a cleaner, more visual summary than CPU-Z’s raw data, Speccy is perfect. It’s also from the makers of CCleaner and is safe and free.
- Download and install Speccy. Run it.
- The main “Summary” page will show your RAM type, size, and speed at a glance.
- Click on the “RAM” section in the left sidebar for more detail. It will list each slot, the capacity of each stick, the type, and the speed. It’s less granular than CPU-Z’s SPD tab (you won’t get the full part number or manufacturer as easily), but it’s excellent for a quick, readable overview of your configuration (e.g., “2 x 8GB DDR4-3200”).
HWiNFO: The Ultimate Power User’s Toolkit
For the absolute maximum detail, HWiNFO is unparalleled. It’s a professional-grade hardware monitoring and information tool that is also free for personal use.
- Download and run HWiNFO (you can run it in “Sensors-only” or “Summary-only” mode, but run it fully for RAM details).
- In the main window, expand the tree for “Memory” and then “Memory Controller” or look for a section called “DDR Memory List” or “SPD”.
- This will list every single DIMM in your system with exhaustive data: part number, manufacturer, size, type, voltage, all timing values (tCL, tRCD, tRP, tRAS), and the supported JEDEC and XMP profiles. This is overkill for most users but invaluable for experts or if you need to match extremely specific high-performance modules.
Safety Note: Always download these tools from their official websites (cpuid.com, piriform.com, hwinfo.com) to avoid bundled malware or fake versions.
Method 3: The Hands-On Approach – Physically Checking the RAM Modules
This is the final method and the only way to be 100% certain of what’s physically installed. However, it comes with major caveats and should only be attempted if your laptop is designed for user serviceability. If your laptop is still under warranty, opening it may void that warranty. Proceed with extreme caution.
Visual guide about How to Check Ram on Laptop
Image source: cgdirector.com
Step 1: Is Your Laptop Upgradeable? Do Your Homework First!
Do not just start unscrewing. First, determine if your model is meant to be opened.
- Check the Official Manual: Search for your exact laptop model number (e.g., “Dell XPS 13 9310 manual”) and look for a “Service Manual” or “Maintenance Guide.” It will have a chapter on “Memory” with removal instructions if it’s user-serviceable.
- Search Online Forums & Videos: Search “[Your Laptop Model] RAM upgrade” or “[Your Laptop Model] teardown.” Sites like iFixit often have excellent step-by-step guides with pictures. YouTube teardown videos are invaluable. If you see people easily removing a bottom panel and accessing RAM slots, it’s likely upgradeable.
- Look for External Access Panels: Some laptops have a small, single-screw panel on the bottom specifically for accessing the RAM. This is the best-case scenario. Others require removing the entire bottom cover.
- Know the Modern Reality: An unfortunate trend, especially in ultra-thin laptops (like many MacBooks, Microsoft Surfaces, and premium ultrabooks from Dell, HP, and Lenovo), is that the RAM is soldered directly onto the motherboard. There are no slots, no sticks to remove. The “System Report” on a Mac or a Crucial System Scanner tool will often tell you this. If the RAM is soldered, physical inspection is pointless and risky.
Step 2: The Safe Opening Procedure
If you’ve confirmed your model is upgradeable, follow these safety steps religiously.
- Power Down Completely: Shut down the laptop. Do not just sleep or hibernate it.
- Unplug Everything: Remove the charger, any USB devices, dongles, or SD cards.
- Remove the Battery (If Possible): If your laptop has a removable battery, take it out. This is a critical safety step to prevent any electrical short.
- Discharge Static Electricity: Static discharge can fry sensitive components. Before touching any internal parts, touch a grounded metal object (like the unpainted screw on a light switch plate or the metal chassis of a plugged-in, but switched-off, device). You can also use an anti-static wrist strap, clipping it to a grounded metal part of your desk.
- Use the Right Tools: You’ll typically need small Phillips-head screwdrivers (PH0 or PH00 size). A plastic spudger or pry tool is helpful for releasing clips without scratching.
- Work in a Clean, Well-Lit Area: A large, flat surface with good lighting is essential. Keep screws in a small container and note their locations and lengths, as they are often not all the same.
Step 3: Locating and Identifying the RAM
Once the bottom panel is off (after carefully removing all screws and prying apart any plastic clips), you’ll see the internal components.
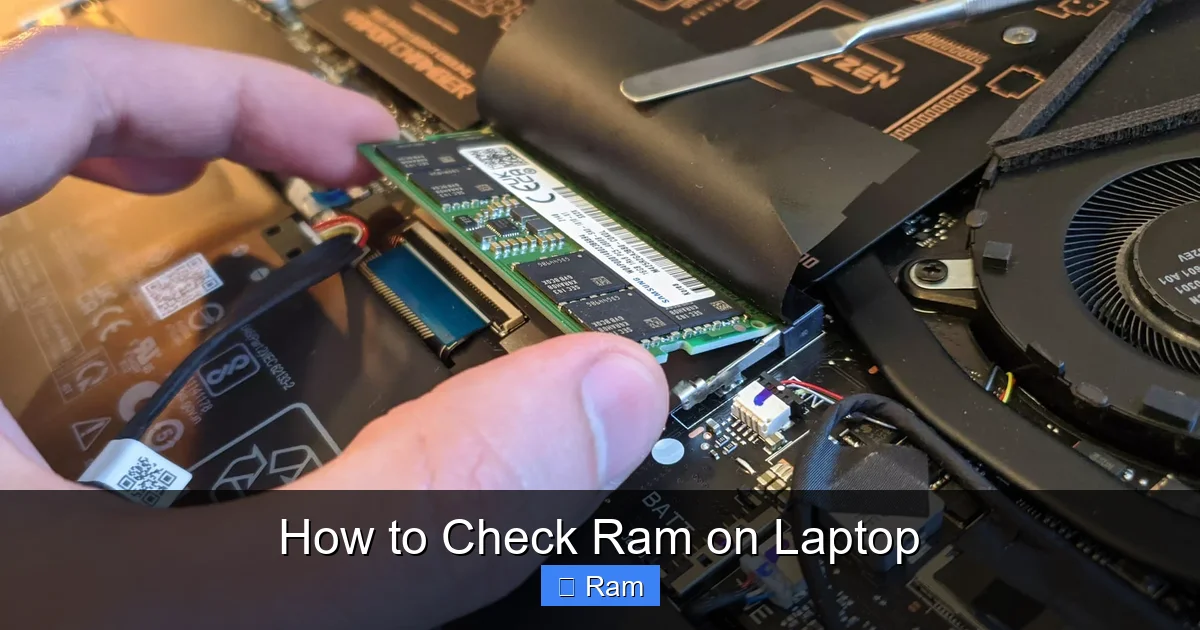
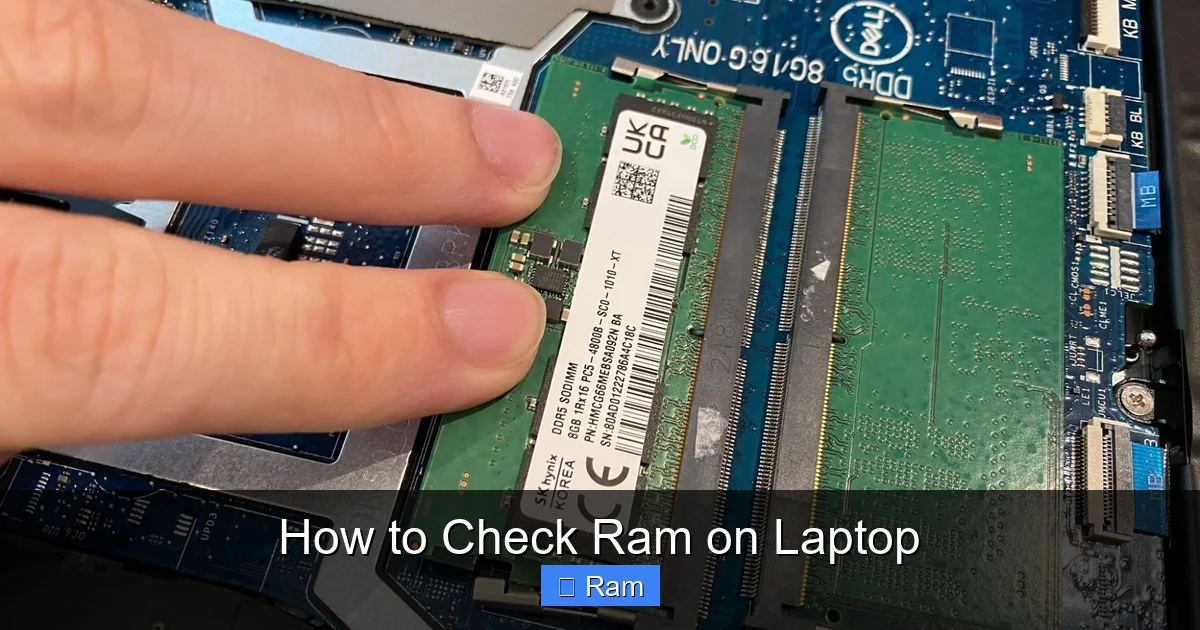
- Locate the RAM Modules: They are small, rectangular circuit boards (about the size of your thumb) usually positioned near the center or side of the motherboard. They are held in place by small metal clips on either side.
- Visual Identification:
- Size & Shape: Laptop RAM uses a form factor called SODIMM. It’s smaller than the DIMMs used in desktop PCs. It has a distinctive notch (key) in the bottom edge that prevents it from being inserted incorrectly.
- Stickers: The modules have stickers with crucial information. Look for:
- Capacity: “4GB,” “8GB,” “16GB” etc.
- Type: “DDR3,” “DDR4,” “DDR5.”
- Speed: Often listed as “1600,” “2666,” “3200” (MHz).
- Voltage: “1.2V” is standard for DDR4/DDR5.
- Manufacturer & Part Number: Brands like Samsung, SK Hynix, Micron (Crucial), or Kingston are common. The part number (e.g., “KCP426SS8/8”) is the most precise identifier.
- To Remove a Module (if upgrading): Gently but firmly push the two metal retention clips outward (away from the module). The module will pop up at an angle. Pull it straight out by holding the edges, avoiding touching the gold contacts.
After inspection, carefully reassemble your laptop by reversing the steps. Ensure all clips are seated and screws are snug but not overtightened.
Method 4: Using Manufacturer & Third-Party Scanner Tools
Beyond the general tools, some utilities are tailored for the upgrade process itself.
Laptop Manufacturer Support Tools
Companies like Dell (Dell Command | Update, SupportAssist), HP (HP Support Assistant), and Lenovo (Lenovo Vantage or System Update) have their own system scan tools. Running these can sometimes provide a hardware inventory that includes RAM details and, most valuably, will often tell you the maximum RAM your specific model supports and the number of slots available. This is critical information that generic tools don’t always know.
Crucial System Scanner
From the memory manufacturer Crucial (part of Micron), this is a fantastic tool for the sole purpose of planning an upgrade.
- Go to the Crucial website and run their online scanner (it downloads a small executable).
- It scans your system and immediately tells you your current RAM configuration (capacity, type, speed, number of slots used).
- Its killer feature: it shows you a list of compatible upgrade modules specifically for your laptop model, along with pricing. It takes the guesswork out of buying the right RAM. It’s a commercial tool, but the scan itself is free and informative.
Interpreting Your RAM Specs: From Numbers to Meaning
Now you have all this data. Let’s break down what it all means in practical terms.
Capacity (GB): The “How Much”
This is the total amount of memory. For context in 2024:
- 8GB: The absolute bare minimum for Windows 11/10 and modern macOS. Acceptable only for very light web browsing and office work. Multitasking will quickly exhaust it.
- 16GB: The sweet spot for most users. Comfortably handles dozens of Chrome tabs, office applications, media playback, and light photo editing.
- 32GB: The recommended target for power users, content creators (video/photo editing, 3D work), developers with virtual machines, and future-proofing.
- 64GB+: For professional workstations, heavy scientific computing, running multiple large VMs, or massive datasets. Overkill for general use.
Type (DDR4, DDR5, LPDDR): The “What Generation”
DDR stands for Double Data Rate. The number indicates the generation.
- DDR3: Very old, found in laptops from ~2012-2015. Slow by today’s standards.
- DDR4: The dominant standard for the last decade. Offers a good balance of performance, power efficiency, and cost.
- DDR5: The current standard in new laptops (2022+). Faster, higher bandwidth, but often more expensive and, in early implementations, sometimes with higher latency.
- LPDDR4/5: This is “Low Power DDR.” It’s soldered to the motherboard (never upgradeable) and is used in ultra-thin laptops and Apple Silicon Macs for extreme power efficiency. You cannot upgrade it.
You must match the type your laptop supports. You cannot put DDR5 RAM in a DDR4 slot.
Speed (MHz): The “How Fast”
Measured in megahertz (MHz), this is the clock speed. Higher numbers mean more data transfers per second.
- DDR4 typically ranges from 2133 MHz to 3200 MHz in laptops.
- DDR5 starts around 4800 MHz and goes much higher.
Faster RAM is better, but the real-world difference between, say, 2666MHz and 3200MHz in a laptop is often marginal (5-10% in specific applications) unless you’re doing highly memory-sensitive tasks. The capacity increase from 8GB to 16GB will feel vastly more significant than the speed bump from 2666 to 3200.
Channels: Dual-Channel vs. Single-Channel
Modern laptops and their processors support dual-channel memory mode. For this to work, you need two identical RAM sticks (same capacity, type, speed) installed in the correct slots (usually the two slots closest to the CPU). This effectively doubles the memory bandwidth. If you have one stick, you run in single-channel mode, which is significantly slower.
- How to check: CPU-Z’s “Memory” tab will say “Channel #: Dual” if it’s active. Speccy will show “2 x 8GB” indicating two sticks. If you have one 16GB stick, it’s single-channel.
- Upgrade Implication: To get dual-channel performance, if you currently have one stick, you should buy a matching kit of two sticks (e.g., a 2x8GB kit) and replace the old one. Adding a second, different stick might work but will run in asymmetric dual-channel (flex mode), which is slower than true dual-channel.
Strong Conclusion: Knowledge is Power (and Performance)
Checking your laptop’s RAM is no longer a task reserved for IT technicians. With the simple, built-in tools in your operating system, you can instantly see if you’re running out of memory. With free, powerful utilities like CPU-Z or Speccy, you can unlock the full technical specification of your memory modules—the exact type, speed, and manufacturer. And if your laptop permits, a careful physical inspection provides absolute certainty. This knowledge transforms you from a passive user into an active manager of your technology.
You can now confidently diagnose slowdowns, make informed decisions about a performance-boosting RAM upgrade, and verify the specs of any machine you consider buying. Remember the key steps: start with the quick OS check, dive deeper with CPU-Z for full specs, and always research your laptop’s upgradeability before ever picking up a screwdriver. In the world of computing, understanding your memory is the first step toward ensuring your laptop keeps up with you, not the other way around. So go ahead, open that Task Manager or run that system scan—your laptop’s secret life is waiting to be read.
Frequently Asked Questions
Can I check my laptop RAM without opening it?
Yes, absolutely. The easiest way is to use built-in tools like Windows Task Manager (Ctrl+Shift+Esc > Performance tab) or macOS About This Mac (Apple menu > About This Mac). For detailed specs like type and speed, use free third-party software like CPU-Z or Speccy. Opening the laptop is only needed for physical verification.
What’s the difference between RAM and storage (SSD/HDD)?
RAM is volatile, fast, short-term memory used for active tasks and programs. It’s cleared when the laptop powers off. Storage (SSD/HDD) is non-volatile, long-term memory where your operating system, files, and applications are permanently saved. Think of RAM as your desk workspace and storage as your filing cabinet.
Will adding more RAM always make my laptop faster?
Not always. It provides a significant boost only if your current RAM is consistently full (high usage) and your system is using the slow storage drive as “virtual memory.” If you already have ample free RAM (e.g., 16GB with only 6GB used during heavy tasks), adding more will have no noticeable effect on speed. First, check your current usage in Task Manager.
How do I know if my laptop’s RAM is upgradeable?
The best way is to search online for “[Your Exact Laptop Model] RAM upgrade” or “[Your Laptop Model] service manual.” Look for teardown videos or official manuals. On macOS, the “System Report” will state if memory is “Upgradable.” A general rule: very thin and light laptops (especially from 2018 onward) often have soldered, non-upgradable RAM.
What does “Dual-Channel” mean and why does it matter?
Dual-channel is a technology where the processor accesses two identical RAM sticks simultaneously, doubling the data bandwidth. This makes memory-intensive tasks (like gaming, video editing) noticeably faster. To achieve it, you typically need two matching sticks (e.g., two 8GB modules) installed. A single stick runs in slower single-channel mode.
Is it safe to use third-party RAM scanner tools?
Yes, if you download them from their official, reputable websites. Tools like CPU-Z (cpuid.com), Speccy (piriform.com), and HWiNFO (hwinfo.com) are well-established, safe, and free. They only read system information and do not install malware. Always avoid downloading from third-party download portals that bundle unwanted software.