Upgrading your laptop’s RAM is one of the most effective and affordable ways to dramatically improve its speed and multitasking capability. This process involves checking your laptop’s compatibility, acquiring the correct memory modules, and carefully installing them. While it sounds technical, with the right tools, a static-free environment, and careful attention to detail, most users can complete this upgrade in under 30 minutes. Success hinges on thorough preparation—knowing your laptop’s exact model and maximum supported RAM—and following precise safety and installation steps to avoid damaging delicate components.
Is your once-speedy laptop now struggling to keep up? Do you see the spinning wheel of death more often than you’d like? Before you consider an expensive replacement, there’s a simple, powerful upgrade that can breathe new life into your machine: installing more RAM. Random Access Memory (RAM) is your laptop’s short-term memory, the workspace where it holds all the active data and programs you’re using. When this workspace gets full, your system has to shuffle data back and forth to the much slower hard drive or SSD, causing frustrating lag. Adding more RAM expands this workspace, allowing your laptop to handle more tasks simultaneously with smoothness. The best part? For most modern laptops, this is a straightforward DIY project you can accomplish in less time than it takes to watch a movie. This comprehensive guide will walk you through every single step, from the initial detective work to the final verification, ensuring you successfully learn how to install more RAM in your laptop with confidence.
Key Takeaways
- Compatibility is King: Your laptop’s motherboard dictates the type (DDR3, DDR4, DDR5), speed, and maximum amount of RAM it can support. Always verify this before purchasing.
- Ground Yourself: Static electricity can destroy RAM chips. Always work on a non-carpeted surface, use an anti-static wrist strap if possible, and touch a grounded metal object before handling components.
- Handle RAM by the Edges: Avoid touching the gold contacts and circuitry on the memory module. Hold it by the sides to prevent oils and debris from causing connection issues.
- Update BIOS First: Before upgrading, check for and install the latest BIOS/UEFI firmware from your laptop manufacturer’s website. This ensures the best compatibility with new memory.
- Post-Install Verification is Crucial: After installation, enter the BIOS/UEFI to confirm the new RAM is recognized. Then use built-in OS tools or a utility like CPU-Z to verify the total capacity and speed.
- One Module at a Time: If adding to an existing stick, install the new module in the second slot if available, and ensure both modules are identical (same size, speed, brand) for optimal dual-channel performance.
- Don’t Force It: RAM modules should slide into their slot with even, firm pressure until the side clips snap into place. If you meet significant resistance, realign the notch and try again—never use excessive force.
📑 Table of Contents
- Why Upgrade Your Laptop’s RAM? The Tangible Benefits
- Phase One: Pre-Installation Detective Work & Shopping
- Essential Tools & The Sacred Space: Preparing Your Workshop
- Step-by-Step: Disassembly and RAM Installation
- Power On: Verification and Troubleshooting
- Advanced Considerations & Best Practices
- The Final Word: Your Laptop’s New Lease on Life
Why Upgrade Your Laptop’s RAM? The Tangible Benefits
Before we dive into the “how,” let’s solidify the “why.” Understanding the benefits will motivate you through the process and help you set realistic expectations.
Blistering Multitasking Speeds
The most immediate effect of a RAM upgrade is seamless multitasking. With 8GB of RAM, you might be able to have a few browser tabs, a word processor, and a music player open. With 16GB or 32GB, you can run a full suite of office applications, dozens of Chrome tabs (each a memory hog), a graphic design program, and a video call—all without the system stuttering. Your ability to switch between applications instantly returns.
Faster Performance in Demanding Applications
Applications like photo editors (Adobe Photoshop), video editing suites (DaVinci Resolve, Premiere Pro), and modern games rely heavily on available RAM. These programs load large assets—high-resolution images, video timelines, game textures—into memory for quick access. Insufficient RAM forces the app to constantly reload from the storage drive, causing lag, longer render times, and stuttering gameplay. More RAM provides a larger, faster pool for these assets, drastically improving responsiveness.
Future-Proofing Your Investment
Software and operating systems become more demanding over time. Windows 11 and macOS Sonoma are designed with more RAM-hungry features than their predecessors. By upgrading now, you’re not just fixing a current problem; you’re building a performance buffer for the next 2-4 years of software updates and new applications, potentially delaying the need for a entirely new laptop.
Cost-Effective Performance Leap
Compared to the cost of a new laptop, a RAM kit is incredibly affordable. You can often double or quadruple your memory for between $50 and $200, depending on the capacity and type. It’s one of the highest return-on-investment upgrades you can make.
Phase One: Pre-Installation Detective Work & Shopping
Rushing to buy RAM is the number one cause of failed upgrades. This phase is all about gathering intelligence on your laptop. Precision here prevents wasted money and frustration.
Visual guide about How to Install More Ram Laptop
Image source: cdn.mos.cms.futurecdn.net
Step 1: Identify Your Exact Laptop Model
You need the precise model number, not just the series. This is usually found on a sticker on the bottom of the laptop or inside the battery compartment (if removable). Look for labels like “Model No.: XPS 13 9310” or “Product Name: Lenovo ThinkPad T14 Gen 2.” You can also find it in your operating system:
- Windows: Press Win + R, type msinfo32, and hit Enter. Look for “System Model.”
- macOS: Click the Apple menu > About This Mac. The model year and name are displayed.
- Chrome OS: Open Settings > About Chrome OS > Additional details.
Step 2: Discover Your Current RAM Configuration
You need to know how many slots you have and what’s currently installed. This tells you if you can add modules or need to replace existing ones.
- Task Manager (Windows): Press Ctrl+Shift+Esc. Go to the “Performance” tab and click “Memory.” It will show the total, used, and available RAM, and often the speed (e.g., 3200 MHz) and form factor ( SODIMM). It may also say “Slots used: 1 of 2.”
- System Information (Windows): Use the msinfo32 command again. Under “System Summary,” look for “Total Physical Memory.”
- About This Mac (macOS): The “Memory” section will show the size and sometimes the number of slots.
- Third-Party Utilities: Tools like CPU-Z (free) are invaluable. Go to the “Memory” and “SPD” tabs. The SPD tab will list each slot individually, showing the manufacturer, size, speed, and timing of every module installed.
Step 3: Consult the Manufacturer’s Official Specifications
This is your ultimate source of truth. Go to the support page for your exact laptop model on the manufacturer’s website (Dell, HP, Lenovo, ASUS, etc.). Look for the “Technical Specifications” or “Spec Sheet” PDF. Find the section on “Memory.” It will state:
- Maximum RAM: The absolute ceiling (e.g., 64GB).
- Type: DDR4, DDR5, LPDDR4X, etc. Note: LPDDR (low-power) RAM is often soldered and not user-upgradable. You need standard SODIMM modules.
- Speed: Supported speeds (e.g., 3200 MT/s). You can usually install faster RAM, which will run at the system’s maximum supported speed.
- Number of Slots: Crucial information. If it says “2 slots,” you have room to add. If it says “1 slot” and you already have a module, you must replace it.
Step 4: Purchase the Correct RAM Kit
Armed with your specs, shop from reputable brands like Crucial, Kingston, Corsair, or G.Skill. Use their online configurators (e.g., Crucial System Scanner) which can automatically detect your model and recommend compatible kits. For best performance, especially if you have two slots:
- Match Modules: If adding to an existing stick, try to buy an identical module (same brand, model, size, speed, and timings). Mismatched modules can force the system into a slower “flex” mode.
- Buy a Kit: A “2x8GB” kit is pre-tested to work together. If you’re filling both slots, buy a kit, not two separate sticks.
- Consider Future Needs: If you max out your slots (e.g., 2 slots, max 32GB), buying a 2x16GB kit gives you more headroom than 2x8GB.
Essential Tools & The Sacred Space: Preparing Your Workshop
Your laptop is a precision instrument. A clean, static-free workspace and the right tools are non-negotiable for a safe installation.
Visual guide about How to Install More Ram Laptop
Image source: cdn.mos.cms.futurecdn.net
The Tool Checklist
You likely have most of these already:
- Small Phillips Head Screwdriver (#0 or #1): The most common size for laptop bottom screws. Some laptops use Torx (star-shaped) screws; check your model.
- Plastic Spudger or Pry Tool: For gently prying open plastic clips without marring the case. A old credit card can work in a pinch.
- Anti-Static Wrist Strap (Highly Recommended): This grounds you to the laptop’s chassis, safely dissipating static charge. Plug the alligator clip into the metal part of the laptop’s port (like a USB port’s shield) after the bottom is off.
- Small Container or Magnetic Mat: To hold screws. They are tiny and easy to lose.
- Can of Compressed Air: To blow out dust from the RAM slots before installation.
- Good Lighting: A desk lamp or flashlight to see the small components clearly.
Crafting the Ideal Static-Free Environment
Static discharge can fry sensitive electronics instantly. Follow these rules:
- Work on a Non-Carpeted Floor: Carpet is a static generator. Stand on a wooden or tile floor.
- Use a Solid Surface: A wooden or glass tabletop. Avoid plastic surfaces.
- Humidity Helps: If the air is very dry (winter), you generate more static. A humidifier can help, but don’t spray moisture near electronics.
- The Grounding Ritual: Before touching any internal component, touch the bare metal of the laptop’s chassis (the exposed metal part of the port or a screw hole) for a few seconds. If using a wrist strap, clip it on first.
- Keep Components in Anti-Static Bags: Until the moment of installation, keep your new RAM in its original anti-static bag. Do not place it on the table.
Step-by-Step: Disassembly and RAM Installation
Now, the main event. The process varies slightly by laptop, but the core principles are universal. We’ll use a standard bottom-access laptop as our example.
Visual guide about How to Install More Ram Laptop
Image source: cdn.mos.cms.futurecdn.net
Step 1: Power Down and Unplug Completely
Shut down your laptop fully. Do not just sleep or hibernate. Unplug the AC adapter. If your laptop has a removable battery, take it out. For non-removable batteries, you must open the case. This is critical.
Step 2: Remove the Bottom Cover
Flip the laptop over. Locate all the screws holding the bottom plate. They may all be the same size, or some may be longer (often near the hinge). Take note of where each screw came from. A diagram on a piece of paper next to the laptop helps. Start by unscrewing all screws. Some may be hidden under rubber feet or warranty stickers—you may need to peel these back carefully (they can be sticky, use a tool). Gently insert your pry tool into a seam along the edge. Work your way around, releasing plastic clips. They will make a popping sound. Be patient. If a section resists, check for a missed screw. Once all clips are free, lift the bottom cover off.
Step 3: Locate the RAM Modules
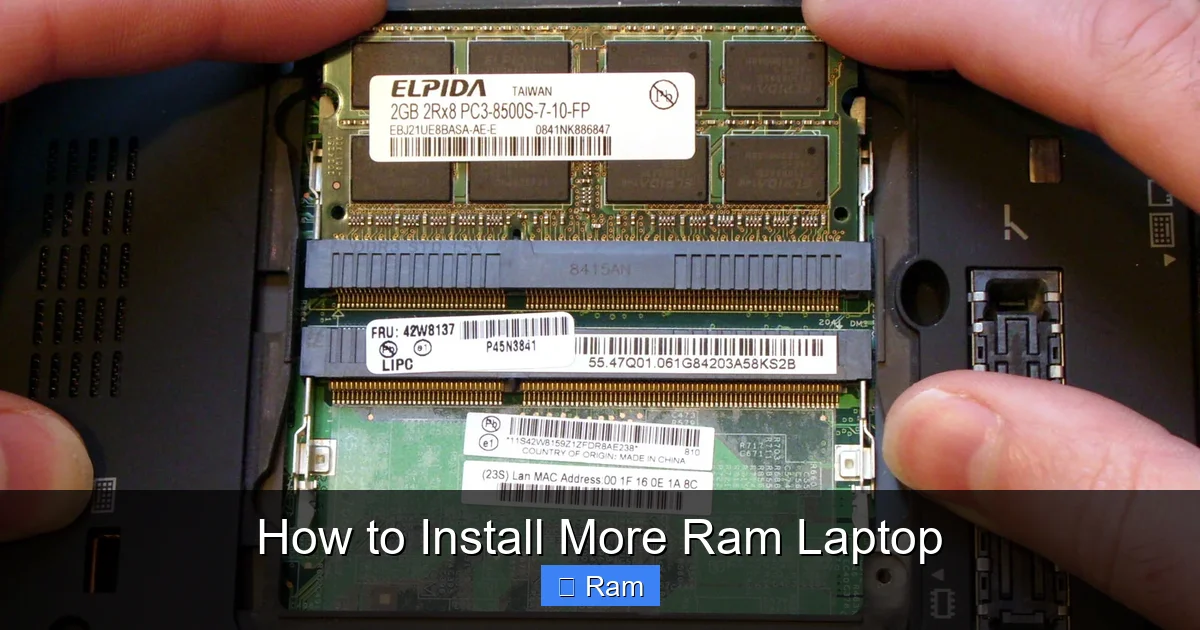
Inside, you’ll see the motherboard, fan, battery (if internal), and storage drives. The RAM slots are easy to spot: they are small, narrow slots, usually near the center or a corner, with small metal clips on either side. A SODIMM module is about the size of your index finger, with a notch (key) in the bottom edge and gold contacts. You’ll see one or two modules lying flat, often held down by those side clips.
Step 4: Remove Existing RAM (If Replacing)
To remove a module, gently pry the two metal retention clips outward (away from the module). They should pop up slightly. The module will then tilt up at a ~45-degree angle. Grasp the module by its edges and pull it straight out. Do not wiggle it side-to-side. Place it on its anti-static bag or a safe spot.
Step 5: Install the New RAM
This is the critical moment.
- Align the Notch: Look at the notch in your new RAM module and the plastic protrusion in the slot. They must align. DDR3, DDR4, and DDR5 notches are in different positions. If it doesn’t fit one way, flip it over. Do not force it.
- Insert at an Angle: Hold the module by the edges. Insert it into the slot at the same ~45-degree angle you removed the old one. Push it in firmly and evenly until the gold contacts are fully buried in the slot.
- Seat the Module: Press down on the top edge of the module (the non-contact side) until the side clips snap into place over the module’s edges. You should hear a soft click. The module should now lie flat against the motherboard, held securely. Apply even pressure on both ends.
Step 6: Double-Check and Reassemble
Visually inspect. The modules should be parallel to the motherboard and secured by the clips. Give them a very gentle tug to ensure they are seated. Now, blow out any dust from the area with compressed air. Carefully place the bottom cover back on, aligning all the clips. Press around the edges until they all snap. Reinsert all screws in their correct holes and tighten them snugly, but do not over-tighten and strip the plastic threads.
Power On: Verification and Troubleshooting
Don’t just assume it worked. Verification is key.
The First Boot
Reconnect the AC adapter (and battery if you removed it). Power on. Your laptop may reboot once or twice—this is normal as the system configures the new memory. If it boots to your login screen normally, great! If you get a black screen, no power, or a series of beeps (consult your manual for beep codes), power it off immediately.
BIOS/UEFI Check
The most reliable place to see the new RAM is in your system’s firmware. Restart and press the key to enter BIOS/UEFI (common keys: F2, F10, F12, Del, Esc—usually a prompt shows during boot). Navigate to the “System Information” or “Memory” tab. You should see the total installed RAM matching your new capacity (e.g., 16GB). It should also list the speed. If it shows the wrong size or only one stick, power down and re-check your installation.
Operating System Verification
In Windows, go to Settings > System > About. Under “Device specifications,” it should show “Installed RAM.” For more detail, open Task Manager (Ctrl+Shift+Esc), Performance tab, Memory. It will show the speed, form factor (SODIMM), and “Hardware reserved” amount (should be minimal). On macOS, click Apple menu > About This Mac > Memory. Use a tool like CPU-Z (Windows) or System Information (macOS) to see details for each individual slot.
Common Troubleshooting Scenarios
- No Boot / Beep Codes: Reseat the RAM modules. Ensure they are fully clicked in. Try booting with only one module installed (test each one in each slot) to isolate a bad stick or bad slot.
- RAM Not Fully Recognized: This can happen with mismatched modules or if you installed a module that’s incompatible with your specific motherboard chipset, even if it’s the right type. Reinstall the old RAM to see if the system boots normally. If it does, the new module is likely incompatible.
- System Runs Very Slow After Install: Enter BIOS and check if the RAM is running at the correct speed (e.g., 3200MHz). Sometimes it defaults to a safe, slow speed like 2133MHz. You may need to enable an XMP/EXPO profile in BIOS (if your laptop supports it, many do not) or update the BIOS again.
Advanced Considerations & Best Practices
Once you’ve mastered the basic upgrade, these tips will help you optimize and avoid pitfalls.
Understanding Dual-Channel vs. Single-Channel
Most modern laptops support dual-channel memory, which doubles the data bandwidth between the RAM and the memory controller. For this to work, you need two identical modules (same size, speed, timings) installed in the correct slots (usually slot A and B, often color-coded). A single 16GB stick will run in single-channel mode. Two 8GB sticks in a matched kit will run in faster dual-channel mode, offering better performance in integrated graphics and memory-intensive tasks. Always aim for a matched kit if you have two slots.
The Solder vs. Slot Dilemma
This is the most critical compatibility check. Many modern ultrabooks and gaming laptops solder the RAM directly to the motherboard to save space. If your RAM is soldered, you cannot upgrade it. The manufacturer’s specs will say “soldered” or “not upgradeable.” If it says “1 slot available” or “2 SODIMM slots,” you’re good. There is no way to add RAM to a soldered system without advanced, risky rework.
Thermal Considerations
High-performance RAM can run warm. In the tight confines of a laptop, ensure your new modules have low-profile heat spreaders if space is tight. Never block laptop air vents. Some high-end gaming laptops have dedicated RAM cooling pads or heatsinks; ensure your modules fit under any existing heatsink.
When to Consider a Professional or Skip the Upgrade
If your laptop is still under warranty, opening it may void it. Check the warranty terms. Some manufacturers (like Apple with most MacBooks) seal the case, making upgrades impossible or impractical. If your laptop is very old (e.g., DDR3 era), the cost of compatible RAM might approach the value of the machine itself. Also, if the slow performance is due to an old, mechanical hard drive, upgrading to an SSD will provide a far more dramatic improvement than adding RAM to a system already bottlenecked by storage.
The Final Word: Your Laptop’s New Lease on Life
Congratulations! By following this guide, you’ve transformed your laptop from a sluggish companion into a responsive powerhouse. The process of learning how to install more RAM in a laptop teaches you valuable skills about your machine’s inner workings. Remember the golden rule: preparation and compatibility trump everything. The 30 minutes you spend researching your model and buying the right kit saves you from hours of headache. You’ve conquered static electricity, deciphered model numbers, and delicately handled circuit boards. Now, enjoy the payoff. Feel the instant responsiveness as you open a dozen browser tabs, switch effortlessly between a video call and a spreadsheet, and launch your favorite games without the dreaded stutter. This upgrade isn’t just about adding chips; it’s about reclaiming productivity, extending the useful life of your trusted device, and making a tangible, positive impact on your daily computing experience. Your laptop is no longer a victim of its original specs—it’s a upgraded machine, ready for the tasks you throw at it.
Frequently Asked Questions
Will installing more RAM void my laptop’s warranty?
It depends on the manufacturer’s policy. Some brands (like Dell, Lenovo, HP) allow user upgrades without voiding the warranty, as long as you don’t damage anything. Others, notably Apple, consider any opening of the case a warranty violation. Always check your warranty terms or contact support before opening your specific model.
Can I mix RAM sizes and brands, like adding a 16GB stick to an existing 8GB?
Technically, you can mix sizes and brands, but it’s not recommended for optimal performance. The system will run in asymmetric or “flex” dual-channel mode, which is slower than true dual-channel. For best results, use a matched kit of two identical modules. If you must mix, ensure the new stick has at least the same speed (MHz) and capacity as the old one for the best chance of stability.
Is static electricity really that big of a deal for RAM installation?
Absolutely. A static discharge you can’t even feel (as low as 100 volts) can instantly fry a memory module’s sensitive circuits. Always ground yourself by touching the laptop’s metal chassis before touching the RAM, work on a non-carpeted surface, and handle modules by the edges, avoiding the gold contacts. An anti-static wrist strap provides the best protection.
My laptop runs a 64-bit OS. Is there a RAM limit I should worry about?
Yes, but it’s rarely the limiting factor for modern laptops. A 64-bit Windows 11/10 Home edition officially supports up to 128GB, and Pro/Enterprise editions support much more. The actual limit will be the physical maximum your laptop’s motherboard supports (e.g., 32GB, 64GB). Your operating system will almost always support more than your hardware can physically take.
Will more RAM make my games run faster?
It depends. If your game is stuttering because it’s running out of memory and using the slower SSD/HDD as “virtual memory,” then yes, adding RAM will provide a smoother, more consistent frame rate. However, if your game’s performance is limited by your graphics card (GPU) or processor (CPU), adding RAM will have little to no effect. RAM is most impactful for games with large, open worlds or for multitasking while gaming (streaming, Discord, browser).
My laptop has only one RAM slot and it’s already occupied. What do I do?
You must replace the existing module with a larger-capacity one. For example, if you have 8GB in the single slot, you need to purchase a single 16GB or 32GB module to upgrade. Before buying, double-check the maximum RAM your laptop supports for a single module (e.g., “supports up to 32GB per slot”).