4 Pin to 5 Pin Backup Camera Adapter
Upgrading or repairing your vehicle’s reversing system often comes down to one small but critical component: the 4 pin to 5 pin backup camera adapter. This handy connector bridges the gap between older wiring setups and modern camera systems, ensuring your rear view stays clear and reliable. In this guide, you will learn exactly how these adapters work, when you need one, and how to install it without headaches. We will also cover common wiring mistakes, compatibility tips, and maintenance tricks to keep your backup camera running smoothly for years.
Rear visibility has become a non-negotiable feature for modern drivers. Whether you are parking in tight spaces, towing a trailer, or simply backing out of a driveway, a reliable backup camera saves time and prevents costly accidents. But what happens when your new camera does not quite match your vehicle’s existing wiring? That is where a 4 pin to 5 pin backup camera adapter steps in as a simple, affordable solution.
Many older trucks, SUVs, and aftermarket monitor setups use a four-wire reversing camera system. Newer models, however, often include a fifth wire for enhanced video transmission, better grounding, or auxiliary power. When these systems meet, you get a mismatch that can cause blank screens, flickering images, or complete signal failure. Instead of rewiring your entire vehicle, an adapter bridges the gap cleanly and efficiently.
In this guide, we will walk through everything you need to know about these adapters. You will learn how they work, how to choose the right one, and how to install it safely. We will also cover troubleshooting tips, maintenance habits, and when to call a professional. By the end, you will feel confident upgrading or repairing your rearview system without guesswork.
Key Takeaways
- Adapter Purpose: A 4 pin to 5 pin backup camera adapter bridges mismatched wiring harnesses between older vehicles and modern reversing cameras.
- Pin Functionality: The extra pin usually carries video signal, ground, or power, making proper matching essential for clear footage.
- Compatibility Check: Always verify your camera’s wire count and vehicle monitor input before buying an adapter to avoid signal loss.
- Installation Safety: Disconnect the battery, use proper wire strippers, and secure connections with heat shrink or quality electrical tape.
- Signal Quality: Poorly seated pins or corroded wires often cause flickering screens, distorted images, or complete camera failure.
- Maintenance Matters: Keep connectors clean, dry, and protected from moisture to extend the life of your entire rearview system.
- Professional Help: If your vehicle uses complex factory integration or digital video networks, consult a technician to prevent wiring damage.
📑 Table of Contents
Understanding the 4 Pin to 5 Pin Backup Camera Adapter
At its core, a 4 pin to 5 pin backup camera adapter is a small wiring connector that translates signals between two mismatched camera systems. Think of it as a translator for your vehicle’s electronics. One side accepts the four wires from your existing harness, while the other side plugs into a five-wire camera or monitor input. The adapter ensures each wire carries the correct signal without cross-wiring or power loss.
Most reversing cameras rely on a standard set of connections. These typically include ground, reverse light trigger, video output, and power supply. A five-wire system usually adds an extra conductor for improved shielding, a separate video return line, or a dedicated accessory power feed. When you pair a four-wire source with a five-wire destination, the adapter maps each function correctly so your screen displays a clear, stable image.
How the Pin Configuration Works
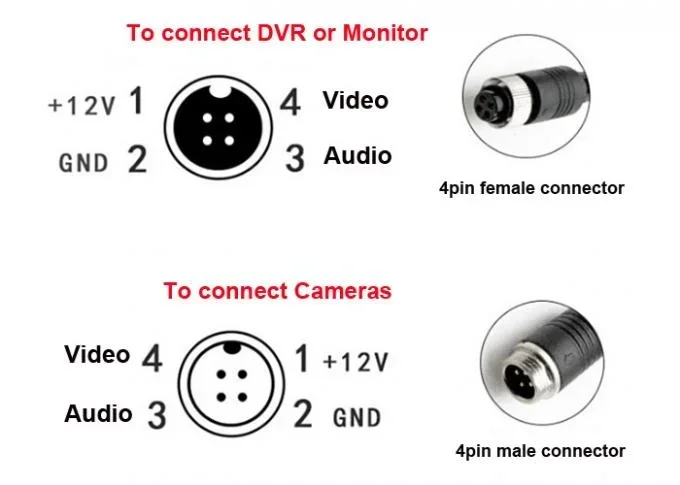
Understanding the pin layout helps you avoid costly wiring mistakes. While exact colors and positions vary by manufacturer, the general function remains consistent across most automotive reversing systems. Here is a quick breakdown of what each pin typically handles:
- Pin 1 (Ground): Completes the electrical circuit and stabilizes the video signal.
- Pin 2 (Reverse Trigger): Tells the monitor to switch to camera view when you shift into reverse.
- Pin 3 (Video Output): Carries the actual rearview footage from the camera to your display.
- Pin 4 (Power Supply): Provides steady voltage to keep the camera operating while the vehicle runs.
- Pin 5 (Auxiliary/Shield): Often used for enhanced grounding, signal shielding, or extra video return in newer systems.
When you use a 4 pin to 5 pin backup camera adapter, the fifth pin is usually mapped to an existing function or left inactive if your system does not require it. The key is matching each wire to its correct counterpart. A wrong connection can fry the camera module, blow a fuse, or create a noisy video feed.
Why Vehicles Use Different Pin Counts
Automakers and aftermarket manufacturers change pin counts for several practical reasons. Older vehicles often used minimal wiring to keep costs low and installation simple. Newer models add extra conductors to support higher-resolution video, better weather resistance, or integrated parking guidelines. Some systems also separate power and ground paths to reduce electrical interference from the engine or alternator.
Aftermarket camera kits follow similar patterns. Budget-friendly setups usually stick to four wires for straightforward installation. Premium kits add a fifth wire for improved signal clarity, especially when running long cable routes through a vehicle frame. If you are mixing components from different eras or brands, a 4 pin to 5 pin backup camera adapter becomes the missing link that keeps everything talking to each other.
When You Actually Need This Adapter
Not every camera upgrade requires an adapter. In many cases, your existing harness already matches the new device, or you can use a standard plug-and-play connector. You typically need a 4 pin to 5 pin backup camera adapter when you notice a clear mismatch between your current wiring and the replacement or added camera.
Here are the most common scenarios where this adapter saves the day:
- Replacing an older camera with a newer model: Your vehicle has a four-wire setup, but the new camera expects five connections.
- Adding a monitor to a legacy system: You want to keep your original camera but upgrade to a display that uses a five-pin input.
- Mixing aftermarket brands: One brand uses a four-pin harness while another uses a five-pin layout, and you want to combine them.
- Repairing a damaged connector: Your original plug broke or corroded, and the replacement part has a different pin count.
Signs Your Wiring Mismatch Is Causing Problems
Before buying any adapter, confirm that a pin mismatch is actually your issue. Several symptoms point to a wiring incompatibility rather than a broken camera or monitor. Watch for these warning signs:
- Screen stays blank in reverse: The monitor does not activate when you shift gears, suggesting the trigger wire is not reaching the display.
- Flickering or static-filled video: Poor grounding or mismatched signal lines create an unstable picture.
- Camera works only sometimes: Intermittent operation often means a loose pin or incomplete circuit.
- Burnt smell or blown fuse: Incorrect wiring can short the circuit and damage sensitive electronics.
If you see these issues, inspect your connectors before assuming the camera is dead. A 4 pin to 5 pin backup camera adapter may solve the problem in minutes instead of hours.
Choosing the Right Adapter for Your Setup
Not all adapters are built the same. Some are basic passive connectors, while others include shielding, sealed housings, or built-in signal conditioning. Picking the right one depends on your vehicle type, camera model, and installation environment.
Key Features to Look For
Start by matching the adapter to your exact wiring needs. A quality 4 pin to 5 pin backup camera adapter should feel sturdy, fit snugly, and clearly label each pin or wire position. Look for these practical features:
- Corrosion-resistant housing: Plastic or metal shells that resist moisture and road salt extend connector life.
- Clear pin labeling: Marked positions reduce guesswork during installation.
- Secure locking mechanism: Tabs or clips keep the adapter from vibrating loose over time.
- Weather sealing: Rubber gaskets or sealed ends protect against water intrusion.
- Compatible wire gauge: The adapter should match your existing harness thickness for a tight, reliable connection.
Compatibility Checklist Before You Buy
A quick compatibility check prevents wasted money and frustrating returns. Run through this short list before ordering your 4 pin to 5 pin backup camera adapter:
- Count the wires on your current camera or harness.
- Count the pins on your monitor or new camera input.
- Verify whether the fifth pin is active or unused in your system.
- Check voltage requirements to ensure the adapter handles your vehicle’s power supply.
- Confirm the adapter supports your video format, especially if you use analog versus digital signals.
- Read manufacturer notes about reverse-trigger behavior and ground placement.
If you are unsure about your setup, consult your camera manual or vehicle service guide. A few minutes of verification can save you from a frustrating installation day.
Step-by-Step Installation Guide
Installing a 4 pin to 5 pin backup camera adapter is usually a straightforward job. You do not need advanced electrical skills, but you do need patience, clean tools, and a careful approach. Follow these steps to get a solid connection and a clear rearview image.
Preparation and Safety First
Before touching any wires, protect yourself and your vehicle. Disconnect the negative battery terminal to prevent accidental shorts. Gather your tools, including wire strippers, electrical tape or heat shrink tubing, a multimeter if available, and a flashlight. Work in a dry area and keep loose metal objects away from exposed terminals.
Connecting the Adapter Correctly
Once you have identified each wire, connect them in the correct order. A typical 4 pin to 5 pin backup camera adapter installation follows this sequence:
- Step 1: Locate the four-wire harness coming from your vehicle or existing camera.
- Step 2: Match each wire to its function: ground, reverse trigger, video, and power.
- Step 3: Attach the corresponding wires to the adapter’s four-pin side.
- Step 4: Connect the adapter’s five-pin side to your new camera or monitor input.
- Step 5: Secure every connection with heat shrink or quality electrical tape.
- Step 6: Route the cables away from moving parts, sharp edges, and heat sources.
- Step 7: Reconnect the battery and test the system before reassembling panels.
Take your time with each connection. A loose wire can cause signal noise, while a poorly insulated joint can lead to corrosion later. If your adapter includes a sealing gasket, make sure it sits flush to keep moisture out.
Testing the Connection
After installation, verify that everything works as expected. Shift into reverse and check whether the monitor activates automatically. Look for a steady image without flickering, lines, or discoloration. If the screen stays dark, double-check the reverse trigger wire and ground connection first. These two points cause most early failures.
If the image appears but looks grainy, inspect the video wire and ensure the adapter pins are fully seated. A partial connection often creates a weak signal. Once the picture looks clean and stable, tuck the wiring neatly and reassemble any trim pieces you removed.
Troubleshooting Common Issues
Even with a quality 4 pin to 5 pin backup camera adapter, problems can pop up. Most issues come from poor connections, mismatched wiring, or environmental damage rather than a defective adapter. Use this troubleshooting guide to spot and fix the most common headaches.
Flickering or No Video Signal
A flickering screen usually points to a weak ground or a loose video wire. Start by checking the ground connection and cleaning any rust or paint residue from the contact point. Then inspect the video line for pinches, cuts, or loose pins. If the signal still jumps, try reseating the adapter and confirming that the fifth pin is not creating an unintended short.
Reverse Trigger Not Working
If your monitor does not switch to camera mode, the reverse trigger wire may not be connected properly. Verify that the trigger wire reaches the correct terminal on the adapter and that it receives power when you shift into reverse. A multimeter can help you confirm the signal. If the wire is intact but the monitor still ignores it, check the display settings to ensure reverse input is enabled.
Adapter or Connector Damage
Physical damage happens more often than people expect. Vibration, heat, and moisture can crack housings or corrode pins over time. Inspect the adapter regularly for bent terminals, cracked plastic, or green corrosion. Replace damaged adapters immediately, since a failing connector can introduce resistance and degrade your video quality.
Maintenance and Long-Term Reliability
A 4 pin to 5 pin backup camera adapter works best when you treat it as part of a larger rearview system that needs occasional care. Simple maintenance habits keep your camera clear, your wiring intact, and your monitor responsive.
Keep Connectors Clean and Dry
Moisture is the enemy of automotive electronics. Wipe down exposed connectors during routine washes or seasonal inspections. If your adapter sits in a damp area, consider adding a light sealant around the housing edges. Avoid spraying water directly into the connector zone, especially when the vehicle is hot.
Inspect Wiring Periodically
Temperature changes and road vibration can loosen wires over time. Every few months, glance at the adapter area and nearby harness routing. Look for frayed insulation, loose clips, or signs of rubbing against metal. Catching small issues early prevents bigger failures later.
Quick Tips for Better Performance
- Use quality materials: Choose heat shrink and tape that stand up to heat and moisture.
- Avoid sharp bends: Route cables with gentle curves to protect the internal conductors.
- Label your wires: Clear labels make future repairs faster and less error-prone.
- Test after every repair: Confirm the camera activates before closing panels.
- Store spare parts: Keep an extra adapter or connector handy for quick replacements.
If you ever want to improve your overall rearview setup, you can also explore related upgrades such as a backup camera and monitor kit. A matched kit often simplifies installation and reduces compatibility guesswork.
Expert Insights and Final Recommendations
Experienced installers agree on one thing: most rearview camera problems come from small wiring mistakes, not major hardware failures. A 4 pin to 5 pin backup camera adapter is only as good as the connections around it. When you take time to identify each wire, secure every joint, and test the system before finishing the job, you give your camera the best chance to perform reliably.
If your vehicle uses a factory-integrated display or a more complex video network, proceed with extra caution. Some modern screens expect specific signal formats or digital communication rather than simple analog video. In those cases, a generic adapter may not solve the issue, and a vehicle-specific solution could be the better path.
For most standard setups, though, this adapter is a practical, low-cost fix. It helps you keep your existing wiring, avoid unnecessary harness replacement, and get your rearview system back on track. With the right adapter and a careful install, you can drive with confidence every time you shift into reverse.
If you are also curious about how to keep your camera lens in top shape, check out our guide on how to keep backup camera clean for simple maintenance habits that protect your view.
Conclusion
A 4 pin to 5 pin backup camera adapter is a small part that solves a very common problem. It bridges mismatched wiring, restores clear rearview footage, and helps you avoid unnecessary rewiring. By understanding pin functions, checking compatibility, and installing the adapter carefully, you can fix signal issues and improve your overall driving safety.
Remember to inspect your connections, keep the housing sealed, and test the system before finishing the job. With a little attention to detail, your backup camera can deliver the reliable view you need every time you reverse. If you take your time and choose the right adapter, this simple upgrade can make a noticeable difference behind the wheel.
Frequently Asked Questions
What does a 4 pin to 5 pin backup camera adapter do?
It connects a four-wire reversing camera setup to a five-pin camera or monitor input by matching each wire to the correct function. This helps restore video signal, reverse triggering, and power without rewiring the whole vehicle.
Can I use this adapter for any backup camera?
Not always. You need to confirm that your camera and monitor use compatible signal types and that the fifth pin matches your system’s needs. Always check the wire count and function before buying an adapter.
How do I know which wire goes where during installation?
Start by identifying the standard functions: ground, reverse trigger, video output, and power. Use your camera manual, wire colors, or a multimeter to confirm each line, then match them carefully to the adapter’s labeled pins.
Why is my backup camera still blank after installing the adapter?
A blank screen usually means the reverse trigger or ground connection is incorrect. Recheck both ends of the adapter, make sure the pins are fully seated, and verify that the monitor receives a signal when you shift into reverse.
Do I need to disconnect the battery before installing the adapter?
Yes, disconnecting the battery is a smart safety step because it reduces the risk of short circuits while you handle exposed wires. It also protects sensitive camera and monitor electronics during installation.
How can I prevent this adapter from failing over time?
Keep the connector clean, dry, and securely locked in place. Use heat shrink or quality tape, route the wires away from heat and sharp edges, and inspect the area periodically for corrosion or loose connections.