How to Install OpenSSH Server on Windows 11 Step by Step
Installing OpenSSH Server on Windows 11 is simpler than you think. This guide walks you through every step using the Settings app, PowerShell, and manual configuration. You will learn how to enable the SSH service, configure key settings, and test your connection safely.
Setting up a secure remote connection to your PC sounds intimidating, but it really is not. With OpenSSH Server on Windows 11, you can access your computer from anywhere in the world without needing extra software. Microsoft has actually built OpenSSH directly into Windows 11, which means you do not need to hunt down a third-party download. This guide shows you exactly how to install OpenSSH Server on Windows 11, step by step, so you can start working remotely with confidence.
Whether you are a developer, a system administrator, or just someone who wants to manage files on your PC from another device, OpenSSH makes it possible. The whole process takes about ten minutes if you follow along. You will learn how to turn on the SSH server, tweak a few settings, open the right ports in your firewall, and verify that everything connects properly. Let us get started.
Key Takeaways
- OpenSSH Server is built into Windows 11: You do not need to download third-party software to get it working.
- Multiple installation methods exist: You can enable it through Settings, PowerShell, or Command Prompt.
- Configuration is straightforward: Editing the sshd_config file lets you customize ports, authentication, and logging.
- Firewall setup is critical: You must allow port 22 through Windows Defender Firewall for remote connections.
- Testing your setup ensures everything works: A simple local test confirms the server is running correctly.
- Security best practices matter: Disabling password login and using SSH keys keeps your system safe.
- Managing the service is easy: You can start, stop, and restart OpenSSH through the Services console.
📑 Table of Contents
- What Is OpenSSH Server and Why Use It on Windows 11?
- How to Install OpenSSH Server on Windows 11
- Starting and Enabling the OpenSSH Server Service
- Configuring OpenSSH Server Settings
- Setting Up Firewall Rules for OpenSSH
- Testing Your OpenSSH Server Connection
- Managing and Troubleshooting OpenSSH Server
- Security Best Practices for OpenSSH Server
- Conclusion
What Is OpenSSH Server and Why Use It on Windows 11?
OpenSSH is a free, open-source toolkit that lets you communicate securely between two computers over a network. The server side runs on your Windows 11 machine and listens for incoming connections. The client side runs on the device you are connecting from. Together, they create an encrypted tunnel that keeps your data safe from prying eyes.
Before OpenSSH came built into Windows, people had to use tools like PuTTY or download Cygwin to get SSH working. Now, Microsoft includes the OpenSSH Server as an optional feature right inside Windows 11. This means you get native support, regular updates through Windows Update, and no need to manage third-party software. For anyone doing remote system administration, this is a game changer.
Here are some common reasons people turn on OpenSSH Server on their machines:
- Remote file management using tools like SCP or SFTP.
- Running command-line tasks on a remote PC from another location.
- Automating backups through secure, encrypted connections.
- Development workflows where you need to push code or manage servers.
- Learning and experimentation with network protocols and secure shell technology.
One thing to keep in mind: your PC should meet basic requirements. A machine with at least 8GB of RAM and a solid-state drive handles SSH workloads easily. If you are running a lightweight setup, you can still use OpenSSH without issues. For heavier development work, check out a Windows 11 16GB RAM laptop for smoother multitasking while managing remote sessions.
How to Install OpenSSH Server on Windows 11
There are three main ways to install OpenSSH Server on your Windows 11 machine. You can use the Settings app, PowerShell, or Command Prompt. All three methods achieve the same result. Pick whichever feels most comfortable to you.
Method 1: Using the Settings App
This is the easiest method and works great if you prefer a visual interface. Follow these steps carefully:
- Open the Settings app by pressing Windows Key + I.
- Click on Apps in the left sidebar.
- Select Optional features from the menu.
- Click the View features button near the top.
- Type “OpenSSH Server” into the search bar.
- Select OpenSSH Server from the results and click Install.
- Wait for the installation to finish, then close Settings.
That is it. Windows 11 downloads and installs the OpenSSH Server component for you. You can verify the installation by searching for “OpenSSH” in the Start menu. You should see “OpenSSH SSH Server” listed as an installed feature.
Method 2: Using PowerShell
PowerShell gives you a faster, more hands-on approach. Here is what to do:
- Right-click the Start button and select Windows Terminal (Admin).
- Type the following command and press Enter:
Add-WindowsCapability -Online -Name OpenSSH.Server~~~~0.0.1.0
- Wait for the command to complete. You will see a success message when done.
PowerShell is especially useful if you are scripting setups across multiple machines. It also lets you check whether OpenSSH Server is already installed before you try to add it again.
Method 3: Using Command Prompt
If you prefer the classic command line, Command Prompt works just as well:
- Search for “cmd” in the Start menu.
- Right-click Command Prompt and choose Run as administrator.
- Type the following command and press Enter:
dism /online /Add-Capability /CapabilityName:OpenSSH.Server~~~~0.0.1.0
- Wait for the process to finish and confirm the success message.
All three methods install the same OpenSSH Server component. The difference is just how you interact with Windows during the process. Choose the one that matches your comfort level.
Starting and Enabling the OpenSSH Server Service
Installing OpenSSH Server does not start it automatically. You need to manually start the service and set it to run every time your PC boots up. This is a crucial step that many people skip.
Here is how to do it:
- Press Windows Key + R to open the Run dialog.
- Type services.msc and press Enter.
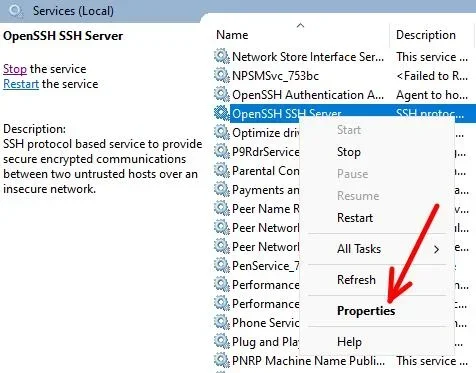
- Scroll down the list until you find OpenSSH SSH Server.
- Right-click it and select Properties.
- Change the Startup type to Automatic.
- Click Start if the service is not already running.
- Click Apply and then OK.
Setting the startup type to Automatic ensures the SSH server starts every time you turn on your computer. Without this, you would have to manually start the service each time, which gets old fast. After you finish, you should see the service status show as “Running” in the Services window.
One tip: if the service fails to start, check the Windows Event Viewer for error messages. This can help you pinpoint configuration issues quickly. Also make sure no other application is using port 22, since that is the default SSH port.
Configuring OpenSSH Server Settings
The default OpenSSH configuration works for most users, but you may want to tweak a few settings for better security or to match your needs. The configuration file lives at C:\Windows\System32\OpenSSH\sshd_config.
Opening the Configuration File
You need administrator privileges to edit this file. Here is how:
- Open Notepad as an administrator. Search for Notepad, right-click it, and choose Run as administrator.
- In Notepad, click File and then Open.
- Navigate to C:\Windows\System32\OpenSSH\sshd_config.
- Change the file type filter from “Text Documents” to “All Files.”
- Select the sshd_config file and click Open.
Key Settings to Adjust
Here are the most important settings you might want to change:
- Port: The default is 22. You can change it to a different port number for basic security through obscurity. Just remember to update your firewall rules accordingly.
- PermitRootLogin: Set this to “no” to prevent direct root access.
- PasswordAuthentication: Set this to “no” if you plan to use SSH keys instead of passwords. This is a strong security practice.
- PubkeyAuthentication: Make sure this is set to “yes” to allow key-based authentication.
- MaxAuthTries: Limit the number of login attempts to reduce brute-force attack risk.
After making any changes, save the file and restart the OpenSSH service. You can do this from the Services console or by running Restart-Service sshd in PowerShell.
Setting Up Firewall Rules for OpenSSH
Your Windows Defender Firewall blocks incoming connections by default. You need to create a rule that allows SSH traffic through. Without this step, remote connections will fail even if the OpenSSH Server is running perfectly.
Here is how to set it up:
- Open Windows Defender Firewall with Advanced Security. Search for it in the Start menu.
- Click on Inbound Rules in the left panel.
- Click New Rule… in the right panel.
- Select Port and click Next.
- Select TCP and enter 22 (or your custom port number) in the specific local ports field.
- Select Allow the connection and click Next.
- Check all three boxes (Domain, Private, Public) unless you have a specific reason not to.
- Give the rule a name like “OpenSSH Server” and click Finish.
If you changed the default port from 22, make sure you enter the new port number in step 5. Also, if you are on a public network, consider restricting the rule to only Private networks for added safety.
For a more permanent and secure setup, consider storing your configuration files on a fast laptop with 16GB RAM and 1TB SSD running Windows 11. This ensures smooth performance when managing remote connections and handling encrypted SSH traffic.
Testing Your OpenSSH Server Connection
Now that everything is set up, it is time to test whether your OpenSSH Server is working correctly. You should always test locally before trying to connect from another machine.
Testing Locally
Open PowerShell or Command Prompt on the same PC and type:
ssh localhost
You should see a prompt asking you to accept the host key. Type “yes” and press Enter. Then enter your Windows username and password when prompted. If you get a command prompt, congratulations, your server is working.
Testing Remotely
To test from another computer on the same network:
- Find your PC’s local IP address by typing ipconfig in Command Prompt.
- On the remote machine, open a terminal or command prompt.
- Type ssh yourusername@yourpcipaddress and press Enter.
- Accept the host key and enter your password.
If the connection succeeds, you are all set. If it fails, double-check your firewall rule and make sure the OpenSSH service is running. You can also verify that the correct port is open by using the telnet command or a network scanning tool.
Using SSH Keys for Better Security
Password-based logins are convenient, but SSH keys are much more secure. Here is a quick overview of how to set them up:
- Generate a key pair on your client machine using ssh-keygen.
- Copy the public key to your Windows 11 PC using ssh-copy-id or manually add it to C:\Users\YourName\.ssh\authorized_keys.
- Disable password authentication in the sshd_config file by setting PasswordAuthentication no.
- Restart the OpenSSH service and test your key-based connection.
SSH keys eliminate the risk of brute-force password attacks entirely. Even if someone guesses your password, they still cannot log in without the private key. This is the gold standard for secure remote access on any system.
Managing and Troubleshooting OpenSSH Server
Once your OpenSSH Server is up and running, you will occasionally need to manage it or troubleshoot issues. Here are the most common scenarios and how to handle them.
Common Commands for Managing the Service
- Start the service:
Start-Service sshd - Stop the service:
Stop-Service sshd - Restart the service:
Restart-Service sshd - Check service status:
Get-Service sshd
Troubleshooting Tips
- Connection refused: Make sure the OpenSSH service is running and the firewall rule is correct.
- Authentication failed: Double-check your username and password, or verify your SSH key is properly installed.
- Timeout errors: Check your network connection and make sure port 22 (or your custom port) is not blocked by a router or ISP.
- Permission denied: Ensure you are editing the sshd_config file with administrator privileges.
- Windows Update issues: Sometimes updates can reset your configuration. Keep a backup of your sshd_config file.
For ongoing maintenance, consider keeping your system updated with the latest Windows 11 patches. A well-maintained system with 16GB of RAM handles SSH connections smoothly even under heavier workloads. If you are running a development environment, look into a 16GB RAM Windows 11 laptop for reliable performance during remote sessions.
Security Best Practices for OpenSSH Server
Running an SSH server exposes your PC to the network, so security should always be a top priority. Follow these best practices to keep your system safe:
- Use SSH keys instead of passwords whenever possible.
- Change the default port from 22 to reduce automated scan attempts.
- Disable root login to prevent direct administrative access.
- Limit login attempts using the MaxAuthTries setting.
- Keep Windows 11 updated to patch any security vulnerabilities.
- Use a strong firewall and restrict access to trusted IP addresses only.
- Disable password authentication once your SSH keys are set up.
- Monitor your logs regularly for suspicious activity.
Taking these precautions does not take much time, but they make a huge difference in protecting your system. A few minutes of setup now can save you from serious security headaches later.
Conclusion
Installing OpenSSH Server on Windows 11 is a straightforward process that opens up powerful remote management capabilities. You learned how to install it through Settings, PowerShell, or Command Prompt. You also discovered how to start the service, configure key settings, set up firewall rules, test your connection, and harden your security with SSH keys.
The beauty of OpenSSH is that it comes built right into Windows 11, which means no extra downloads or third-party tools are needed. Whether you are managing files remotely, automating tasks, or learning about network protocols, OpenSSH gives you a secure, encrypted connection every time. Follow the security best practices in this guide, and you will have a rock-solid remote access setup that keeps your data safe.
Now that you have OpenSSH Server running on your Windows 11 machine, try connecting from another device and explore what remote management feels like. Once you get comfortable with it, you will wonder how you ever managed without it. Happy connecting.
Frequently Asked Questions
Is OpenSSH Server free to use on Windows 11?
Yes, OpenSSH Server is completely free and built directly into Windows 11. You do not need to download anything or pay for any licenses. It is an optional feature that Microsoft includes with the operating system.
What port does OpenSSH Server use by default?
The default port for OpenSSH Server is 22. You can change this port in the sshd_config file if you want to use a different one. Just remember to update your firewall rule to match whichever port you choose.
Can I install OpenSSH Server on Windows 10?
OpenSSH Server is available as an optional feature starting with Windows 10 version 1809 and later. The process is very similar to Windows 11. You can use Settings, PowerShell, or Command Prompt to install it on Windows 10 as well.
Do I need administrator rights to install OpenSSH Server?
Yes, you need administrator rights to install and configure OpenSSH Server. The installation process requires elevated permissions, and editing the sshd_config file also requires administrator access.
How do I uninstall OpenSSH Server from Windows 11?
You can uninstall OpenSSH Server by going to Settings, then Apps, then Optional features. Find “OpenSSH Server” in the list, click it, and select Uninstall. You can also remove it using PowerShell with the Remove-WindowsCapability command.
Is it safe to expose OpenSSH Server to the internet?
Exposing OpenSSH Server directly to the internet carries risks. You should use strong authentication methods like SSH keys, change the default port, and restrict access through your firewall. For most users, keeping SSH access limited to your local network is the safest approach.