Activate Camera with Turn Indicator Without Trailer
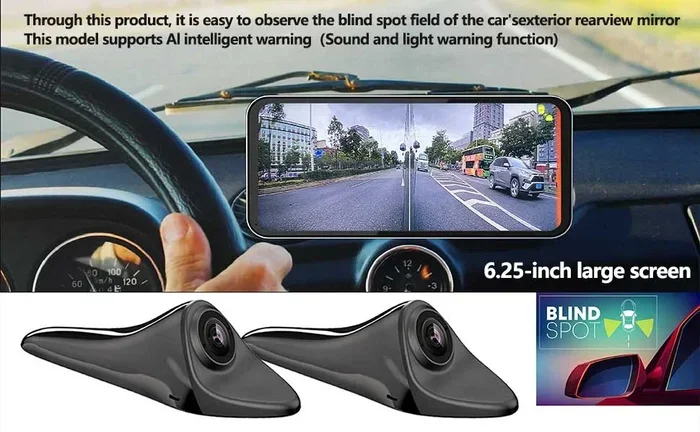
Activating a camera with your turn indicator gives you a clear view when you signal a lane change or turn. You can set this up even without a trailer by tapping into your vehicle backup or side-view system. This guide explains the wiring, safety benefits, and simple steps to make it work. You will also learn what parts you need and how to avoid common mistakes.
Driving feels safer when you can see what is beside you before you move over. A turn signal is already part of your daily routine, so using it to wake up a camera makes a lot of sense. In this guide, we will show you how to activate camera with turn indicator without trailer and keep the setup simple, reliable, and useful.
You do not need a big towing setup to benefit from this idea. Many drivers want extra visibility for lane changes, parking, and tight turns. With the right camera and a clean wiring plan, you can link activation to your signal switch or indicator circuit. We will walk through the why, the what, and the how so you can decide if this is right for your vehicle.
Key Takeaways
- Simple signal trigger: You can use the turn indicator circuit as a camera activation cue without a trailer.
- Safety first: A side-view or mirror camera helps you spot blind spots during lane changes.
- Right parts matter: Choose a camera, trigger module, and wiring that match your vehicle.
- Clean installation: Plan wire routes, protect connections, and test before final mounting.
- Legal and safe use: Keep the system focused on safety and avoid distracting displays while driving.
- Test and tune: Verify activation timing, image clarity, and night performance after install.
- Maintenance helps: Check connections, lenses, and power sources regularly for reliable use.
📑 Table of Contents
Why Link a Camera to Your Turn Signal
A turn signal tells other drivers what you plan to do. It also gives you a natural moment to check your blind spot. If a camera turns on at that same moment, you get a second set of eyes right when you need it. This can be especially helpful on busy roads, in rain, or when your mirrors do not show enough.
The idea is simple. You signal, the camera wakes up, and your screen or mirror display shows the side view. Then the camera can stay on for a short time or until you cancel the signal. That timing matters because you want help during the move, not a distraction after it.
Safety Benefits You Can Expect
A camera linked to your signal can reduce guesswork. It can show a car, bike, or pedestrian that sits just outside your mirror view. It can also help when your mirror is blocked by passengers, cargo, or weather.
Here are a few common benefits:
- Better lane change awareness
- Clearer view in tight turns
- Extra confidence in bad weather
- Less reliance on head movement alone
Of course, a camera is a helper, not a replacement for good driving habits. Use it to confirm what you see, not to replace checking your mirrors and looking around.
Good Use Cases Without a Trailer
You may not tow anything, but you can still benefit from this setup. For example, a side-view camera can help on narrow streets or busy highways. It can also help when you drive a taller vehicle and have more blind area to manage.
Some drivers want this feature for daily commuting. Others want it for work vehicles that make frequent stops and turns. Either way, the same basic idea applies. You want the camera to turn on when you signal, even without a trailer attached.
What You Need to Make It Work
Before you start, gather the right parts and tools. The exact items depend on your vehicle and the camera you choose. Still, the core pieces are usually similar.
Here is a basic checklist:
- A compatible camera that works with your display or monitor
- A trigger or relay module to connect the signal circuit to the camera
- Wiring and connectors that match your vehicle’s electrical system
- Fuses and protection to keep the install safe
- Mounting hardware for the camera location you choose
- Basic tools such as wire strippers, electrical tape, zip ties, and a multimeter
Camera Types That Fit This Idea
Not every camera is right for this job. You want something that can activate quickly and give a useful side view. A small wide-angle camera often works well because it shows more of the area beside you.
Some people mount the camera near the side mirror. Others place it on the bumper corner or behind a small grille opening. The best spot depends on what you want to see and how your vehicle is shaped.
If you already use a rear or backup setup, you may want to compare options. For example, a rear view camera with sensors can add distance awareness, while a side camera focuses on lane visibility. Different goals call for different hardware.
Trigger Options and Wiring Basics
The trigger is what tells the camera to turn on when you use the signal. In simple terms, the turn indicator circuit can send a signal to a relay or control module. That module then powers the camera for the needed moment.
You do not need a trailer plug for this. Instead, you are using the vehicle’s own signal wiring as the trigger source. That is the core of how to activate camera with turn indicator without trailer. The trick is doing it cleanly and safely.
A few common approaches include:
- Relay-based trigger: A relay switches the camera power when the signal is active.
- Small control module: A module handles timing and keeps the camera on only when needed.
- Integrated display logic: Some screens can be set to show a camera when a signal input is active.
Whichever method you choose, make sure the power source and ground are solid. Weak connections can cause flickering, late activation, or no activation at all.
Planning the Install Step by Step
A good install starts with a plan. Do not rush into cutting or splicing. First, decide where the camera will go, where the wire will run, and how you will protect the connections.
Step 1: Choose the Camera Location
Pick a spot that gives a useful side view without creating new blind spots. The camera should not block your mirrors, lights, or sensors. It should also be placed where dirt and water are less likely to cause trouble.
Before mounting, test the view if possible. A temporary placement can help you confirm the angle. If the image is too narrow or too high, adjust before you finalize anything.
Step 2: Map the Wire Route
Plan the path from the camera to the display or control module. Then plan the trigger wire route to the signal circuit. Keep wires away from hot parts, moving parts, and sharp edges.
Use existing grommets or openings when you can. If you need to pass through metal, protect the wire with a sleeve or loom. Secure the run with zip ties so it does not flap or rub over time.
Step 3: Connect Power and Ground
A stable power connection matters. Use the proper fuse protection and connect to a clean ground point. If the camera needs constant power, switched power, or both, follow the camera’s instructions closely.
This is a good time to double-check polarity. A reversed connection can damage electronics or cause strange behavior. Take your time and verify everything before you button things up.
Step 4: Wire the Turn Signal Trigger
This is the key step for the project. You want the camera to activate when the signal is on, without affecting normal indicator operation. That usually means tapping into the signal circuit in a way that does not interfere with the lamps or flasher.
A relay or module can help isolate the camera circuit from the indicator circuit. That isolation is important because you do not want the camera setup to change how the signal behaves. If you are unsure, check the vehicle wiring diagram or get help from a qualified installer.
If you want to understand more about indicator-related camera use, you may find it helpful to read about how to turn on a backup camera while driving. Different systems have different rules, but the general idea of safe activation timing is similar.
Step 5: Test Before Final Mounting
Do not seal everything up too early. Turn on the vehicle, use the signal, and confirm the camera activates as expected. Check both left and right signals if your setup supports them.
Look for these signs of a good test:
- Camera turns on when the signal is active
- Image appears clearly on the display
- No flicker or intermittent loss
- Signal lights still work normally
If anything looks off, fix it now. It is much easier to adjust wiring before you hide it behind panels or trim.
Tuning the Activation and Display
Once the hardware works, focus on how it behaves while you drive. The goal is helpful timing, not constant distraction. You want the camera to appear when the signal is active and then disappear cleanly when it is not.
Keep the Display Useful, Not Overwhelming
A screen that pops up at the wrong time can be annoying. If your display allows settings, adjust when the image appears and how long it stays visible. Some systems let you set a short delay after the signal ends. That can be useful if you want the view to remain for a moment after you cancel the signal.
Also think about brightness. A display that is too bright can pull your attention away from the road. A display that is too dim may not help at all. Find a balance that works in daylight and at night.
Night Vision and Weather Performance
A camera should help in more than perfect conditions. Check how it performs at night and in rain. Lens quality, lighting, and angle all matter. A camera that looks great in the garage may not be as useful on a dark road.
Keep the lens clean. Mud, road spray, and dust can ruin the image fast. If the camera sits near the front corner of the vehicle, it may get hit by gravel or spray more often. Plan for easy inspection and cleaning.
If your vehicle already uses a mirror display, you might also look into options like a Velvac RV mirror with camera for a more integrated view. Different setups can change how the image appears and how much space it takes on your dash or mirror.
Common Mistakes to Avoid
This project is straightforward when planned well, but a few mistakes show up often. Avoiding them can save time and prevent frustration.
Mistake 1: Poor Wire Protection
Loose wires can rub, chafe, or short out. Always secure and protect the wiring. Use loom, tape, or sleeving where needed, especially near metal edges or moving parts.
Mistake 2: Weak or Unstable Power
A camera that turns on and off randomly often points to a power issue. Check the fuse, ground, and connector quality. A solid connection is worth the extra care.
Mistake 3: Blocking Important Views
A camera mount can accidentally block a light, sensor, or mirror view. Before finalizing placement, look at the vehicle from several angles. Make sure the new part helps more than it hinders.
Mistake 4: Ignoring Signal Behavior
If the indicator starts acting oddly, the trigger wiring may be interfering. That is a sign to stop and recheck the connection. The signal should still flash normally and do its job.
Mistake 5: Skipping the Test Drive
A bench test is not enough. Drive slowly in a safe area and see how the camera behaves during real signaling. You may notice angle issues, glare, or timing problems that were not obvious at rest.
Quick Tips for a Better Setup
Here are a few practical tips that can make the system more reliable and more useful:
- Start with a clear goal: Decide whether you want lane-change help, turn visibility, or both.
- Keep wiring tidy: A clean install is easier to troubleshoot later.
- Use quality connectors: Good connections reduce future headaches.
- Check the angle often: Small changes in camera angle can make a big difference.
- Test in different light: Day, dusk, and night all reveal different issues.
- Keep it simple: If a setup feels overly complicated, simplify it.
If you are comparing different camera ideas for your vehicle, it can help to look at related installations too. For example, some drivers explore a backup camera for trailer hitch setups, while others want side visibility for daily driving. The best choice depends on where you need to see and how you use the vehicle.
Expert Insights worth Considering
Experienced installers usually say the same thing: plan the visibility first, then build the wiring around it. A great camera in the wrong spot will not help much. A modest camera in the right spot can be very useful.
Another common insight is to keep the activation logic simple. If the system is hard to understand, it is harder to trust. A clean trigger, clear display behavior, and reliable power are more valuable than fancy extras you rarely use.
It also helps to think about long-term use. Can you reach the lens for cleaning? Can you inspect the wire if a warning light appears? Will the mount survive weather and vibration? These questions matter because a good setup should still work months later, not just on install day.
Key Takeaways
- Plan the view first: Choose a camera location that actually helps during turns and lane changes.
- Use a clean trigger: A relay or control module can link the signal to the camera without disrupting normal indicator use.
- Protect the wiring: Secure, fuse, and insulate every important connection.
- Test early and often: Verify activation, image quality, and signal behavior before finalizing the install.
- Keep it driver-friendly: Make sure the display helps without becoming a distraction.
- Maintain the system: Clean the lens, check connections, and recheck the view from time to time.
If you want a safer, more confident feel when you signal, this is a practical upgrade to consider. With the right camera, a sensible trigger setup, and careful wiring, you can activate camera with turn indicator without trailer and make your daily driving easier to manage. Take your time, test each step, and build a system that helps you see more when it matters most.
Frequently Asked Questions
Can I activate a camera with the turn signal if I do not tow a trailer?
Yes. You can use the vehicle’s own signal circuit with a relay or control module to trigger the camera. The setup does not require a trailer as long as the wiring and camera are compatible.
Will this affect how my turn signals work?
It should not if the trigger is wired correctly. A good relay or isolated module keeps the camera circuit separate so the signal lights still flash normally.
Where is the best place to mount the camera?
The best spot gives a clear side view without blocking mirrors, lights, or sensors. Many drivers mount it near the side mirror or at the front corner of the vehicle, depending on the view they want.
Do I need a special display for this to work?
Not always. Some setups work with an existing monitor, while others need a display that can show the camera when triggered. Check the camera and display requirements before buying parts.
What if the camera turns on too late or stays on too long?
That usually means the trigger timing or display settings need adjustment. A control module or system setting can often fix the delay and shutoff behavior.
Is this setup hard to install for a beginner?
It can be manageable if you are comfortable with basic wiring and testing. The hardest part is usually planning the wire route and making solid, protected connections. If you are unsure, get help from a qualified installer.