Are Helmet Cameras Illegal in California
Helmet cameras are generally legal in California, but strict rules apply to how you use them while riding. You must avoid obstructing your vision, keep both hands on the handlebars, and follow local traffic laws. Understanding these rules helps you capture great footage without risking fines or safety.
Key Takeaways
- Helmet cameras are allowed: California law does not ban helmet cameras outright.
- Vision must stay clear: Mounts cannot block your view of the road ahead.
- Hands must stay on handlebars: You cannot operate the camera while riding.
- Local rules may vary: Cities and counties can add their own restrictions.
- Safety comes first: Poorly mounted cameras can become dangerous projectiles.
- Insurance may be affected: Distracted riding could impact accident claims.
- Check your helmet type: Full-face and open-face helmets may need different mounts.
📑 Table of Contents
- Are Helmet Cameras Illegal in California?
- What California Law Says About Helmet Cameras
- Where You Can Mount a Helmet Camera
- What You Cannot Do With a Helmet Camera
- Common Mistakes Riders Make
- How to Stay Safe and Legal While Riding
- Do Other States Have Different Rules?
- Helmet Camera Setup Comparison
- Final Thoughts on Helmet Cameras in California
Are Helmet Cameras Illegal in California?
Riding a motorcycle is one of the best ways to feel the open road. Many riders want to capture those moments. A small camera on your helmet seems like a perfect solution. But you might wonder, are helmet cameras illegal in California? The short answer is no. The state does not ban them outright. However, the rules around them matter a lot. You need to know how to mount them, when to use them, and what to avoid. This guide breaks down everything you need to know in plain language.
California has strict traffic laws. The state cares deeply about rider safety. A camera on your helmet can be safe if you set it up right. It can also be risky if you place it poorly. The key is to keep your focus on the road. You must never let the camera distract you. You also must never block your own view. Let us walk through the details so you can ride with confidence.
What California Law Says About Helmet Cameras
California law focuses on safe riding. The Vehicle Code does not mention helmet cameras by name. That means the law looks at how you use them. If a camera helps you record your ride without causing danger, it is usually fine. If it blocks your vision or takes your hands off the bars, it becomes a problem.
The state requires motorcyclists to keep a clear view of the road. Any device that gets in the way of that view can lead to trouble. Officers may cite you if they see a mount that sticks out too far. They may also stop you if the camera seems to distract you. The goal is simple. Keep your eyes on traffic. Keep your hands on the controls. Keep your mind on the ride.
You should also know that California follows the federal helmet law. All riders must wear a properly fitted helmet. That rule does not change with a camera on board. You still need to wear a legal helmet that meets safety standards. The camera just sits on top of that requirement. It does not replace it. It does not override it.
Clear Vision Rules
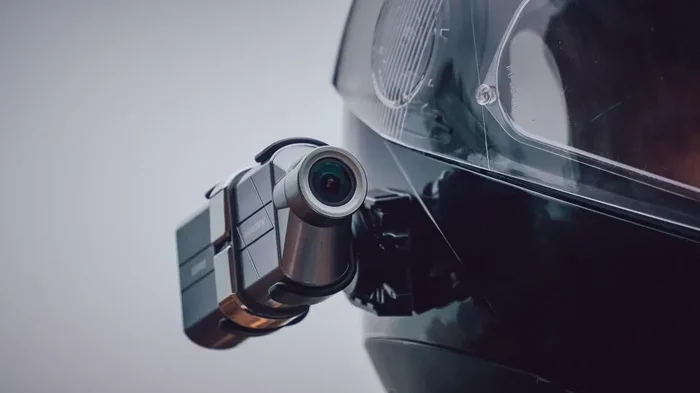
Your helmet protects your head. It also frames your view. A camera mount should never sit in your line of sight. If you look forward and see the camera body, that is a red flag. The lens should face outward. The mount should sit low or to the side. You want a clean view of the road, signs, and other vehicles.
A good test is simple. Put on your helmet. Look straight ahead. Look left and right. If the camera blocks any of those views, move it. Small adjustments make a big difference. You can also ask a friend to check your setup. A second pair of eyes often spots issues you miss.
Hands-On Handling Rules
California expects riders to keep both hands on the handlebars. You cannot tap the camera to start recording while moving. You cannot twist a dial in traffic. You cannot check the screen while riding. These actions take your focus off the road. They also break the hands-on rule.
The safest habit is to set everything before you roll. Start the recording before you pull out. Stop it after you park. Use voice controls if your setup supports them. If your camera needs manual input, wait until you are fully stopped. This keeps you legal and safe.
Where You Can Mount a Helmet Camera
Placement matters more than the camera itself. A well-placed camera captures smooth footage. A poor placement creates shaky video and safety risks. You have a few common spots to choose from. Each spot has pros and cons.
Top Mount
A top mount sits on the crown of the helmet. It often gives a natural view of the road ahead. It also keeps the lens away from your face. The downside is wind resistance. A top mount can catch more air. It may vibrate more on rough roads. You need a sturdy clamp and good padding.
Side Mount
A side mount sits near your temple or ear area. It can capture a wider view of the lane and traffic beside you. It often looks less bulky. The risk is closer proximity to your head. You must use a soft, secure bracket. Avoid hard plastic edges near your skin. Check that the mount does not rub against your helmet shell.
Chest or Handlebar Alternatives
Some riders prefer a chest mount or a handlebar mount. These options keep the helmet lighter. They also reduce the chance of blocking your view. A chest mount gives a rider-focused perspective. A handlebar mount shows the road and the controls. Both can work well. The choice depends on the footage you want.
If you still want a helmet camera, you can compare setups. A helmet mount gives a first-person view. A chest mount gives a stable, centered view. A handlebar mount gives a broader road view. Think about your goal before you buy.
Quick Tips for Mounting
– Use soft padding between the mount and helmet shell.
– Tighten screws by hand first, then check with a tool.
– Avoid drilling into the helmet unless the maker allows it.
– Test the setup on a short ride before a long trip.
– Check the mount after each ride for loose parts.
What You Cannot Do With a Helmet Camera
Just because a camera is allowed does not mean you can do anything with it. There are clear limits. These limits protect you and everyone else on the road.
No Obstructing Your View
A camera cannot sit where it blocks your sight. That rule is firm. If a mount sticks out too far, it can catch glare or block a sign. It can also distract you when light hits the lens. Keep the camera low and tight. Use a small lens if possible. A compact setup often works better than a large one.
No Touching the Camera While Riding
You cannot adjust the camera while the bike is moving. That includes pressing record, changing angles, or checking playback. These actions split your attention. They also break the hands-on rule. If you need to change settings, pull over safely first.
No Distracting Lights or Sounds
Some cameras have status lights or alerts. Bright lights can reflect inside your helmet. Loud beeps can distract you in traffic. Keep alerts low. Use a mute option if available. You want the camera to record, not to interrupt your focus.
No Unsafe Modifications
Never cut or drill into a helmet unless the maker says it is safe. A damaged helmet may not protect you in a crash. A weak mount can also fall off at speed. That creates a new hazard. Use approved brackets and sticky pads made for helmets. Stick to safe, reversible methods.
Common Mistakes Riders Make
Even experienced riders make simple errors. These mistakes can lead to poor footage or safety issues. Here are the most common ones.
- Placing the camera too high: This can block your view and catch more wind.
- Using a loose mount: A shaky bracket causes jittery video and can fall off.
- Ignoring wind noise: A bad mount can increase helmet noise and fatigue.
- Starting recording late: You miss the best moments if you wait until you are moving.
- Forgetting battery life: Long rides need more power. Plan ahead.
- Not checking local rules: Some areas add their own limits on devices or mounts.
Common Mistakes to Avoid
– Do not mount the camera where glare hits the lens.
– Do not use heavy accessories that strain the helmet.
– Do not assume a mount fits every helmet model.
– Do not forget to secure cables away from your neck and chin.
– Do not rely on a single screw for support.
How to Stay Safe and Legal While Riding
Safety comes first. Legal use comes second. When both align, you get great footage and peace of mind. Here is a simple plan you can follow.
Before You Ride
Pick a mount that fits your helmet shape. Test it on a stand first. Make sure the lens faces forward without blocking your sight. Start the recording before you move. Check battery levels and storage space. Clear your helmet area of loose items. A tidy setup reduces noise and distractions.
During the Ride
Keep both hands on the bars. Ride as you normally would. Let the camera do the work. Do not look at the screen. Do not adjust the angle in traffic. Stay aware of cars, signs, and road conditions. If you need to change something, find a safe place to stop.
After the Ride
Turn off the camera. Remove the mount if you store the helmet in a warm or tight space. Heat and pressure can affect some adhesives over time. Inspect the mount for wear. Tighten any loose parts. Back up your footage soon after the ride. Fresh files are easier to organize and review.
Expert Insights
– A compact camera often works better than a bulky one.
– Soft mounts reduce vibration and helmet noise.
– Pre-ride checks save time and prevent mid-ride fixes.
– A simple setup beats a complex one for most riders.
– Review local rules before you ride in a new city or county.
Do Other States Have Different Rules?
California is not the only place with rules about helmet devices. Other states handle them in different ways. Some focus on vision. Some focus on distractions. Some leave it to local agencies. If you travel with your camera, learn the local rules first.
For example, some riders ask about are helmet cameras illegal in California when they also travel to nearby states. Rules can change at the border. A setup that works here may need adjustments elsewhere. Always check the local traffic code before a long trip. A quick search can save you a ticket or a bad stop.
You may also see questions about other camera laws in daily life. People often ask about cameras in classrooms in California, or workplace camera rights in California. Those topics deal with privacy and location rules. They are different from motorcycle helmet use. Still, they show how California thinks about cameras in public and private spaces. The theme stays the same. Use cameras responsibly. Respect the setting. Follow the law.
Helmet Camera Setup Comparison
Different setups serve different goals. This table gives a quick look at common options.
| Setup | View Style | Pros | Cons |
|---|---|---|---|
| Helmet top mount | Forward road view | Natural angle, stable | More wind, possible vibration |
| Helmet side mount | Wide lane view | Compact, less face obstruction | Closer to head, needs soft bracket |
| Chest mount | Rider-centered view | Light helmet, steady footage | Different perspective, less first-person feel |
| Handlebar mount | Road and controls view | Easy to adjust, stable | Shows handlebars, not helmet view |
Final Thoughts on Helmet Cameras in California
So, are helmet cameras illegal in California? No, they are not banned. You can use one if you set it up safely. Keep your view clear. Keep your hands on the bars. Keep your focus on the road. Avoid loose mounts, bright distractions, and unsafe changes to your helmet. Follow these simple steps and you can record your rides with confidence.
A good helmet camera setup should feel invisible while you ride. It should not change how you steer, brake, or look around. It should simply capture the journey. Take your time when choosing a mount. Test it before a long ride. Check it often. Ride safe, stay legal, and enjoy the road.
Frequently Asked Questions
Are helmet cameras legal in California?
Yes, helmet cameras are generally legal in California as long as they do not block your view or distract you while riding. You must keep both hands on the handlebars and follow all traffic laws.
Can I mount a camera on any motorcycle helmet?
Most helmets can work with a camera mount, but the setup must fit the helmet shape and stay secure. Avoid drilling or cutting the helmet unless the manufacturer says it is safe.
Do I need to turn off the camera while riding?
You do not need to turn it off, but you should start and stop it only when you are parked or before you move. You should not touch the camera while the motorcycle is moving.
What happens if the camera blocks my vision?
If the mount blocks your line of sight, an officer may consider it unsafe and could cite you. Keep the camera low and tight so your view stays clear in all directions.
Are there local rules that affect helmet cameras?
Yes, some cities or counties may add their own limits on devices or mounts. It is smart to check local traffic rules before riding in a new area.
Can a helmet camera affect my insurance after a crash?
It could matter if the camera setup contributed to distracted riding or an unsafe mount. A safe, legal setup is the best way to protect yourself and your claim.