Bahtinov Mask for Camera Lens
Looking to nail razor‑sharp stars and crystal‑clear details? A Bahtinov mask for camera lens is the secret tool that many astrophotographers swear by. This guide walks you through how it works, why it matters, and how to pick the perfect mask for your gear—all in friendly, easy‑to‑read language.
Key Takeaways
- What it is: A Bahtinov mask is a diffraction pattern that helps you achieve perfect focus on any camera lens.
- Why use it: It gives an instant visual cue, making manual focusing fast and accurate, especially in low‑light situations.
- Compatibility: Masks are sold for specific focal lengths and filter thread sizes, so measure your lens before buying.
- DIY option: You can print or laser‑cut your own mask for a fraction of the cost.
- Versatility: While famed for astrophotography, the mask also sharpens macro, landscape, and night‑city shots.
- Care tips: Keep the mask clean, store it flat, and avoid scratching the pattern.
- Best accessories: Pair it with a sturdy tripod, a good camera backpack for hiking, and reliable SD cards for long sessions.
📑 Table of Contents
- Introduction: Why Focus Matters More Than You Think
- 1. The Science Behind the Bahtinov Mask
- 2. Choosing the Right Bahtinov Mask for Your Lens
- 3. How to Use a Bahtinov Mask Effectively
- 4. DIY Bahtinov Mask: Save Money and Customize
- 5. Maintaining Your Bahtinov Mask
- 6. Pairing the Bahtinov Mask with Other Gear
- Conclusion: Is a Bahtinov Mask Worth It?
Introduction: Why Focus Matters More Than You Think
Imagine pointing your camera at a glittering night sky, pressing the shutter, and ending up with a blurry mess of stars. Frustrating, right? The culprit is usually focus—especially when you’re shooting without autofocus help. This is where the Bahtinov mask for camera lens shines. Originally designed for telescopes, the mask creates a distinctive diffraction pattern that tells you instantly when your lens is perfectly focused.
Whether you’re an amateur astronomer, a macro enthusiast, or just someone who loves crisp night‑city silhouettes, the Bahtinov mask can save you time and headaches. In the next few sections we’ll break down the science, show you how to choose and use a mask, and share practical tips that feel like a chat with a knowledgeable friend.
1. The Science Behind the Bahtinov Mask
How Diffraction Becomes Your Focusing Friend
The mask is a thin sheet of metal or sturdy plastic with three sets of fine, angled slits. When light passes through, it diffracts and forms three bright spikes on a bright object (like a star). The middle spike should line up perfectly between the two side spikes when focus is spot‑on. If the spikes are misaligned, you know you’re out of focus and which direction to turn the focus ring.
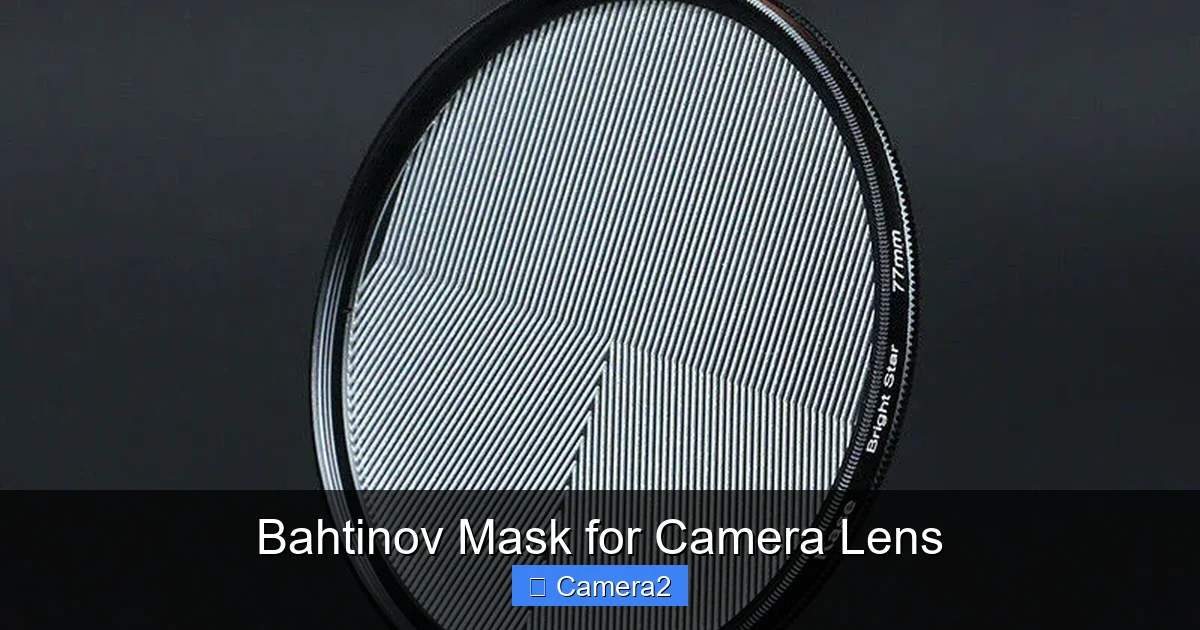
Visual guide about Bahtinov Mask for Camera Lens
Image source: bahtinovmask.com
Why It Works for Any Lens
Even though the mask was born for telescopes, the principle works on any camera lens that can capture a point source of light. The key is a clear, bright target—whether it’s a star, a streetlamp, or a distant LED. The pattern appears on the live view or in a quick test shot, giving you a visual cue that’s far more reliable than “turn the knob until it looks sharp.”
2. Choosing the Right Bahtinov Mask for Your Lens
Measure Your Filter Thread Size
Most masks screw onto the front of the lens just like a filter. Look at the edge of your lens; you’ll see a number like “77 mm” or “58 mm.” That’s the thread size you need. Buying a mask that’s too small won’t fit; too big will wobble and ruin the diffraction pattern.
Match the Focal Length
Some manufacturers sell “universal” masks that work across a range of focal lengths, but the sharpest pattern comes from a mask designed for your specific focal length (e.g., 50 mm, 85 mm, 200 mm). If you own multiple lenses, consider a set of masks or a modular design that lets you swap the aperture plate.
Material Matters
- Aluminum: Durable, lightweight, and resists warping. Great for frequent field use.
- Stainless steel: Heavier but extremely sturdy; ideal for rugged environments.
- Plastic (PETG or acrylic): Cheap and easy to print at home, but can flex under wind.
Budget vs. Premium Options
If you’re just testing the waters, a printable design from a free online source can cost under $5 in material. For professional work, a machined aluminum mask from a reputable brand may run $30‑$50 but will last a lifetime.
3. How to Use a Bahtinov Mask Effectively
Step‑by‑Step Focusing Routine
- Attach the mask: Screw it onto the lens just like a filter. Make sure it’s snug.
- Find a bright point source: For astrophotography, a bright star; for city shoots, a streetlamp; for macro, an LED on a reflective surface.
- Zoom in on live view: Use 100 % magnification if your camera allows it.
- Observe the spikes: The middle spike should sit exactly between the two side spikes.
- Adjust focus: Turn the focus ring slowly. When the spikes align, you’re at perfect focus.
- Take a test shot: Verify the sharpness on the computer. If needed, fine‑tune.
- Remove the mask: Unscrew carefully and store flat.
Tips for Different Shooting Scenarios
- Astrophotography: Use a sturdy tripod, a remote shutter release, and a tracking mount if possible. Combine the mask with a good camera backpack for hiking to protect your gear on remote sites.
- Macro: Place a tiny LED behind the subject. The mask will work the same way as with a star.
- Night‑cityscape: Aim at a distant illuminated billboard. The mask helps nail focus on far‑away lights.
4. DIY Bahtinov Mask: Save Money and Customize
Materials You’ll Need
- Thin sheet metal (0.5 mm aluminum) or sturdy clear PETG plastic.
- Laser cutter or CNC mill (many makerspaces have them).
- Threaded adapter matching your lens size (optional).
- Fine‑grit sandpaper for edge cleanup.
Design Sources
Websites like Thingiverse host free STL files for Bahtinov masks. Search for “Bahtinov mask 77mm” to find a design that matches your lens. Download, slice, and print or cut.
Visual guide about Bahtinov Mask for Camera Lens
Image source: nailzypakistan.com
Step‑by‑Step DIY Process
- Download the STL file and open it in your slicer software.
- Set layer height to 0.1 mm for crisp edges.
- Print on PETG for a balance of flexibility and durability.
- After printing, remove any support material and sand the edges.
- Attach a threaded ring using a small set screw or epoxy.
- Test on a bright light source; adjust the slits if needed.
When to Upgrade to a Commercial Mask
If you notice warping, uneven spikes, or if the mask rattles in windy conditions, it’s time to invest in a machined version. Professional masks retain their shape better and often come with a protective case.
5. Maintaining Your Bahtinov Mask
Cleaning Routine
Dust and fingerprints can blur the diffraction pattern. Use a soft microfiber cloth and a few drops of lens‑cleaning solution. Avoid abrasive wipes.
Storage Solutions
Store the mask flat in a padded case. Many manufacturers sell a small fabric pouch; otherwise, a lens case works fine. Keep it away from magnets that could attract metal dust.
Common Issues and Fixes
- Mask wobbling: Tighten the screw or add a rubber O‑ring for a snug fit.
- Spikes not forming: Ensure the mask is clean and that you’re using a bright point source.
- Distorted pattern: Check for bends; gently flatten with a wooden block.
6. Pairing the Bahtinov Mask with Other Gear
Tripods and Mounts
A solid tripod eliminates camera shake, letting the mask do its job without interference. For long exposure astrophotography, a motorized equatorial mount is ideal.
Memory Cards for Long Sessions
When shooting deep‑sky stacks, you’ll capture hundreds of frames. A fast, high‑capacity SD card for trail camera works well for both speed and reliability.
Rear‑View Camera Monitors
If you’re mounting a camera on a vehicle for night‑time wildlife tracking, a monitor for rear view camera can display the live diffraction pattern without looking away from the road.
Conclusion: Is a Bahtinov Mask Worth It?
Short answer: absolutely, if you care about getting sharp focus quickly in low‑light situations. The Bahtinov mask for camera lens turns a tricky manual focus task into a visual game—align the spikes, click the shutter, and move on. Whether you buy a ready‑made aluminum mask, print your own, or start with a cheap plastic version, the investment pays off in sharper stars, crisper macro details, and fewer missed shots.
Remember to match the mask to your lens thread size, keep it clean, and pair it with sturdy support gear. With these habits, you’ll spend less time hunting for focus and more time capturing the night sky you’ve always dreamed of.
Frequently Asked Questions
What exactly does a Bahtinov mask do?
The mask creates a diffraction pattern of three spikes on a bright point source. When the middle spike lines up perfectly between the two side spikes, the lens is at optimal focus.
Can I use a Bahtinov mask on any camera lens?
Yes, as long as the lens has a filter thread that matches the mask’s size and you can view a bright point source, the mask will work.
Do I need a telescope to use a Bahtinov mask?
No. While it was invented for telescopes, the same principle applies to any camera lens, making it useful for astrophotography, macro, and night‑city shooting.
Is a DIY Bahtinov mask as good as a commercial one?
A well‑printed or laser‑cut DIY mask can perform admirably for hobby use. For professional work, a machined aluminum mask offers better durability and consistent diffraction patterns.
How often should I clean the mask?
Clean it whenever you notice dust or fingerprints affecting the spike pattern—usually after each shooting session in dusty environments.
Can the mask damage my lens?
No. The mask attaches like any filter and does not touch the glass. Just avoid forcing it onto the wrong thread size.