How Do You Get More Ram on a Laptop
Is your laptop feeling sluggish and struggling with multiple apps? Upgrading your RAM is one of the most cost-effective and impactful ways to significantly improve performance. This comprehensive guide explains how to determine if your laptop can be upgraded, how to select the correct memory, and provides a safe, detailed walkthrough for the installation process. Even if you’re not a technical expert, you can complete this upgrade and give your laptop a new lease on life.
You’re working on a important project, your browser is open with a dozen tabs, a spreadsheet is calculating, and a video call is about to start. Suddenly, your laptop grinds to a halt. The cursor becomes a spinning wheel of doom. We’ve all been there. The frustration is real. Before you start budgeting for a brand-new laptop, there’s a powerful, affordable, and often overlooked solution: upgrading your Random Access Memory (RAM). But how do you get more RAM on a laptop? The process is more straightforward than you might think, but it’s a journey that starts with knowledge, not a screwdriver. This guide will walk you through every single step, from the initial “can I even do this?” check to the final moment of powering on your revitalized machine. Think of it as a first-aid kit for your slow laptop.
Key Takeaways
- Not all laptops support RAM upgrades: Many modern ultrabooks and some business laptops have memory soldered directly to the motherboard, making upgrades impossible. Always verify your model’s upgradeability first.
- Compatibility is critical: You must match the RAM type (DDR3, DDR4, DDR5), speed (MHz), and form factor (SO-DIMM) to your laptop’s specifications. Using incompatible RAM will not work or can cause crashes.
- Capacity and configuration matter: For best performance, use matched pairs of RAM sticks in dual-channel mode (e.g., two 8GB sticks instead of one 16GB stick), especially for gaming and creative work.
- The installation process is simple but requires care: It typically involves removing a bottom panel, releasing clips, and inserting new modules. The key risks are electrostatic discharge (ESD) and physical damage to connectors.
- Always verify after installation: Use your operating system’s tools or dedicated software to confirm the new RAM is recognized and running at the correct speed before closing up your laptop.
- If you can’t upgrade internally, there are alternatives: Options include optimizing your current system, using ReadyBoost (Windows), or leveraging cloud/streaming solutions for memory-intensive tasks.
- A RAM upgrade can extend your laptop’s useful life by years: For a fraction of the cost of a new machine, adding 8GB or 16GB of RAM can transform an old, frustrating device into a capable tool for everyday work and entertainment.
📑 Table of Contents
- Understanding RAM and Why More Is Almost Always Better
- Step One: The Crucial Compatibility Check (Don’t Skip This!)
- Selecting the Right RAM: Decoding the Labels and Jargon
- The Step-by-Step Guide to Installing New RAM
- What If You Can’t Upgrade? Alternative Solutions
- Testing and Verifying Your Successful Upgrade
- When to Consider a New Laptop Instead
- Conclusion: Empowering Your Laptop’s Second Life
Understanding RAM and Why More Is Almost Always Better
Before we talk about *how* to get more RAM, let’s quickly establish *why* you’d want to. RAM is your laptop’s short-term, ultra-fast workspace. When you open an application or a file, your system pulls the necessary data from your slower storage drive (SSD or HDD) into the RAM. Your CPU then works directly with the data in RAM. The more RAM you have, the larger this workspace becomes. This means your laptop can keep more applications and files ready for instant access without constantly shuffling data back and forth to the storage drive—a process called “swapping” or “paging” that is a primary cause of slowdowns.
The Multitasking multiplier
Modern computing is about multitasking. You might have a word processor, a web browser with dozens of tabs (each a separate process), a music player, and a chat app all running at once. Each of these consumes a slice of your available RAM. With 4GB of RAM, you’re already at the limit with a modern operating system and a few browser tabs. With 8GB, you have comfortable breathing room for general use. With 16GB or more, you can tackle demanding tasks like photo editing, light video work, and running virtual machines without breaking a sweat. More RAM doesn’t make your CPU faster, but it removes a major bottleneck, allowing your existing CPU to work efficiently without waiting for data.
RAM vs. Storage: A critical distinction
A common point of confusion is the difference between RAM and storage (your SSD/HDD). Storage is for *keeping* things—your operating system, programs, documents, photos. It’s permanent memory. RAM is for *using* things—it’s the active, volatile workspace where everything happens right now. Upgrading storage to an SSD is the single biggest speed upgrade for an old laptop with a hard drive. Upgrading RAM is the next biggest. They solve different problems. An SSD makes loading and saving files faster; more RAM makes multitasking and working with large files smoother. You can have one without the other, but the best results come from having both.
Step One: The Crucial Compatibility Check (Don’t Skip This!)
This is the most important step. Buying the wrong RAM is a waste of money and can cause headaches. You cannot just pick up any laptop memory module. Laptops use a specific, smaller form factor called SO-DIMM (Small Outline Dual In-line Memory Module). Furthermore, the “generation” of RAM (DDR3, DDR4, DDR5) is not backward compatible. A DDR4 slot will not accept a DDR3 stick, and vice versa. The key is to discover exactly what your specific laptop model supports.
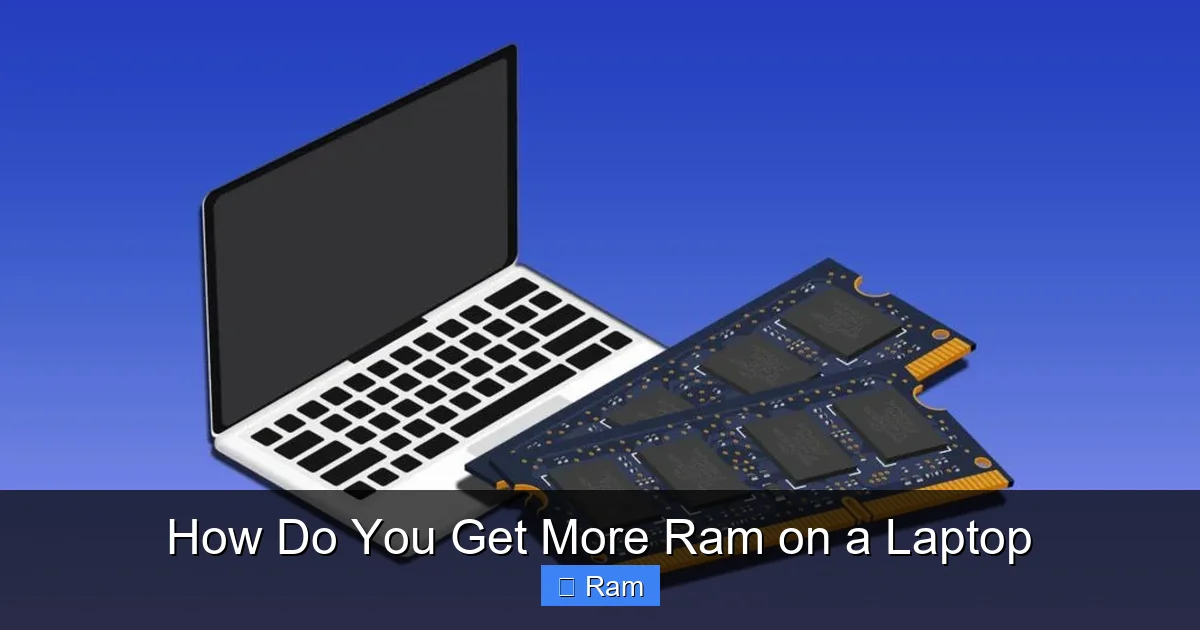
Visual guide about How Do You Get More Ram on a Laptop
Image source: techjunkie.com
Method 1: Use Your Laptop’s Existing Information
The easiest way is to use built-in system tools. On Windows, press Ctrl+Shift+Esc to open Task Manager, then go to the “Performance” tab and click on “Memory.” Here you’ll see the current RAM capacity, speed (e.g., 3200 MHz), and the form factor (almost certainly SO-DIMM). More importantly, look at the top right: it will often say “DDR4” or similar. This is your starting point. For more detailed specs, type msinfo32 into the Windows search bar and run it. In the System Summary, look for “Total Physical Memory” and the “System Model” line, which gives your exact laptop model number.
Method 2: The Manufacturer’s Website
Armed with your laptop’s exact model number (e.g., Dell XPS 13 9310, Lenovo ThinkPad T14 Gen 3, HP Spectre x360 14), go to the official support page for that manufacturer. Find the “Specifications” or “Tech Specs” sheet for your exact configuration. Look for sections titled “Memory,” “RAM,” or “Upgradeability.” It will state the maximum supported RAM (e.g., “Up to 32GB”), the type (DDR4-3200 SO-DIMM), and crucially, the number of slots. It might say “2 slots” or “1 slot, user-accessible” or “soldered.” If it says “soldered” or “integrated,” your RAM is not upgradeable. Period. If it lists slots, note the max per slot and total.
Method 3: Use a Trusted Third-Party Scanner
Websites like Crucial.com and Kingston.com have excellent system scanner tools. You download and run a small, safe application that analyzes your system’s hardware. It will tell you your current RAM configuration and, most valuably, show you a list of compatible upgrade modules specifically for your machine. This is a foolproof way to see exactly what will work, including options for different capacities and speeds within your laptop’s limits. It’s a great way to confirm your own research.
Method 4: The Physical Inspection (The Last Resort)
If you’re comfortable, you can physically open your laptop. This is usually necessary for the actual upgrade anyway. Power off, unplug, remove the battery if possible (many modern laptops have sealed batteries), and locate the bottom panel. Often held by 10-12 Phillips-head screws, sometimes with one under a rubber foot or a warranty sticker. Gently pry off the panel. Look for one or two long, narrow circuit boards (the RAM sticks) held down by small metal clips on either side. Note the label on the existing RAM—it will have the DDR type, size (e.g., 8GB), speed (e.g., 3200MHz), and part number. Take a clear photo. This is your ultimate compatibility reference.
Selecting the Right RAM: Decoding the Labels and Jargon
Now you know your laptop takes, for example, DDR4 SO-DIMM. But the product pages are full of numbers. Let’s break it down. The key specs are DDR Generation, Capacity, Speed (MHz), and Timing (CL).
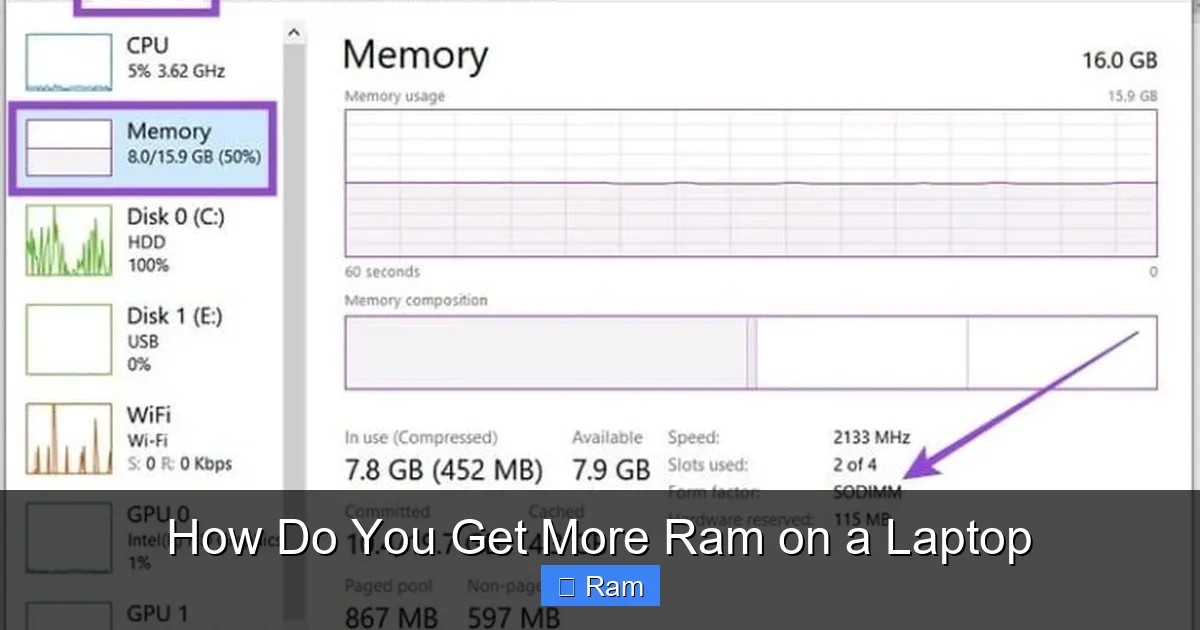
Visual guide about How Do You Get More Ram on a Laptop
Image source: techjunkie.com
DDR Generation: The Non-Negotiable
DDR3, DDR4, and DDR5 are physically and electrically different. You must buy the generation your laptop supports. DDR4 is the most common in laptops from roughly 2015-2022. DDR5 is found in very new, high-end models (2022+). DDR3 is for older machines (pre-2015). This is the first filter. Don’t even look at DDR5 modules if your scanner says DDR4.
Capacity: How Much Do You Need?
This is the most straightforward. For general web browsing, office work, and streaming, 8GB is the new absolute minimum. For comfortable multitasking with many browser tabs and some light creative work, 16GB is the sweet spot for most users. For serious photo/video editing, 3D rendering, running virtual machines, or high-end gaming, 32GB is the target. Check your laptop’s maximum supported capacity. If it maxes at 16GB, buying a 32GB kit is pointless. A practical tip: if you have 4GB now, jumping to 16GB is a massive leap. If you have 8GB, 16GB is a great upgrade. If you already have 16GB, consider if your tasks truly need 32GB.
Speed (MHz) and Timing (CL): The Fine Print
Speed, measured in megahertz (MHz), like 2666, 3200, or 4800, indicates how fast the RAM can operate. Your laptop’s chipset and CPU will support a maximum speed. If you buy 3200MHz RAM but your laptop’s maximum is 2666MHz, the RAM will simply run at 2666MHz—no problem, it’s backward compatible. Buying faster RAM than needed is usually fine and not a waste, as it will run at the system’s max speed. Timing, or CAS Latency (CL), is a measure of delay. Lower CL is better (e.g., CL16 vs CL18), but for most laptop users, the difference is negligible compared to the jump from 8GB to 16GB. Prioritize capacity and compatibility (DDR type) over chasing the absolute fastest timings.
Single vs. Dual Channel: The Performance Bonus
This is a key performance concept. If your laptop has two RAM slots and you install one stick, the RAM runs in single-channel mode. If you install two identical sticks (same capacity, speed, and ideally from the same kit), it runs in dual-channel mode. Dual-channel effectively doubles the data pathway between the RAM and the memory controller, leading to significant performance gains in integrated graphics (iGPU) performance and memory bandwidth-intensive tasks. The rule of thumb: if your laptop has two slots and you’re upgrading from a single stick, buy a matched pair (a “kit”) to replace both sticks for dual-channel performance. For example, if you have one 8GB stick and two slots, buying another identical 8GB stick is ideal. If you want 16GB total, buying a 2x8GB kit is better than a single 16GB stick (though a single 16GB stick will work and leave a slot free for future expansion).
Brands and Labels: What to Buy
Stick with reputable memory manufacturers: Crucial (Micron), Kingston, Samsung, SK Hynix, G.Skill, Corsair, Team Group. Buy from authorized sellers or directly from the brand to avoid counterfeit modules. When searching, use your laptop’s exact model number plus “RAM upgrade.” The product title should read something like: “Crucial 16GB DDR4-3200 MT/s SO-DIMM for Laptop.” The product page or Q&A section will often list compatible laptop models. When in doubt, use the scanner tools from Crucial or Kingston mentioned earlier—they eliminate guesswork.
The Step-by-Step Guide to Installing New RAM
You have your compatible RAM module(s) in hand. Now, the physical installation. This process is remarkably simple for most laptops, but it requires a calm, methodical approach and respect for static electricity. The entire process usually takes 10-20 minutes.
Visual guide about How Do You Get More Ram on a Laptop
Image source: techjunkie.com
Gather Your Tools and Prepare Your Workspace
- Tools: You typically need only a small Phillips-head screwdriver (#0 or #1). Some ultrabooks use pentalobe or tri-point screws; check your laptop’s manual or a teardown guide (like on iFixit) first.
- Workspace: A clean, well-lit, flat surface. Use a microfiber cloth or a large piece of paper as a non-scratch mat.
- ESD Protection (Crucial): Electrostatic discharge can fry sensitive electronics. The best method is to use an antistatic wrist strap clipped to a grounded metal object (like an unpainted radiator or the metal frame of your desk). If you don’t have one, frequently touch the bare metal of your laptop’s chassis (the exposed metal parts) or a grounded object to discharge static from your body before touching internal components. Work on a non-carpeted floor if possible.
Disassembly: Opening the Laptop
- Power Down Completely: Shut down your laptop fully. Do not just sleep or hibernate.
- Unplug Everything: Remove the charger, USB cables, docks, everything.
- Remove the Battery (If Possible): If your laptop has a removable bottom cover that gives access to the battery, disconnect the battery cable from the motherboard first. This is the ultimate safety step to prevent any power from flowing. If the battery is internal and sealed, this step is skipped, but you must be extra careful not to accidentally short anything.
- Remove the Bottom Panel: Locate all the screws around the laptop’s bottom edge. Some may be hidden under rubber feet or plastic covers. Keep screws in a small container, noting their lengths and positions, as they are often not all the same. Gently pry the plastic panel off using a plastic spudger or a guitar pick. Start at a corner and work your way around. It may click; use gentle, even pressure.
Locating and Replacing the RAM
Once the panel is off, you’ll see the motherboard and components. The RAM slots are easy to spot: they are long, narrow slots, usually parallel to each other, with small plastic retention clips on each end. The RAM sticks are held down by these clips.
- Identify Existing RAM: Note which slots are occupied. If upgrading, you may be replacing one stick or both.
- Release the Clips: Gently but firmly push the two small metal or plastic clips on either side of the RAM module outward (away from the module). They will pivot and pop up, releasing the stick. The module will tilt up at about a 30-degree angle.
- Remove the Old Stick: Grasp the RAM stick by its edges (avoid touching the gold contacts or the black chips). Pull it straight out of the slot at the same angle. Place it aside on your antistatic bag or cloth.
- Insert the New Stick: Take your new RAM module. Note the notch on the bottom edge—it’s not centered. This notch aligns with a small bump in the slot. It is keyed to only fit one way. Hold the module at the same 30-degree angle and align the notch with the slot. Firmly but evenly press the module straight down into the slot until the gold contacts are fully seated. You should feel it click into place.
- Secure the Clips: Gently push the retention clips back into their closed position. They should snap over the small notches on the sides of the RAM module, holding it flat against the motherboard. Ensure the stick is level and fully inserted.
- For Dual-Channel Kits: If installing two sticks, consult your laptop’s manual or look for silkscreen labels on the motherboard (often “CHANNEL A” and “CHANNEL B” or “DIMM1” and “DIMM2”). Install the sticks in the correct slots (usually the two slots furthest from the CPU or in specific colored slots). If unlabeled, a common rule is to install in the two black slots or the two slots closest to the CPU—checking an online guide for your specific model is wise.
Reassembly and First Boot
- Double-Check: Ensure nothing is loose, no tools are left inside, and the RAM is securely clipped in.
- Reconnect Battery (if disconnected): If you unplugged the battery, reconnect its cable to the motherboard first.
- Replace the Bottom Panel: Align it carefully and press it down until all clips snap back into place. Reinsert all screws, ensuring they are snug but not overtightened (plastic threads can strip).
- First Power-On: Plug in the charger (do not install the battery yet if it was removed). Press the power button. Your laptop should boot normally. It might take a moment on the first boot as the system configures the new memory. Don’t panic if it restarts once or twice—some systems do this.
- Verify in the OS: Once in Windows, go back to Task Manager > Performance > Memory. You should see the new total capacity (e.g., “16.0 GB”). Also, check the speed listed to ensure it matches your module’s rated speed (it might be slightly lower if your system defaults to a standard JEDEC speed).
What If You Can’t Upgrade? Alternative Solutions
What if you opened up your laptop only to find the RAM is soldered, or there’s only one slot and it’s already maxed out? Don’t give up hope. There are still several software-based and external strategies to improve performance, though none are as potent as a physical RAM upgrade.
System Optimization and Cleanup
Often, a slow laptop isn’t just about RAM capacity; it’s about what’s consuming it. A thorough cleanup can free up gigabytes of RAM instantly.
- Manage Startup Programs: Type “Startup Apps” in the Windows search bar. Disable everything you don’t need to run at boot (like Spotify, Adobe Reader, manufacturer utilities). This frees up RAM immediately after login.
- Check for Memory-Hogging Processes: In Task Manager, sort by “Memory” to see which apps are using the most. A runaway browser tab or a buggy application can consume gigabytes. Close unnecessary ones.
- Browser Tab Discipline: Modern web browsers are infamous RAM users. Use tab suspender extensions like “The Great Suspender” (be mindful of alternatives, as the original had issues) or “OneTab” to unload inactive tabs from memory.
- Adjust Visual Effects: Search for “Adjust the appearance and performance of Windows.” Select “Adjust for best performance” to disable fancy animations, which can save a small amount of system resources.
- Scan for Malware: Malicious software can run hidden processes. Run a full scan with Windows Defender or a trusted third-party antivirus.
Leverage Your SSD: Virtual Memory (Page File)
Windows uses a portion of your SSD as “virtual memory” or a page file when your physical RAM fills up. While an SSD is thousands of times slower than RAM, it’s still vastly faster than a traditional hard drive was. If you have an SSD, Windows is already using it for this purpose. You can manually manage the page file size for optimal performance. Go to Settings > System > About > Advanced system settings > Performance (Settings) > Advanced > Change (Virtual memory). Uncheck “Automatically manage,” select your SSD drive, and set a “Custom size.” A common recommendation is 1.5x your physical RAM for the initial size and maximum size (e.g., for 8GB RAM, set both to 12288 MB). This gives Windows more room to swap, preventing crashes when RAM is full, though it won’t make an overloaded system feel fast.
ReadyBoost (A Legacy Option)
ReadyBoost is a Windows feature that uses a fast USB flash drive or SD card as a cache to supplement RAM. It was more useful in the era of small RAM (2GB-4GB) and slow hard drives. With a decent SSD and 8GB+ of RAM, ReadyBoost provides no tangible benefit today and is generally not recommended. It’s a solution for a bygone era of computing.
Cloud and Streaming Solutions
For specific, RAM-intensive tasks, offload the work to a more powerful machine elsewhere. If you need to do heavy video editing but your laptop is RAM-limited, consider cloud-based editing platforms like Adobe Premiere Pro with cloud storage or simpler browser-based editors. For gaming, services like Xbox Cloud Gaming (Beta) or NVIDIA GeForce Now stream the game from powerful servers, requiring very little local RAM beyond the browser or app itself. This shifts the memory burden from your laptop to the cloud.
The Nuclear Option: A Lightweight Operating System
If your laptop is very old and cannot be upgraded, installing a lightweight Linux distribution like Lubuntu, Xubuntu, or Linux Mint XFCE can give it a new lease on life. These OSes use a fraction of the RAM that Windows 10/11 does (often 500MB-1GB at idle vs. 2-4GB for Windows). This can make a 4GB RAM laptop surprisingly usable for basic web browsing and document work. However, this involves a learning curve and potential software compatibility issues (e.g., some Microsoft Office features or Adobe apps won’t run natively).
Testing and Verifying Your Successful Upgrade
You’ve installed the new RAM and your laptop booted. Great! Now, verify it’s working correctly. Don’t just trust the OS’s initial report.
Quick OS Verification
We already used Task Manager. Also, go to Settings > System > About. Under “Device specifications,” it should list the installed RAM. This is a good first check.
Using CPU-Z for Detailed Specs
Download and run the free, trusted utility CPU-Z (from cpu-z.com). Navigate to the “Memory” tab and the “SPD” tab. The Memory tab will show your total size, type (e.g., DDR4), and size. The most important part is the “Channel #.” It should say “Dual” if you installed two matching sticks correctly. The SPD tab lets you click on each slot (Slot #1, Slot #2) to see the exact specifications of the module in that slot—its manufacturer, part number, size, and configured speed (MHz). This confirms both sticks are recognized and operating at their rated speed (or the system’s max).
Stress Testing with MemTest86
For absolute certainty that your new RAM is stable and error-free, run MemTest86. This is a free, bootable diagnostic tool that writes complex patterns to every bit of your RAM and reads them back to check for errors. A single error is a sign of a faulty module or, less commonly, a motherboard issue. Download the tool, create a bootable USB drive, boot from it, and let it run at least 4-6 passes (which can take hours). If it completes with zero errors, your RAM is solid. This is the gold standard for verification, especially after a DIY install.
Benchmarking Before and After
To feel and see the difference, run a benchmark before and after the upgrade. Use a tool like Cinebench R23 (CPU benchmark) or a memory-specific benchmark like SiSoftware Sandra. While CPU benchmarks won’t double in score, you’ll see improvement in memory latency and bandwidth tests. More importantly, you’ll feel the difference in real-world use: applications launching faster, smoother multitasking, and fewer stutters in games or while editing.
When to Consider a New Laptop Instead
A RAM upgrade is fantastic, but it’s not a magic bullet for every old, slow laptop. There are limits. When does it make more sense to start shopping for a new machine?
The Non-Upgradeable Laptop
If your compatibility check revealed that all RAM is soldered to the motherboard and there are no empty slots, you have no upgrade path. Period. All the optimization in the world won’t add more physical memory. In this case, your best investments are an SSD (if you still have a hard drive) and a clean OS install. If performance is still inadequate after those steps, a new laptop is the only solution.
The Ancient Platform
If your laptop is from the early 2010s or before, even a RAM upgrade might not yield the experience you want. The CPU and GPU are likely too underpowered for modern web applications and operating systems. You might go from 2GB to 8GB and find the system still feels sluggish because the single-core CPU performance is a decade old. At this point, the cost/benefit of a $60 RAM upgrade vs. a $600 new laptop needs to be weighed. A new entry-level laptop will have a modern, efficient CPU, an SSD, and at least 8GB of RAM—a holistic upgrade.
The Bottleneck Has Shifted
After a successful RAM upgrade, if you still experience slowdowns during specific tasks, the bottleneck may have moved elsewhere. For example, if you do photo editing and your CPU is maxing out at 100% while RAM usage is only at 60%, your processor is the limit. If you’re gaming and the frame rate is low despite having plenty of RAM and a decent CPU, your integrated or discrete GPU is the problem. A RAM upgrade fixes a memory bottleneck. It does not make an old, slow CPU or a weak graphics chip faster.
The Cost-Benefit Reality Check
Ask yourself: what do you use the laptop for? If it’s email, web browsing, and video calls, 8GB of RAM is plenty. If you’re a student with 50 Chrome tabs, a PDF, and a Word doc open, 16GB is a dream. But if you’re a professional video editor working with 4K footage, 16GB might be your minimum, and 32GB your target. If your laptop’s maximum supported RAM is 16GB and you’re already there, there’s no more you can do. It’s time to evaluate a new machine that supports 32GB, 64GB, or more, and has a faster CPU to match.
Conclusion: Empowering Your Laptop’s Second Life
So, how do you get more RAM on a laptop? The answer is a clear, step-by-step process: Verify compatibility, choose the correct modules, and install them with care. It’s a tangible, satisfying DIY project that demystifies your computer and delivers immediate, noticeable results. For the vast majority of laptops built in the last decade with user-accessible slots, this is the single most effective performance upgrade you can make for under $100. It transforms a RAM-starved, churning machine into a smooth, multitasking powerhouse. You’ve learned to navigate specs like DDR4 and SO-DIMM, to wield a screwdriver without fear, and to verify your work like a pro. This knowledge is power—the power to save money, reduce e-waste, and take control of your technology. Before you click “buy” on a new laptop, open the back panel. You might just find the key to your current laptop’s revival is resting right there in its memory slots, waiting to be upgraded.
Frequently Asked Questions
Will upgrading my laptop’s RAM void the warranty?
Usually, no. Most manufacturers (Dell, HP, Lenovo) do not consider user-upgradable RAM a warranty-voiding modification, as it’s in a designated accessible slot. However, if your laptop has a warranty sticker over the screws or the RAM is under a secondary warranty seal, breaking it could technically void the warranty. Always check your warranty terms first. Keep the old RAM sticks, as you may need to reinstall them for a warranty claim.
How much RAM can my laptop actually support?
This limit is set by your laptop’s chipset and BIOS, not the operating system. You must find the official maximum from your manufacturer’s specs page for your exact model. Common limits are 16GB, 32GB, or 64GB. Some very old or budget models max at 8GB. A scanner tool from Crucial or Kingston will also tell you the maximum supported by your specific system.
What’s the practical difference between DDR3, DDR4, and DDR5?
They are different, incompatible generations. DDR4 (2014+) is faster and more power-efficient than DDR3 (2007-2014). DDR5 (2021+) offers significantly higher speeds and bandwidth but is only in the newest laptops. You cannot mix generations. The physical notches are in different places to prevent insertion into the wrong slot. Your laptop’s generation is fixed; you must buy the matching type.
Can I mix RAM sizes, speeds, or brands?
You can mix sizes (e.g., 8GB + 16GB), but the system will run in asymmetric dual-channel mode (flex mode), which is slower than true dual-channel with matched pairs. Mixing speeds: the system will run all modules at the speed of the slowest stick. Mixing brands is usually fine if the specs (DDR type, capacity per stick) are the same, but for best stability, especially with two sticks, buying a matched kit from the same brand is highly recommended.
Is it better to have one 16GB stick or two 8GB sticks?
If your laptop has two slots and you want 16GB total, two 8GB sticks (a kit) are almost always the better choice. This enables dual-channel mode, which can provide a 10-30% performance boost in memory-intensive tasks and significantly better performance with integrated graphics. A single 16GB stick will work and leave one slot free for a future upgrade, but it runs in single-channel mode. Choose based on your goal: maximum current performance (2x8GB) or easiest future expansion (1x16GB).
What if my laptop’s RAM is soldered and can’t be upgraded?
If the RAM is soldered to the motherboard (common in ultra-thin laptops like MacBooks, Microsoft Surface, and many modern ultrabooks), there is no physical upgrade path. Your only options are software optimization: clean up startup programs, use a lightweight browser, ensure you have an SSD, and consider a full OS reinstall. For specific heavy tasks, you may need to use cloud-based software or, ultimately, invest in a new laptop designed with upgradable memory.