How Do You Unlock the Mouse on a Dell Laptop

Is your Dell laptop mouse or touchpad not responding? Don’t panic. This is a common issue that can usually be fixed in seconds. In this guide, you’ll learn exactly how to unlock the mouse on a Dell laptop using simple keyboard shortcuts, settings adjustments, and troubleshooting steps. Whether your touchpad is frozen, disabled, or acting strange, we’ve got you covered.
Key Takeaways
- Keyboard shortcuts are the fastest fix: Pressing Fn + F3 (or the touchpad function key) is the most common way to unlock a Dell laptop mouse instantly.
- Windows Settings can disable the touchpad: Check your touchpad settings in Windows to make sure it hasn’t been turned off accidentally.
- Outdated drivers cause mouse problems: Keeping your touchpad drivers updated through Device Manager or Dell SupportAssist prevents many issues.
- External devices can interfere: Plugging in a USB mouse may automatically disable your touchpad on some Dell models.
- BIOS settings control hardware: If software fixes don’t work, the touchpad may be disabled in your laptop’s BIOS.
- Physical damage requires professional help: If none of the software solutions work, the touchpad hardware itself may be damaged.
- Prevention is simple: Regularly updating drivers and being careful with keyboard shortcuts keeps your mouse working smoothly.
📑 Table of Contents
- Introduction: Why Is Your Dell Laptop Mouse Locked?
- Method 1: Use the Keyboard Shortcut to Unlock the Mouse
- Method 2: Enable the Touchpad Through Windows Settings
- Method 3: Update or Reinstall Touchpad Drivers
- Method 4: Check for External Device Interference
- Method 5: Enable the Touchpad in BIOS
- Method 6: Hardware Troubleshooting and When to Seek Help
- Preventing Future Touchpad Lock Issues
- Conclusion: Getting Your Dell Laptop Mouse Back in Action
Introduction: Why Is Your Dell Laptop Mouse Locked?
You’re sitting at your desk, ready to get some work done on your Dell laptop. You move your finger across the touchpad, and nothing happens. The cursor doesn’t budge. The mouse is completely unresponsive. If this sounds familiar, you’re not alone. Thousands of Dell laptop users face this exact problem every single day.
The good news is that figuring out how to unlock the mouse on a Dell laptop is usually a quick and painless process. In most cases, the touchpad hasn’t broken. It’s simply been disabled — either by accident through a keyboard shortcut, through a Windows setting, or because of a driver issue. Think of it like a light switch that got flipped off without you realizing it.
In this comprehensive guide, we’ll walk you through every possible method to get your Dell laptop mouse working again. From the simplest keyboard shortcut to more advanced troubleshooting techniques, you’ll have all the tools you need. Let’s dive in and get that cursor moving again.
Method 1: Use the Keyboard Shortcut to Unlock the Mouse
The Fastest Way to Fix a Locked Touchpad
The most common reason a Dell laptop mouse stops working is that someone accidentally pressed the touchpad toggle shortcut. Dell laptops come with a built-in function key that turns the touchpad on and off. It’s incredibly easy to hit by mistake, especially if you’re typing quickly.
Here’s what you need to do. Look at the top row of your keyboard — the function keys from F1 to F12. One of these keys will have a small icon that looks like a touchpad or a rectangle with a finger on it. On most Dell laptops, this is the F3 key, but it can also be F5, F7, or F9 depending on your specific model.
To unlock the mouse, simply press and hold the Fn key (usually located near the bottom-left corner of your keyboard) and then tap the touchpad function key at the same time. Hold both keys for about one second, then release. You should see a small notification on your screen confirming that the touchpad has been enabled.
What If the Shortcut Doesn’t Work?
If pressing Fn plus the function key doesn’t do anything, don’t worry. Some Dell laptops have a setting that allows you to use the function keys without holding the Fn key. Try pressing just the function key by itself — without holding Fn. On certain Dell models, you may need to toggle this behavior in the BIOS or through the Dell QuickSet utility.
Also, make sure you’re pressing the correct key. The touchpad icon can be small and easy to miss. It typically looks like a small rectangle with two lines beneath it or a hand touching a flat surface. If you’re unsure which key it is, check your Dell laptop’s user manual or look up your specific model online.
If you want to explore more general solutions for this issue across different brands, check out our guide on how to unlock a mouse on a laptop for additional tips and tricks.
Method 2: Enable the Touchpad Through Windows Settings
Check Your Touchpad Settings in Windows 10 and 11
Sometimes the touchpad gets disabled through Windows settings rather than a keyboard shortcut. This can happen after a Windows update, after installing new software, or simply by accident. The good news is that checking and fixing this is straightforward.
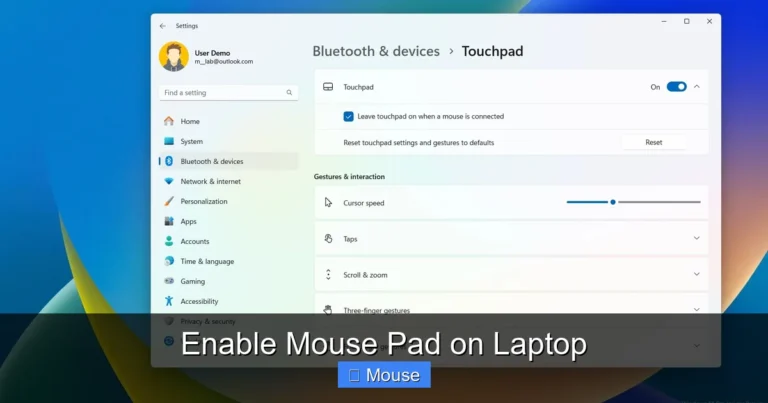
For Windows 11:
- Click the Start button and select Settings (the gear icon).
- Click on Bluetooth & devices in the left sidebar.
- Select Touchpad from the list.
- Make sure the toggle at the top is set to On.
- Also check the option that says “Leave touchpad on when a mouse is connected” if you use an external mouse.
For Windows 10:
- Click the Start button and select Settings.
- Click on Devices.
- Select Touchpad from the left menu.
- Ensure the touchpad toggle is switched to On.
- Review the additional settings below to make sure nothing is preventing the touchpad from working.
Adjust Touchpad Sensitivity
While you’re in the touchpad settings, it’s worth checking the sensitivity level. If the sensitivity is set too low, the touchpad might seem unresponsive even though it’s technically enabled. Dell laptops offer several sensitivity options — from low to high. Try setting it to Medium sensitivity or High sensitivity to see if that resolves the issue.
You should also look for an option called Touchpad sensitivity or Palm check. If palm check is set too aggressively, the touchpad might ignore your finger movements because it thinks your palm is resting on it. Adjusting this setting can make a big difference in how responsive the touchpad feels.
Method 3: Update or Reinstall Touchpad Drivers
Why Drivers Matter for Your Touchpad
Drivers are small pieces of software that tell your operating system how to communicate with hardware components like your touchpad. When these drivers become outdated, corrupted, or incompatible with a recent Windows update, your touchpad can stop working entirely. This is one of the most common causes of mouse issues on Dell laptops.
To check and update your touchpad drivers, follow these steps:
- Right-click the Start button and select Device Manager.
- Expand the section called Mice and other pointing devices.
- Look for your touchpad — it might be listed as “Dell Touchpad,” “Synaptics Touchpad,” “ELAN Touchpad,” or “HID-compliant mouse.”
- Right-click on the touchpad device and select Update driver.
- Choose Search automatically for drivers and let Windows find the latest version.
Reinstall the Driver Completely
If updating the driver doesn’t work, try uninstalling and reinstalling it. In Device Manager, right-click the touchpad device and select Uninstall device. Don’t worry — this won’t permanently remove your touchpad. After uninstalling, simply restart your Dell laptop. Windows will automatically detect the touchpad and reinstall the appropriate driver during startup.
For the best results, you can also visit the Dell Support website and download the latest touchpad driver specifically designed for your laptop model. Enter your service tag or model number on the support page, navigate to the drivers section, and download the most recent touchpad or input device driver available.
If your mouse has completely disappeared from the screen rather than just being locked, you might want to read our article about mouse disappeared on Dell laptop for more targeted solutions.
Method 4: Check for External Device Interference
How USB and Bluetooth Mice Affect Your Touchpad
Here’s something many Dell laptop users don’t realize: connecting an external mouse can automatically disable the built-in touchpad. This is actually a feature designed to prevent accidental cursor movements while you’re using an external mouse. But if you unplug the external mouse and the touchpad doesn’t come back on, that’s a problem.
First, disconnect any external mice — both USB and Bluetooth. Unplug any USB receivers and turn off any Bluetooth mice. Then try using the touchpad again. If it starts working, you know the external device was the culprit.
To prevent this from happening in the future, go back to your touchpad settings in Windows and look for an option that says something like “Leave touchpad on when a mouse is connected.” Make sure this option is enabled. This way, you can use both your external mouse and your touchpad simultaneously if needed.
Check for Conflicting Software
Some third-party mouse software can interfere with your Dell touchpad. If you’ve installed software for a Logitech, Razer, or other brand of mouse, it might be overriding your touchpad settings. Try temporarily disabling or uninstalling that software to see if your touchpad starts working again.
Also, some accessibility features in Windows can affect how the touchpad behaves. Check Settings > Accessibility > Mouse to make sure no unusual settings are enabled that might be blocking your touchpad input.
If you’re having trouble connecting a wireless mouse to your Dell laptop, our guide on how to connect a wireless mouse to a laptop can walk you through the process step by step.
Method 5: Enable the Touchpad in BIOS
When Software Fixes Aren’t Enough
If you’ve tried all the software methods above and your touchpad still isn’t working, the issue might be at a deeper level. Your Dell laptop’s BIOS (Basic Input/Output System) has settings that control hardware components, including the touchpad. If the touchpad is disabled in the BIOS, no amount of Windows settings changes will fix it.
To access the BIOS on a Dell laptop:
- Shut down your laptop completely (don’t just put it to sleep).
- Press the power button to turn it back on.
- Immediately start pressing the F2 key repeatedly until the BIOS screen appears.
- Once in the BIOS, use the arrow keys to navigate (your mouse won’t work here).
- Look for a section called System Configuration or Advanced.
- Find the Touchpad or Internal Pointing Device option.
- Make sure it’s set to Enabled.
- Press F10 to save and exit.
Be Careful in the BIOS
A quick word of caution: the BIOS is a powerful tool, and changing the wrong setting can cause serious problems with your laptop. Only change the touchpad setting and nothing else unless you know exactly what you’re doing. If you’re not comfortable navigating the BIOS, consider taking your laptop to a professional or contacting Dell support for assistance.
After enabling the touchpad in the BIOS and restarting, your touchpad should be working again. If it’s still not responding, the issue might be hardware-related, which we’ll cover in the next section.
Method 6: Hardware Troubleshooting and When to Seek Help
Signs of a Hardware Problem
Sometimes the touchpad isn’t locked or disabled — it’s actually broken. Hardware failures can happen due to physical damage, liquid spills, wear and tear over time, or manufacturing defects. Here are some signs that your touchpad issue might be hardware-related:
- The touchpad doesn’t respond at all, even after trying every software fix.
- You see visible damage, cracks, or warping on the touchpad surface.
- The touchpad works intermittently — sometimes it responds, sometimes it doesn’t.
- The cursor jumps around randomly or moves on its own.
- You recently spilled liquid on or near the touchpad area.
Basic Hardware Checks
Before assuming the worst, try a few basic hardware checks. First, restart your laptop. A simple reboot can resolve many hardware communication issues. If that doesn’t work, try performing a power reset: shut down the laptop, unplug the charger, and hold the power button for 15-20 seconds. Then plug it back in and turn it on.
You can also try booting into the Dell diagnostics tool. Restart your laptop and press F12 during startup to access the boot menu. Select Diagnostics and let the system test your hardware components, including the touchpad. If the diagnostics report a hardware failure, you’ll know for sure that the touchpad needs to be repaired or replaced.
When to Contact Dell Support
If your Dell laptop is still under warranty, contact Dell support right away. They can often repair or replace the touchpad at no cost to you. Even if your warranty has expired, Dell’s support team can provide guidance on repair options and costs.
For out-of-warranty laptops, a local computer repair shop can usually replace a faulty touchpad for a reasonable price. The cost typically ranges from $50 to $150 depending on the model and the repair shop. It’s a relatively quick repair that most technicians can complete within an hour or two.
If you’re experiencing broader mouse issues beyond just the touchpad being locked, our detailed article on why isn’t the mouse working on my laptop covers even more troubleshooting scenarios.
Preventing Future Touchpad Lock Issues
Simple Habits to Keep Your Mouse Working
Now that you’ve unlocked your Dell laptop mouse, let’s talk about preventing this from happening again. A few simple habits can save you a lot of frustration down the road.
First, be mindful of the Fn key. Since the touchpad toggle shortcut is so easy to hit accidentally, try to develop an awareness of where your hands are on the keyboard. If you frequently hit the shortcut by mistake, you can sometimes disable the function key behavior in the BIOS so that the F-keys perform their standard functions instead of the special Dell features.
Second, keep your drivers updated. Set a reminder to check for driver updates once a month, or use Dell’s SupportAssist application, which automatically checks for and installs driver updates for you. This single habit can prevent a wide range of hardware issues, not just touchpad problems.
Third, be careful with Windows updates. Major Windows updates can sometimes reset settings or install incompatible drivers. After a big update, take a moment to verify that your touchpad settings are still configured the way you want them.
Finally, keep your laptop clean. Dust, crumbs, and debris can accumulate around the edges of the touchpad and interfere with its operation. Regularly clean the touchpad surface with a soft, slightly damp cloth to keep it responsive.
Conclusion: Getting Your Dell Laptop Mouse Back in Action
Learning how to unlock the mouse on a Dell laptop is one of those essential tech skills that every laptop user should have. Whether you accidentally hit the Fn shortcut, a Windows update changed your settings, or a driver went haywire, the solutions in this guide will get you back on track.
Start with the simplest fix — the keyboard shortcut — and work your way through the methods until you find the one that works. In most cases, the touchpad will be back to normal within a few minutes. And if it’s a hardware issue, you now know when it’s time to call in the professionals.
The key takeaway is this: don’t panic when your Dell laptop mouse stops working. It’s almost always a software issue that you can fix yourself with a little patience and the right knowledge. Bookmark this guide so you can come back to it whenever you need a quick refresher. Your touchpad will be gliding smoothly again in no time.
Frequently Asked Questions
What is how do you unlock the mouse on a dell laptop?
how do you unlock the mouse on a dell laptop is an important topic with many practical applications.