How to Deactivate Laptop Mouse
Deactivating your laptop’s built-in mouse (touchpad) is a straightforward process to prevent accidental cursor movements when typing or using an external mouse. You can disable it through Windows system settings, dedicated keyboard shortcuts, the BIOS/UEFI menu, or the Device Manager. The method you choose depends on whether you need a temporary fix or a permanent solution, and your specific laptop brand. Always start with the simplest software-based method before exploring hardware-level changes, as these are fully reversible and safe.
Have you ever been typing a crucial email or document, only to have your cursor jump wildly across the screen because your palm brushed against the laptop’s touchpad? It’s a universally frustrating experience that disrupts workflow and can lead to mistakes. The solution is often simple: deactivate the laptop’s built-in mouse, which is almost always a touchpad in modern devices. But “how” can be confusing because the method changes based on your laptop’s manufacturer, your operating system version, and whether you want a temporary or permanent fix. This comprehensive guide will walk you through every single method, from the one-click solution to the advanced BIOS tweak, ensuring you can regain control of your cursor, no matter your technical comfort level.
We’ll demystify the process, explaining not just the steps but the why behind each one. You’ll learn to distinguish between disabling the touchpad and managing an external mouse, navigate brand-specific quirks from Dell to ASUS, and troubleshoot when things don’t work as expected. By the end, you’ll be an expert on managing your laptop’s pointing devices, turning a moment of frustration into a mastered skill.
Key Takeaways
- Understanding the Target: “Deactivate laptop mouse” almost always refers to disabling the built-in touchpad, not an external USB mouse, which is unplugged or disabled separately in Device Manager.
- Software First: The safest and easiest methods are within Windows Settings or the Control Panel, which are completely reversible and do not affect system stability.
- Keyboard Shortcuts Vary: The Fn + Function key shortcut (often F1-F12 with a touchpad icon) is brand-specific and must be enabled in the BIOS sometimes.
- BIOS/UEFI is Permanent (Until Changed): Disabling the touchpad in the BIOS/UEFI settings is the most permanent software-level solution, surviving OS reinstalls, but requires caution to navigate.
- Device Manager for Temporary/Driver Issues: Disabling the touchpad driver in Device Manager is effective for troubleshooting or temporary disablement but can be reset by Windows updates or driver reinstalls.
- Manufacturer Software Matters: Many brands (Dell, HP, Lenovo) install proprietary touchpad control panels (e.g., Dell Touchpad, Synaptics) that override Windows settings, so check there first.
- Troubleshooting is Key: If a method fails, the issue is often a conflicting driver, a disabled shortcut in BIOS, or manufacturer software taking precedence—systematic checking resolves this.
📑 Table of Contents
- Understanding Your Laptop’s Input Devices: Touchpad vs. External Mouse
- The Easiest Method: Deactivating via Windows Settings
- Keyboard Shortcuts: The Quick Toggle
- Going Deeper: BIOS/UEFI Settings for Permanent Control
- Device Manager: The Power User’s Tool for Disabling Drivers
- Special Cases: External Mice and Third-Party Utilities
- Troubleshooting: What to Do When Deactivation Fails
- Conclusion: Choosing the Right Method for You
Understanding Your Laptop’s Input Devices: Touchpad vs. External Mouse
Before we dive into deactivation methods, it’s crucial to clarify terminology. When we say “deactivate laptop mouse,” we are specifically discussing the internal touchpad—the flat, sensitive rectangle below the keyboard. This is distinct from an external USB or Bluetooth mouse, which you plug in or pair separately. The processes for managing each are entirely different.
An external mouse is deactivated by simply unplugging it, turning it off, or disabling its specific driver in the Device Manager. The internal touchpad, however, is a built-in hardware component integrated with the laptop’s motherboard and controlled by its own driver software. Deactivating it requires telling the operating system or the system firmware (BIOS/UEFI) to ignore its input signals. This is the process we will focus on.
When and Why Should You Deactivate the Touchpad?
There are several common scenarios where disabling the touchpad is the ideal solution:
- Using an External Mouse: This is the most common reason. When a precise external mouse is connected, the touchpad becomes redundant and often an obstacle, causing accidental clicks and cursor jumps.
- Faulty or Erratic Touchpad: A damaged touchpad, dirty surface, or failing sensor can cause the cursor to drift, jump, or register phantom touches. Disabling it isolates the problem and provides a stable workaround until repair or replacement.
- Typing Efficiency: Even a perfectly functional touchpad can be a nuisance during intensive typing. Disabling it ensures your palms never interfere with your work.
- Accessibility and Preference: Some users simply prefer the control and ergonomics of a mouse and never use the touchpad, making disabling a permanent quality-of-life improvement.
- Presentation Mode: During slideshows or media playback, an accidental touchpad brush can advance slides or pause videos. A quick disable prevents public mishaps.
Understanding your motivation helps choose the right method. A gamer using an external mouse might want the touchpad permanently off via BIOS. A writer might prefer a quick keyboard toggle for when they switch between typing and browsing.
The Easiest Method: Deactivating via Windows Settings
For the vast majority of users on Windows 10 or Windows 11, the first and best place to look is the built-in system settings. This method is safe, reversible, and doesn’t require any technical knowledge. Microsoft has consolidated touchpad settings, but note that laptop manufacturers often install their own enhanced driver software that can supersede or add to these Windows options.
Visual guide about How to Deactivate Laptop Mouse
Image source: vpnmentor.com
Step-by-Step for Windows 10 & 11
The path is slightly different between the two OS versions but follows the same logic.
For Windows 11:
- Click the Start Menu and select Settings (the gear icon) or press
Win + I. - In the Settings window, select Bluetooth & devices from the left-hand pane.
- Click on Touchpad.
- You will see a master toggle switch labeled Touchpad. Simply click it to turn it Off.
- You may also see additional settings like “Leave touchpad on when a mouse is connected.” Unchecking this ensures the touchpad automatically disables when you plug in an external mouse, which is a highly convenient set-and-forget option.
For Windows 10:
- Open Settings (
Win + I). - Go to Devices.
- In the left sidebar, click Touchpad.
- Find the Touchpad toggle switch and set it to Off.
Important Caveat: If you do not see a “Touchpad” option in your Windows settings, or if the toggle is greyed out, it means your laptop manufacturer’s proprietary software is controlling the touchpad. Do not worry; we will address this in the next section. The Windows setting is being hidden or overridden.
Navigating Manufacturer-Specific Control Panels
Brands like Dell, HP, Lenovo, ASUS, and Acer install their own touchpad configuration utilities. These often offer more granular control (like palm rejection sensitivity) but can also be the only place to find the disable option. They usually appear in the system tray (near the clock) or in the Control Panel under a brand name (e.g., “Dell Touchpad,” “ELAN SmartPad,” “Synaptics TouchPad”).
- How to Find It: Open the Control Panel (search for it in the Start Menu). Set “View by:” to Large icons or Small icons. Look for any entry named after your laptop brand or “Mouse.” Clicking “Mouse” will open the standard Windows mouse properties, but the touchpad-specific tab is often added here by the manufacturer’s driver. Look for tabs labeled Device Settings, ELAN, Synaptics, or TouchPad.
- Inside the Panel: Once you find the correct tab, there is almost always a checkbox or toggle to Disable or Turn Off the internal pointing device. The wording varies (“Disable internal pointing device,” “Disable touchpad”). Check that box and apply the settings. A notification may appear in the system tray confirming the change.
- The “When External Mouse is Connected” Option: This is the gold standard setting. If your manufacturer’s software offers it, enable it. This creates an automatic, seamless experience where your touchpad turns off the moment you plug in a USB or pair a Bluetooth mouse, and turns back on when you unplug it. It’s the most elegant solution.
Pro Tip: If you can’t find the manufacturer’s software, visit your laptop brand’s support website, enter your exact model number, and download the latest “Input” or “Mouse” drivers and utilities. Installing these will place the control panel on your system.
Keyboard Shortcuts: The Quick Toggle
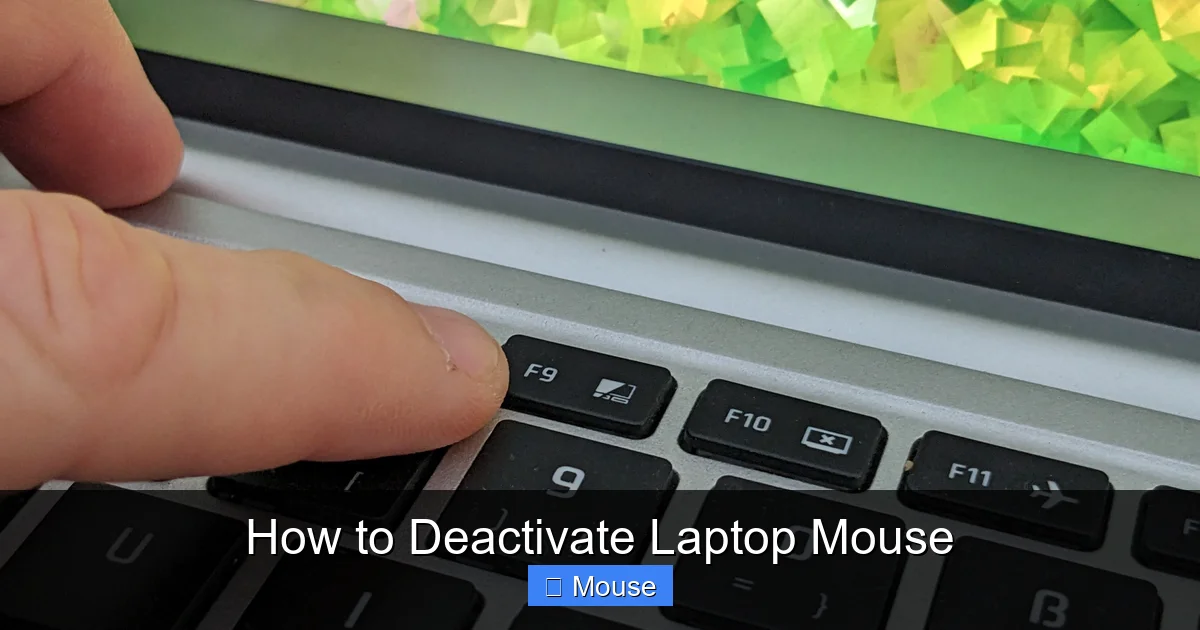
For users who need to frequently switch between touchpad and mouse, a keyboard shortcut is the fastest method. Most laptops dedicate one of the Function keys (F1-F12) to touchpad control, usually marked with a small touchpad icon (sometimes a rectangle with a diagonal line through it, symbolizing disable).
Visual guide about How to Deactivate Laptop Mouse
Image source: minitool.com
Identifying and Using the Correct Key
The key is almost always in the top row of the keyboard, but its exact function depends on your laptop’s make and model.
- The Standard Combination: You must press and hold the Fn (Function) key while pressing the designated Function key (e.g.,
Fn + F7). On many modern laptops, the Function keys have dual purposes, and the touchpad toggle is the “secondary” action, requiring the Fn key. - Fn Lock: Some laptops have an “Fn Lock” key (often Esc) that reverses this behavior. If your touchpad toggle isn’t working, try pressing
Fn + Escto toggle the Fn Lock, then try the Function key alone. - Brand-Specific Keys:
- Dell: Often
Fn + F3(touchpad icon). - HP: Commonly
Fn + F6orFn + F8. - Lenovo: Frequently
Fn + F6orFn + F8. On some ThinkPads, it’s a dedicated key with a touchpad symbol next to the mouse buttons. - ASUS: Typically
Fn + F10orFn + F7. - Acer: Often
Fn + F7. - Toshiba: Usually
Fn + F9.
- Dell: Often
What the Shortcut Does: This key combination sends a signal directly to the laptop’s embedded controller (EC), which toggles the touchpad’s power state at a very low level. It often works even before the operating system loads, which is a good test. If the shortcut does nothing, it may have been disabled in the BIOS/UEFI settings, which we’ll cover next.
The Dedicated Touchpad Button
A small but notable number of business laptops (particularly older Lenovo ThinkPads and some Dell Latitudes) feature a physical button next to the touchpad. Pressing this button will disable (and often light up) the touchpad, providing a tactile, instant toggle. If your laptop has this, it’s the most straightforward method available.
Going Deeper: BIOS/UEFI Settings for Permanent Control
If software methods are ineffective or you want the touchpad disabled at the most fundamental level—even before the operating system starts—the BIOS/UEFI firmware settings are the place to go. This is the most “permanent” software-based solution, as the setting is stored in the motherboard’s non-volatile memory and will persist through Windows reinstalls or updates.

Visual guide about How to Deactivate Laptop Mouse
Image source: png.pngtree.com
Accessing the BIOS/UEFI
The process for entering the BIOS/UEFI is standard across most PCs but varies by brand.
- Shut down your laptop completely (not restart).
- Power it on and immediately begin pressing the BIOS access key repeatedly. Common keys are F2, F10, F12, Del, or Esc. The correct key is usually briefly shown on the splash screen (e.g., “Press F2 to enter Setup”).
- If Windows 10/11’s “Fast Startup” feature interferes, a full shutdown from within Windows (hold Shift while clicking Shut down) is more reliable than a restart.
Finding the Touchpad Setting
Once inside the BIOS/UEFI setup utility (a blue or grey screen with text menus), navigate using the arrow keys, Tab, and Enter. The setting is typically located under one of these categories:
- Configuration
- Advanced
- Device
- Input Device Settings
- Internal Pointing Device
Look for an entry named “Touchpad,” “Internal Pointing Device,” “Trackpad,” or “TrackPoint” (for the pointing stick in some Lenovos). Its state will be Enabled. Change it to Disabled. Use the on-screen instructions to save and exit (usually F10 to Save and Exit). Your laptop will reboot with the touchpad disabled at the hardware detection level.
Important Considerations for BIOS Disablement
- It’s Not “Bricking”: Disabling the touchpad in BIOS is 100% safe and reversible. You simply go back into the BIOS and re-enable it. You cannot damage your laptop by doing this.
- No OS Required: This is useful if your touchpad driver is corrupted and Windows won’t boot properly, or if you are setting up a new machine and want it off from the start.
- Keyboard Navigation Only: You must navigate the BIOS menus using only the keyboard. A mouse will not work if the touchpad is disabled and you have no external mouse connected. Plan accordingly.
- It Overrides Everything: A BIOS-disabled touchpad will not be detected by Windows at all. You will not see it in Device Manager, and no manufacturer software will control it. This is the ultimate disable.
Device Manager: The Power User’s Tool for Disabling Drivers
Windows Device Manager provides a hardware-centric view of all components. Disabling the touchpad driver here tells Windows to stop loading and using that specific piece of hardware. This is an excellent method for troubleshooting or for temporary disablement when other methods fail.
How to Disable the Touchpad in Device Manager
- Right-click the Start button and select Device Manager. Alternatively, press
Win + Xand choose Device Manager. - In the Device Manager window, expand the category Mice and other pointing devices.
- You will see an entry for your touchpad. It could be named generically as “PS/2 Compatible Mouse” or specifically as “Synaptics TouchPad,” “ELAN Touchpad,” “HID-compliant touch pad,” or your laptop brand (e.g., “Dell Touchpad”).
- Right-click on this entry and select Disable device.
- A confirmation pop-up will appear. Click Yes.
- The entry will now have a down arrow icon, and the touchpad will stop responding immediately.
Re-enabling and Important Notes
To re-enable it, simply return to Device Manager, right-click the disabled touchpad, and select Enable device.
Key Warnings:
- Temporary Nature: A Windows Update might reinstall the driver and re-enable the device. A system restore or major driver update could also reset this.
- No External Mouse? Big Problem: If you disable the touchpad driver in Device Manager and you have no external mouse connected, you will have no way to move the cursor to re-enable it. You would need to use the keyboard (Tab, arrow keys, Enter) to navigate back to Device Manager, which is possible but extremely tedious. Always have an external mouse handy before using this method, or be prepared for a keyboard-only navigation challenge.
- Driver vs. Hardware: This only disables the software driver. The hardware is still powered and detected by the BIOS. It is less “deep” than a BIOS disable but more invasive than a Windows setting change.
Special Cases: External Mice and Third-Party Utilities
While the primary goal is usually to disable the internal touchpad, you may also need to manage external mice. Furthermore, some third-party tools offer enhanced automation and control that goes beyond built-in Windows or manufacturer features.
Deactivating an External Mouse
This is straightforward and follows a similar pattern to the touchpad, but in reverse.
- Physical Disconnection: The simplest method—unplug a USB mouse or turn off a wireless mouse’s power switch.
- Via Device Manager: Follow the same steps as for the touchpad, but find your external mouse under “Mice and other pointing devices.” Right-click and select Disable device. This is useful if the mouse is malfunctioning and needs to be reset or temporarily ignored.
- Bluetooth: For Bluetooth mice, go to Settings > Bluetooth & devices, find your mouse in the list, click the three dots menu, and select Remove device or simply toggle Bluetooth off.
Automation with Third-Party Tools
For users who want the touchpad to automatically disable only when an external mouse is present—even if their laptop manufacturer’s software lacks this feature—third-party utilities can fill the gap.
- Touchpad Blocker: A popular free utility. It can automatically disable the touchpad when any external mouse is detected, when you are typing (with a customizable delay), or via a system tray icon or hotkey. It works independently of manufacturer software and is highly configurable.
- Other Utilities: Tools like AutoHotkey can be scripted to run the disable/enable commands based on USB device arrival/removal events, but this requires scripting knowledge.
- Manufacturer Software Revisited: Always check your brand’s official utility first. Dell, Lenovo, and others often have this auto-switch feature built into their latest touchpad drivers. Installing the latest driver suite from the support website is the first step before seeking third-party solutions.
Troubleshooting: What to Do When Deactivation Fails
Despite following all steps, you might find the touchpad remains active. Don’t panic. This is usually due to a software conflict or a setting override. Here is a systematic troubleshooting guide.
Scenario 1: The Touchpad Toggle is Greyed Out or Missing in Windows Settings
Cause: Your laptop manufacturer’s proprietary driver is in control, and it has disabled the native Windows touchpad settings.
Solution:
- Open the Control Panel and look for a brand-specific mouse/touchpad utility (as detailed in Section 2). Disable it there.
- If you cannot find it, go to Device Manager, find your touchpad under “Mice and other pointing devices,” right-click it, and select Disable device. This will override any software setting.
- As a last resort, you can uninstall the touchpad driver from Device Manager (right-click > Uninstall device, check “Attempt to remove the driver software”). Upon reboot, Windows will install a generic driver that respects the Windows Settings toggle. However, you will lose advanced features like multi-finger gestures until you reinstall the manufacturer’s driver.
Scenario 2: The Keyboard Shortcut (Fn + Key) Does Nothing
Cause: The shortcut functionality can be disabled in the BIOS/UEFI, or the Fn Lock key is in the wrong state.
Solution:
- Try pressing
Fn + Escto toggle the Fn Lock, then test the function key again without holding Fn. - Enter the BIOS/UEFI settings. Navigate to the Configuration or Advanced tab. Look for an option called “Function Key Behavior,” “Hotkey Mode,” or “Touchpad Control”. Ensure it is set to Enabled or Multimedia key first (depending on the BIOS wording). Save and exit.
- Some business laptops (e.g., certain ThinkPads) have a separate setting for the touchpad shortcut under a “Input Device” or “Keyboard” menu in the BIOS.
Scenario 3: The Touchpad Re-enables After a Restart or Windows Update
Cause: You likely used the Device Manager disable method, which is not persistent against driver reinstalls. Or, a manufacturer utility is resetting the setting.
Solution:
- Use the method you truly want to be permanent. If you want it off forever until you manually re-enable, use the BIOS/UEFI method.
- If you prefer a software method, set it in the manufacturer’s control panel and ensure you have the latest driver installed. The setting is often saved in the driver’s configuration files.
- In Windows Settings, if the “Leave touchpad on when a mouse is connected” option exists, uncheck it. This prevents Windows from re-enabling it when an external mouse is unplugged.
Scenario 4: Nothing Works, and the Touchpad is Still Erratic
Cause: The issue might be physical (dirt, moisture, damage) or a deeply corrupted driver.
Solution:
- Clean the Touchpad: Use a microfiber cloth slightly dampened with screen cleaner. Gently wipe the surface.
- Update/Reinstall Drivers: Go to your laptop manufacturer’s support site, download the latest “Input” or “Mouse” driver for your exact model, and perform a clean installation. During installation, ensure any “Enable touchpad” option is unchecked if you want it off.
- Test in Safe Mode: Boot into Windows Safe Mode (with Networking). In Safe Mode, only basic drivers load. If the touchpad works normally, a third-party software conflict is likely.
- Hardware Issue: If the touchpad is physically damaged (cracks, unresponsive areas) or still acts erratically after all software fixes, it may need professional repair or replacement. At this point, permanent software disablement is your best workaround.
Conclusion: Choosing the Right Method for You
Deactivating your laptop’s touchpad is a simple yet powerful way to customize your computing experience and eliminate a common source of frustration. You now have a full toolkit of methods, from the one-click convenience of Windows Settings to the rock-solid permanence of a BIOS change. Remember this decision tree: Start with your laptop manufacturer’s control panel or Windows Settings for a safe, reversible solution. If that fails, try the keyboard shortcut. For a guaranteed, OS-independent disable, use the BIOS/UEFI method. Reserve Device Manager for quick troubleshooting or when all else fails.
Always prioritize software-based solutions (Settings, Manufacturer Panel) over hardware-level ones (BIOS) for everyday use, as they are easier to reverse. Keep a USB mouse handy whenever experimenting with Device Manager or BIOS changes to avoid getting locked out. By understanding the “why” behind each method, you can confidently manage your laptop’s input devices, ensuring your cursor always behaves exactly as you intend, whether you’re writing a novel, crunching numbers, or battling in an online game. Your productivity—and your sanity—will thank you.
Frequently Asked Questions
Can I permanently deactivate my laptop’s touchpad?
Yes, the most permanent method is to disable it within your laptop’s BIOS/UEFI settings. This setting is stored in the motherboard firmware and will remain disabled even if you reinstall Windows. The Windows Settings or manufacturer software disablement is also persistent across reboots but can be overridden by driver updates or system restores.
How do I re-enable my touchpad if I’ve disabled it?
Re-enabling depends on how you disabled it. If you used a keyboard shortcut (Fn + F-key), press the same combination again. If you used Windows Settings or the manufacturer’s control panel, simply return to that same toggle and switch it back on. If you used Device Manager, right-click the disabled touchpad and select “Enable device.” For a BIOS disable, you must re-enter the BIOS/UEFI settings and change the “Internal Pointing Device” option back to “Enabled.”
What’s the difference between disabling and uninstalling the touchpad driver?
Disabling the driver (in Device Manager) tells Windows to ignore the hardware, but the driver file remains installed. The device shows as disabled but can be re-enabled instantly. Uninstalling removes the driver software completely. Windows will reinstall a generic driver on the next boot, or you must manually reinstall the manufacturer’s driver. Uninstalling is more drastic and is typically done for driver cleanup, not simple deactivation.
My external mouse isn’t being detected, so my touchpad won’t auto-disable. What now?
First, ensure the external mouse is properly connected (USB port, Bluetooth paired, and powered on). Check Device Manager to see if the mouse appears under “Mice and other pointing devices.” If it has a yellow exclamation mark, there is a driver issue. Try a different USB port, replace the mouse’s batteries, or reinstall its driver. Once the mouse is fully functional, the “auto-disable when mouse is connected” feature (in Windows or manufacturer settings) will work.
Can I deactivate the touchpad but keep the pointing stick (nub) active?
Yes, this is usually possible. The pointing stick (like the TrackPoint on Lenovo ThinkPads) is often treated as a separate input device in the manufacturer’s control panel or in the BIOS. You may need to go into the specific brand’s settings (e.g., Lenovo’s Mouse Properties) to disable only the touchpad while leaving the “UltraNav” or “TrackPoint” enabled. In the BIOS, they might share a single “Internal Pointing Device” setting, so check your specific model’s documentation.
My laptop doesn’t have a touchpad toggle in Windows or the Control Panel. Why?
This usually means one of two things: 1) Your laptop uses a very basic, generic touchpad driver that lacks advanced settings, and Windows has hidden the toggle because it assumes you have no need to disable it. 2) The manufacturer’s installation of their proprietary driver/software failed or was not installed. Your best bet is to visit the laptop brand’s support website, download the latest “Input” or “Mouse” driver for your exact model, and install it. This will add the missing control panel and settings. As a workaround, you can always use the Device Manager or BIOS methods.