How to Find Ram on Laptop
Finding your laptop’s RAM (Random Access Memory) is a quick, essential task for troubleshooting, upgrading, or buying a used machine. You can check it instantly using built-in Windows tools like Task Manager or System Information, or macOS’s About This Mac. For detailed specs like type and speed, use Command Prompt, PowerShell, or free third-party apps like CPU-Z. Physically inspecting the RAM modules is the final, most accurate method but requires opening your laptop. Knowing your RAM capacity and specs empowers you to improve performance and compatibility.
Key Takeaways
- Built-in OS tools are the fastest way: Use Windows Task Manager (Ctrl+Shift+Esc) or macOS About This Mac for an instant RAM size check.
- System Information gives more detail: Windows System Information (msinfo32) shows total physical memory and available slots.
- Command-line tools reveal specs: Use Command Prompt or PowerShell commands to find RAM type, speed, and form factor.
- Third-party apps are comprehensive: Free tools like CPU-Z or Speccy provide the most detailed breakdown of your memory modules.
- Physical inspection is definitive: Opening the laptop’s service panel lets you see the exact RAM sticks installed, crucial for upgrades.
- Knowing your RAM helps with upgrades: Check your laptop’s maximum supported RAM, slot count, and compatible types (DDR3/DDR4/DDR5) before buying new modules.
- RAM info aids troubleshooting: Low RAM is a common cause of slowdowns; checking it is the first step in diagnosing performance issues.
📑 Table of Contents
- Why Knowing Your Laptop’s RAM Matters
- Method 1: The Instant Check with Windows Task Manager
- Method 2: Deep Dive with Windows System Information
- Method 3: Command Prompt & PowerShell for the Tech-Savvy
- Method 4: The Gold Standard with Third-Party System Profilers
- Method 5: The Physical Inspection – Opening Your Laptop
- What to Do After You Find Your RAM Info
- Special Considerations for macOS Users
Why Knowing Your Laptop’s RAM Matters
Have you ever felt your laptop crawling along, struggling to open a few browser tabs or a simple program? Before you blame the processor or consider a full replacement, there’s a key component you should check first: your RAM, or Random Access Memory. Think of RAM as your laptop’s short-term workspace. The more RAM you have, the more tasks it can juggle at once without slowing down. Knowing exactly how much RAM you have, what type it is, and how many slots are available is critical information. It helps you diagnose slowdowns, plan a cost-effective upgrade, or make a smart decision when buying a used laptop. This guide will walk you through every single method to find your RAM details, from the simplest one-click check to physically opening your machine. Let’s get started.
Method 1: The Instant Check with Windows Task Manager
For the vast majority of Windows users, this is the fastest and easiest way to see your installed RAM capacity. It takes three seconds and requires no downloads or complex commands.
Visual guide about How to Find Ram on Laptop
Image source: i.pinimg.com
Step-by-Step Guide
Simply press the Ctrl + Shift + Esc keys on your keyboard simultaneously. This keyboard shortcut opens Task Manager directly. Alternatively, you can right-click on the taskbar at the bottom of your screen and select “Task Manager.”
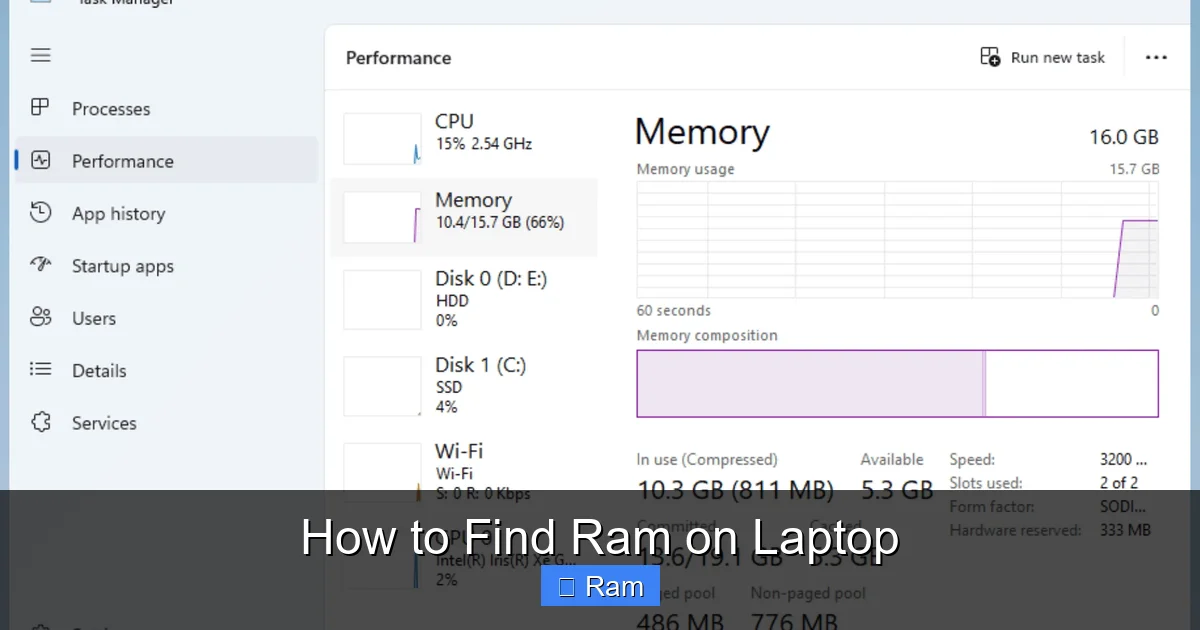
Once Task Manager is open (it might look minimal at first), click on the “Performance” tab at the top. On the left-hand side, you’ll see a list of hardware components. Click on “Memory.”
The main graph and panel will now display all the crucial information you need for a basic understanding:
- In use (Compressed): How much RAM is currently being used by your running apps and Windows.
- Available: The amount of RAM ready for new tasks.
- Committed: The total virtual memory (RAM + page file) in use.
- Speed: The clock speed of your RAM (e.g., 3200 MHz).
- Installed RAM (GB): This is the big number you’re looking for—your total physical RAM capacity (e.g., 16.0 GB).
- Hardware reserved: RAM set aside for your GPU and other hardware.
Important Note: Task Manager shows the total installed RAM. It does not tell you how many sticks (modules) you have or the specific type (DDR4, DDR5, etc.). For that, you need to go deeper.
Method 2: Deep Dive with Windows System Information
If Task Manager gives you the “what” (total GB), the built-in System Information tool gives you more of the “where” and “how.” It’s a treasure trove of hardware details.
Visual guide about How to Find Ram on Laptop
Image source: nextofwindows.mystagingwebsite.com
How to Access and Interpret It
Press the Windows Key + R to open the Run dialog box. Type msinfo32 and hit Enter. The System Information window will launch.
In the left pane, navigate to Components and then click on Memory. The right pane will populate with a detailed list. Here’s what to look for:
- Total Physical Memory: Confirms your total RAM in GB (e.g., 16384 MB = 16 GB).
- Available Physical Memory: Shows how much is free right now.
- Total Virtual Memory: Your RAM plus the page file on your SSD/HDD.
- Memory Devices (or similar): This is the important part. It will list each Physical Memory slot on your motherboard. For each slot, it may show:
- Size: Capacity of that specific stick (e.g., 8192 MB).
- Speed: Its operating frequency.
- Form Factor: Usually ” SODIMM ” for laptops (Small Outline DIMM).
- Type: Often shows “DDR4” or “DDR5”.
- Bank Locator: Which slot it’s in (e.g., BANK 0, BANK 1).
This view can tell you if your RAM is in a single 16GB stick or two 8GB sticks. If a slot shows “Not Available,” that means it’s empty and available for an upgrade.
Method 3: Command Prompt & PowerShell for the Tech-Savvy
For users comfortable with the command line, these built-in tools can provide very specific, script-friendly information without any third-party software.
Visual guide about How to Find Ram on Laptop
Image source: robots.net
Using WMIC in Command Prompt
Open Command Prompt (search for “cmd” in the Start menu, right-click, and “Run as administrator” for best results). Type the following command and press Enter:
wmic memorychip get capacity, speed, memorytype, formfactor
This will return a table for each RAM stick installed. The output can be a bit cryptic:
- Capacity: Shows in bytes. Divide by 1,073,741,824 (1024^3) to get GB. E.g., 17179869184 / 1073741824 = 16 GB.
- Speed: In MHz.
- MemoryType: A number code (24 = DDR3, 26 = DDR4, 30 = DDR5).
- FormFactor: A number code (20 = SODIMM for laptops).
Using Get-CimInstance in PowerShell
PowerShell is more modern and provides cleaner output. Open PowerShell (right-click Start menu > Windows Terminal (Admin) or PowerShell (Admin)). Run this command:
Get-CimInstance -ClassName Win32_PhysicalMemory | Format-Table -Property Speed, @{Label="Size(GB)";Expression={[math]::Round($_.Capacity / 1GB, 2)}}, PartNumber, DeviceLocator
This gives you a clean table with Speed (MHz), Size in GB, the part number (which often includes the model and specs), and which slot (DeviceLocator) the stick is in. The part number is gold for identifying exact RAM for an upgrade.
Method 4: The Gold Standard with Third-Party System Profilers
When you need every single detail—the exact part number, manufacturer, timings, and voltage—dedicated system information tools are unbeatable. They are free, safe, and incredibly user-friendly.
CPU-Z: The Industry Favorite
Download and run CPU-Z from its official website (cpuid.com). It’s a lightweight, no-install program. Once open, click on the “Memory” tab and the “SPD” tab.
- Memory Tab: Shows total size, type (DDR4), size, and channels (single/dual).
- SPD Tab: This is the master key. Use the drop-down menu for “Memory Slot Selection.” It will list each slot (DIMM 0, DIMM 1). Selecting each shows the full, granular specs for that specific stick:
- Part Number: Exact model (e.g., HMA851S6DJR6N-XN).
- Module Size: Capacity.
- Max Bandwidth: e.g., DDR4-2666 (1333 MHz).
- Manufacturer: Who made the chips (Samsung, Micron, Hynix).
- Min/Max Cycle Time: Timings like 19-19-19.
Armed with the part number, you can search online for an identical or compatible replacement stick for a dual-channel upgrade.
Other Great Alternatives
- Speccy (by Piriform): Offers a very clean, “at-a-glance” summary on its main screen showing RAM type, size, and speed. Clicking on “RAM” gives more detail.
- HWiNFO: Extremely detailed, used by enthusiasts and technicians. It shows sensor data and exhaustive hardware lists. Look under the “Memory” section.
Method 5: The Physical Inspection – Opening Your Laptop
This is the most hands-on method and is necessary if you plan to upgrade your RAM yourself. It removes all software ambiguity. Warning: Only proceed if you’re comfortable and your laptop’s warranty allows it. Always power off, unplug, and remove the battery (if possible). Ground yourself to avoid static electricity.
Locating and Accessing the RAM Bay
Most modern laptops have a small, removable service panel on the bottom, held by one or two screws. Flip your laptop over and look for a panel that’s roughly 2-3 inches square, often with a RAM module icon (two small rectangles with a line connecting them). Consult your laptop’s manual or search for “[Your Laptop Model] RAM upgrade” on YouTube for a visual guide.
Once you remove the screws and the panel, you’ll see one or two small circuit boards (the RAM sticks) held down by small metal clips on the sides.
Reading the Sticker on the RAM Module
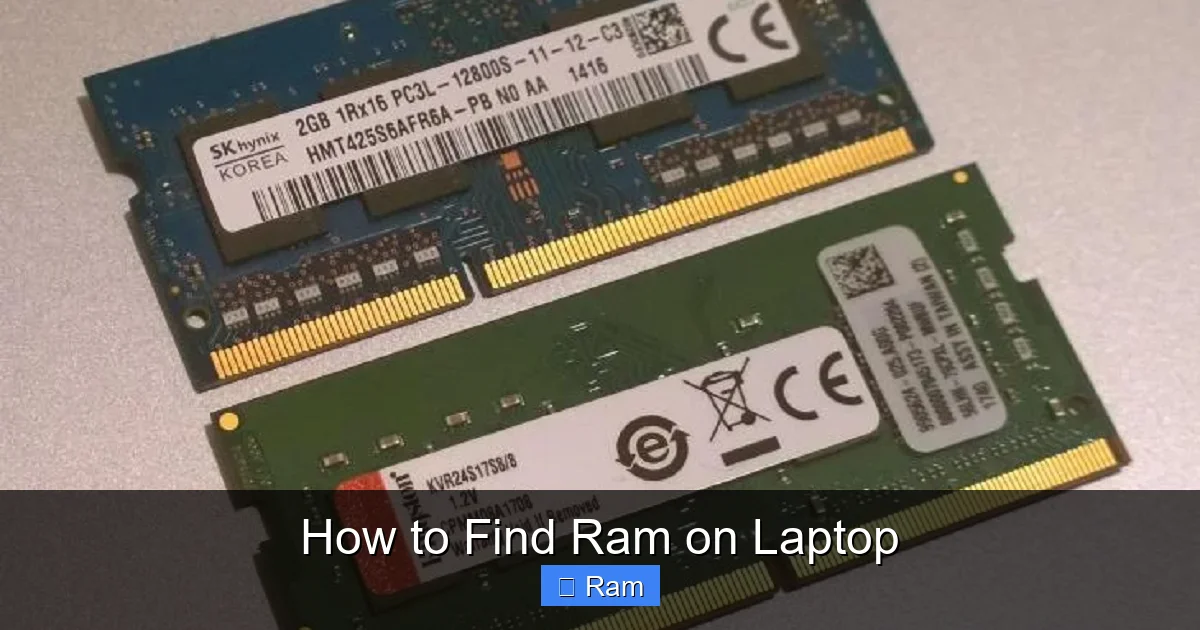
Gently release the clips (they pop outward) and the stick will tilt up at a 45-degree angle, allowing you to pull it out. On the top of the RAM stick, there is a sticker with all the definitive information:
- Part Number / Model: The most important identifier (e.g., KF320C16BB/8G).
- Capacity: Usually in GB (8GB, 16GB).
- Type: DDR3, DDR4, DDR5.
- Speed: In MHz, often with the “PC” rating (e.g., 3200MHz / PC4-25600).
- Timings: A series of numbers like 16-18-18-36.
- Voltage: Typically 1.2V or 1.35V.
Write down or photograph this sticker. This is your blueprint for an exact or compatible replacement. If you have two sticks, check if they are identical—matching pairs in dual-channel mode offer the best performance. If they are different, it’s best to replace both with a matched kit.
What to Do After You Find Your RAM Info
So you’ve used one of the methods above and have your specs. Now what? The path forward depends on your goal.
If You’re Upgrading for Better Performance
First, check your laptop’s maximum supported RAM. This is a critical limit set by the motherboard and BIOS. You can often find this on the manufacturer’s support website for your specific model number. Use the information from your physical inspection or CPU-Z to determine:
- How many slots are occupied? If both are full, you must replace existing sticks with higher-capacity ones.
- What is the current RAM type and speed? You must buy compatible RAM. DDR4 will not fit in a DDR3 slot. It’s best to match the speed and timings of your existing RAM if keeping any old sticks.
- What is the maximum per-slot capacity? Some older laptops max out at 8GB per slot, even if the total max is 16GB.
Pro Tip: For best results and stability, especially in dual-channel mode, purchase a RAM kit (two identical sticks sold together) rather than mixing two separate, potentially mismatched sticks.
If You’re Diagnosing a Slow Laptop
Check your RAM usage in Task Manager’s Performance tab. Consistently seeing 80-100% usage while doing light tasks is a red flag. If you have less than 8GB in 2024, it’s likely insufficient for modern Windows and browser workloads. An upgrade to 16GB is the single most effective performance boost for a general-use laptop. If you already have 16GB but still see high usage, the issue may be background software, a failing drive, or a weak CPU.
If You’re Buying a Used Laptop
Use the methods above (Task Manager is quickest) to verify the seller’s claims. A laptop advertised as “8GB RAM” might have two 4GB sticks, which is easy to upgrade, or one 8GB stick, leaving a slot empty. Knowing the slot configuration tells you how easy and cheap it will be to add more RAM later.
Special Considerations for macOS Users
The process for Apple Silicon (M1/M2/M3) MacBooks and Intel-based MacBook Pros is different but equally simple.
For Apple Silicon Macs (M1, M2, M3 Chips)
RAM is unified and soldered to the motherboard. It cannot be upgraded after purchase. To check, click the Apple menu (🍎) > About This Mac. The overview window will clearly state your memory (e.g., “8GB unified memory”). That’s all you need to know. There are no slots, no user-replaceable modules.
For Intel-Based MacBooks (pre-2020)
Many, but not all, had user-upgradable RAM. To check: Apple menu > About This Mac > Memory tab. It will state the memory size and often say “Upgradeable” or “Not Upgradeable.” For the most detailed view (slots, type), click System Report… (or go to Utilities > System Information). Under Hardware > Memory, you’ll see the total, type (e.g., DDR4), and the number of slots used and empty.
Important: If you have an Intel MacBook with a Retina display (most 2012+ models), the RAM is almost always soldered and not upgradeable. Only older, non-Retina MacBook Pros (usually pre-2012) have accessible RAM slots.
Frequently Asked Questions
Can I check my laptop’s RAM without turning it on?
No, you cannot check RAM capacity or specs without powering on the laptop and loading an operating system. The only way to see the physical modules is to open the laptop, which requires it to be powered off and unplugged. However, you can sometimes find the original specifications from the manufacturer’s website using your laptop’s serial number or model number, which is often on a sticker on the bottom.
Does the RAM type (DDR3, DDR4, DDR5) really matter for an upgrade?
Absolutely. RAM types are not physically or electrically compatible. A DDR4 stick will not fit into a DDR3 or DDR5 slot, and vice versa. The type is determined by your motherboard’s chipset. You must match the type exactly. Use CPU-Z or your physical inspection to confirm the type before buying any new RAM.
What’s the difference between “total RAM” and “usable RAM”?
“Total RAM” or “Installed RAM” is the physical capacity of all memory modules in your laptop (e.g., 16GB). “Usable RAM” is slightly less because the system and your integrated or discrete graphics card reserve a portion of that physical RAM for their own use (this is “hardware reserved” in Task Manager). On most modern laptops with 16GB or more, the difference is negligible (e.g., 15.8GB usable out of 16GB). On systems with very low RAM (4GB), the reserved portion can be more noticeable.
Is it better to have one large RAM stick or two smaller ones?
For performance, two smaller sticks (e.g., 2x8GB) in a dual-channel configuration is significantly better than one large stick (1x16GB). Dual-channel mode allows the CPU to access both sticks simultaneously, doubling the data bandwidth. This improves performance in integrated graphics, gaming, and memory-intensive applications. However, using two sticks means both slots are occupied, leaving no room for future expansion. Using one stick leaves a slot free for a future upgrade to 2x16GB, but you sacrifice the dual-channel benefit until you add the second stick.
My laptop shows less RAM than I installed. Why?
This can happen for several reasons. First, if you have a 32-bit version of Windows, it can only address about 4GB of RAM total. You must be running a 64-bit OS to use more than 4GB. Second, some of your RAM may be “hardware reserved” by your BIOS for the GPU, especially on laptops with integrated graphics. This is normal and can be seen in Task Manager. Third, a faulty RAM stick or a poorly seated module can cause the system to ignore part of your memory. Reseating the modules or running a memory diagnostic (Windows Memory Diagnostic) can help identify hardware issues.
How much RAM do I actually need in 2024?
For a new laptop in 2024, 16GB is the new sweet spot for most users. It comfortably handles modern Windows 11/10, dozens of Chrome tabs, office applications, and light photo editing. 8GB is the absolute minimum for basic use but will feel cramped with multiple apps open. 32GB is recommended for demanding tasks like professional video editing, 3D rendering, running virtual machines, or heavy software development. Gamers can often stick with 16GB, but 32GB is becoming more common for future-proofing. For basic web browsing and document work, 8GB might still suffice, but 16GB offers a much smoother experience.