How to Find Ram of Laptop
Knowing your laptop’s RAM (Random Access Memory) is crucial for performance upgrades and troubleshooting. You can easily find this information using your operating system’s built-in utilities like Windows Task Manager or macOS About This Mac. For more detailed specs, free third-party software like CPU-Z or Speccy provides in-depth data. If you’re comfortable, a physical check inside the laptop’s service panel gives the most accurate model and capacity details. Always power down and unplug your laptop before any internal inspection.
Key Takeaways
- Built-in OS tools are the fastest method: Windows Task Manager and macOS System Information provide immediate, basic RAM capacity and speed data without any downloads.
- Third-party software offers deep technical details: Tools like CPU-Z or HWiNFO reveal not just size but exact RAM type (DDR3/DDR4/DDR5), timings, and slot usage, which is vital for upgrades.
- Physical inspection is 100% accurate for modules: Opening the service panel lets you see the exact RAM sticks installed, their make, model, and available slots, but requires caution and power disconnection.
- Linux users have powerful terminal commands: Commands like `free -h` and `sudo dmidecode –type memory` give comprehensive RAM information directly from the command line.
- Understanding the specs matters for upgrades: Knowing your laptop’s maximum supported RAM, slot count, and compatible type (DDR generation, speed) is essential before purchasing new memory modules.
- Virtual/Total RAM are different: The “RAM” you see in system info is physical memory. Your OS also uses a portion of your storage drive as virtual memory (page file/swap), which is much slower.
- Safety first: Always shut down, unplug the charger, and remove the battery (if possible) before opening your laptop’s case to avoid electric shock or component damage.
📑 Table of Contents
- Why Knowing Your Laptop’s RAM Matters
- Method 1: Using Your Operating System’s Built-In Tools
- Method 2: Leveraging Trusted Third-Party Software
- Method 3: The Physical Inspection (Opening Your Laptop)
- Understanding the Specs: Decoding RAM Jargon
- Planning an Upgrade: What to Do After You Find the Info
- Common Pitfalls and Troubleshooting
- Conclusion: Knowledge is Power (and Performance)
Why Knowing Your Laptop’s RAM Matters
Have you ever felt your laptop sluggish when opening a dozen browser tabs, editing a photo, or running a simple spreadsheet? The culprit is often insufficient or slow RAM (Random Access Memory). RAM is your laptop’s short-term memory workspace. It holds the data your active applications and the operating system need right now for quick access. Unlike your hard drive or SSD, which stores data permanently, RAM is volatile—it clears when you power off. Understanding how to find the RAM in your laptop isn’t just a tech trivia question; it’s a practical skill for diagnosing slowdowns, planning a cost-effective performance boost, or ensuring compatibility before buying a new machine.
Whether you’re a student, a professional, or a casual user, knowing your current RAM capacity, type, and configuration empowers you. It answers critical questions: Can I run this new software? Should I upgrade my memory? Is my laptop capable of handling more demanding tasks? This guide will walk you through every reliable method to discover your laptop’s RAM specifications, from the simplest one-click software checks to the hands-on approach of peeking inside the hardware. We’ll cover Windows, macOS, and Linux systems, ensuring you have the knowledge regardless of your device.
Method 1: Using Your Operating System’s Built-In Tools
The easiest way to find your laptop’s RAM is to ask the operating system itself. Both Windows and macOS have excellent, built-in utilities that provide this information in seconds, with no need to install any third-party software. This is perfect for a quick check or for users who are uncomfortable downloading utilities or opening their device.
Visual guide about How to Find Ram of Laptop
Image source: itarian.com
For Windows Users: Task Manager & System Information
Windows offers two primary built-in tools. The first, and quickest, is the Task Manager. The second, more detailed one is the System Information utility.
Using Task Manager:
1. Press Ctrl + Shift + Esc on your keyboard. Alternatively, right-click the taskbar and select “Task Manager.”
2. If it opens in a compact view, click “More details” at the bottom.
3. Navigate to the “Performance” tab.
4. Click on “Memory” in the left-hand pane.
5. The top-right graph will show you your total RAM (e.g., “16.0 GB”). Below, you’ll see details like In use (Committed), Speed (e.g., 3200 MHz), Form factor ( SODIMM for laptops), and Hardware reserved memory. This gives you a great snapshot.
Using System Information:
1. Open the Start Menu and type msinfo32, then press Enter. This opens the System Information window.
2. In the left pane, navigate to Components > Memory.
3. The right pane displays a wealth of information. Look for “Total Physical Memory” for your total capacity. Scroll down to the “Physical Memory” section. Here you’ll see a list of each RAM slot (if you have more than one stick). For each, it shows the Size, Speed, Manufacturer (if reported), and Part Number. This is more detailed than Task Manager.
For macOS Users: About This Mac & System Report
Apple makes it incredibly straightforward to check your MacBook’s RAM.
Using About This Mac:
1. Click the Apple menu () in the top-left corner of your screen.
2. Select “About This Mac.”
3. A window pops up showing an overview. The line labeled “Memory” will show your total RAM (e.g., “8 GB 2133 MHz LPDDR3”). It displays the total capacity, speed, and the RAM generation (LPDDR3, DDR4, etc.).
For More Detail (System Report):
1. In the same “About This Mac” window, click the “System Report…” button.
2. In the System Information window, under the Hardware section, select “Memory.”
3. This page lists each memory slot. You’ll see the Type (e.g., DDR4), Speed, Status (OK), the Manufacturer, and the Part Number. It also tells you the number of slots used versus total slots, which is crucial for upgrade planning.
For Linux Users: Terminal Commands
Linux, being open-source and highly configurable, offers several powerful command-line tools to inspect RAM. Open your terminal (Ctrl+Alt+T or search for “Terminal”).
Command 1: `free -h` (Human-readable)
This is the most common command. The `-h` flag makes the output easy to read (using GB, MB).
free -h
Look for the row labeled “Mem:”. The “total” column shows your installed RAM. The “used” and “available” columns show current usage.
Command 2: `cat /proc/meminfo` (Detailed Info)
This command dumps all memory information from the kernel.
cat /proc/meminfo
Look for MemTotal (total usable RAM), MemFree, and MemAvailable. It also lists details about swap space.
Command 3: `sudo dmidecode –type memory` (Most Detailed)
This command reads the system’s DMI (Desktop Management Interface) table, providing incredibly detailed information about each RAM module as reported by the firmware.
sudo dmidecode --type memory
You’ll need sudo (administrator) privileges. The output will list each “Memory Device” (DIMM). Key fields are Size, Type (e.g., DDR4), Speed, Manufacturer, Part Number, and Locator (which slot it’s in).
Method 2: Leveraging Trusted Third-Party Software
While built-in tools are great, sometimes you need more technical depth or a user-friendly interface that aggregates all hardware data in one place. This is where reputable, free system information utilities shine. They are invaluable for enthusiasts, gamers, and anyone planning an upgrade who needs to know the exact model number of their RAM sticks to ensure compatibility.

Visual guide about How to Find Ram of Laptop
Image source: itarian.com
Top Recommended Tools: CPU-Z and Speccy
CPU-Z (from CPUID):
This is the gold standard for hardware enthusiasts. It’s lightweight, free, and provides extremely detailed, accurate information.
1. Download it from the official cpuid.com website. Avoid download portals that bundle unwanted software.
2. Run the executable (no installation needed).
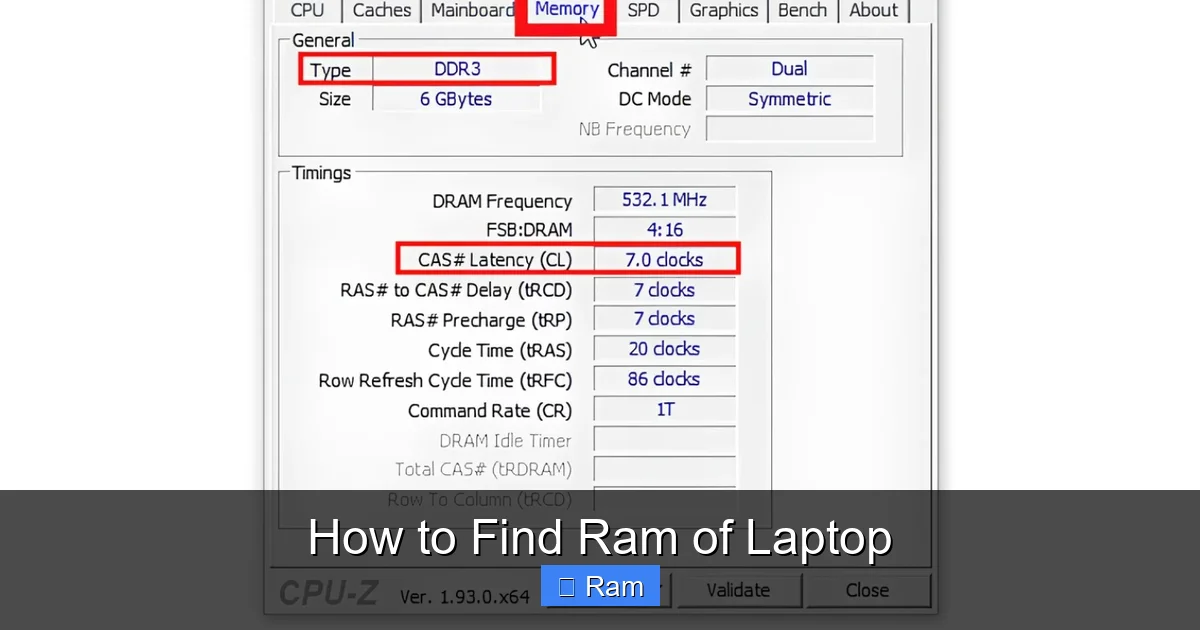
3. Click the “Memory” tab. Here you’ll see the Type (DDR4, etc.), Size, Channel # (single/dual), and NB Frequency.
4. For module-specific details, click the “SPD” tab. Use the drop-down menu to select Slot #1, Slot #2, etc. This reveals the Part Number, Manufacturer, Min/Max Speed, and timings (like 16-18-18-38) for that specific stick. This part number is the key to finding an identical replacement or matching pair.
Speccy (by Piriform – makers of CCleaner):
Speccy offers a more visually appealing, summary-style view of all your components.
1. Download from the official ccleaner.com/speccy site.
2. Install and run it.
3. The main window shows a snapshot. Click on “RAM” in the left sidebar for a dedicated view.
4. It clearly displays Total capacity, Type, Speed, and lists each Memory Slot with its size, type, and speed. It’s excellent for a quick, comprehensive overview without diving into raw technical data.
Other Notable Utilities
HWiNFO: A powerhouse for sensor reading and hardware enumeration. Its summary page is fantastic, and the memory section is incredibly thorough, showing not just module info but also detailed SPD data for each slot. It’s more complex but is the tool of choice for many system builders.
Windows PowerShell/Command Prompt (Advanced): You can also use built-in commands. Get-WmiObject -Class Win32_PhysicalMemory | Format-Table in PowerShell will list each memory module’s capacity, speed, manufacturer, and part number. It’s a good no-download option for advanced users.
Method 3: The Physical Inspection (Opening Your Laptop)
If you want absolute certainty—or if your laptop won’t boot and you can’t use software—there’s no substitute for looking at the RAM modules yourself. This method confirms the exact physical components installed and reveals if you have open slots available for an upgrade. However, this requires caution.
Visual guide about How to Find Ram of Laptop
Image source: robots.net
Essential Pre-Check: Is Your Laptop Upgradeable?
Before you even grab a screwdriver, you must know: can you open your laptop? Many modern ultrabooks and MacBooks have RAM soldered directly onto the motherboard, making it completely non-upgradeable. Apple has done this since ~2012 on most models. Many thin-and-light Windows laptops from Dell XPS, HP Spectre, and Lenovo Yoga lines also feature soldered RAM. Your first step is to research your exact laptop model.
1. Find your model number. It’s often on a sticker on the bottom of the laptop or in the system information (BIOS/UEFI name).
2. Search online for “[Your Laptop Model] RAM upgrade” or “[Your Laptop Model] service manual.”
3. Look for official documentation or reputable teardown videos (from iFixit, YouTube creators like “Linus Tech Tips”). These will confirm if there are accessible SODIMM slots or if the memory is soldered.
Step-by-Step Guide to Safe Physical Inspection
If your research confirms upgradeable SODIMM slots, proceed with extreme care:
1. Power Down Completely: Shut down the operating system fully. Do not just sleep or hibernate.
2. Unplug Everything: Remove the charger, any USB devices, and peripherals.
3. Remove the Battery (if possible): If your laptop has a removable bottom cover and a separate battery, disconnect it. This is a critical safety step to prevent any power from reaching the motherboard.
4. Ground Yourself: Static electricity can destroy components. Touch a grounded metal object (like the unpainted part of a radiator or the laptop’s own metal chassis if it’s plugged into a grounded outlet) before touching internal parts. Using an anti-static wrist strap is the best practice.
5. Locate and Remove the Service Panel: Most laptops have a small panel on the bottom secured by one or two Phillips-head screws. Gently pry it off. Some older models require removing the entire bottom plate.
6. Locate the RAM Modules: They are small, green circuit boards (SODIMMs) about the size of your thumb, usually held down by small metal clips on either side. They are often located near the center or a corner of the motherboard.
7. Inspect and Identify: Gently push the metal clips outward (away from the module) to release it. The module will pop up at an angle. Pull it out gently. Look at the sticker on the module. It will clearly state the Capacity (e.g., 8GB), Type (e.g., DDR4 SDRAM), Speed (e.g., 3200MHz), and the Manufacturer Part Number (e.g., HMT451S6BFR8A-PB). This is the most accurate information you can get.
8. Reassembly: To reinstall, align the notch on the module with the key in the slot, insert it at the same angle, and press down firmly until the side clips snap into place. Replace the panel and screws. Reconnect the battery if you removed it.
Understanding the Specs: Decoding RAM Jargon
Finding the numbers is one thing; understanding what they mean is another. Let’s break down the key specifications you’ll encounter.
Capacity: The “How Much”
This is the total amount of data your RAM can hold at once, measured in gigabytes (GB). For decades, 4GB was the baseline. Today, 8GB is the absolute minimum for basic use with modern operating systems and web browsers. 16GB is the sweet spot for most users—smooth multitasking, photo editing, and casual gaming. 32GB or more is for professional workloads (video editing, 3D rendering, virtual machines, heavy programming). Your laptop may have one 16GB stick, two 8GB sticks, or other combinations adding up to the total.
Generation: DDR3, DDR4, DDR5
This refers to the RAM technology standard. They are not physically compatible with each other. The notch (key) is in a different position.
– DDR3: Found in laptops from ~2007-2015. Speeds typically 1066 to 2133 MHz.
– DDR4: The dominant standard from ~2015-2022. Speeds from 2133 to 3200 MHz commonly in laptops.
– DDR5: The newest standard, starting to appear in high-end 2022+ laptops. Faster (4800+ MHz) but currently more expensive. Your OS or system tools will usually report this clearly (e.g., “DDR4”).
Speed: MHz and Timings
Speed is measured in megahertz (MHz), like 2666, 3200, or 4800. Higher numbers mean faster data transfer rates. However, RAM also has timings (e.g., 16-18-18-38), a series of numbers (CL, tRCD, tRP, tRAS) that represent latency—the delays in accessing data. Lower timings are better. For most users, matching the speed (and generation) of your existing RAM is the primary concern. Enthusiasts may also match timings for optimal performance.
Channels: Single vs. Dual
If your laptop has two RAM slots, using two identical sticks (e.g., two 8GB modules) enables dual-channel mode. This effectively doubles the data pathway between RAM and the memory controller, significantly improving performance (especially for integrated graphics). Your system tools (like CPU-Z’s “Memory” tab) will show “Channel #: Dual” if it’s active. For an upgrade, it’s always best to install matching pairs in the correct slots (usually slot A and B, not both in A).
Planning an Upgrade: What to Do After You Find the Info
So you’ve discovered your laptop has only 4GB of RAM and it’s crawling. What next? Your newfound knowledge is the foundation for a successful upgrade.
Step 1: Determine Maximum Supported RAM
Your laptop’s chipset and BIOS have a maximum RAM limit. This is often higher than what’s currently installed. Search online for your laptop’s exact model + “maximum RAM.” Manufacturer spec sheets will state this (e.g., “Up to 64GB”). Your physical inspection (Method 3) will also show how many slots you have. Two slots with 8GB each = 16GB total. If the max is 32GB, you could replace both with 16GB sticks.
Step 2: Identify the Correct Module Type
From your inspection or CPU-Z, you know you need DDR4 SODIMM modules. SODIMM is the small form factor for laptops (vs. DIMM for desktops). You also need the correct speed. While faster RAM often downclocks to the slowest module’s speed, it’s best to match. If you have 2666MHz RAM, buying a 3200MHz stick will likely run at 2666MHz. For dual-channel, buy a matched kit (two identical sticks sold together) from a reputable brand like Crucial, Kingston, Corsair, or G.Skill.
Step 3: Purchase and Install
Buy from a reputable retailer with a good return policy. Use the part number you found as a reference. Before installing, ensure you’ve followed all safety steps (power off, unplug, ground). The installation process you learned during physical inspection is the same. After installing, power on and immediately go back to your system tool (Task Manager, About This Mac) to confirm the new capacity is recognized. If not, reseat the modules.
Common Pitfalls and Troubleshooting
What if you do all this and something’s wrong? Here are common issues.
“My laptop shows less RAM than I installed.” This is common with 32-bit Windows, which has a ~4GB limit. You must be running a 64-bit OS to use more than 4GB. It can also happen if one stick is faulty or not seated properly. Reseat the modules.
“My RAM speed is lower than the sticker says.” Many laptops, especially business-class ones (Dell Latitude, Lenovo ThinkPad), have a default power setting that runs RAM at a conservative speed (e.g., 2133MHz on a 3200MHz kit) for stability and battery life. You may need to enable XMP/EXPO profiles in the BIOS/UEFI, but many laptops lock this. Check your laptop’s manual.
“I can’t find the RAM info in BIOS/UEFI.” Some very basic BIOS screens don’t show detailed RAM info. Use the operating system methods instead. The BIOS might only show total size during POST (Power-On Self-Test).
“My laptop won’t turn on after I opened it.” 99% of the time, this is due to not reconnecting the battery cable (if it was separate) or not properly seating the RAM modules. Double-check all connections and ensure the RAM is clicked firmly into place.
Conclusion: Knowledge is Power (and Performance)
Learning how to find the RAM in your laptop demystifies one of the most critical components affecting your daily computing experience. You now have a toolkit of methods, from the effortless one-minute check in your OS’s settings to the definitive physical inspection. Remember the hierarchy: start with built-in tools for a quick answer. Use CPU-Z or Speccy for detailed specs essential for upgrades. Resort to physical inspection only when necessary and after confirming your laptop is upgradeable.
This knowledge transforms you from a passive user into an informed one. You can now diagnose performance issues, make intelligent purchasing decisions, and even perform your own upgrades, saving money and extending the life of your device. So, go ahead—open Task Manager, run `dmidecode`, or carefully unscrew that panel. Discover what’s under the hood and take control of your laptop’s performance today. Your future, faster self will thank you.
Frequently Asked Questions
Can I check my laptop’s RAM without turning it on?
No, you cannot check RAM specifications without powering on the laptop at least to the operating system or BIOS. The physical method requires removing the back panel, but you still need to power off and unplug the laptop first. The BIOS/UEFI screen (accessed during boot) sometimes shows basic RAM info, but it’s not consistent across all models.
What’s the difference between RAM and storage (SSD/HDD)?
RAM is volatile, super-fast temporary memory used for active tasks and data the CPU needs immediately. Storage (SSD/HDD) is non-volatile, permanent memory for your operating system, programs, and files. Think of RAM as your desk where you work on current papers, and storage as your filing cabinet where everything is kept long-term.
Is it better to have one large RAM stick or two smaller ones?
For most modern laptops with two slots, using two identical sticks (e.g., two 8GB modules) enables dual-channel mode, which provides a significant performance boost (up to 10-15% in some applications) compared to a single stick. So, two matching sticks are generally better than one large stick, provided your laptop supports dual-channel (which most with two slots do).
Can I mix RAM speeds? For example, a 2666MHz and a 3200MHz stick?
Yes, you can physically install them, but all modules will run at the speed of the slowest stick (in this case, 2666MHz). The faster module will simply downclock. For best performance and stability, especially in dual-channel mode, it’s highly recommended to use a matched kit of identical speed, capacity, and timings from the same manufacturer.
My laptop shows 8GB RAM but only 7.9GB is usable. Is that normal?
Yes, this is completely normal. A portion of your RAM is “hardware reserved” by the system for the integrated graphics processor (iGPU), BIOS, and other system functions. This reserved amount varies (typically 0.5GB to 2GB) depending on your laptop’s hardware and BIOS settings. The OS subtracts this from the total physical RAM reported.
Does adding more RAM always make my laptop faster?
Not always. If your current RAM usage is consistently below 80% during your normal tasks, adding more RAM will have a negligible effect. The performance gain is most noticeable when you are constantly maxing out your existing RAM (causing slowdowns and disk thrashing). Adding RAM in that scenario removes that bottleneck. Also, if your laptop’s CPU or storage drive is very slow, those components may still limit overall performance even with ample RAM.