How To Install Laptop Ram And Upgrade Memory Today
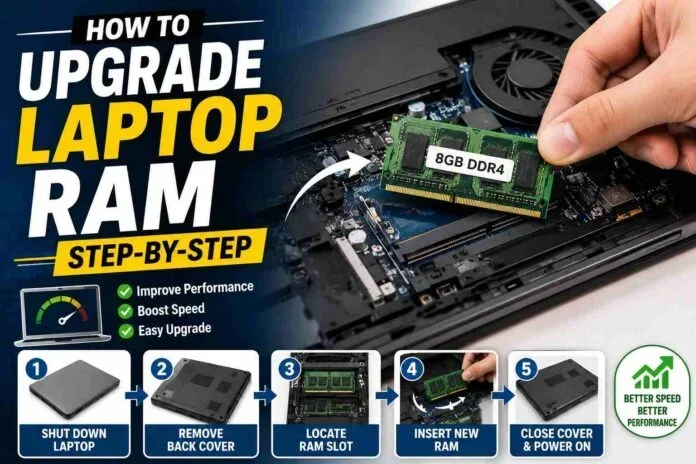
Learning how to install laptop RAM is one of the easiest and most affordable ways to boost your laptop’s performance. This guide walks you through every step, from checking compatibility to popping in a new memory module. Whether you have a Dell, HP, or Lenovo, you will be up and running in under 30 minutes.
Is your laptop feeling slow? Do you struggle to open multiple browser tabs or run heavy programs without lag? The answer might be simpler than you think. A laptop RAM upgrade can transform a sluggish machine into a fast, responsive powerhouse. In this guide, we will show you exactly how to install laptop RAM step by step. You do not need to be a tech expert. Anyone can do this at home with just a few basic tools.
Upgrading your laptop memory is one of the best value upgrades you can make. A new RAM stick can cost as little as $20 to $50, yet the difference in speed and multitasking ability is huge. Whether you are a student, a remote worker, or a casual gamer, more RAM means a better experience. Let us dive into everything you need to know about installing RAM in your laptop today.
Key Takeaways
- Easy DIY Project: Installing laptop RAM takes just a few simple tools and no technical expertise.
- Big Performance Boost: More RAM means faster multitasking, smoother browsing, and better overall speed.
- Check Compatibility First: Always verify your laptop’s RAM type, speed, and max capacity before buying.
- Affordable Upgrade: A RAM upgrade costs far less than buying a new laptop.
- Safety Matters: Ground yourself and handle RAM sticks carefully to avoid damage.
- Quick Process: Most installations take 10 to 20 minutes from start to finish.
📑 Table of Contents
- Why Upgrading Your Laptop RAM Matters
- Step 1: Check Your Laptop’s RAM Compatibility
- Step 2: Gather Your Tools and Materials
- Step 3: Prepare Your Laptop for the RAM Installation
- Step 4: Open Your Laptop and Access the RAM
- Step 5: Install the New RAM Stick
- Step 6: Close Up and Test Your Laptop
- Quick Tips for a Smooth RAM Upgrade
- Common Mistakes to Avoid When Installing Laptop RAM
- How Much of a Performance Boost Can You Expect?
- When Should You Not Upgrade RAM?
- Conclusion
Why Upgrading Your Laptop RAM Matters
Random Access Memory, or RAM, is the short-term memory your laptop uses to handle tasks. When you open apps, browse the web, or edit documents, your laptop stores temporary data in RAM. The more RAM you have, the more tasks your laptop can handle at once without slowing down.
Signs Your Laptop Needs More RAM
How do you know if your laptop needs a memory boost? Look for these common signs:
- Your laptop takes forever to switch between apps
- You get “out of memory” errors frequently
- Your browser slows down with multiple tabs open
- Videos and games stutter or freeze
- Your laptop takes a long time to wake from sleep
If you notice any of these issues, it is probably time to upgrade your laptop RAM. Before you rush out to buy new memory, though, there are a few things you need to check first.
Step 1: Check Your Laptop’s RAM Compatibility
This is the most important step. Not all RAM works with all laptops. Before purchasing any memory module, you need to know what your laptop supports.
Find Out What Type of RAM Your Laptop Uses
Most modern laptops use DDR4 RAM, while older models may use DDR3. Some very new laptops use DDR5. You can check your current RAM type using the System Information tool on Windows or by visiting your laptop manufacturer’s support page. Simply search for your laptop model number and look up the specifications.
Check Your Max RAM Capacity
Every laptop has a maximum amount of RAM it can support. Some laptops support up to 16 GB, while others can handle 32 GB or even 64 GB. Check your laptop manual or the manufacturer’s website to find this number. If your laptop already has 8 GB installed and supports 16 GB, you can add an 8 GB stick to double your memory.
Count Your Available RAM Slots
Laptops usually have one or two RAM slots. Some ultra-thin models have RAM soldered to the motherboard and cannot be upgraded. Use a tool like Crucial’s System Scanner or check your laptop manual to see how many free slots you have. This tells you how much memory you can add.
Check RAM compatibility for your specific model before making any purchase. This saves you time, money, and frustration.
Step 2: Gather Your Tools and Materials
Here is what you will need before you start the installation process:
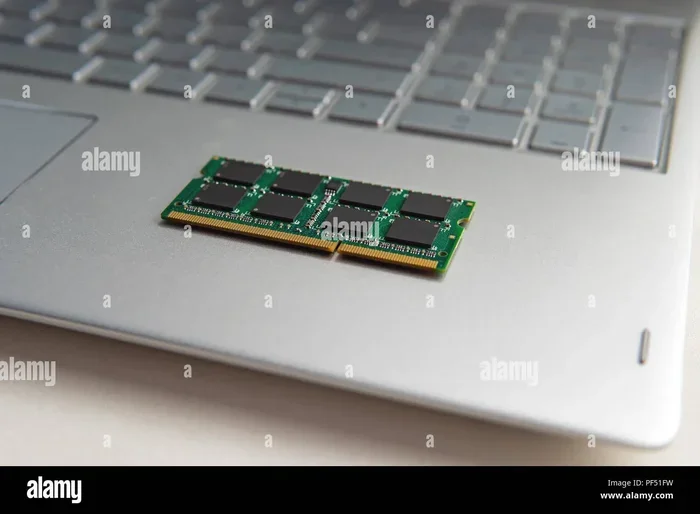
- A compatible RAM stick (DDR4 SODIMM is the most common type for modern laptops)
- A small Phillips-head screwdriver
- An anti-static wrist strap (optional but recommended)
- A clean, flat workspace with good lighting
- A soft cloth to place your laptop on
You can buy RAM sticks from most electronics stores or online retailers. Make sure the RAM matches the type, speed, and capacity your laptop supports. Installing RAM in your laptop becomes much smoother when you have everything ready before you start.
Step 3: Prepare Your Laptop for the RAM Installation
Safety comes first. Working with computer components requires a few precautions to avoid damaging your laptop or yourself.
Power Down and Unplug Everything
Shut down your laptop completely. Do not just put it to sleep. Unplug the power adapter and disconnect any external devices like USB drives, mice, or monitors. Remove the battery if your laptop has a removable battery. This prevents any electrical damage during the installation.
Ground Yourself
Static electricity can damage sensitive components like RAM. Touch a metal surface, like a doorknob or your laptop’s metal frame, to discharge any static buildup. If you have an anti-static wrist strap, clip it to the metal part of your laptop. This simple step protects your new memory module from static damage.
Find a Clean Workspace
Place your laptop on a soft, clean cloth. Avoid carpets or blankets that can generate static. Good lighting helps you see the small screws and slots inside your laptop.
Step 4: Open Your Laptop and Access the RAM
Now for the fun part. Opening your laptop to access the RAM is easier than most people think.
Locate the RAM Compartment
Most laptops have a small panel on the bottom held in place by one or two screws. Look for a panel labeled “Memory” or “RAM.” If you are unsure, check your laptop’s user manual or search online for a disassembly guide specific to your model.
Remove the Bottom Panel
Use your Phillips-head screwdriver to remove the screws. Keep the screws in a safe place, like a small bowl. Gently pry off the panel using a plastic spudger or your fingernail. Avoid using metal tools that could scratch the laptop’s surface.
Locate the Existing RAM Sticks
Once the panel is off, you will see the RAM sticks. They are long, thin rectangles clipped into slots on the motherboard. If your laptop has two slots and one is already filled, you will install the new stick in the empty slot. If both slots are filled, you will need to remove one stick and replace it with the new one, or add both new sticks.
Before touching any components, ground yourself again by touching the metal frame of the laptop.
Step 5: Install the New RAM Stick
Here is where the actual laptop RAM installation happens. Follow these steps carefully.
Remove the Old RAM (If Needed)
If you need to remove existing RAM to make room, gently push the metal clips on either side of the RAM stick outward. The stick will pop up at an angle. Carefully pull it straight out. Place it in an anti-static bag or on a safe surface.
Insert the New RAM Stick
Take your new SODIMM RAM stick out of its packaging. Hold it by the edges to avoid touching the gold contacts. Align the notch on the RAM stick with the ridge in the slot. Insert the stick at a 30- to 45-degree angle. Push it down firmly until the metal clips on both sides click into place. The stick should sit flat and feel secure.
Double-Check the Installation
Give the RAM stick a gentle tug to make sure it is firmly seated. It should not move or wobble. The clips on both sides should be fully locked. If the stick pops out or feels loose, remove it and reinsert it at the correct angle.
Step 6: Close Up and Test Your Laptop
Now that the new RAM is installed, it is time to put everything back together and test it.
Replace the Bottom Panel
Place the bottom panel back onto the laptop. Press it down gently until it clicks into place. Replace the screws and tighten them firmly but not too tight. Overtightening can strip the screw holes.
Reconnect the Battery and Power
If you removed the battery, put it back in. Reconnect the power adapter and any external devices you removed earlier.
Power On and Verify the Upgrade
Turn on your laptop. During the boot process, you may see a message showing the new RAM amount. Once Windows loads, right-click on “This PC” or “My Computer” and select “Properties.” You should see the updated RAM amount listed under “Installed memory (RAM).” If the amount matches your new stick, congratulations. Your upgrade was successful.
If the new RAM is not detected, try reseating the stick. Sometimes the stick needs a little extra pressure to click fully into place. You can also use Windows Memory Diagnostic to test the new RAM for errors.
Quick Tips for a Smooth RAM Upgrade
Here are some expert tips to make your laptop memory upgrade even easier:
- Buy matching RAM pairs: If your laptop has two slots, install identical sticks for dual-channel performance. This can improve speed by up to 20 percent.
- Check RAM speed: Make sure the new stick’s speed (measured in MHz) matches or exceeds your laptop’s supported speed.
- Watch the videos: Search YouTube for a disassembly video of your specific laptop model. Seeing the process helps a lot.
- Take photos: Before removing any screws or components, take photos. This helps you remember how everything goes back together.
- Be patient: Do not force anything. If a part does not fit easily, stop and double-check your approach.
Common Mistakes to Avoid When Installing Laptop RAM
Even simple tasks can go wrong if you are not careful. Here are common mistakes to watch out for:
- Buying the wrong RAM type: DDR3 and DDR4 RAM look similar but are not interchangeable. Always double-check your laptop’s requirements.
- Forcing the RAM stick: RAM should slide in smoothly. If it resists, stop. Forcing it can bend the pins and ruin the stick.
- Forgetting to ground yourself: Static discharge is the number one cause of RAM damage during installation. Always ground yourself first.
- Not removing the battery: Leaving the battery connected can cause electrical issues. Always disconnect power before working inside your laptop.
- Skipping the compatibility check: Buying RAM without checking your laptop’s specs is the fastest way to end up with incompatible memory.
Avoiding these simple mistakes ensures your laptop RAM installation goes smoothly the first time. If you ever feel unsure, this detailed guide on upgrading laptop RAM offers additional step-by-step support.
How Much of a Performance Boost Can You Expect?
The improvement you see after upgrading depends on what you were working with before. If your laptop had 4 GB of RAM and you upgrade to 8 GB or 16 GB, the difference is dramatic. Apps open faster, web pages load smoother, and you can run multiple programs without slowdowns.
For basic tasks like browsing, email, and word processing, 8 GB of RAM is usually enough. For video editing, photo processing, gaming, or running virtual machines, 16 GB or more makes a big difference. The key is matching your RAM to your usage needs.
Here is a quick comparison of what different RAM amounts feel like:
- 4 GB: Bare minimum. Fine for very light use but struggles with modern apps and multitasking.
- 8 GB: Sweet spot for most users. Handles browsing, office work, and light gaming well.
- 16 GB: Great for creative work, heavy multitasking, and modern gaming.
- 32 GB or more: Ideal for professional video editing, 3D rendering, and running virtual machines.
If you are unsure what your laptop currently has, you can check which RAM is compatible with your laptop and find out your current setup in just a few minutes.
When Should You Not Upgrade RAM?
While RAM upgrades are great for most laptops, they are not always the solution. Here are situations where a RAM upgrade may not help:
- Your laptop has soldered RAM that cannot be replaced
- Your laptop’s slow performance is caused by an old hard drive (an SSD upgrade would help more)
- Your laptop has plenty of RAM but a weak processor
- Your software issues are caused by malware or an operating system problem
In these cases, consider other upgrades like replacing your hard drive with an SSD or optimizing your software. But for most laptops with upgradeable RAM, adding memory is the quickest path to a faster machine.
Conclusion
Installing laptop RAM is one of the simplest and most rewarding upgrades you can do yourself. It costs very little, takes just minutes, and delivers an immediate improvement in speed and performance. You do not need special skills or expensive tools. Just follow the steps in this guide, be careful and patient, and you will have a faster laptop in no time.
Remember to check compatibility first, ground yourself before touching components, and handle the RAM sticks gently. If you run into any issues, refer back to the tips and troubleshooting advice in this article. Once you experience the difference that extra laptop memory makes, you will wonder why you did not upgrade sooner.
So go ahead. Grab a compatible RAM stick, open up your laptop, and give it the boost it deserves. Your upgraded machine is waiting.
Frequently Asked Questions
Can I install laptop RAM myself?
Absolutely. Installing laptop RAM is one of the easiest DIY computer upgrades. You only need a small screwdriver, a compatible RAM stick, and about 15 minutes. No technical experience is required.
How do I know which RAM is compatible with my laptop?
Check your laptop’s user manual, visit the manufacturer’s website, or use a tool like Crucial’s System Scanner. Look for the RAM type (DDR3, DDR4, or DDR5), speed, and maximum capacity your laptop supports before buying.
How much does it cost to upgrade laptop RAM?
A single 8 GB DDR4 SODIMM RAM stick typically costs between $20 and $40. Prices vary based on brand, speed, and capacity. It is one of the most affordable upgrades you can make.
Will adding more RAM make my laptop faster?
Yes, if your laptop is running low on memory. More RAM allows your laptop to handle more tasks at once without slowing down. However, if your laptop already has enough RAM for your needs, adding more may not make a noticeable difference.
Can I mix different RAM sticks in my laptop?
You can, but it is best to use matching sticks of the same brand, size, speed, and type. Mixing RAM can sometimes cause compatibility issues or prevent dual-channel mode from working properly.
What happens if I install RAM incorrectly?
If the RAM is not seated properly, your laptop may not recognize it or may fail to boot. This is usually not permanent damage. Simply remove the stick and reinsert it at the correct angle until the clips click into place.