Security Camera Wall Mount Bracket
A security camera wall mount bracket keeps your surveillance system stable, clear, and safe from weather or tampering. This guide walks you through bracket types, mounting steps, common mistakes, and smart placement tips so you can install with confidence. You will also learn how to match your bracket to indoor, outdoor, and high-angle setups without extra hassle. By the end, you will know exactly what to buy and how to mount it for long-term peace of mind.
Security camera wall mount bracket choices can feel confusing at first, but the right one makes your whole setup easier. A good mount keeps your camera steady, protects the wiring, and helps you capture the right view without constant adjustments. If the bracket is too weak, the camera can drift. If the bracket is too bulky, it can ruin the look of your wall. So the best choice balances strength, flexibility, and clean installation.
Many people focus only on the camera itself and forget the mount. That is a mistake. The mount is what holds everything in place day after day, through wind, vibration, temperature changes, and ordinary wear. A solid security camera wall mount bracket helps your camera stay aligned, reduces false motion alerts, and makes your surveillance system more reliable. In this guide, we will keep things simple and practical so you can choose and install with confidence.
Key Takeaways
- Choose the right bracket style: fixed, adjustable, swing, or dome mounts each serve different camera angles and spaces.
- Check your wall material: drywall, brick, stucco, and concrete all need different anchors and screws for a secure hold.
- Mind the camera weight: a security camera wall mount bracket must support the camera without sagging or loosening over time.
- Plan the viewing angle first: aim for clear coverage of doors, driveways, and entry points before drilling any holes.
- Use weather-resistant hardware outdoors: stainless steel or coated brackets help prevent rust and extend the life of your setup.
- Keep wiring tidy and safe: hide cables behind walls or use proper conduits so the mount stays neat and protected.
- Test before finalizing: loosen, adjust, and retighten the bracket after the first week to catch any shifting early.
📑 Table of Contents
- Why a Quality Security Camera Wall Mount Bracket Matters
- Types of Security Camera Wall Mount Brackets
- Choosing the Right Bracket for Your Wall and Camera
- How to Install a Security Camera Wall Mount Bracket
- Common Mistakes to Avoid
- Tips for Long-Term Performance
- When to Call for Professional Help
- Final Thoughts on Choosing and Using a Security Camera Wall Mount Bracket
Why a Quality Security Camera Wall Mount Bracket Matters
A camera can have great resolution, smart features, and strong night vision, but none of that matters if the mount fails. The bracket is the foundation of your setup. It affects stability, angle, and even how long the camera lasts. A weak mount can cause shaky footage, poor coverage, and repeated readjustments. A strong mount gives you cleaner video and fewer headaches.
Outdoor cameras face more stress than indoor ones. Rain, sun, wind, and temperature swings can loosen cheap hardware over time. Indoor cameras may not deal with weather, but they still need a bracket that stays firm and looks neat. If you want your system to work well for years, start with the mount, not just the camera.
Stability Protects Your Footage
Shaky video is frustrating. It can blur faces, miss important details, and make recordings less useful. A well-built security camera wall mount bracket reduces movement and helps keep the field of view steady. That matters whether you are watching a front porch, a backyard gate, or a shared hallway.
The Right Bracket Improves Coverage
Not every wall angle works for every camera. Some spots need a straight-on view. Others need a tilted or offset angle. The right bracket lets you fine-tune the position without awkward drilling or extra hardware. That flexibility can make a big difference in how well your camera covers the area you care about most.
Types of Security Camera Wall Mount Brackets
Not all brackets are built the same. The best option depends on your camera style, your wall, and the view you want. Here are the most common types you will see when shopping for a security camera wall mount bracket.
Fixed Wall Mounts
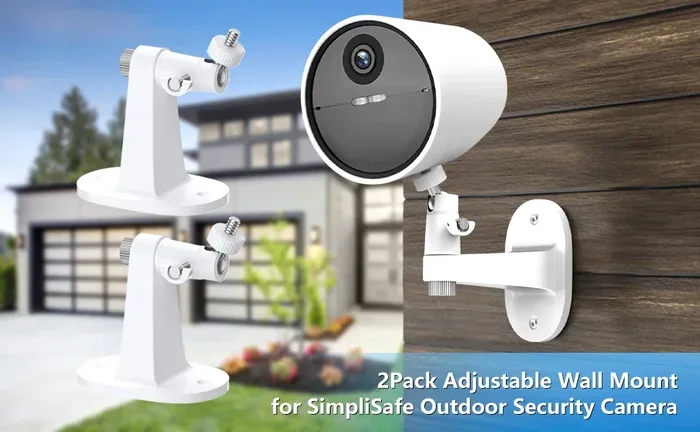
Fixed mounts are simple and sturdy. They hold the camera in one position with very little movement. This is a good choice when you already know the exact angle you want. Fixed mounts are often easy to install and work well for basic surveillance needs.
They are usually the most straightforward option, but they do not allow much adjustment later. If your camera position needs to change, you may need to remove and reinstall the bracket.
Adjustable and Tilt Mounts
Adjustable mounts give you more control. You can often tilt the camera up or down after installation. This is useful for covering driveways, entrances, or areas that need a precise angle. If you want a little flexibility without adding a lot of complexity, this is a smart middle ground.
Swing or Pendant-Style Mounts
Swing-style mounts can help when you need the camera to extend away from the wall. These are sometimes used when the wall surface or trim gets in the way of a direct mount. They can also help create a cleaner line of sight in certain spaces. Just keep in mind that extra moving parts may need more careful installation.
Dome and Junction Box Mounts
Some cameras use dome-style housings or junction box mounts. These setups often look more polished and can be a good fit for commercial or shared building environments. A security camera wall mount bracket for these cameras should match the housing exactly so the unit sits securely and looks consistent.
Choosing the Right Bracket for Your Wall and Camera
Before you buy, match the bracket to both the camera and the wall. This step saves time and prevents frustrating do-overs. A bracket that fits your camera but not your wall can still cause problems.
Check Camera Weight and Size
Every mount has a load limit. Lighter cameras can work with smaller brackets, while heavier units need stronger support. Always check the camera specifications and compare them with the bracket rating. If the bracket feels borderline, choose a sturdier one. It is better to over-support than under-support.
Match the Bracket to the Wall Surface
Different walls need different fasteners. Drywall usually needs anchors. Brick and concrete often need masonry bits and screws. Stucco can be fragile, so it may need careful handling and the right anchor type. If you are unsure, pause and confirm the wall material before drilling.
Indoor vs Outdoor Needs
Outdoor mounts should handle moisture and temperature changes. Look for corrosion-resistant materials and hardware that will not rust quickly. Indoor mounts can be simpler, but they still need to stay secure. If the camera sits near a window, door, or busy area, choose a bracket that can handle frequent vibration or accidental bumps.
How to Install a Security Camera Wall Mount Bracket
A careful installation makes a huge difference. You do not need to be a professional to do this well, but you do need patience and the right steps. A rushed job often leads to crooked cameras or weak holds.
Plan the Placement First
Before drilling, decide where the camera should go. Think about what you want to capture and where people naturally walk or enter. Check for obstacles like branches, lights, or reflections that could interfere with the view. If possible, hold the camera in place temporarily before mounting so you can test the angle.
Gather the Right Tools
You will usually need:
- A drill and suitable drill bits
- Screws and anchors that fit your wall
- A level
- A measuring tape
- A screwdriver
- Optional: a pencil for marking holes
Having everything ready before you start helps the process go smoothly. It also reduces the chance of missing an important step.
Mark, Drill, and Secure
Start by marking the bracket holes carefully. Use a level so the bracket sits straight. Drill only after you double-check the position. Then insert anchors if needed and fasten the bracket firmly. Do not overtighten if the wall material is fragile, but make sure the mount is secure.
Attach the Camera and Adjust
Once the bracket is fixed, attach the camera and set the angle. If your mount allows adjustment, take your time and test the view. Small changes can improve coverage a lot. After everything is in place, check that the camera stays firm and does not shift when touched lightly.
Common Mistakes to Avoid
Even a simple mount can go wrong if a few common mistakes slip in. Avoiding these problems will save you time and improve your results.
Mistake 1: Choosing a Bracket That Is Too Weak
Some people pick the cheapest option without checking weight limits or material quality. That can lead to sagging or loosening later. A security camera wall mount bracket should be strong enough for your specific camera and location.
Mistake 2: Ignoring Wall Type
Using the wrong anchor is one of the most common installation errors. Drywall anchors do not work the same way as masonry anchors. If you skip this step, the mount may not hold properly.
Mistake 3: Poor Angle Planning
If you mount the camera before thinking about the view, you may miss the area you wanted to cover. Always consider lighting, obstacles, and the most likely entry points before finalizing the position.
Mistake 4: Leaving Cables Exposed or Loose
Messy wiring can look bad and may get damaged more easily. Plan cable routing before you mount the camera. If the setup is outdoors, protect the wires as much as possible so weather and movement do not cause problems.
Tips for Long-Term Performance
A good mount should keep working well long after installation. A few simple habits can help your bracket and camera stay in good shape.
Check Tightness Periodically
Temperature changes and vibration can slowly loosen hardware. Check the bracket and screws every so often, especially after severe weather or if the camera is in a high-traffic area. A quick inspection can prevent bigger issues later.
Keep the Area Around the Mount Clean
Dust, leaves, spider webs, and other debris can build up around outdoor cameras. Clearing the area helps maintain a clear view and reduces the chance of moisture trapping or blockages.
Reassess the View Over Time
Trees grow, furniture moves, and activity patterns change. If your coverage starts to drift, adjust the bracket if it allows movement. Even a fixed mount may need to be repositioned if the area around it changes.
Use a Bracket That Fits Your Style and Setting
If you care about appearance, choose a bracket that blends well with the wall and camera. If you care more about flexibility, choose one that gives you easier angle control. There is no single best option for every home or building. The best security camera wall mount bracket is the one that fits your camera, your wall, and your goals.
When to Call for Professional Help
Many installs are simple enough for a careful DIY job. But some situations are trickier. If you are mounting a heavy camera on a high wall, working with unknown materials, or dealing with complex wiring, extra help may be useful. Professional installation can also be a good idea when you want the setup to look polished and stay secure without trial and error.
If you are considering a larger system or a commercial-style setup, it may help to review broader installation guidance as well. For example, some property owners explore commercial security camera installation options when they need a more structured approach.
Final Thoughts on Choosing and Using a Security Camera Wall Mount Bracket
A security camera wall mount bracket may seem like a small part, but it plays a big role in how well your surveillance system works. The right bracket gives your camera stability, improves coverage, and helps the whole setup last longer. Take the time to match the mount to your camera, your wall, and your environment. Plan the angle before drilling, use the correct anchors, and check the installation after the first few days.
If you choose carefully and install thoughtfully, your camera will stay where it should and capture the view you want. That simple step can make your security setup much more dependable over time.
Frequently Asked Questions
What is a security camera wall mount bracket used for?
A security camera wall mount bracket holds your camera securely against a wall and helps you position it at the right angle. It also keeps the camera stable so your footage stays clear and consistent.
Can I install a security camera wall mount bracket on drywall?
Yes, but you usually need the right anchors for drywall so the mount can support the camera safely. If the camera is heavy or the location gets vibration, stronger anchoring may be necessary.
How do I know which bracket fits my camera?
Check the camera’s size, weight, and mounting style, then compare those details with the bracket specifications. The best security camera wall mount bracket is the one made to support your specific camera model or attachment type.
Do outdoor cameras need a special wall mount bracket?
They often do, because outdoor mounts should resist rust, moisture, and temperature changes better than basic indoor hardware. Corrosion-resistant materials and sturdy fasteners are a smart choice for exterior setups.
What should I do if my camera keeps shifting after mounting?
Tighten the bracket screws, check that the anchors are secure, and make sure the camera fits the mount properly. If the wall material is weak or the bracket is undersized, you may need a stronger mount or different anchors.
Is it better to mount a camera high on the wall or lower?
That depends on what you want to capture. Higher mounting can give a broader view of an entry area, while lower mounting may be better for focused coverage. The best height is the one that gives you a clear, useful angle without creating blind spots.