Which Feature Physically Adjusts a Camera Lens to Counteract Movement
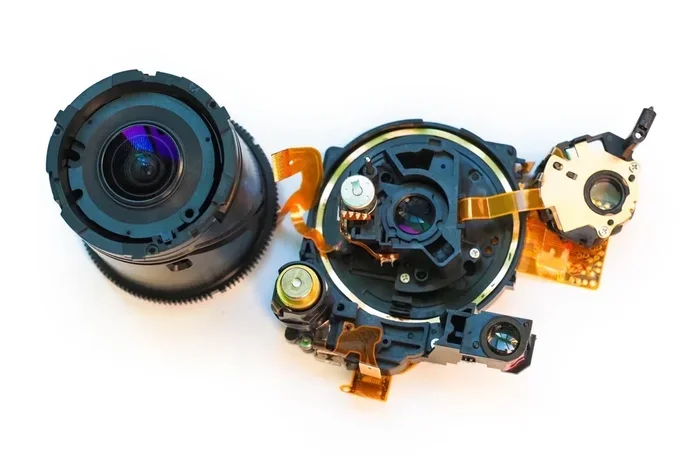
Optical image stabilization is the key feature that physically adjusts a camera lens to counteract movement. This technology shifts lens elements to compensate for hand shake. It helps you capture sharp photos even in low light. Understanding this mechanism improves your photography skills significantly. You will learn exactly how your gear fights motion blur.
Have you ever taken a photo that looks blurry? You might have held your breath and stood still. Yet the image still looks soft. This happens because of tiny movements in your hands. Even the best photographer shakes a little bit. The good news is that modern cameras have a smart solution.
The answer to which feature physically adjusts a camera lens to counteract movement is optical image stabilization. This system uses tiny motors inside the lens. These motors move specific glass elements around. They do this very fast to fight your hand shake. It feels like magic but it is pure engineering.
In this guide we will explore how this works. We will look at why it matters for your photography equipment. You will learn when to use it and when to turn it off. By the end you will know how to get sharper digital images every time. Let us dive into the mechanics of camera lens stabilization.
Key Takeaways
- Optical Stabilization: This feature moves lens elements to cancel out hand shake.
- Sensor Shift: Some cameras move the sensor instead of the lens for stability.
- Low Light Help: Stabilization allows slower shutter speeds without blur.
- Video Benefit: Smooth footage is easier to achieve with stabilized lenses.
- Battery Life: Electronic stabilization uses more power than optical methods.
- Cost Factor: Stabilized lenses often cost more than non-stabilized ones.
- Tripod Use: You should turn stabilization off when using a tripod.
📑 Table of Contents
- Understanding Optical Image Stabilization
- Sensor Shift Stabilization Explained
- Why Stabilization Matters for Sharp Photos
- Video Stabilization vs Photo Stabilization
- When to Turn Off Stabilization
- Cost and Value of Stabilized Lenses
- Comparison of Stabilization Methods
- Expert Tips for Better Stability
- Common Mistakes to Avoid
- Future of Camera Stabilization
- Conclusion
Understanding Optical Image Stabilization
Optical image stabilization is often called OIS. It is a hardware feature found in many camera lenses. The main goal is to reduce blur caused by motion. This motion usually comes from your hands holding the camera. It can also come from walking or wind.
The system works by detecting movement first. Small sensors inside the lens feel the shake. These sensors send data to a microcomputer. The computer tells tiny motors what to do. These motors then move the lens elements in the opposite direction.
Imagine you are trying to keep a laser pointer on a dot. If your hand moves left the dot moves left. OIS moves the lens right to cancel that shift. This keeps the light path steady on the sensor. The result is a much clearer photo capture.
How the Motors Work
The motors used in optical stabilization are very precise. They are often voice coil motors or piezo motors. These devices can move glass elements by micrometers. A micrometer is one thousandth of a millimeter. This level of precision is necessary for sharp images.
The process happens in real time. It occurs faster than your eye can see. You do not feel the lens moving during shooting. However you might see a shift in the viewfinder. Some systems compensate for this visual shift too.
Types of Lens Stabilization
Not all stabilization systems are the same. Different brands use different names and methods. Canon calls it IS which stands for Image Stabilization. Nikon uses the term VR for Vibration Reduction. Sony refers to it as OSS or Optical SteadyShot.
Despite the different names the physics remain similar. They all rely on moving physical parts. This distinguishes them from electronic methods. Electronic image stabilization crops the image instead. It does not move the lens physically. We will compare these later in the article.
Sensor Shift Stabilization Explained
Some cameras do not put stabilization in the lens. Instead they put it inside the camera body. This is called sensor shift stabilization. The image sensor itself moves to counteract shake.
This method is very effective for many mirrorless cameras. It allows you to use non-stabilized lenses. You still get the benefit of steady shots. This can save money on camera gear in the long run.
Pros and Cons of Sensor Shift
There are clear advantages to moving the sensor. You can use any lens you want. Older lenses work just as well as new ones. The stabilization works across all focal lengths too.
However there are some limits. The range of movement is smaller than in a lens. Very long telephoto lenses might need lens-based stabilization. Also the camera body might be more expensive. You need to check your specific model specs.
When to Choose Sensor Shift
Sensor shift is great for street photography. It is also good for travel photography. You might carry one body and many lenses. Having stabilization in the body simplifies your kit. It ensures every lens has shake reduction capabilities.
Why Stabilization Matters for Sharp Photos
The main reason to use stabilization is clarity. Blur ruins otherwise perfect moments. It is especially bad in low light situations. When light is low you need slower shutter speeds. Slower speeds mean more time for shake to happen.
A general rule is the one over focal length rule. If you use a 50mm lens you should shoot at 1/50th of a second or faster. Without stabilization this is hard to do handheld. With stabilization you might shoot at 1/10th of a second. This opens up many creative possibilities.
Low Light Photography
Indoor events often have poor lighting. You cannot always use a flash. Stabilization helps you capture candid moments. You can lower your ISO settings too. Lower ISO means less noise in your digital images. This leads to higher quality prints.
Telephoto Lens Challenges
Long lenses magnify everything including shake. A small movement at the camera becomes a big movement at the subject. This is why telephoto lenses often have built-in stabilization. It is crucial for wildlife and sports photography. Without it your shots will look soft.
Video Stabilization vs Photo Stabilization
Taking photos and shooting video have different needs. For photos you need a single sharp moment. For video you need consistent smoothness over time. Video stabilization often combines optical and electronic methods.
Optical stabilization handles high frequency shake well. This includes small hand vibrations. Electronic stabilization handles low frequency movement. This includes walking or panning across a scene. Together they create very smooth footage.
Limitations in Video Mode
Optical systems can sometimes struggle with large movements. If you move the camera too fast the lens might run out of range. The system might also introduce a floating look. This is sometimes called the jelly effect. It is important to test your gear before a big shoot.
Using Stabilization for Cinematic Looks
Many filmmakers use gimbals for the best results. But stabilization in the lens helps a lot. It reduces the workload on the gimbal motors. It also helps when you cannot use a gimbal. Handheld video looks much more professional with it.
When to Turn Off Stabilization
Even though stabilization is great it is not always needed. There are times when you should switch it off. Using it incorrectly can actually hurt your image quality. You need to know when to disable camera shake correction.
Using a Tripod
When you mount your camera on a tripod the camera is still. The stabilization system might think the stillness is shake. It might try to move the lens unnecessarily. This creates micro-vibrations that blur the image. Always turn off stabilization on a solid tripod.
Fast Shutter Speeds
If you are shooting at very fast speeds stabilization is not needed. A fast shutter freezes motion completely. The stabilization system has nothing to correct. Leaving it on might add slight noise or drain battery. It is better to save the power for when you need it.
Long Exposure Nuances
Some systems have a special tripod mode. This allows stabilization for very long exposures. It compensates for wind or ground vibration. Check if your lens has this specific setting. It can be very useful for night photography.
Cost and Value of Stabilized Lenses
Stabilized lenses usually cost more than non-stabilized ones. You are paying for the extra motors and sensors. This adds to the complexity of the build. However the value is often worth the price. It gives you more flexibility in the field.
Budget Considerations
If you are on a tight budget you have options. You can buy a stabilized camera body instead. Or you can focus on fast prime lenses. Fast lenses let in more light naturally. This reduces the need for stabilization in some cases.
Long Term Investment
Technology changes but stabilization remains useful. It is a feature that will not go out of style. Buying stabilized gear is a safe long term choice. It ensures you can shoot in varied conditions. This makes your photography equipment more versatile.
Comparison of Stabilization Methods
It helps to see the differences side by side. Different methods suit different needs. Here is a quick comparison to help you decide.
| Feature | Optical Lens Stabilization | Sensor Shift Stabilization | Electronic Stabilization |
|---|---|---|---|
| Mechanism | Moves lens elements | Moves image sensor | Crops and shifts video |
| Best For | Telephoto and low light | Versatility with any lens | Video and social media |
| Battery Impact | Low | Low to Medium | High |
| Image Quality | Maintains full resolution | Maintains full resolution | Reduces resolution |
| Cost | Higher per lens | Higher per body | Included in many cameras |
This table shows the trade offs clearly. Optical is great for resolution. Electronic is great for video convenience. Sensor shift offers a good middle ground. Choose based on your primary shooting style.
Expert Tips for Better Stability
Technology helps but your technique matters too. You can improve stability with good habits. Combine your gear with proper holding methods. This gives you the best chance for sharp results.
Proper Holding Technique
Hold the camera close to your body. Tuck your elbows in tight. Use your viewfinder instead of the rear screen. This creates a third point of contact. Breathe out gently before pressing the shutter. These small steps reduce physical movement.
Using Support Tools
Monopods are great for heavy lenses. They provide support without restricting movement. Walls and tables can also act as rests. Lean your camera against a stable surface. Even a small beanbag can stabilize a heavy rig.
Focusing on Breathing
Your own breathing moves the camera. Try to shoot between breaths. Some photographers hold their breath briefly. Do not hold it too long or you will shake. Find a rhythm that works for you.
Common Mistakes to Avoid
Many photographers make simple errors with stabilization. Avoiding these mistakes saves time and frustration. Here are some common pitfalls to watch out for.
- Leaving it on for landscapes: Tripod shots need it off.
- Expecting infinite range: Stabilization has limits on movement.
- Ignoring battery drain: Active stabilization uses more power.
- Forgetting to reset: Some lenses need a reset after storage.
- Assuming all lenses have it: Check specs before buying.
Being aware of these issues helps you plan better. You will spend less time editing blurry photos. You will also protect your gear from unnecessary wear.
Future of Camera Stabilization
Technology keeps improving every year. New motors are becoming faster and quieter. Algorithms are getting smarter at predicting shake. We might see even more integration in the future.
Some systems now combine lens and body stabilization. This dual stabilization offers maximum protection. It covers a wider range of movement frequencies. This is exciting for both photo and video shooters.
Integration with AI
Artificial intelligence might play a bigger role. Cameras could learn your specific shake patterns. They could adjust the stabilization profile automatically. This would make shooting even easier for beginners. It would also help pros work faster.
Impact on Smartphone Photography
Smartphones already use heavy stabilization. They combine optical and electronic methods heavily. As phone cameras improve this tech trickles down. It raises the bar for all image stabilization technology. Everyone benefits from these advancements.
Conclusion
So which feature physically adjusts a camera lens to counteract movement? It is optical image stabilization. This clever system uses motors to move glass elements. It fights the natural shake of your hands. It allows for sharper photos in challenging light.
Whether you choose lens-based or sensor-based systems matters less. What matters is that you use stabilization wisely. Turn it off on tripods. Turn it on for handheld low light shots. Understand the limits of your specific gear.
By mastering this feature you improve your photography skills. You capture moments that would otherwise be lost to blur. Your images will look more professional and crisp. Keep experimenting with your settings to find what works best. Happy shooting!
Frequently Asked Questions
How does optical stabilization move the lens?
Small motors inside the lens shift specific glass elements. They move in the opposite direction of your hand shake. This keeps the light path steady on the sensor.
Is sensor shift better than lens stabilization?
Neither is strictly better as they serve different needs. Sensor shift works with any lens you attach. Lens stabilization often handles longer focal lengths better.
Does stabilization work in manual mode?
Yes stabilization works regardless of your exposure mode. It focuses purely on physical movement. You can use it in manual or automatic settings.
Can stabilization fix motion blur from subjects?
No it only fixes blur from camera movement. If your subject moves fast you need a faster shutter speed. Stabilization does not freeze action.
Why does my lens move when I look through it?
You might see a shift when stabilization activates. This is normal for some optical systems. The viewfinder compensates for this in many modern cameras.
Should I leave stabilization on all the time?
You should turn it off when using a tripod. It can cause vibrations when the camera is already still. Otherwise leaving it on is usually fine for handheld shooting.