Camera Settings for Blurred Background
Want that dreamy, creamy background in your photos? Learn how to adjust aperture, focal length, and subject distance to create a beautiful blur. These easy camera settings for blurred background work for DSLRs, mirrorless and even smartphones.
Key Takeaways
- Aperture is king: The wider the f‑stop, the smoother the background blur.
- Focal length matters: Longer lenses compress distance and boost bokeh.
- Get close to your subject: Reducing subject‑to‑camera distance increases separation.
- Sensor size influences blur: Full‑frame sensors give the most background separation.
- Use manual focus when needed: It guarantees the exact point you want sharp.
- Lighting can enhance or soften blur: Soft light keeps edges gentle.
- Practice makes perfect: Experiment with settings in real‑world scenes to find your style.
📑 Table of Contents
- Introduction
- 1. Aperture: The Heart of Bokeh
- 2. Focal Length: How Lens Choice Shapes Blur
- 3. Distance: Subject‑to‑Camera and Camera‑to‑Background
- 4. Sensor Size: Full‑Frame, APS‑C, Micro‑Four‑Thirds
- 5. Exposure Triangle: Balancing Shutter Speed & ISO
- 6. Creative Enhancements: Light, Filters, and Post‑Processing
- 7. Putting It All Together: A Step‑by‑Step Workflow
- 8. Common Mistakes and How to Avoid Them
- 9. Gear Recommendations (Optional)
- Conclusion
Introduction
There’s something magical about a photo where the subject pops out of a soft, creamy background. Whether you’re shooting a portrait, a flower, or a street scene, that blur—often called “bokeh”—adds depth and drama. The good news? You don’t need expensive lenses or a fancy studio. By mastering a few key camera settings, you can create a blurred background with almost any gear.
In this guide we’ll break down the science and the art behind camera settings for blurred background. You’ll learn how aperture, focal length, sensor size, and distance work together, plus practical tips you can apply right now. Think of it as a friendly chat over coffee, where I share the exact steps I use on my own shoots.
1. Aperture: The Heart of Bokeh
What aperture does
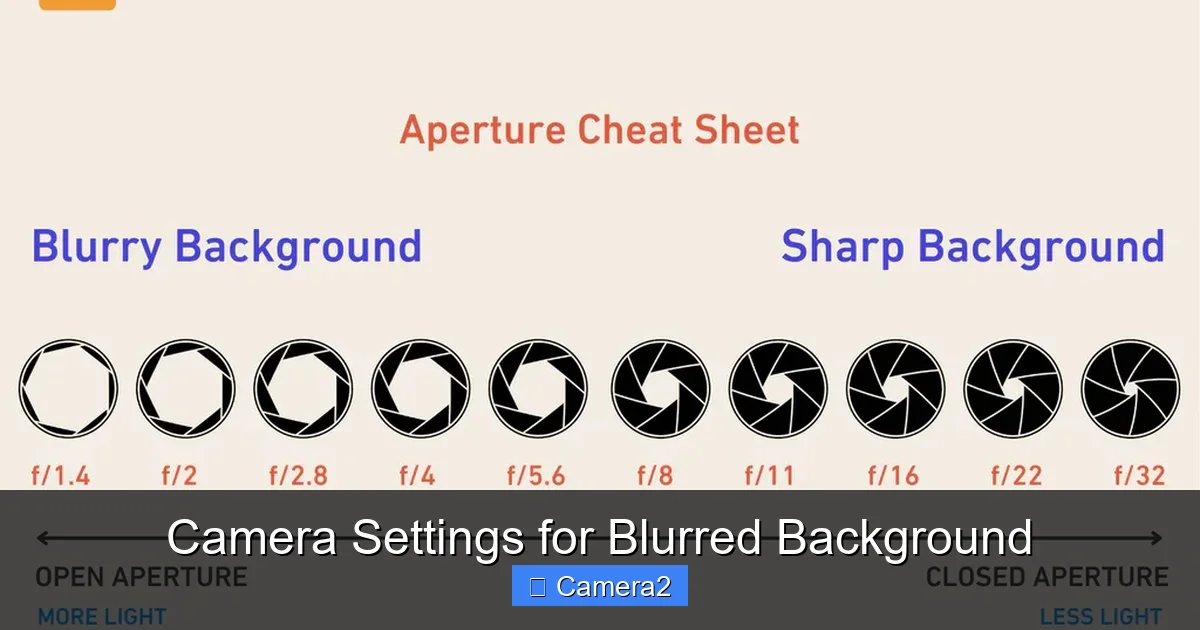
Aperture controls the size of the opening in the lens through which light enters. It’s measured in f‑stops: f/1.4, f/2.8, f/5.6, etc. A lower number means a wider opening, letting in more light and creating a shallower depth of field. That shallow depth of field is what gives you a blurred background.
Choosing the right f‑stop
- Portraits: Aim for f/1.8 to f/2.8. This isolates the face while keeping the eyes razor‑sharp.
- Close‑up nature shots: Even f/4 can work if you get very close to the flower.
- Group photos: Use a narrower aperture (f/5.6‑f/8) to keep everyone in focus.
Practical tip
If your camera has a “aperture priority” mode (A or Av), set the desired f‑stop and let the camera choose the shutter speed. This is a quick way to experiment with blur without diving into full manual mode.
2. Focal Length: How Lens Choice Shapes Blur
Why longer lenses help
Focal length is the distance (in millimeters) between the lens and the sensor when focused at infinity. Longer lenses (e.g., 85 mm, 135 mm, 200 mm) compress the scene, making background elements appear closer to the subject. This compression amplifies the blur effect.
Prime vs. zoom
- Prime lenses (fixed focal length) often have wider maximum apertures, making them ideal for bokeh.
- Zoom lenses can still produce beautiful blur if you zoom to the longer end and open the aperture.
Example setup
Take a 50 mm prime on a full‑frame DSLR, set to f/1.8, and stand 4 feet from your subject. The background will melt away. If you switch to a 200 mm lens and back up to 8 feet, the blur becomes even smoother while maintaining composition.
3. Distance: Subject‑to‑Camera and Camera‑to‑Background
The three‑distance rule
Blur is strongest when three conditions are met:
- Close subject distance: The nearer you are to the subject, the shallower the depth of field.
- Far background distance: The farther the background is from the subject, the more it blurs.
- Long focal length: As covered above, this adds extra compression.
How to measure
Use your camera’s focus assist or a simple tape measure. For portrait work, a distance of 3‑5 feet usually yields pleasing blur at f/2.0.
Real‑world example
When photographing a child playing in a park, crouch down and get within 2 feet of the child. Even a modest 35 mm lens at f/2.8 will give a soft backdrop of trees and benches.
4. Sensor Size: Full‑Frame, APS‑C, Micro‑Four‑Thirds
Why sensor matters
Larger sensors capture a wider field of view at the same focal length, which translates to a shallower depth of field. That’s why full‑frame cameras are prized for bokeh.
What to do with smaller sensors
- Use lenses with wider maximum apertures (e.g., f/1.4, f/1.8).
- Crop in post‑processing to simulate a longer focal length.
- Get as close as possible to the subject.
Quick comparison
At f/2.0, a 50 mm lens on a full‑frame camera gives about 1.5 feet of near‑focus distance, while the same lens on an APS‑C sensor behaves like a 75 mm lens on full‑frame, delivering even more background blur.
5. Exposure Triangle: Balancing Shutter Speed & ISO
Keeping the image sharp
When you open the aperture for blur, more light hits the sensor. To avoid overexposure, you’ll need to adjust shutter speed or ISO.
Shutter speed tips
- For static subjects, you can drop the shutter speed to 1/60 s or slower.
- For moving subjects, keep the shutter at 1/125 s or faster to freeze motion.
ISO considerations
Raise ISO only as much as needed. Modern cameras handle ISO 800‑1600 with minimal noise, but staying low preserves image quality.
6. Creative Enhancements: Light, Filters, and Post‑Processing
Lighting tricks
Soft, diffused light (cloudy days, window light with a sheer curtain) keeps the subject’s edges gentle, complementing the background blur.
Using filters
A circular polarizer can deepen the sky’s color without affecting bokeh. A neutral density (ND) filter lets you shoot wide open in bright daylight.
Post‑processing boost
In Lightroom or Capture One, increase the “Clarity” just for the subject using a radial filter, and add a slight “Vignette” to push attention inward.
7. Putting It All Together: A Step‑by‑Step Workflow
Step 1 – Choose your lens
Select a lens with a wide maximum aperture. If you have a prime like 85 mm f/1.8, great. If you’re using a kit zoom, set it to the longest focal length.
Step 2 – Set aperture priority
Switch to Av/A mode and pick the widest aperture your lens allows (e.g., f/1.8).
Step 3 – Position yourself
Move close to the subject, ensure the background is at least a few meters away, and compose.
Step 4 – Adjust ISO & shutter
If the exposure meter reads too bright, raise ISO or add an ND filter. If it’s too dark, slow the shutter (use a tripod if needed).
Step 5 – Focus
Use single‑point autofocus on the subject’s eye or the most important part. For ultimate control, switch to manual focus.
Step 6 – Shoot and review
Take a few test shots, zoom in on the preview, and confirm the background is nicely blurred. Adjust distance or aperture as needed.
8. Common Mistakes and How to Avoid Them
Using too small an aperture
Stopping down to f/8 or higher will bring the background into focus, ruining the bokeh.
Standing too far away
If you’re too distant, even a wide aperture won’t separate the subject enough.
Ignoring sensor limitations
On a tiny sensor (e.g., smartphone), you may need to rely on computational portrait modes instead of optical blur.
9. Gear Recommendations (Optional)
If you’re looking to upgrade, consider a lens like the DSLR camera for photo booth setup that includes a fast prime lens. Pair it with a sturdy good camera backpack for hiking to protect your gear on location.
Conclusion
Creating a blurred background isn’t magic; it’s a combination of aperture, focal length, distance, and sensor size. By understanding how these camera settings for blurred background interact, you can consistently produce images with that professional, dreamy look—no matter if you’re using a high‑end DSLR or a pocket‑size mirrorless. Remember to experiment, review your shots, and have fun playing with light and perspective. The next time you look at a photo with creamy bokeh, you’ll know exactly how you made it happen.
Frequently Asked Questions
What aperture should I use for the smoothest background blur?
Generally, the widest aperture your lens offers (e.g., f/1.4, f/1.8, f/2.0) gives the smoothest bokeh. The lower the f‑stop, the shallower the depth of field.
Can I achieve blurred background with a smartphone?
Yes. Use portrait mode or a third‑party app that simulates shallow depth of field. Getting close to the subject and ensuring the background is far away also helps.
Does sensor size affect bokeh?
Absolutely. Larger sensors (full‑frame) produce a shallower depth of field at the same aperture and focal length than smaller APS‑C or Micro‑Four‑Thirds sensors.
Why does my background still look sharp even at f/1.8?
It could be because you’re too far from the subject, the background is close, or the lens isn’t actually wide open. Move closer or increase the focal length.
Should I use manual focus for portrait blur?
Manual focus gives precise control, especially when the autofocus may hunt. Focus on the subject’s eye, then lock exposure.
How does lighting influence background blur?
Soft, diffused light keeps the subject’s edges gentle, making the transition to the blurred background smoother. Harsh light can create hard edges that look less natural.