Can You Add Ram to a Laptop
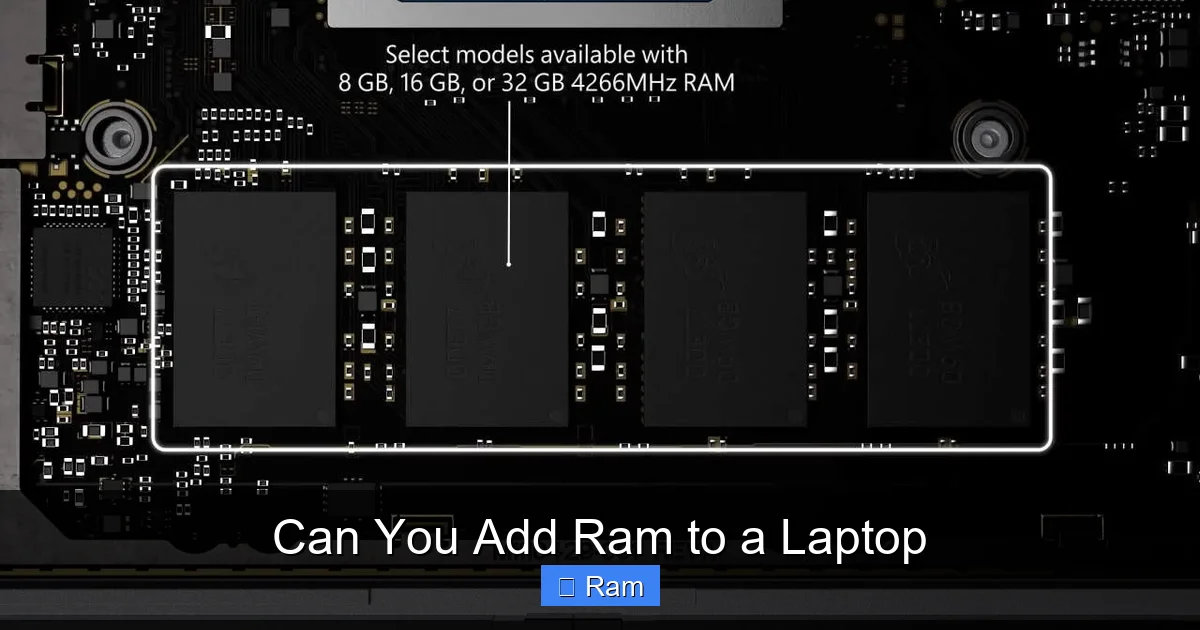
Yes, in many cases you can add RAM to a laptop to significantly improve its performance, but it’s not universally possible. The upgrade depends entirely on your specific laptop model, as some have soldered, non-removable memory. You must first verify your laptop’s maximum supported RAM, the type of RAM (DDR3, DDR4, DDR5), and whether it has an accessible slot. With the right information and a simple toolkit, the physical installation is a straightforward process for most users, often taking less than 15 minutes. This upgrade is one of the most cost-effective ways to breathe new life into an aging machine, making multitasking smoother and speeding up demanding applications.
Key Takeaways
- Not All Laptops Are Upgradable: Many modern ultrabooks and thin-and-light laptops have RAM soldered directly to the motherboard, making an upgrade impossible. Always check your specific model first.
- Compatibility is King: You must match the exact RAM type (DDR generation), speed (MHz), and form factor (SO-DIMM). Mixing mismatched RAM can prevent your laptop from booting.
- Simple Tools, Big Impact: The physical upgrade typically only requires a small Phillips-head screwdriver and possibly a plastic pry tool. An anti-static wrist strap is a recommended safety precaution.
- Performance Gains Are Real: Adding RAM directly addresses slowdowns caused by insufficient memory, allowing more applications to stay open simultaneously and improving performance in RAM-hungry software like photo editors and virtual machines.
- Check Maximum Supported RAM: Your laptop’s chipset and BIOS have a maximum RAM limit (e.g., 16GB, 32GB, 64GB). Installing more than this limit is a waste of money as the system won’t recognize it.
- Backup Before You Start: While rare, hardware changes can sometimes cause boot issues. Always back up your important data before opening your laptop’s chassis.
- When in Doubt, Seek Help: If you’re uncomfortable with the process, a local computer repair shop can perform the upgrade quickly and safely for a modest fee.
📑 Table of Contents
- Why Would You Want to Add RAM to a Laptop?
- How to Determine if Your Laptop’s RAM is Upgradable
- The Tools and Materials You’ll Actually Need
- Step-by-Step: How to Physically Install the RAM
- Troubleshooting: What If My Laptop Doesn’t Boot After Adding RAM?
- What If My Laptop’s RAM Cannot Be Upgraded?
- Conclusion: Is Adding RAM to a Laptop Worth It?
Why Would You Want to Add RAM to a Laptop?
Have you ever sat watching the spinning beach ball of death on your Mac or the endless loading circle on Windows? That frustrating feeling often stems from one common culprit: insufficient Random Access Memory (RAM). RAM is your laptop’s short-term, high-speed workspace. When you open an application, it loads from your slower storage drive (SSD/HDD) into the lightning-fast RAM. The more RAM you have, the more programs and data your laptop can juggle at once without needing to constantly shuffle information back to the slower drive.
Adding more RAM is arguably the single most effective and affordable hardware upgrade you can make to an older laptop. It’s a direct injection of responsiveness. You’ll notice it immediately in everyday tasks: web browsing with dozens of tabs open, switching between a word processor, spreadsheet, and video call, or working with large photo and video files. For creative professionals, more RAM means smoother scrubbing through timelines. For gamers, it can reduce stutters in open-world games. For students and professionals, it means less waiting and more doing.
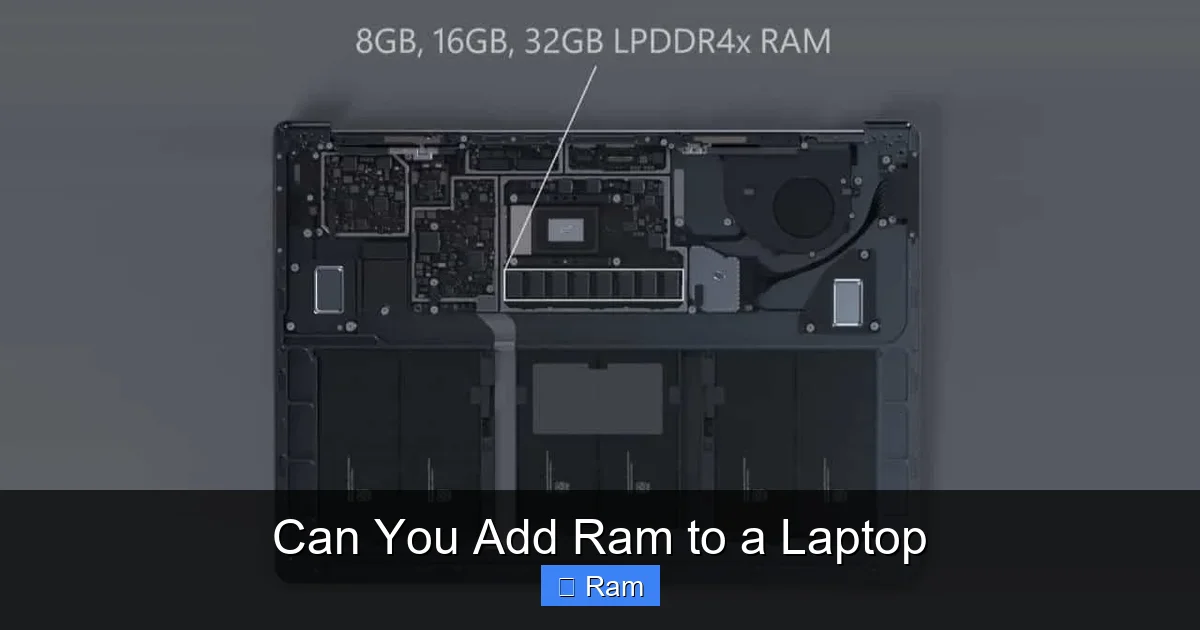
Before we dive into the “how,” we must address the most critical question: can you add RAM to your specific laptop? The answer isn’t a simple yes for everyone. The landscape of laptop design has changed dramatically. A decade ago, most laptops had easily accessible RAM slots. Today, manufacturers prioritize thinness, lightness, and battery life, often soldering RAM chips directly onto the motherboard to save space. So, our journey begins not with a screwdriver, but with research.
The Performance Bottleneck: Is RAM Your Problem?
It’s important to diagnose whether low RAM is actually your bottleneck. A slow laptop can be caused by a failing hard drive (if you still have an HDD), an outdated CPU, or even malware. On Windows, you can check your RAM usage by opening Task Manager (Ctrl+Shift+Esc) and clicking the “Memory” tab. If you consistently see usage above 80-90% during normal use, an upgrade will likely help. On a Mac, use the Activity Monitor’s Memory tab. If “Memory Pressure” is in the red, you’re memory-constrained. If your usage is consistently low, say under 50%, adding RAM will have a negligible effect, and you should look elsewhere for performance gains.
How to Determine if Your Laptop’s RAM is Upgradable
This is the most important phase. Rushing to buy RAM only to find your laptop won’t take it is a frustrating and avoidable mistake. You need to become a temporary laptop detective. Here is your systematic, step-by-step investigation process.
Visual guide about Can You Add Ram to a Laptop
Image source: surfacetip.com
Step 1: Identify Your Exact Laptop Model
You cannot work with vague descriptions like “my Dell laptop” or “my HP from a few years ago.” You need the precise model number. This is usually found on a sticker on the bottom of the laptop, in the battery compartment (if removable), or within the operating system. On Windows, press Windows key + R, type msinfo32, and look for “System Model.” On a Mac, click the Apple menu > About This Mac > System Report, and look under “Hardware Overview” for “Model Identifier” (e.g., MacBookPro15,2). Write this exact model number down.
Step 2: Consult the Manufacturer’s Official Specifications
With your model number in hand, go to the manufacturer’s support website (Dell, HP, Lenovo, ASUS, Acer, etc.). Navigate to the specifications or technical details page for your exact model. Look for sections titled “Memory,” “RAM,” or “Specifications.” You are hunting for four critical pieces of information:
- Installed RAM: How much is currently there (e.g., 8GB).
- Maximum Supported RAM: The absolute ceiling (e.g., 32GB). Do not buy more than this.
- RAM Type/Speed: The exact specification (e.g., DDR4 SODIMM, 2666MHz).
- Slots Available: Does it say “2 slots” or “1 slot available”? This tells you if you can add to existing RAM or need to replace it.
If the spec sheet says “Soldered” or “Integrated” next to the memory, the RAM is permanently attached. You cannot upgrade it. If it mentions “1 SODIMM slot available” or similar, you’re in business.
Step 3: Use Third-Party System Information Tools
For a quick, detailed view, use a free, trusted utility. For Windows, CPU-Z is the gold standard. Download it, run it, and go to the “Memory” and “SPD” tabs. The “SPD” tab will list each RAM slot (if populated) and show you the exact type, size, speed, and manufacturer of the stick currently installed. This is invaluable for matching a new stick. For Macs, the “System Information” app (in Utilities) under “Memory” provides similar details. Tools like Speccy by Piriform also offer a user-friendly overview.
Step 4: Physically Inspect (If Comfortable)
If you’re still uncertain, the ultimate truth lies inside. Power off the laptop, unplug it, and remove the bottom panel (usually held by many screws). Once open, look for one or two long, narrow circuit boards (the RAM sticks) held down by small metal clips on either side. If you see this, you have upgradeable RAM. If you see no slots and only a large chip or two near the CPU, the RAM is soldered. This step voids no warranties for user-serviceable models, but always be gentle and document screw locations.
The Tools and Materials You’ll Actually Need
Assuming your laptop is upgradable, the good news is the hardware requirements are minimal. You don’t need a full workshop. Here’s your essential and optional toolkit.
Visual guide about Can You Add Ram to a Laptop
Image source: blogger.googleusercontent.com
Essential Tools
- A Small Phillips-Head Screwdriver (#0 or #1): This is your primary tool for removing the bottom case screws. Some laptops use Torx screws (star-shaped), so having a small Torx set (T5, T6) is a good idea if your Phillips doesn’t fit. Never force a screwdriver that doesn’t match the screw head.
- A Plastic Pry Tool or Old Credit Card: Laptop cases are often clipped together. Metal tools can scratch or crack the plastic. A plastic spudger or even an old, stiff credit card is perfect for gently prying the bottom panel off once screws are removed.
Highly Recommended Tools
- An Anti-Static Wrist Strap: Static electricity from your body can instantly and invisibly destroy sensitive computer components. A strap that clips to a grounded metal object (like the laptop’s own chassis after it’s open) safely dissipates static. It’s a $5-10 investment that provides total peace of mind. If you don’t have one, touch a grounded metal object (like a file cabinet) frequently to discharge static before touching components.
- A Small Container or Magnetic Mat: To hold the tiny screws you remove. Laptop screws are often different lengths. Keeping them organized by their original location is crucial for reassembly.
The Most Important Material: The Correct RAM
Buying the wrong RAM is the most common mistake. You must match these specifications exactly:
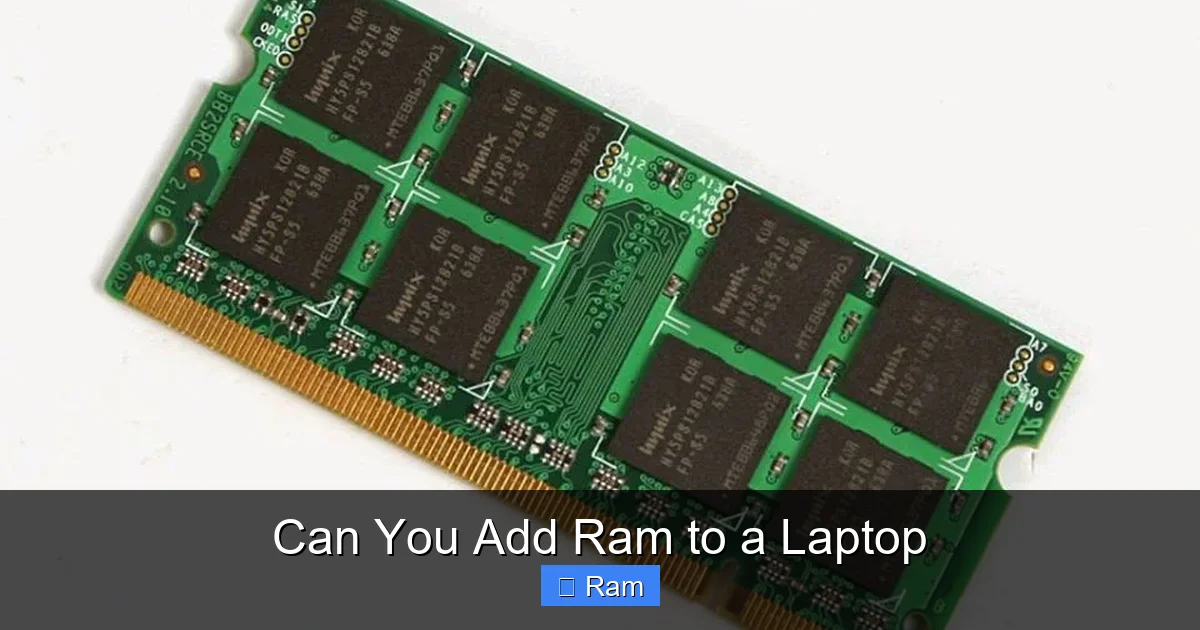
- Form Factor: Laptops use SODIMM (Small Outline DIMM) modules. They are about half the length of desktop RAM. Do not buy standard DIMMs.
- DDR Generation: This is non-negotiable and incompatible across generations. DDR3, DDR4, and DDR5 are physically different (notch positions vary) and electrically incompatible. Your laptop’s spec sheet or CPU-Z will tell you which you need. DDR4 is most common in laptops from ~2015-2021, DDR5 is in newer 2022+ models, and DDR3 is in much older machines.
- Speed (MHz): RAM is rated in megahertz (e.g., 2666MHz, 3200MHz). Your new RAM should be at least as fast as your existing RAM, preferably matching it exactly for dual-channel performance (if your laptop supports it). You can use faster RAM in a pinch—it will simply run at the lower speed supported by your laptop’s chipset, but matching is best.
- Capacity: To add to existing RAM, buy a stick of the same size as what’s already installed for optimal dual-channel performance (e.g., add another 8GB to an existing 8GB for 16GB total). If you’re replacing the old stick, buy the capacity you need (e.g., a single 16GB stick).
Pro Tip: Use the Crucial System Scanner (from Crucial.com) or Kingston’s Memory Search tool. These are safe, reputable utilities that scan your system and list guaranteed compatible RAM kits. This is the easiest way to avoid error.
Step-by-Step: How to Physically Install the RAM
With your compatible SODIMM in hand and your tools ready, it’s time for the surgery. The process is remarkably similar across almost all laptops with upgradeable RAM. Patience and a steady hand are your best allies.
Visual guide about Can You Add Ram to a Laptop
Image source: cdn.mos.cms.futurecdn.net
Preparation and Safety First
1. Power Down Completely: Shut down your laptop. Do not just sleep or hibernate it.
2. Unplug Everything: Remove the charger, any USB devices, SD cards, and external monitors.
3. Remove the Battery (If Removable): This is a critical safety step. On older or some business laptops, the battery is a separate, easily removable block. Pop it out. For laptops with internal, non-removable batteries, you must proceed to the next step with extreme care, ensuring the laptop is completely unplugged and powered off. The internal battery is usually disconnected by unplugging a cable after opening the case, but consult your service manual first.
4. Ground Yourself: Put on your anti-static wrist strap, clipping it to a grounded metal object. If you don’t have a strap, frequently touch the exposed metal chassis of the laptop (after opening) to discharge static.
Opening the Laptop Chassis
1. Place the laptop upside down on a soft, static-free cloth or pad.
2. Locate all the screws around the perimeter of the bottom panel. They may be hidden under rubber feet or stickers. Keep track of each screw’s location and length—use your small container or label a piece of paper.
3. Using the correct screwdriver, carefully remove all screws. Do not use excessive force.
4. Once screws are out, use your plastic pry tool. Gently insert it into a seam along the edge of the bottom panel. Work your way around, releasing the plastic clips. They will pop with a gentle snap. Be patient; forcing it can crack the plastic.
5. Once the clips are free, lift the bottom panel off. You may need to disconnect a cable (e.g., for the Wi-Fi antenna if it’s routed under the panel). If you see any cables, gently unplug them by pulling on the plastic connector, not the wires.
Locating and Replacing the RAM Modules
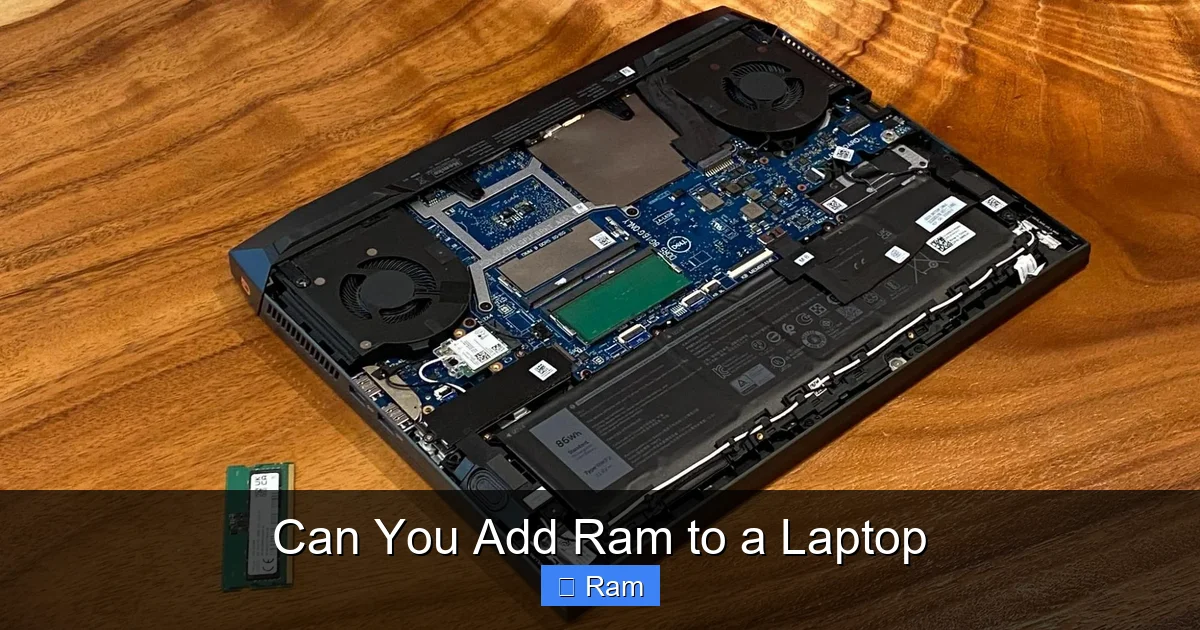
1. Inside, you should see one or two long, narrow slots with small metal retaining clips on either end. These are the SODIMM slots. The RAM stick itself is held down by the tension of these clips.
2. To Remove Old RAM: Gently push the two retaining clips on either side of the stick outward (away from the center of the stick). The stick will pop up at an angle of about 30 degrees. Carefully grasp the edges of the stick and pull it straight out. Place it somewhere safe, static-free.
3. To Install New RAM: Hold the new SODIMM by the edges. Note the notch on the bottom edge of the module—it’s not centered. Align this notch with the key in the slot. The stick only fits one way. Do not force it.
4. Insert the stick into the slot at the same 30-degree angle. The gold contacts should go in first. Push it in firmly until it is seated deep in the slot.
5. Now, press down on the top edge of the stick (the edge with the chips on it) until it is flat and parallel to the motherboard. You should hear/feel a distinct click as the two retaining clips snap back into place, locking the stick in. Give it a very gentle tug to ensure it’s secure.
6. If you have a second slot, repeat the process for the second stick. For dual-channel performance, if you have two sticks of different capacities, install the larger capacity stick in the slot recommended by your laptop’s manual (often labeled “DIMM A” or “Slot 1”). If no manual, it usually doesn’t matter critically.
Reassembly and First Boot
1. Double-check that the RAM is fully seated and clips are locked.
2. Reconnect any cables you disconnected from the bottom panel.
3. Place the bottom panel back on, aligning it carefully. Press around the edges until all the plastic clips snap back into place. Do not screw it down yet.
4. If you removed the battery, reinstall it now.
5. Plug in the charger but do not yet power on. Screw the bottom panel back in, using the correct screws in the correct holes. Tighten them snugly but do not overtighten and strip the plastic threads.
6. Power on your laptop. It may reboot once or twice as it recognizes the new memory—this is normal. Do not interrupt this process.
7. Once you reach your login screen or desktop, verify the new RAM is recognized. On Windows, go to Settings > System > About, or Task Manager > Performance > Memory. On a Mac, go to Apple menu > About This Mac. It should show the new total capacity.
Troubleshooting: What If My Laptop Doesn’t Boot After Adding RAM?
Don’t panic. A failed boot after a RAM install is almost always a simple, fixable issue. Follow this checklist in order.
1. Reseat the RAM
This is the solution 90% of the time. The stick is not fully inserted or the clips aren’t locked. Power off, unplug, open the case, and remove the new RAM stick. Look at the gold contacts. If they are dirty or have any oxidation, gently wipe them with a pencil eraser or isopropyl alcohol on a lint-free cloth. Reinsert the stick, pressing down firmly until the clips lock with an audible click. Reassemble and try again.
2. Check Compatibility and Maximum Support
Did you accidentally buy DDR3 RAM for a DDR4 laptop? The physical notches are different, but it’s possible to slightly force a mismatched stick, which will cause a failure. Double-check the type. Also, did you exceed the manufacturer’s maximum RAM limit? If your laptop only supports 16GB and you installed a 32GB stick, it will likely not boot. You must install RAM within the supported limit.
3. Test Individually and in Different Slots
If you have two sticks, try booting with only the new one installed (remove the old one). If it works, the old stick might be faulty or incompatible. If it doesn’t, the new stick is likely bad or incompatible. Also, if you have two slots, try installing the new stick in the other slot. A faulty slot on the motherboard is rare but possible.
4. Clear CMOS/Reset BIOS
Sometimes the BIOS/UEFI settings get confused. Resetting them to defaults can help. The method varies by laptop. Often, you can disconnect the internal CMOS battery (a small coin cell on the motherboard) for a few minutes with the main battery removed. Alternatively, some laptops have a pinhole reset button on the bottom. Consult your specific model’s service manual online for instructions.
5. Listen for Beep Codes
If your laptop has a built-in speaker, it may emit a series of beeps on boot failure. These are diagnostic codes. Look up “beep codes” for your laptop brand (e.g., Dell beep codes, HP beep codes) to interpret the pattern. A memory-related failure is usually a repeating short beep.
What If My Laptop’s RAM Cannot Be Upgraded?
So you’ve done the research, opened the case, and confirmed the RAM is soldered to the motherboard. Your upgrade path via traditional RAM sticks is a dead end. But before you resign yourself to buying a new laptop, consider these alternative strategies to improve performance.
Maximize Your Existing RAM
Even with soldered RAM, you can often optimize its use. Close unnecessary background applications and browser tabs. In Windows, disable startup programs you don’t need (Task Manager > Startup). On a Mac, manage your login items (System Settings > General > Login Items). Use a lightweight browser like Firefox with strict settings or a Chromium-based browser with memory-saving extensions. This frees up your existing RAM for the tasks that matter.
Upgrade to a Faster SSD
If your laptop still has a traditional Hard Disk Drive (HDD), swapping it for a SATA or NVMe Solid State Drive (SSD) is the next best upgrade. The speed difference is night and day. An SSD will make your system feel dramatically faster in boot times, application launches, and file transfers, often providing a more noticeable day-to-day improvement than a RAM upgrade would have. This is a very common and effective upgrade for older systems with soldered RAM.
Optimize Your Operating System
A fresh install of your operating system (Windows/macOS) can wipe out years of software bloat, registry errors, and accumulated temporary files, giving your laptop a clean slate. This is a more involved process than adding RAM but can yield significant performance restoration. Ensure you have proper backups before attempting a clean install.
Consider External Solutions (Advanced)
For very specific, RAM-intensive tasks like video editing or 3D rendering, some professionals use external solutions. Thunderbolt 3 or 4 ports (on some newer laptops) can connect to an external GPU (eGPU) enclosure, which has its own dedicated memory. This does not increase your system RAM but offloads graphics processing. For general use, this is not a practical solution for “more RAM.”
Accept the Limits and Plan for the Future
Sometimes, the most cost-effective decision is to accept that a very old or ultra-compact laptop has reached its hardware ceiling. If your tasks consistently demand more than 8GB or 16GB of RAM (e.g., modern game development, large-scale data analysis, 4K video editing), and your laptop cannot be upgraded, investing in a new, upgradeable model may be the only long-term solution. Look for business-class laptops (Dell Latitude, Lenovo ThinkPad, HP EliteBook) from recent years, as they are far more likely to have user-upgradable RAM and storage than consumer ultrabooks.
Conclusion: Is Adding RAM to a Laptop Worth It?
So, can you add RAM to a laptop? The definitive answer is: it depends entirely on your specific machine. For a vast segment of laptops made in the last 5-8 years—particularly business laptops, gaming laptops, and many traditional consumer models—the answer is a resounding yes. It is a simple, inexpensive, and highly effective upgrade that can extend the useful life of your computer by 2-3 years or more. The process is a straightforward exercise in research and careful handling.
For the increasingly common category of ultra-thin ultrabooks and premium consumer laptops, the answer is often no. The RAM is soldered, a permanent fixture of the motherboard. In these cases, your upgrade dollars are better spent on a high-capacity, high-speed SSD or, ultimately, on a new laptop designed with upgradability in mind.
The key takeaway is to never guess. Always, always perform the due diligence outlined in the “How to Determine” section. Identify your exact model, check the official specs, and use a tool like CPU-Z. Armed with that knowledge, you can confidently purchase the correct SODIMM module, set aside 15 minutes of your time, and perform one of the most satisfying and impactful upgrades in the PC world. Your future, less-frustrated self will thank you every time you switch between a dozen browser tabs and a spreadsheet without a single hiccup.
Frequently Asked Questions
Can I add RAM to any laptop?
No. Many modern laptops, especially ultra-thin models, have RAM soldered directly to the motherboard, making it non-upgradable. You must check your specific laptop model’s specifications to see if it has an accessible RAM slot.
How much RAM can my laptop support?
The maximum RAM is determined by your laptop’s chipset and BIOS, not just the number of slots. This limit is set by the manufacturer. You can find it in your laptop’s official spec sheet or by using a system scanner tool like the one from Crucial. Exceeding this limit will not work.
Can I mix different sizes or brands of RAM?
You can mix different sizes (e.g., 8GB + 16GB), but for optimal dual-channel performance, matching pairs (same size, speed, brand, model) are recommended. Mixing different speeds will cause all sticks to run at the speed of the slowest module. Always ensure the DDR type (DDR4, DDR5) is identical.
Will adding RAM make my laptop faster for gaming?
It can, but only if low RAM is your current bottleneck. If your laptop has less than the recommended RAM for a game (often 8GB minimum, 16GB recommended), adding more will reduce stuttering and improve loading times. However, if your graphics card (GPU) or CPU is the limiting factor, more RAM will have little to no effect on gaming performance.
Is it cheaper to upgrade RAM or buy a new laptop?
For a laptop that is 3-5 years old and otherwise meets your needs, a RAM upgrade (often $30-$80) is vastly more cost-effective than buying a new machine. If your laptop is very old, has a slow HDD, or a weak CPU, a new laptop may be a better long-term investment.
Should I upgrade my laptop’s RAM myself or pay someone?
If your laptop is confirmed to have upgradeable RAM and you’re comfortable with basic electronics and using a screwdriver, it’s a very simple DIY project. If you are unsure, nervous about static, or the laptop has a sealed chassis, paying a local repair shop $20-50 for professional installation is a wise and safe choice.