How Do I Upgrade Ram on My Laptop
Upgrading the RAM on your laptop is one of the easiest and most affordable ways to make your computer faster and more responsive. Whether you are a student, a professional, or a casual user, adding more memory can dramatically improve how your laptop handles multitasking, gaming, and demanding apps. This guide walks you through every step, from checking your current RAM to installing new memory modules with confidence.
Is your laptop running slow? Do apps freeze every time you open a few tabs? The answer might be simpler than you think. Upgrading the RAM on your laptop can transform a sluggish machine into a smooth, responsive powerhouse. And the best part? You do not need to be a tech expert to do it.
RAM, short for Random Access Memory, is the short-term memory your laptop uses to handle everything you do right now. When you run out of it, your computer slows down, freezes, or crashes. Adding more memory gives your laptop the room it needs to juggle multiple tasks without breaking a sweat.
In this guide, we will walk you through the entire process step by step. You will learn how to check your current memory, find the right upgrade, and install it safely. By the end, you will feel confident enough to do it yourself and save money on professional repairs.
Key Takeaways
- Know Your Current RAM: Always check how much memory your laptop has and what type it uses before buying anything.
- Check Compatibility First: Not all RAM works with every laptop. Match the right DDR type, speed, and maximum capacity to your model.
- Follow Safety Steps: Power off your laptop, disconnect the battery, and ground yourself to prevent static damage.
- Installation Is Simple: Most laptops have accessible RAM slots that take just a few minutes to upgrade.
- Test After Upgrading: Verify the new RAM is recognized and running correctly before closing everything up.
- Know When to Stop: Some laptops have soldered RAM or limited slots, so check if your device even supports an upgrade.
📑 Table of Contents
- Why Upgrading RAM on Your Laptop Makes a Difference
- Step 1: Check Your Current RAM and Laptop Specs
- Step 2: Choose the Right RAM for Your Laptop
- Step 3: Prepare for the Installation
- Step 4: Install the New RAM
- Step 5: Verify the Upgrade and Optimize Performance
- Common Mistakes to Avoid When Upgrading Laptop RAM
- When to Consider Professional Help
- Final Thoughts
Why Upgrading RAM on Your Laptop Makes a Difference
Before you dive into the how-to, it helps to understand why this upgrade matters so much. Laptop memory plays a huge role in everyday performance. Here is what a memory upgrade can do for you:
- Faster multitasking: Switch between apps, browser tabs, and documents without lag.
- Smoother gaming: Many modern games require more than 8GB of memory to run well.
- Better video editing: Programs like Premiere Pro and DaVinci Resolve eat up memory fast.
- Quicker boot times: More available RAM helps your system start up and load programs faster.
- Longer lifespan: A memory boost can make an older laptop feel brand new again.
If your laptop has 4GB or even 8GB of memory, there is a good chance it could benefit from an upgrade. Most users today find that 16GB is the sweet spot for everyday use. If you want to know exactly how much memory you need, check out our guide on how much RAM you need on your laptop for more details.
Step 1: Check Your Current RAM and Laptop Specs
The first thing you need to do before buying any new memory is to find out what your laptop currently has and what it supports. Skipping this step is the most common mistake people make, and it can lead to buying the wrong part.
How to Check Your Existing Memory
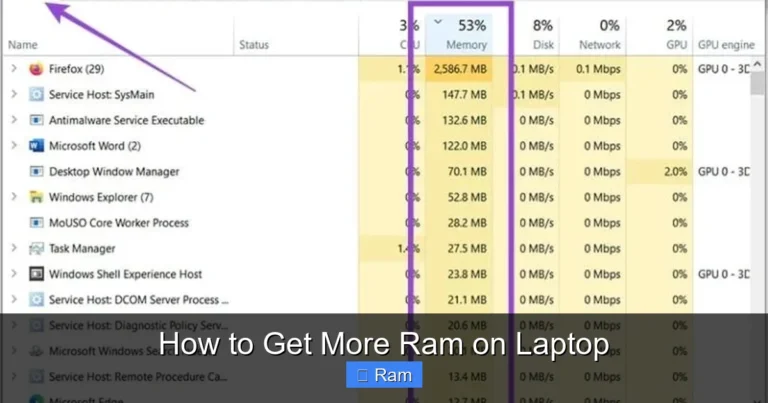
On Windows, you can quickly see your current RAM. Open the Task Manager by pressing Ctrl + Shift + Esc. Click on the Performance tab and then select Memory. You will see how much RAM is installed, how many slots are being used, and what type of memory your laptop uses.
You can also use the built-in System Information tool. Press the Windows key, type “System Information,” and hit Enter. Look for “Installed Physical Memory (RAM)” in the list. This gives you a clear picture of your current setup.
If you want a more detailed view, you can use a free tool like CPU-Z. It shows your RAM type, speed, timings, and the number of available slots. This information is gold when shopping for an upgrade.
How to Find Out What Your Laptop Supports
Not every laptop can take any type of memory. Your laptop’s motherboard has specific limits on RAM type, speed, and maximum capacity. To find this information:
- Check your laptop manufacturer’s website. Enter your exact model number in the support section.
- Look up the user manual or spec sheet for your model.
- Use a tool like Crucial’s System Scanner, which automatically detects compatible upgrades.
Before purchasing any RAM, it is also a good idea to confirm whether your laptop allows upgrades at all. Some newer thin laptops have soldered memory that cannot be replaced. If you are unsure, you can read our article on whether you can upgrade your RAM on your laptop for helpful guidance.
Step 2: Choose the Right RAM for Your Laptop
Now that you know what your laptop supports, it is time to pick the right memory. The laptop memory market can feel overwhelming with all the options, but it really comes down to a few key factors.
Understanding DDR Types
RAM comes in different generations, and they are not all interchangeable. The most common types you will encounter are:
- DDR4: The current standard for most modern laptops. It offers great speed and efficiency.
- DDR5: The newest generation, found in high-end and newer laptops. It is faster but still emerging in the laptop market.
- DDR3: An older standard found in older laptops. Still available but becoming less common.
Make sure you match the DDR type to what your laptop supports. You cannot mix DDR4 and DDR3 in the same laptop. They have different physical slots and electrical requirements.
Choosing the Right Capacity
When it comes to how much memory to buy, think about what you use your laptop for:
| Usage Type | Recommended RAM |
|---|---|
| Basic browsing and office work | 8GB |
| Multitasking and light creative work | 16GB |
| Gaming and heavy video editing | 32GB |
Most users will see a huge improvement by going from 8GB to 16GB. If your laptop supports it, 32GB is excellent for power users and content creators.
RAM Speed and Form Factor
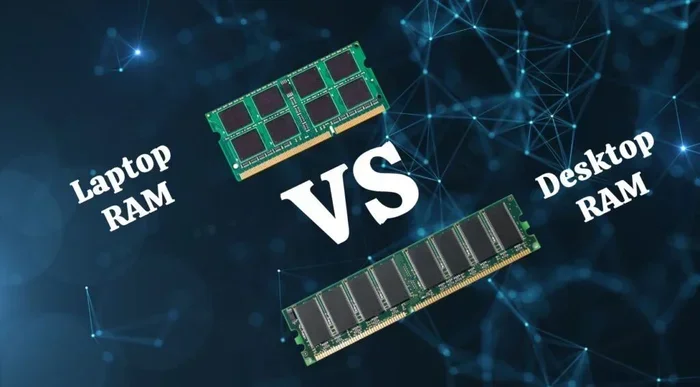
Laptop memory uses a smaller form factor called SODIMM, which is different from desktop RAM. Make sure you buy the correct size. Speed, measured in MHz, also matters, but it is less critical than matching the DDR type and capacity. Your laptop will automatically run the RAM at the speed its motherboard supports.
Step 3: Prepare for the Installation
Preparation is the key to a smooth and safe RAM upgrade. Taking a few minutes to get ready will save you from potential problems.
What You Will Need
Gather these items before you start:
- The new SODIMM RAM modules you purchased
- A small Phillips-head screwdriver
- A soft, clean workspace with good lighting
- An anti-static wrist strap (optional but recommended)
- Your laptop’s user manual (helpful for finding the RAM access panel)
Safety Precautions
Static electricity can damage your laptop’s components. To stay safe:
- Power off your laptop completely and unplug it from the charger.
- Remove the battery if your laptop has a removable one.
- Press and hold the power button for 10 seconds to drain any remaining electricity.
- Ground yourself by touching a metal surface or wearing an anti-static wrist strap.
Work on a flat, non-carpeted surface. Avoid working in rooms with a lot of static, like over carpet or in very dry environments.
Step 4: Install the New RAM
This is the exciting part. Installing RAM on a laptop is straightforward, even if you have never opened one before. Most laptops give you easy access to the memory slots through a bottom panel.
Locating the RAM Slots
Flip your laptop over and look for a small panel marked with a memory icon or labeled “RAM.” This panel is usually held in place by one or two screws. Remove the screws carefully and set them aside in a safe spot.
Gently slide off or pop open the panel. You should see one or two RAM slots inside. If both slots are already occupied, you will need to remove the existing modules to replace them with higher-capacity ones.
Removing Old RAM (If Necessary)
If you need to remove existing memory, look for small metal clips on either side of each RAM stick. Gently push the clips outward. The module will pop up at an angle. Pull it straight out and set it aside.
Installing the New Module
Take your new SODIMM out of its anti-static packaging. Hold it by the edges to avoid touching the gold contacts. Align the notch on the RAM stick with the ridge in the slot. Insert the module at a 30- to 45-degree angle and press it down firmly until the side clips snap into place with a click.
If you are installing two modules, repeat the process for the second slot. Make sure both sticks are fully seated and locked in by the clips.
Closing Up and Powering On
Replace the bottom panel and screw it back in. Reconnect the battery and the charger. Power on your laptop and listen for the normal startup sounds. Your laptop should recognize the new memory immediately.
Step 5: Verify the Upgrade and Optimize Performance
Once your laptop boots up, you need to confirm the upgrade worked. Do not skip this step!
How to Confirm the New RAM Is Recognized
Right-click on the Start button and select System. Look for “Installed RAM” in the device specifications. It should now show the total amount of memory you just installed. If it does not, try reseating the modules and booting again.
You can also go back to the Task Manager and check the Memory section to see the total capacity and whether all slots are being used.
Tips to Get the Most Out of Your Upgrade
To make sure you are getting the full benefit of your new memory, try these tips:
- Restart your laptop: A fresh reboot ensures the system detects all hardware changes properly.
- Update your BIOS: Sometimes a BIOS update helps the motherboard recognize new memory modules correctly.
- Run a memory test: Windows has a built-in tool. Type “Windows Memory Diagnostic” in the search bar and run it to check for errors.
- Close unnecessary startup programs: Free up memory usage so your new RAM can make the biggest impact.
If you run into any issues after the upgrade, you are not alone. Many users have the same questions. Check out our article on how to check the RAM on your laptop for troubleshooting tips and tools.
Common Mistakes to Avoid When Upgrading Laptop RAM
Even with the best intentions, mistakes can happen. Here are the most common errors to watch out for:
- Buying the wrong DDR type: DDR3 and DDR4 slots are physically different. Always double-check compatibility before purchasing.
- Forcing the module in: RAM should slide in smoothly. If it resists, you may have it angled wrong. Do not use excessive force.
- Ignoring the maximum capacity: Your laptop’s motherboard has a limit. Installing more RAM than it supports will not work and wastes money.
- Mixing different RAM brands: While it can work, matching the same brand, speed, and size ensures the best stability and performance.
- Skipping the grounding step: Static discharge can fry your memory or other components. Always ground yourself first.
Taking your time and following each step carefully will make the process smooth and successful. If at any point you feel unsure, remember that upgrading RAM on a laptop is a task thousands of people do every day with great results.
When to Consider Professional Help
Most RAM upgrades are simple and safe to do at home. However, there are situations where professional help makes sense:
- Your laptop does not have an accessible RAM panel or uses soldered memory.
- You are uncomfortable opening your laptop or unsure about the process.
- Your laptop is still under warranty, and opening it might void the coverage.
- You have tried the upgrade and your laptop is not recognizing the new memory.
In these cases, a local repair shop or the manufacturer’s service center can handle the upgrade for you. It may cost a little extra, but it gives you peace of mind.
Final Thoughts
Upgrading RAM on your laptop is one of the most rewarding DIY projects you can tackle. It is affordable, takes less than 30 minutes, and delivers noticeable results right away. Whether you are trying to breathe new life into an older laptop or get more out of a newer one, more memory is almost always the answer.
Start by checking what you have now. Then find the right memory for your model. Follow the installation steps carefully, and verify everything works after the upgrade. You will be amazed at how much faster and smoother your laptop feels.
Do not let a slow laptop hold you back any longer. Grab your screwdriver, pick up the right RAM, and give your laptop the boost it deserves. You have got this!
Frequently Asked Questions
Can I upgrade RAM on any laptop?
Not all laptops allow RAM upgrades. Some models, especially thin and lightweight ones, have soldered memory that cannot be replaced. Check your laptop’s specifications or manufacturer website to confirm whether your model supports a memory upgrade before purchasing anything.
How much does it cost to upgrade laptop RAM?
The cost varies depending on the type and capacity you need. A single 8GB or 16GB DDR4 SODIMM typically ranges from $20 to $60. Compared to buying a new laptop, upgrading RAM is a very affordable way to improve performance.
How do I know if my laptop needs more RAM?
If your laptop slows down when you open multiple apps or browser tabs, freezes during multitasking, or takes a long time to switch between tasks, it likely needs more memory. You can also check Task Manager to see if your RAM usage is consistently above 80% during normal use.
Can I mix different brands of RAM in my laptop?
Yes, you can mix RAM brands, but it is best to match the same type, speed, and capacity for optimal stability. Mismatched modules may still work, but they could run at the slower module’s speed or cause occasional compatibility issues.
Is it hard to install RAM in a laptop?
No, it is one of the easiest laptop upgrades you can do. Most laptops have a removable bottom panel that gives you direct access to the RAM slots. With a screwdriver and about 10 minutes, you can complete the installation yourself.
Will upgrading RAM improve my laptop’s gaming performance?
Yes, upgrading RAM can significantly improve gaming performance, especially if your current memory is below 8GB. Games today often require at least 16GB of memory to run smoothly. Adding more RAM reduces stuttering, faster load times, and better multitasking while gaming.