How to Find Ram on Laptop
Knowing your laptop’s RAM is crucial for performance troubleshooting and upgrade planning. You can easily check RAM using built-in system tools on Windows (Task Manager, System Information), macOS (About This Mac), or Linux (Terminal commands). For a definitive answer, especially with soldered memory, a physical inspection by opening the case may be necessary. Always verify your laptop’s specific model and maximum supported RAM before purchasing upgrades.
Ever felt your laptop sluggish when you have a dozen browser tabs open, a document, and a video call running simultaneously? The culprit is often your system’s memory, specifically its Random Access Memory (RAM). Understanding exactly how much RAM your laptop has, what type it is, and how it’s being used is the first step toward solving performance bottlenecks or planning a cost-effective upgrade. This guide will walk you through every method, from the simplest software check to the more involved physical inspection, ensuring you can confidently answer the question: “How to find RAM on laptop?”
We’ll start with the easiest, non-invasive techniques using your laptop’s own operating system. Then, we’ll explore when and how to safely open your machine for a definitive look at the memory modules themselves. By the end, you’ll not only know your current RAM specifications but also possess the knowledge to make informed decisions about future upgrades, compatibility, and troubleshooting.
Key Takeaways
- RAM is your laptop’s short-term memory: It temporarily stores data for active applications, directly impacting multitasking and overall system speed.
- Use software first: Built-in OS tools like Windows Task Manager provide the fastest, safest way to see installed RAM capacity and speed without opening your laptop.
- Physical inspection is the final authority: Opening the laptop’s service panel lets you see the exact RAM modules (sticks), their make, model, and available slots, which is vital for upgrades.
- Not all RAM is upgradeable: Many modern laptops have RAM soldered to the motherboard. Checking physically is the only way to confirm if slots exist for additional modules.
- Know your specs before buying: Upgrading requires matching your laptop’s supported RAM type (e.g., DDR4, DDR5), speed (MHz), and maximum capacity per slot and system.
- Check both capacity and utilization: Finding how much RAM you *have* versus how much your system is *using* helps diagnose if an upgrade would actually solve performance issues.
📑 Table of Contents
- Why Knowing Your Laptop’s RAM Matters
- How to Find RAM on a Windows Laptop
- How to Find RAM on a macOS Laptop
- How to Find RAM on a Linux Laptop
- The Physical Inspection: Opening Your Laptop
- Understanding RAM Specifications for Upgrades
- Practical Examples and Troubleshooting Tips
- Conclusion: From Curiosity to Confidence
Why Knowing Your Laptop’s RAM Matters
Before diving into the “how,” let’s quickly establish the “why.” RAM is your laptop’s working memory. When you open an application, relevant data is loaded from your slow storage drive (SSD/HDD) into the fast, volatile RAM. Your processor can then access this data almost instantly. More RAM allows more applications and their data to reside in this fast-access space simultaneously, reducing the need to constantly swap data back to the slower storage drive—a process that causes lag and stuttering.
Checking your RAM serves three primary purposes:
- Troubleshooting Slowness: Is your system constantly running at 90-100% memory usage? You likely need more RAM.
- Planning an Upgrade: You can’t buy compatible RAM if you don’t know what’s already installed or what your motherboard supports.
- Verifying Specifications: When buying a used laptop or confirming a new purchase’s specs, a quick RAM check verifies you’re getting what was advertised.
The Software-First Approach: Safe and Simple
The vast majority of the time, you can find all the essential information about your laptop’s RAM without unscrewing a single bolt. Your operating system maintains detailed hardware inventories. Let’s explore the methods for each major OS.
How to Find RAM on a Windows Laptop
Windows provides several built-in utilities, each offering slightly different details. Here are the most effective methods, from quickest to most detailed.
Visual guide about How to Find Ram on Laptop
Image source: itarian.com
Method 1: Using Task Manager (The Quick Glance)
Task Manager is your go-to for real-time performance monitoring. It’s perfect for a fast check on capacity and current usage.
- Open Task Manager: Press Ctrl + Shift + Esc or right-click the taskbar and select “Task Manager.”
- Navigate to Performance: Click the “Performance” tab at the top.
- Select Memory: In the left-hand pane, click on “Memory.”
You will now see a summary at the bottom. Key fields include:
- In use (Compressed): Total RAM currently utilized by the system and applications.
- Committed: The total virtual memory (RAM + page file) your system has committed.
- Cached: RAM used for cached system files and data.
- Available: The amount of RAM readily available for new applications.
- Speed: The clock speed of your installed RAM module(s) (e.g., 3200 MHz).
- Form factor: Will typically say ” SODIMM” for laptops.
- Hardware reserved: Memory reserved for the GPU and other hardware. This is normal.
Pro Tip: The graph at the top gives you a visual history of memory usage. If it’s consistently near the top, your system is memory-constrained.
Method 2: Using System Information (The Detailed Specs)
For a more static, hardware-focused view, the System Information tool is excellent.
- Open the Run dialog: Press Win + R.
- Launch System Information: Type msinfo32 and press Enter.
- Find Installed Physical Memory (RAM): In the “System Summary” window, scroll down to find this line. It will show your total installed RAM in megabytes (MB). For example, 16,384 MB equals 16 GB.
For more detail, expand the “Components” section on the left, then click on “Memory.” This view provides a breakdown of each physical RAM slot, if available. It will list:
- Capacity: Size of each module.
- Speed: The module’s rated speed.
- Manufacturer: The brand (e.g., Samsung, Micron, SK Hynix).
- Part Number: The specific model number of the module.
- Device Locator: Which slot it’s in (e.g., DIMM 0, DIMM 1).
Important Note: If your laptop has soldered RAM, this section may only show a single entry for the total capacity or may not list individual slots at all.
Method 3: Using Command Prompt or PowerShell (The Geek’s Shortcut)
If you prefer command-line interfaces, a simple command gives you a clean, direct output.
- Open Command Prompt or PowerShell: Search for “cmd” or “PowerShell” in the Start Menu, right-click, and select “Run as administrator.”
- Run the command: Type the following and press Enter:
wmic memorychip get capacity,speed,manufacturer,partnumber
This will output a list for each RAM chip installed. The “Capacity” is shown in bytes. To convert it to GB, you can divide by 1,073,741,824 (or use an online converter). For example, 17179869184 bytes = 16 GB. This method is particularly useful because it often provides the part number, which is gold when searching for exact replacement modules.
How to Find RAM on a macOS Laptop
Apple makes this process beautifully straightforward. The information is integrated into the “About This Mac” overview.

Visual guide about How to Find Ram on Laptop
Image source: itarian.com
The Standard Method: About This Mac
- Click the Apple Menu: In the top-left corner of your screen, click the (Apple) icon.
- Select “About This Mac”: The first item in the dropdown menu.
A window opens displaying a summary of your Mac. Directly below the macOS version and serial number, you will see a line for “Memory” (e.g., “8 GB 2133 MHz LPDDR3”). This tells you the total installed RAM and its type and speed.
For More Detail: System Report
To see if your RAM is upgradeable (a critical question for Macs) and for more technical specs:
- In the “About This Mac” window, click the “System Report…” button.
- Select “Memory” from the hardware section on the left.
This report provides the same total memory information but also crucially states the number of memory slots (e.g., “BANK 0/1” means two slots) and whether the memory is “upgradable.” For many modern MacBooks (post-2016 for most models), this will say “None” because the RAM is soldered. For older models or Mac minis, it will show the configuration and upgrade status.
How to Find RAM on a Linux Laptop
Linux offers powerful command-line tools to inspect hardware. The most common and comprehensive is the `dmidecode` command, but a simpler `free` command is great for capacity and usage.
Method 1: Using the Terminal (free command)
- Open Terminal. You can usually find it in the applications menu or press Ctrl+Alt+T.
- Type
free -hand press Enter.
The output will show memory in a human-readable format (the `-h` flag). Look at the line for “Mem:” in the “total” column. This is your total usable RAM (e.g., 7.7G). Note that Linux uses some RAM for the kernel and buffers, so the reported “total” may be slightly less than the physical capacity.
Method 2: Using dmidecode (The Detailed Hardware View)
This command reads the system’s DMI (Desktop Management Interface) table, which contains detailed hardware info from the BIOS. It requires sudo (administrator) privileges.
- In Terminal, type:
sudo dmidecode -t memory - Enter your password when prompted.
Scroll through the output. You’ll see entries for “Memory Device” for each slot. Key fields include:
- Size: Capacity of the module in that slot (e.g., 8 GB).
- Speed: Current speed in MHz.
- Type: DDR type (e.g., DDR4).
- Manufacturer: Brand of the module.
- Part Number: Exact model.
- Locator: Physical slot identifier (e.g., DIMM 0).
If a slot is empty, its “Size” will read “No Device Installed.” This is the most definitive software-based way to see the layout of your RAM slots.
The Physical Inspection: Opening Your Laptop
Software tools are fantastic, but they have limitations. They cannot always tell you:
- If the RAM is soldered (permanently attached) or socketed (removable).
- The exact physical form factor and pin count if you need to buy a new module.
- The precise make and model of the stick for perfect matching.
- If there are empty slots available for expansion.
For this, you must look inside. WARNING: Only proceed if you are comfortable with basic hardware disassembly. Opening your laptop may void its warranty. Always power down, unplug, and remove the battery if possible. Work on a static-free surface and use an anti-static wrist strap if you have one.
Step-by-Step Guide to Accessing the RAM Bay
- Identify your laptop model: Flip it over. The model number is usually on a sticker (e.g., Dell XPS 13 9310, Lenovo ThinkPad T14 Gen 3, HP Pavilion 15-ek1xxx). Write this down. This is your most important piece of information.
- Research the service manual: Go to the manufacturer’s support website. Enter your exact model number and look for the “Service Manual” or “Hardware Maintenance Manual.” This PDF will have exploded diagrams and exact instructions for accessing internal components. Search within it for “memory” or “RAM.”
- Locate the access panel: Based on the manual, find the screws securing the bottom cover or a dedicated RAM access panel. Many modern ultrabooks have the entire bottom plate secured by many screws. Some business laptops (like ThinkPads) have a single, small panel on the bottom for RAM and storage.
- Remove screws carefully: Use the correct size Phillips-head screwdriver. Keep screws in a small container and note their locations, as they may be different lengths.
- Pry open the case: Use a plastic spudger or a guitar pick. Starting at a seam, gently work your way around the perimeter. Do not use excessive force. Clips can snap.
- Locate the RAM modules: Once inside, look for small, green or black circuit boards about the size of your index finger, held down by small metal clips on either side. They are usually near the center or one side of the motherboard.
What to Look For and Document
Once you can see the RAM stick(s):
- Count the modules and slots: Are there one or two sticks? Are both slots occupied? Is one slot empty?
- Read the label: On the sticker on the module, find:
- Part Number (P/N): The most precise identifier (e.g., M471A1K43DB1-CTD).
- Type: Look for “DDR4,” “DDR5,” “LPDDR4X,” etc. “LPDDR” is low-power, soldered RAM.
- Capacity: Usually printed as “4GB,” “8GB,” etc.
- Speed: Often in MHz (e.g., 3200) or as a “PC” number (e.g., PC4-25600).
- Voltage: Usually 1.2V for DDR4/DDR5.
- Check for soldering: Look closely at the edges of the module where the gold contacts meet the green PCB. If you see a continuous line of small solder dots connecting the module to the motherboard, it is soldered. If it sits in a socket with visible clips, it is removable.
- Take a clear photo: A photo of the module label and its position in the laptop is the best way to shop for an exact match or identical additional stick.
After inspection, carefully re-seat the module (if you removed it) and re-assemble the laptop exactly as you found it.
Understanding RAM Specifications for Upgrades
Finding your RAM is only half the battle. Understanding what you found is key to a successful upgrade. Here’s a decoder ring for the common spec sheets.
DDR Generations: DDR4 vs. DDR5 vs. LPDDR
This is the most fundamental compatibility check. They are not physically or electrically compatible.
- DDR4: The standard for most laptops from ~2015-2021. Notch position is specific. Voltage ~1.2V.
- DDR5: The current standard for new performance laptops (2021+). Higher speeds, but also higher voltage (~1.1V) and a different notch position. You cannot mix DDR4 and DDR5.
- LPDDR4X / LPDDR5: “Low Power DDR.” Almost exclusively soldered to the motherboard in modern thin-and-light laptops. It is not user-upgradeable. If you find this, your upgrade path is likely closed.
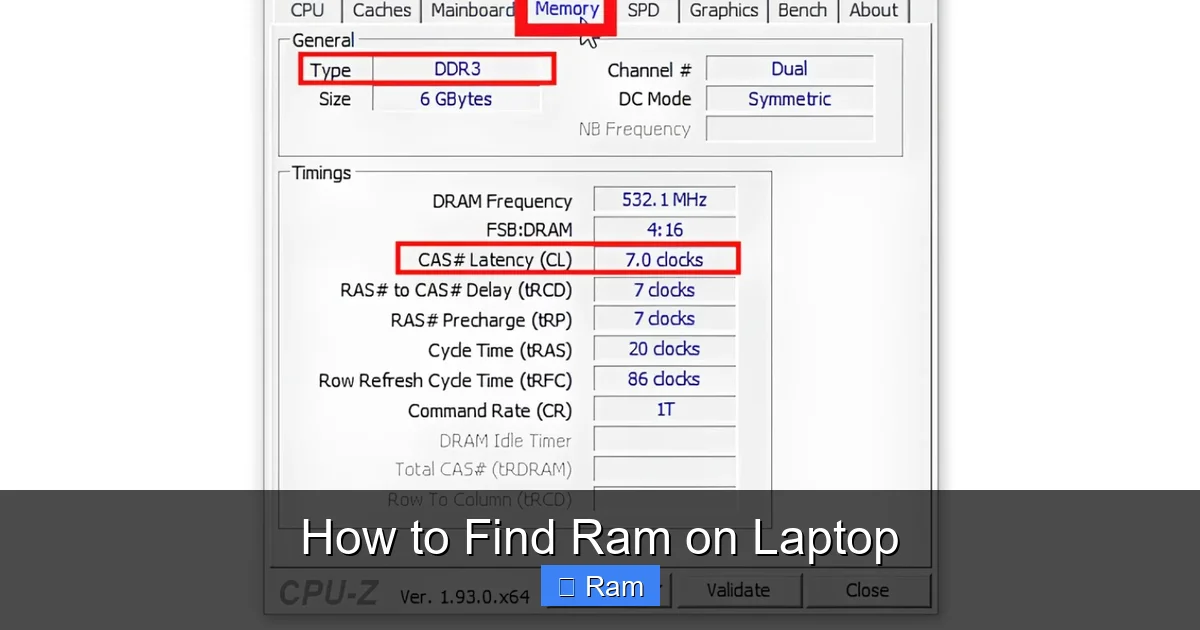
Speed (MHz) and Timings (CAS Latency)
Speed is measured in megahertz (MHz), like 2666, 3200, or 4800. Higher numbers are faster. When adding RAM to an existing system:
- Mixing Speeds: All modules will run at the speed of the slowest module. If you have 2666 MHz RAM and add a 3200 MHz stick, both will run at 2666 MHz.
- Dual-Channel Mode: For optimal performance, use two identical sticks (same capacity, speed, timings) in the correct slots (usually A2/B2 on desktops, but often any two for laptops). This doubles the data transfer bandwidth. For best results, buy a matched kit (e.g., a 2x8GB kit from the same brand and model).
- CAS Latency (CL): A timing number like CL16 or CL18. Lower is slightly better, but matching timings between modules is more important for stability than chasing the lowest CL.
Capacity Limits: What Your Laptop Can Actually Hold
This is the most critical and often overlooked spec. The maximum RAM your laptop can support is determined by:
- The Chipset/CPU: The processor and its integrated memory controller have a hard limit (e.g., 64GB, 128GB).
- The Motherboard: The physical board and BIOS must support the capacity per slot and total.
- The Operating System: 64-bit Windows 10/11 Home officially supports up to 128GB, while Pro/Enterprise support more. 32-bit OSes are limited to ~4GB. Linux distributions typically support very high limits.
How to Find Your Limit: Your laptop’s official specifications page on the manufacturer’s website is the source of truth. Search for your exact model and look for “Memory” or “Specifications.” It will state something like “16GB max” or “Up to 64GB (2 slots).” Do not rely on software tools to tell you the maximum. They only report what’s currently installed.
Practical Examples and Troubleshooting Tips
Let’s walk through a few common real-world scenarios you might encounter.
Scenario 1: “My Windows Task Manager shows 8GB, but System Information says 4GB in one slot and 4GB in another.”
This is normal and actually good! It means you have two 4GB sticks running in dual-channel mode. The total is 8GB. The System Information breakdown is more detailed. If you wanted to upgrade to 16GB, you would replace both 4GB sticks with two 8GB sticks of matching type (DDR4, 2666MHz, etc.). Mixing a 4GB and an 8GB stick would work but would likely run in single-channel mode, hurting performance.
Scenario 2: “My MacBook says 8GB, but the System Report shows ‘BANK 0/1’ with 4GB each. Can I upgrade?”
Check the “Upgradable” field in the System Report’s Memory section. If it says “Yes” and shows two slots, you can likely replace the 4GB sticks with 8GB or 16GB sticks (check the official max spec). If it says “No,” the RAM is soldered, and you cannot upgrade. The “BANK 0/1” listing is the software’s way of showing two separate memory channels, even if soldered.
Scenario 3: “I opened my laptop and see only one RAM stick. The slot next to it is empty. My laptop specs say ‘up to 32GB.’ Can I just add another stick?”
Yes, this is the classic upgrade path. However, you must match the existing stick as closely as possible for stability and to maintain dual-channel performance. The ideal solution is to buy a new, matched kit of two identical sticks (e.g., 2x16GB) and replace the old single stick. If you add a different stick (different brand, speed, timings), the system will downclock everything to the lowest common denominator and may run in sub-optimal flex mode (part dual-channel, part single-channel).
Troubleshooting After an Upgrade
If you install new RAM and the laptop doesn’t boot or shows errors:
- Reseat the modules: Power off, unplug, remove battery. Press the clips outward to release the stick, pull it out, and firmly re-insert it at a 45-degree angle, then press it down until the clips snap into place.
- Test one at a time: If you have two new sticks, try booting with only one installed in the primary slot (usually slot 0). If it works, try the other. This isolates a faulty module.
- Clear CMOS: Some laptops require a CMOS reset (via a specific key combo or removing the CMOS battery) to recognize new memory configurations. Check your service manual.
- Incompatibility: The new RAM may simply not be compatible with your laptop’s chipset or BIOS. You may need to return it and find a model known to work with your specific laptop model (check forums like the Lenovo or Dell community boards for user-reported compatible RAM lists).
Conclusion: From Curiosity to Confidence
Finding the RAM in your laptop is a straightforward process of using the right tool for the job. For 90% of users, the built-in system tools in Windows (Task Manager/System Information), macOS (About This Mac), or Linux (free/dmidecode) will provide all the necessary information about capacity, speed, and current usage. These methods are safe, instant, and require no technical risk.
However, when the time comes to upgrade, the software view becomes incomplete. The physical inspection, guided by your laptop’s official service manual, is the only way to definitively confirm whether your memory is upgradeable, identify the exact modules installed, and locate available slots. This knowledge transforms you from a curious user to a confident, informed consumer who can purchase the correct, compatible RAM and potentially perform the upgrade yourself, saving money and extending the life of your trusted laptop.
Remember the golden rule: Always verify your laptop’s official maximum RAM specifications before purchasing any new memory modules. With this comprehensive guide, you are now fully equipped to answer “how to find RAM on laptop” and take the next steps with certainty.
Frequently Asked Questions
Can I check my laptop’s RAM without opening it?
Yes, absolutely. On Windows, use Task Manager (Ctrl+Shift+Esc) or System Information (msinfo32). On macOS, use About This Mac. On Linux, use the terminal command `free -h`. These methods show total capacity, speed, and current usage.
What’s the difference between DDR4 and DDR5 RAM?
DDR5 is the newer, faster standard (starting around 4800 MHz) with improved efficiency and higher potential capacities. They are physically incompatible—the notches are in different positions. You cannot install DDR5 RAM in a laptop designed for DDR4, and vice-versa. Your laptop’s age and specifications dictate which type it uses.
My laptop shows 8GB RAM in software, but I see only one RAM stick inside. Is that normal?
Yes, it’s normal. Many laptops, especially thinner models, use a single 8GB stick instead of two 4GB sticks. This leaves one slot free for a future upgrade to 16GB by adding another 8GB stick. However, a single stick runs in single-channel mode, which is slightly less performant than dual-channel with two sticks.
How can I find the maximum RAM my laptop supports?
The only reliable source is your laptop manufacturer’s official specifications page for your exact model number. Search online for “[Your Brand] [Your Model] specifications.” Look for the “Memory” section, which will list the maximum supported RAM (e.g., “Up to 64GB”). Do not rely on what is currently installed or what a system tool reports as a limit.
Can I mix different sizes of RAM (e.g., 8GB and 16GB)?
Technically, yes, if they are the same type (DDR4, etc.) and speed, the system will usually boot. However, for optimal performance and to enable full dual-channel mode, it’s highly recommended to use a matched pair of identical sticks (same capacity, brand, model, and speed). Mixing sizes often results in “flex mode,” where part of the memory runs in dual-channel and part in single-channel.
Why does my laptop have less usable RAM than what’s installed?
This is normal. A portion of your total RAM is “hardware reserved” by the system and your graphics card (especially if it uses shared system memory). This reservation is handled by the BIOS. You can see the “Hardware reserved” amount in Windows Task Manager’s Memory tab. The difference between “In use” and “Available” is also normal, as the OS uses RAM for caching and system processes.