How To Make A 3d Mouse Out Of Paper With Simple Steps
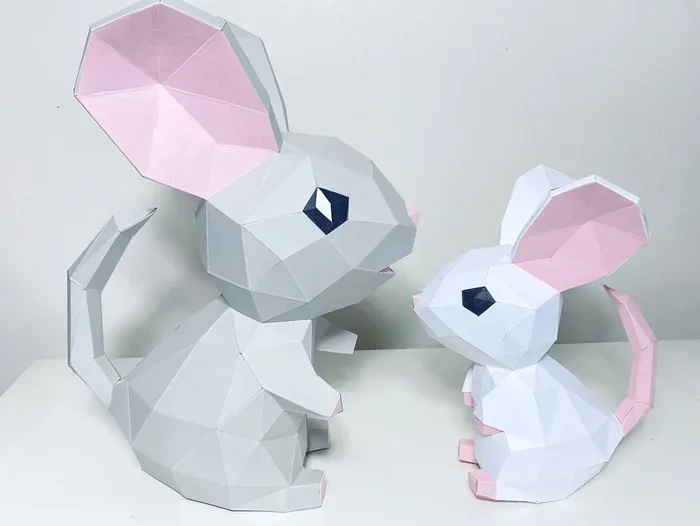
Discover how to create a fully functional-looking 3D mouse out of paper using easy DIY techniques. This step-by-step guide walks you through choosing the right materials, folding and assembling your paper mouse, and adding realistic details. Whether you want a fun desktop accessory or a creative project, you will learn how to build a paper mouse that looks and feels like the real thing.
Have you ever wanted to try something creative and hands-on with materials you already have at home? Making a 3D mouse out of paper is one of the most enjoyable and rewarding DIY projects you can try. It is simple, affordable, and produces a surprisingly realistic result that can sit on your desk as a fun conversation piece. This guide walks you through every single step so you can build your own paper mouse with confidence.
A paper mouse project like this lets you explore the world of paper crafts without needing expensive tools or advanced skills. You do not need to be an artist or an engineer. All you need is a little patience, some basic supplies, and the willingness to follow along. By the end of this article, you will know exactly how to create a 3D paper mouse that looks great and feels solid in your hands.
We will cover everything from the materials you need to the final painting touches. Along the way, we share practical tips and common mistakes to avoid. So grab a cup of coffee, clear off your workspace, and let us dive into this exciting DIY mouse project together.
Key Takeaways
- Simple Materials: You only need basic supplies like cardstock, glue, scissors, and a printer to build your paper mouse.
- Step-by-Step Process: The guide breaks down the build into clear, easy-to-follow stages that anyone can complete.
- Realistic Results: With the right painting and detailing tips, your paper mouse can look incredibly lifelike.
- Fun for All Ages: This project works great for kids, teens, and adults who love hands-on crafts.
- No Special Tools Required: Everything you need is already around the house or easy to find at any craft store.
📑 Table of Contents
What You Need to Make a 3D Paper Mouse
Before you start building, gather all your materials. Having everything ready makes the process smooth and enjoyable. You do not want to stop halfway through to hunt for supplies.
Essential Materials
- Cardstock paper (thick paper works best for structure)
- White glue or a hot glue gun for assembly
- Scissors or a craft knife for cutting
- A ruler and pencil for marking measurements
- Printed paper mouse template (you can find free ones online)
- Acrylic paint and brushes for coloring
- Clear varnish or sealant to protect your finished piece
Optional Helpful Tools
- A bone folder for crisp paper folds
- Sandpaper for smoothing edges
- Small clamps to hold pieces while glue dries
- A cutting mat to protect your table
These items are easy to find at any dollar store or craft shop. You do not need to spend a lot of money. In fact, a basic paper crafts kit often has everything you need. The key is to use sturdy cardstock because thin paper will not hold the shape of your 3D model mouse.
Step-by-Step Guide to Building Your Paper Mouse
Now comes the fun part. This section breaks the build process into clear stages. Follow each step carefully, and you will have a fantastic handmade mouse in no time.
Step 1: Print and Cut Out Your Template
Start by downloading a paper mouse template from a reliable source. Print it on cardstock for the best results. Once printed, use your scissors or craft knife to carefully cut out each piece. Take your time here. Clean cuts make assembly much easier and your finished mouse looks more polished.
If you do not have access to a printer, you can draw the pieces yourself. Simply trace a real mouse shape onto the cardstock and cut it out. This works great for a creative mouse design that is uniquely yours.
Step 2: Score and Fold the Pieces
Before gluing anything, use your ruler and a blunt tool to score the fold lines. Scoring means pressing a light line along the paper where it needs to bend. This step is essential for paper engineering because it creates clean, precise folds.
Fold all the pieces according to the template guidelines. Make sure every fold is sharp and accurate. Loose folds lead to gaps in the final structure, and nobody wants that.
Step 3: Assemble the Base Structure
Begin with the main body of the mouse. Apply glue to the tabs and press them firmly into place. Hold each joint for a few seconds while the glue sets. Work slowly from the center outward.
Next, attach the head to the body. Then add the tail, ears, and legs one at a time. Let each piece dry partially before moving to the next. This prevents pieces from shifting and keeps your paper sculpture mouse looking symmetrical.
Step 4: Add the Details
Now it is time to bring your mouse to life. Add small details like whiskers, eyes, and a nose. You can cut these from thinner paper or use small beads for the eyes. These tiny touches make a huge difference in the final look of your desktop accessories.
For the whiskers, try using thin wire wrapped in paper. This gives them a slight bend so they look more natural. You can also add small paws or a scroll wheel if you want your paper mouse to resemble a real computer mouse.
Step 5: Paint and Seal
Once the glue is completely dry, it is time to paint. Use acrylic paint in colors that match a real mouse or go wild with your own design. Apply thin layers and let each one dry before adding the next.
After painting, spray or brush on a clear sealant. This protects your work from dust and moisture. It also gives the surface a nice finish that makes your paper craft mouse look professional.
Tips for Making Your Paper Mouse More Realistic
Want your 3D paper mouse to stand out? Try these expert tips that take your project to the next level.
- Use textured paper: Corrugated cardstock adds a grainy surface that resembles real mouse fur.
- Layer your colors: Start with a dark base coat and dry-brush lighter shades on top for a realistic look.
- Add weight: Place a small coin inside the base to make your mouse feel heavier and more solid.
- Shape the ears carefully: Real mice have round, slightly pointed ears. Take extra time on this detail.
- Try different breeds: Research cartoon or real mice to find unique shapes and proportions for your design.
These small adjustments transform a simple paper project into something that genuinely impresses. The goal is to make people look twice and wonder if your homemade mouse is really made of paper.
How to Use Your Paper Mouse With Your Laptop
While your paper mouse is primarily a decorative piece and craft project, it is fun to think about how it relates to real mouse usage. If you have a working laptop, you likely use a mouse on laptop daily for navigation, clicking, and scrolling. A paper mouse cannot replace that functionality, but it makes a wonderful desk companion alongside your real device.
For those who work without a traditional mouse, you might explore how to work a laptop without a mouse using touchpad gestures or keyboard shortcuts. This is especially useful if your mouse stops working or if you are traveling light. On the other hand, if you prefer a wireless setup, you can learn how to connect a wireless mouse to a laptop easily through Bluetooth or a USB receiver. These real-world mouse skills complement your creative paper craft hobby perfectly.
The beauty of this project is that it bridges the gap between paper art and everyday technology. Your paper mouse sits proudly next to your laptop, reminding you that creativity and functionality can coexist beautifully.
Fun Variations and Creative Ideas
Once you master the basic build, the possibilities expand. Here are some exciting ways to customize your paper mouse design ideas.
Try Different Animal Shapes
Why stop at a mouse? Use the same technique to build a rabbit, a cat, or even a dinosaur. The folding and assembly process stays the same. You simply change the template shape. This opens up a whole world of paper folding techniques you can explore.
Create a Themed Set
Make a collection of paper animals that sit together on your desk. A mouse, a cat, and a cheese wedge would make a cute and cohesive set of creative mouse design pieces. You could even gift these to friends and family.
Add LED Lights
For a techy twist, embed small LED lights inside your paper mouse. This creates a glowing effect that looks amazing in dim lighting. It is a great way to blend paper engineering with basic electronics.
Each variation teaches you new skills and keeps the project fresh and exciting. You will find yourself coming back to this craft again and again.
Common Mistakes to Avoid
Even simple projects come with pitfalls. Here are the most common mistakes people make when building a 3D paper mouse and how to avoid them.
- Using thin paper: Thin paper lacks the structure needed for a 3D build. Always choose cardstock or heavier paper.
- Rushing the gluing process: Wet glue needs a moment to set. Press and hold each joint before moving on.
- Skipping the scoring step: Unscored paper tears easily and folds unevenly. Score every fold line first.
- Overloading on paint: Thick paint warps paper. Apply thin, even coats and let them dry completely.
- Ignoring symmetry: Check that both sides of your mouse match before the glue dries completely.
Avoiding these mistakes saves you time and frustration. It also ensures your finished piece looks clean and professional. Remember, patience is your best tool in any paper crafts project.
Quick Tips for Success
- Work on a clean, flat surface to keep your pieces aligned.
- Use a toothpick to apply glue in tight spaces.
- Let your mouse dry fully before handling it.
- Keep a damp cloth nearby to wipe off excess glue immediately.
- Take photos during the build process to share your progress.
These quick tips might seem small, but they make a big difference in the quality of your final paper mouse tutorial result. Bookmark this section and refer back to it as you build.
Conclusion
Building a 3D mouse out of paper is a rewarding and accessible project for anyone who enjoys hands-on creativity. You learned how to gather the right materials, follow a step-by-step build process, and add realistic details that make your piece stand out. From scoring and folding to painting and sealing, every step brings you closer to a finished product you can be proud of.
This DIY mouse project proves that amazing things can come from simple materials. You do not need expensive tools or years of experience. Just a little time, some paper, and the desire to create. We encourage you to try this project today and share your results with friends and family. Once you finish your first paper mouse, you will be hooked on the world of paper crafts and paper engineering. Happy crafting!
Frequently Asked Questions
What kind of paper works best for making a 3D paper mouse?
Cardstock is the best choice because it is thick enough to hold shape and structure. Standard printer paper is too flimsy and will not maintain the 3D form. If you want extra durability, try using textured cardstock or scrapbook paper.
How long does it take to build a paper mouse?
Most people complete the project in about one to two hours. The time depends on your experience level and how detailed you want the finished mouse to be. First-time builders might take a little longer, and that is perfectly fine.
Can kids make a 3D paper mouse safely?
Yes, this is a great project for kids with adult supervision. Younger children may need help with cutting and gluing. The project teaches fine motor skills, patience, and creativity in a fun and engaging way.
Do I need any special tools to build the paper mouse?
No special tools are required. A pair of scissors, a ruler, a pencil, and glue are all you need. Optional tools like a bone folder or cutting mat can make the process smoother but are not essential.
Can I make the paper mouse move or function like a real mouse?
The paper mouse is primarily a decorative craft piece. It cannot function as an actual computer input device. However, you can make movable parts like a hinged jaw or spinning ears to add interactive elements to your design.
Where can I find free paper mouse templates online?
Many crafting websites and Pinterest boards offer free printable templates. You can also search for “paper mouse template” on Google Images to find a variety of designs. Choose one that matches your skill level and desired style.