Lenovo Gaming Laptop Ram Upgrade

A Lenovo gaming laptop ram upgrade can transform your system speed, gaming performance, and multitasking ability. This guide walks you through everything you need to know, from choosing the right memory to installing it yourself. You will learn how to check your current specs, find compatible DDR4 or DDR5 RAM, and avoid costly mistakes.
Your Lenovo gaming laptop is only as fast as its memory allows. If you have noticed lag during gameplay or slow loading screens, it might be time for a Lenovo gaming laptop ram upgrade. Adding more memory is one of the simplest and most affordable ways to boost your laptop’s speed and gaming performance.
Many gamers stick with whatever RAM came factory-installed. But the truth is, upgrading your memory can make a huge difference. Whether you are playing the latest AAA titles or streaming while gaming, more RAM helps everything run smoother. This guide will show you exactly how to do it step by step.
We will cover everything from checking your current specs to picking the right RAM sticks. You will also learn about common pitfalls and how to avoid them. By the end, you will feel confident enough to upgrade your laptop memory on your own.
Key Takeaways
- Easy Process: Upgrading RAM on a Lenovo gaming laptop is straightforward and does not require advanced technical skills.
- Boosts Gaming Performance: More RAM means smoother gameplay, faster load times, and better multitasking.
- Check Compatibility First: Always verify your laptop model supports the RAM type and maximum capacity before buying.
- Dual Channel Matters: Installing RAM in matched pairs can significantly improve memory bandwidth and speed.
- Avoid Common Mistakes: Skipping the BIOS update or buying incompatible RAM are the most frequent errors users make.
- Cost Effective: A RAM upgrade is one of the cheapest ways to breathe new life into an older gaming laptop.
📑 Table of Contents
- Why You Should Upgrade RAM on Your Lenovo Gaming Laptop
- Understanding Your Current RAM Setup
- Choosing the Right RAM for Your Lenovo Gaming Laptop
- Step-by-Step Guide to Upgrading Your Lenovo Gaming Laptop RAM
- Common Mistakes to Avoid When Upgrading RAM
- Expert Tips to Maximize Your RAM Upgrade
- Conclusion
Why You Should Upgrade RAM on Your Lenovo Gaming Laptop
RAM, or random access memory, is the short-term memory your laptop uses to handle tasks. When you run a game, your system loads textures, maps, and game data into RAM. The more RAM you have, the more data your laptop can hold at once without slowing down.
Here are the main reasons a ram upgrade makes sense for your Lenovo gaming laptop:
- Smoother Gameplay: Games run more consistently with fewer stutters and frame drops.
- Better Multitasking: You can have a game, Discord, browser, and streaming software open without lag.
- Faster Load Times: More memory helps your laptop access data quicker, reducing wait times.
- Future-Proofing: Newer games demand more memory. Upgrading now keeps your laptop relevant longer.
- Affordable Upgrade: RAM is one of the cheapest hardware upgrades you can make.
If your laptop currently has 8GB of RAM, upgrading to 16GB or even 32GB can feel like getting a new machine. Many people ask, can I upgrade RAM in my laptop? The answer is usually yes, especially with Lenovo gaming models that are designed with user-accessible memory slots.
Understanding Your Current RAM Setup
Before you buy any new memory, you need to know what your laptop currently has. This helps you figure out what kind of upgrade you need and how much room you have to grow.
How to Check Your Current RAM
Checking your current RAM on a Windows laptop is simple. Open the Task Manager by pressing Ctrl + Shift + Esc. Click on the Performance tab and then select Memory. You will see how much RAM is installed, what type it is, and how many slots are being used.
Another quick way is to type System Information in the Windows search bar. Look for Installed Physical Memory (RAM). This tells you the total amount your system recognizes.
What Type of RAM Does Your Lenovo Use?
Most modern Lenovo gaming laptops use DDR4 RAM, while newer models support DDR5. The key is to match the type. You cannot mix DDR4 and DDR5 in the same laptop. Check your laptop’s manual or visit the Lenovo support page for your specific model to confirm the RAM type.
Also pay attention to the speed rating. RAM speed is measured in megahertz (MHz). Higher MHz means faster data transfer. But your laptop’s motherboard has a maximum speed it supports, so do not buy RAM that exceeds that limit.
Choosing the Right RAM for Your Lenovo Gaming Laptop
Picking the right memory can feel overwhelming with so many options available. But it does not have to be complicated. You just need to match a few key specifications.
Capacity: How Much RAM Do You Need?
For most gaming needs, 16GB is the sweet spot. It handles modern games well and leaves room for background applications. If you are a heavy multitasker or play very demanding titles, 32GB gives you even more headroom.
Here is a quick comparison of RAM capacities:
- 8GB: Minimum for basic gaming. May struggle with newer titles.
- 16GB: Ideal for most gamers. Smooth performance in most titles.
- 32GB: Great for hardcore gaming and streaming. Future-proofs your setup.
- 64GB: Overkill for gaming. Useful for content creation and heavy workloads.
If you want to see what options are available, you can explore 16GB Lenovo laptop configurations to understand what a solid upgrade target looks like.
Speed and Dual Channel Configuration
RAM speed matters, but not as much as people think. The real performance boost comes from using dual channel memory. This means installing two RAM sticks instead of one. Dual channel doubles the data pathway between your RAM and the processor, which improves overall performance.
For example, if you currently have one 8GB stick, consider replacing it with two 8GB sticks instead of one 16GB stick. This simple change can noticeably improve your system’s memory bandwidth.
Step-by-Step Guide to Upgrading Your Lenovo Gaming Laptop RAM
Now for the fun part. Installing RAM on a Lenovo gaming laptop is easier than most people expect. You do not need to be a tech expert. Follow these steps carefully and you will be done in under 30 minutes.
Step 1: Gather Your Tools
You will need very few tools for this job:
- A small Phillips-head screwdriver
- An anti-static wrist strap (optional but recommended)
- Your new RAM sticks
- A clean, flat workspace
Make sure your new RAM matches your laptop’s specifications. Check the type, speed, and capacity before you start. Buying the wrong RAM is the most common mistake people make.
Step 2: Power Down and Unplug
Turn off your laptop completely. Unplug the power cable and disconnect any peripherals. Remove the battery if your Lenovo model has a removable battery. This ensures safety while you work inside the laptop.
Step 3: Open the Back Panel
Flip your laptop over and locate the screws holding the back panel. Use your screwdriver to remove them carefully. Keep the screws in a safe place. Gently pry the panel off using a plastic spudger or your fingernail. Avoid using metal tools that could scratch the laptop.
Step 4: Locate the RAM Slots
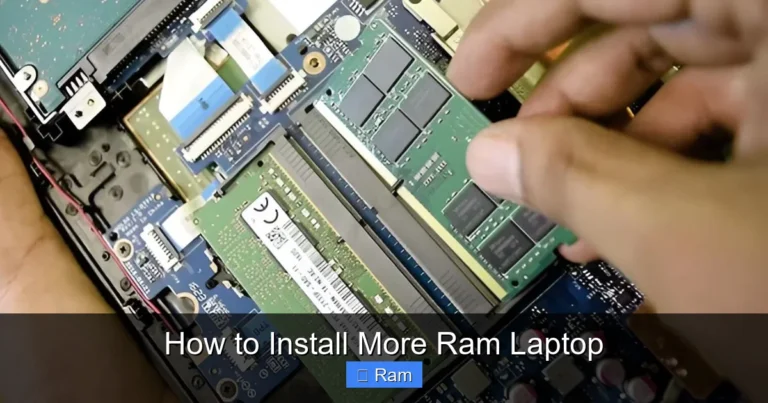
Once the panel is off, you will see the RAM slots. They are long, thin slots with small clips on each end. Your laptop may have one or two slots available for upgrades. Some Lenovo models have one slot occupied and one empty, while others have both slots free.
If you are unsure about your specific model’s layout, you can check the how to upgrade RAM on a laptop guide for general instructions that apply to most models.
Step 5: Remove Old RAM (If Needed)
If you are replacing existing RAM, gently push the clips on either side of the stick outward. The RAM module will pop up at an angle. Carefully pull it out. Handle the RAM by the edges to avoid touching the gold contacts.
Step 6: Install the New RAM
Align the new RAM stick with the slot at a 45-degree angle. Push it firmly into the slot until the clips snap into place. You should hear a click. This means the RAM is securely seated.
If you are installing two sticks for dual channel, repeat the process for the second slot. Make sure both sticks are fully inserted and locked in.
Step 7: Close Up and Test
Replace the back panel and screw it back in. Reconnect the battery and power cable. Turn on your laptop. Once it boots, check the Task Manager to confirm the new RAM is recognized. You should see the full updated capacity listed under the Memory section.
Common Mistakes to Avoid When Upgrading RAM
Even though upgrading RAM is simple, people still make mistakes. Here are the most common ones and how to avoid them.
Buying Incompatible RAM
The biggest mistake is buying RAM that does not work with your laptop. Always double-check your laptop model’s RAM specifications. Look at the type (DDR4 or DDR5), the maximum supported capacity, and the speed limit. When in doubt, check your Lenovo laptop’s user manual or support page.
Skipping the BIOS Update
Some Lenovo laptops need a BIOS update to recognize newer or larger RAM modules. Before you upgrade, visit the Lenovo support website and check if there is a BIOS update available for your model. A quick update can save you from compatibility headaches.
Not Seating the RAM Properly
If your laptop does not recognize the new RAM after an upgrade, it may not be fully seated. Remove the stick and reinsert it, making sure you hear the click. Loose RAM is a common reason for boot failures after an upgrade.
Mixing Different RAM Sticks
While it is sometimes possible to mix RAM sticks, it is best to use matching pairs. Sticks from different brands, with different speeds, or different capacities can cause instability. Stick with a matched set for the best results.
Expert Tips to Maximize Your RAM Upgrade
Once you have upgraded your memory, there are a few extra steps you can take to get the most out of it.
First, update your laptop drivers after the upgrade. New hardware sometimes needs updated drivers to perform at its best. Check the Lenovo support site for the latest drivers for your model.
Second, check your BIOS settings. Some laptops have XMP or EXPO profiles that let you run RAM at its rated speed. Go into your BIOS during startup and look for memory overclocking options. Enabling these can unlock better performance from your new RAM.
Third, keep your system clean. Over time, background programs eat up your memory. Use Task Manager to close unnecessary programs and keep your system running lean. This ensures your upgraded RAM is actually being used for the tasks that matter.
Finally, consider pairing your RAM upgrade with other improvements. A solid-state drive upgrade or a GPU refresh can complement your memory boost and take your gaming experience to the next level.
Conclusion
A Lenovo gaming laptop ram upgrade is one of the best investments you can make for your gaming setup. It is affordable, easy to do, and delivers noticeable performance improvements. Whether you are upgrading from 8GB to 16GB or going all the way to 32GB, the difference in speed and smoothness is real.
Follow the steps in this guide, avoid the common mistakes, and you will have your laptop running better than ever in no time. Do not let slow RAM hold you back from enjoying your favorite games at their best. Upgrade today and feel the difference.
Frequently Asked Questions
Can I upgrade the RAM on any Lenovo gaming laptop?
Most Lenovo gaming laptops allow RAM upgrades, but it depends on the specific model. Check your laptop’s manual or the Lenovo support website to confirm your model has accessible RAM slots and supports upgrades. Some thin and light models may have soldered RAM that cannot be replaced.
How much RAM do I need for gaming on a Lenovo laptop?
16GB is the recommended amount for most modern games. It provides smooth gameplay and enough memory for multitasking. If you play very demanding titles or stream while gaming, 32GB offers even better performance and future-proofing.
Can I mix different brands of RAM in my Lenovo laptop?
It is technically possible, but it is not recommended. Mixing RAM sticks from different brands can cause compatibility issues and instability. For the best results, use matching RAM sticks with the same brand, speed, and capacity.
Do I need to update my BIOS before upgrading RAM?
It is a good idea to check for BIOS updates before upgrading. Some Lenovo laptops require a BIOS update to properly recognize newer or larger RAM modules. Visit the Lenovo support site for your model and install any available updates before you begin.
How long does a Lenovo gaming laptop RAM upgrade take?
The entire process usually takes about 15 to 30 minutes. Opening the back panel, installing the RAM, and closing everything up is quick and straightforward. The most time-consuming part is usually researching compatible RAM beforehand.
Will upgrading RAM improve my gaming FPS?
RAM upgrades can improve FPS in games that are memory-limited, especially at lower settings. If your game is using the GPU more heavily, a RAM upgrade may have less impact on frame rates. However, it will still improve overall system responsiveness and reduce stuttering.