Why Cant I Format Usb to Fat32 on Mac
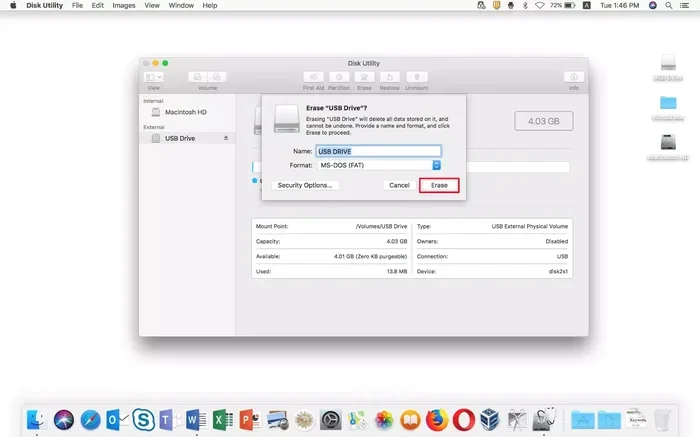
Why Cant I Format Usb to Fat32 on Mac is a common frustration caused by macOS restrictions in Disk Utility. Apple limits FAT32 formatting to drives 32GB or smaller, leaving larger USB drives without a direct format option. This guide explains the real reasons and provides simple, proven workarounds including Terminal commands and third-party tools.
You plug in your USB drive, open Disk Utility, and hit format. Then you see it. The option for FAT32 is grayed out or missing entirely. You are not alone. Why cant I format USB to FAT32 on Mac is one of the most common questions Mac users search for every year. This frustrating limitation catches people off guard, especially when they need FAT32 for compatibility with older devices, gaming consoles, or car stereos.
The truth is, Apple built macOS with certain restrictions that prevent easy FAT32 formatting on larger drives. But the good news is that you have several reliable workarounds. Whether you prefer using built-in Terminal commands, free third-party apps, or understanding why the limitation exists in the first place, this guide covers everything you need. By the end, you will know exactly how to format your USB drive to FAT32 on your Mac without any hassle.
Key Takeaways
- macOS blocks FAT32 formatting on large drives: Disk Utility will not offer FAT32 for drives over 32GB, which is a built-in Apple restriction.
- FAT32 has a 4GB file size limit: Even when formatted, FAT32 cannot store individual files larger than 4GB.
- Terminal is a free built-in workaround: You can format any size USB drive to FAT32 on Mac using command line instructions.
- Third-party tools make it effortless: Apps like FAT32 Format provide a simple visual interface for beginners.
- exFAT is a modern alternative: It removes the 4GB file limit and works on both Mac and Windows seamlessly.
- Always back up before formatting: Formatting erases all data on your drive permanently with no undo option.
📑 Table of Contents
- Why Mac Blocks FAT32 Formatting on USB Drives
- What Is FAT32 and Why Do People Still Need It
- How to Format USB to FAT32 on Mac Using Terminal
- Best Third-Party Tools for Formatting USB to FAT32 on Mac
- exFAT vs FAT32: Which Should You Choose
- Common Mistakes to Avoid When Formatting USB on Mac
- Final Thoughts on Formatting USB to FAT32 on Mac
Why Mac Blocks FAT32 Formatting on USB Drives
Before you try any fix, it helps to understand why macOS makes this so difficult. Apple designed Disk Utility to push users toward modern file systems like APFS and exFAT. FAT32 is an older format that dates back to the Windows 95 era. Apple sees it as outdated and limits its availability in Disk Utility for a reason.
When you open Disk Utility and select your USB drive, you will notice that FAT32 simply does not appear as an option for larger drives. This is not a bug. It is a deliberate design choice by Apple. The company wants Mac users to adopt newer file systems that handle large files and modern storage better.
The 32GB Size Limit
Here is the biggest reason you cannot format USB to FAT32 on Mac directly. Disk Utility simply will not offer FAT32 as an option for drives larger than 32GB. This is a hard limit built into macOS. Even if your USB drive is 64GB, 128GB, or 1TB, Disk Utility will only give you options like APFS, Mac OS Extended, or exFAT.
This restriction exists because Apple wants to encourage better file systems. FAT32 was fine in the 1990s, but it has serious limitations today. Still, many people need FAT32 for specific devices. Game consoles like the PlayStation and Xbox often require FAT32. Car stereos and older smart TVs also rely on this format. That is why Apple did not remove it entirely, they just buried it behind a size restriction.
The 4GB File Size Limit
Even if you somehow format a drive to FAT32, you will run into another problem. FAT32 cannot handle individual files larger than 4GB. That means you cannot store a single video file, ISO image, or large backup archive on a FAT32 drive. This limitation makes FAT32 impractical for modern use in many cases.
So why do people still use it? Compatibility. FAT32 works on almost every device that supports USB storage. Mac, Windows, Linux, gaming consoles, car stereos, and even some routers can read FAT32. That universal compatibility keeps it relevant despite its age. If you have ever tried to format a USB drive on your Mac and felt stuck, you already know how annoying this can be. The good part is that you are not stuck. There are real solutions that work.
For users who also work with external SSDs and enclosures, understanding file systems matters. If you use an M.2 NVMe to USB C SSD enclosure, you may encounter similar formatting challenges depending on your target file system.
What Is FAT32 and Why Do People Still Need It
FAT32 stands for File Allocation Table 32. It is one of the oldest file systems still in widespread use today. Microsoft introduced it in 1996 with Windows 95 OSR2. Since then, it has become a universal standard for removable storage devices like USB flash drives and memory cards.
Here is why FAT32 still matters in 2024 and beyond:
- Universal compatibility: Almost every device that reads USB storage can read FAT32 without any extra software.
- No driver needed: Your device recognizes FAT32 drives instantly without installing any additional drivers.
- Lightweight and fast: FAT32 uses very little system resources, making it ideal for older hardware and low-powered devices.
- Cross-platform support: It works seamlessly on Mac, Windows, and Linux machines without any configuration.
Despite these benefits, FAT32 has clear drawbacks. The 32GB partition limit and 4GB file limit make it unsuitable for large media files or modern storage needs. Still, for sharing files between devices or using with older hardware, nothing beats FAT32 for simplicity. If you have ever needed to format an NVMe SSD to a compatible file system, you know how important choosing the right format really is.
How to Format USB to FAT32 on Mac Using Terminal
The built-in Terminal app gives you full control over your drives. This method bypasses the Disk Utility restrictions and lets you format USB drives of any size to FAT32. It is completely free and does not require downloading anything from the internet. You just need to follow the steps carefully.
Step-by-Step Terminal Guide
Follow these steps carefully. Formatting erases all data on your drive, so back up your files first. There is no undo button for formatting.
- Connect your USB drive to your Mac using a USB port.
- Open Terminal. You can find it in Applications > Utilities or search for it using Spotlight by pressing Command and Space.
- Type
diskutil listand press Enter. This shows all connected drives. Find your USB drive by its size and name. - Unmount the drive. Type
diskutil unmountDisk /dev/diskXand replace X with the correct disk number for your USB drive. - Run the format command. Type
sudo newfs_msdos -F 32 /dev/diskXand press Enter. Enter your Mac administrator password when prompted. - Wait for the process to finish. Terminal will display a confirmation message when the format is complete.
This method works reliably for most USB drives. The Terminal approach gives you full control without any size restrictions. If you are not comfortable with the command line, do not worry. There are easier options coming up below. Many users who work with external drives also use adapters to connect NVMe SSDs. For example, an NVMe SSD to USB adapter can help you connect and format external NVMe drives the same way using Terminal.
Tips for Using Terminal Safely
- Double-check the disk number. Typing the wrong disk number can erase the wrong drive. Always verify before pressing Enter.
- Use diskutil unmountDisk before formatting. This prevents data corruption and ensures a clean format.
- Back up your data first. Always save important files to another location before formatting anything.
- Be patient. Larger drives take longer to format through Terminal. Let the process finish without interruption.
Best Third-Party Tools for Formatting USB to FAT32 on Mac
If Terminal feels too technical, third-party tools make the process simple. These apps provide a visual interface that guides you through every step. Most are free or offer free versions that handle FAT32 formatting with ease. You do not need to be a tech expert to use them.
FAT32 Format by Ridgecrop
This is the most popular free tool for formatting drives to FAT32 on Mac. It works with drives of any size and requires no technical knowledge. You simply select your drive, choose FAT32, and click start. The app handles the rest in seconds.
The free version works perfectly for most users. It is lightweight, fast, and does not bundle any unnecessary software or adware. Many Mac users rely on this tool as their go-to solution for FAT32 formatting. It solves the 32GB limit that Disk Utility imposes and makes the entire process feel effortless.
GUIFormat and Other Alternatives
GUIFormat is another excellent option that provides a simple graphical interface for formatting USB drives to FAT32. It is a port of the popular Windows tool and works well on Mac through Java. Other options include SD Card Formatter and various disk management utilities available online.
For users who also deal with other storage formats, learning about formatting tools can help. If you have ever needed to format an NVMe SSD or use a drive with an M.2 NVMe SSD to USB 3.1 adapter, the principles of choosing the right file system remain the same. Understanding how different file systems work gives you more control over your storage setup.
exFAT vs FAT32: Which Should You Choose
When you cannot use FAT32 or decide it is not the right choice, exFAT is the next best option. Both file systems work on Mac and Windows, but they have important differences that matter depending on your use case.
| Feature | FAT32 | exFAT |
|---|---|---|
| Max file size | 4GB | 16EB (virtually unlimited) |
| Max partition size | 32GB (macOS limit) | 128PB (virtually unlimited) |
| Mac support | Read and write natively | Read and write natively |
| Windows support | Read and write natively | Read and write natively |
| Best for | Small files, older devices | Large files, modern use |
| Compatibility | Older devices, consoles | Modern Macs and PCs |
exFAT is the clear winner for most modern users. It handles large files effortlessly and works on both Mac and Windows without any restrictions. If you need to transfer videos, disk images, or large backups between computers, exFAT is the smarter choice. It was designed specifically for flash drives and external storage, so it performs well on USB drives.
However, FAT32 still wins when compatibility with older devices matters. If you need your USB drive to work with a car stereo, older TV, or retro gaming console, FAT32 remains the safest bet. These older devices often do not support exFAT at all.
Quick tip: if you own an external drive enclosure or adapter, always check the manufacturer guidelines for the best file system. Some devices only recognize FAT32 regardless of the file system you choose.
Common Mistakes to Avoid When Formatting USB on Mac
Formatting a USB drive on a Mac can go wrong in several ways. Avoid these common mistakes to save time and protect your valuable data.
Skipping the Backup Step
The most common mistake is formatting without backing up first. Once you click the format button, all data on the drive is gone permanently. There is no undo, no recycle bin, and no way to recover your files. Always copy your important files to your Mac or a cloud service before you start the formatting process.
Choosing the Wrong File System
Selecting APFS or Mac OS Extended instead of FAT32 or exFAT can cause problems. If you plan to use the drive on both Mac and Windows, you need a file system that works on both. APFS only works on Mac. NTFS only works on Windows. FAT32 and exFAT work everywhere. Always double-check your target device requirements before choosing a format.
Ignoring Drive Size Limits
Many users try to format a 64GB or 128GB drive to FAT32 using Disk Utility and wonder why it fails. Remember, Disk Utility simply does not offer FAT32 for drives over 32GB. Use Terminal or a third-party tool instead. Do not waste time trying to find a hidden option that does not exist.
Not Ejecting the Drive Properly
After formatting, always eject your USB drive properly. Pulling it out without ejecting can cause file system corruption. Click the eject icon next to the drive name in Finder or use the Terminal command diskutil unmountDisk /dev/diskX. This simple habit protects your data and extends the life of your drive.
Final Thoughts on Formatting USB to FAT32 on Mac
Why cant I format USB to FAT32 on Mac is a question with a clear and straightforward answer. macOS intentionally restricts FAT32 formatting through Disk Utility to push users toward modern file systems like APFS and exFAT. But this does not mean you are out of options. You can use Terminal for a free built-in solution, rely on third-party tools like FAT32 Format for an easy visual experience, or choose exFAT as a modern alternative that removes the 4GB file limit entirely.
The right choice depends on your specific needs. If you need FAT32 for an older device or gaming console, use Terminal or a third-party app. If you just need a reliable format for large files on both Mac and Windows, exFAT is the way to go. Either way, you now have the knowledge and tools to take control of your USB formatting on Mac.
Remember to always back up your data before formatting. Choose the right file system for your use case. And if you run into any issues, the Terminal method and third-party tools will get the job done. Your USB drive will be formatted and ready to use in no time. Do not let macOS restrictions stop you from getting the most out of your USB drives.
Frequently Asked Questions
Why does macOS not let me format USB to FAT32 in Disk Utility?
Apple intentionally restricts FAT32 formatting in Disk Utility for drives larger than 32GB. This is a deliberate design choice to encourage users to adopt modern file systems like APFS and exFAT. However, you can still format larger drives to FAT32 using Terminal or third-party tools.
Can I format a 64GB USB drive to FAT32 on Mac?
Yes, you can. Disk Utility will not allow it directly, but you can use the Terminal command line or a free third-party tool like FAT32 Format. Both methods bypass the 32GB restriction and let you format any size drive to FAT32 on your Mac.
What is the difference between FAT32 and exFAT?
FAT32 has a 4GB file size limit and a 32GB partition limit on Mac. exFAT has no practical file size or partition limits and works just as well on both Mac and Windows. For most modern users, exFAT is the better choice unless you need FAT32 for an older device.
Is it safe to use Terminal to format my USB drive?
Yes, it is completely safe as long as you follow the steps carefully. The main risk is typing the wrong disk number, which could erase the wrong drive. Always double-check your disk number using diskutil list before running any format command.
Do I need to pay for any software to format USB to FAT32 on Mac?
No. You can use the free Terminal method or download free third-party tools like FAT32 Format by Ridgecrop. You do not need to pay for any software to format your USB drive to FAT32 on a Mac.
Will formatting my USB drive to FAT32 delete all my files?
Yes. Formatting erases all data on the drive permanently. Always back up your important files to your Mac or a cloud service before you begin the formatting process. There is no way to recover data after formatting.