Yes, you can often upgrade a laptop’s RAM, but it’s not always possible. The upgradeability depends entirely on your specific laptop model—some have easily accessible slots, while others have memory soldered directly to the motherboard. Before buying anything, you must check your laptop’s exact model specifications to see if an upgrade is supported and what type of RAM it requires. This guide walks you through every step, from diagnosis to installation, ensuring you boost your laptop’s performance safely and correctly.
You’re hammering away on your laptop, tabs piled high in your browser, a video editing project rendering, and a game loading in the background. Suddenly, everything grinds to a halt. The cursor spins, applications freeze, and a low memory warning pops up. It’s the classic sign of a RAM bottleneck. Your first instinct? “Can I just add more RAM?” It’s a fantastic idea—more RAM is often the most cost-effective way to breathe new life into a struggling machine. But the answer to “Can you upgrade RAM on a laptop?” is a classic tech answer: It depends.
Unlike a desktop tower with its spacious, standardized case, laptops are engineered for portability and compactness. This leads to a wide spectrum of designs. Some are as open as a desktop, with a simple panel on the bottom. Others are sealed units, glued and screwed shut, with components soldered in place for ultimate thinness. Navigating this landscape is key. This comprehensive guide will transform you from a curious user into a confident diagnostician and potential installer. We’ll cover everything from the fundamental concepts of laptop memory to the precise screw you need to turn, ensuring you make the right decision and execute it flawlessly.
Key Takeaways
- Not All Laptops Are Upgradable: Many modern ultrabooks and thin-and-lights have RAM soldered to the motherboard, making upgrades impossible. Always verify your specific model.
- Check Official Specifications First: Your laptop’s manual or manufacturer support page is the definitive source for max RAM, supported type (DDR4, DDR5, etc.), speed, and slot configuration.
- Tools & Prep Are Crucial: You’ll typically need small screwdrivers (Phillips #0 or #00), a plastic pry tool, and an anti-static wrist strap. Preparation prevents damage.
- Performance Gains Have Limits: Upgrading RAM dramatically helps if you’re constantly maxing out memory (slowdowns, stuttering, swapping). It won’t fix a slow CPU or outdated storage drive.
- Match RAM Specs Exactly: For best results, use modules with the same speed (MHz), voltage, and timings. Mixing mismatched sticks can cause instability or force all RAM to run at the speed of the slowest stick.
- Post-Upgrade Verification is Key: After installation, enter the BIOS/UEFI to confirm the new RAM is detected, then use your operating system’s system information tool to verify the total capacity and speed.
- Know When to Seek Help: If you’re uncomfortable opening your laptop, the bottom panel is tricky, or you void a warranty, consider a professional technician or a manufacturer upgrade service.
📑 Table of Contents
- Understanding Laptop Memory: Slots vs. Soldered
- Step 1: Diagnosing Your Laptop’s Upgradeability
- Step 2: Sourcing the Correct Replacement RAM
- Step 3: The Physical Upgrade Process (A Detailed Walkthrough)
- Step 4: Verification and Troubleshooting
- Step 5: When Upgrading RAM Isn’t the Answer (or Isn’t Possible)
- Conclusion: Empowerment Through Knowledge
Understanding Laptop Memory: Slots vs. Soldered
Before you even think about a screwdriver, you need to understand the two primary ways RAM exists inside a laptop. This distinction is the single most important factor determining your upgrade path.
The Accessible RAM Slot (SO-DIMM)
This is the good news scenario. Many laptops, especially business-class models (like Dell Latitude, Lenovo ThinkPad), gaming laptops (Alienware, some ASUS ROG), and many older or thicker consumer models, use standard, replaceable memory modules. These are smaller versions of desktop RAM sticks, called SO-DIMMs (Small Outline DIMM). They plug into a slot on the motherboard, secured by small plastic clips on either side. If your laptop has one or two of these slots, upgrading is usually as simple as opening an access panel, releasing the clips, swapping the old stick(s) for new ones, and closing it up. This design allows for easy future upgrades and repairs.
The Soldered RAM (On-Board Memory)
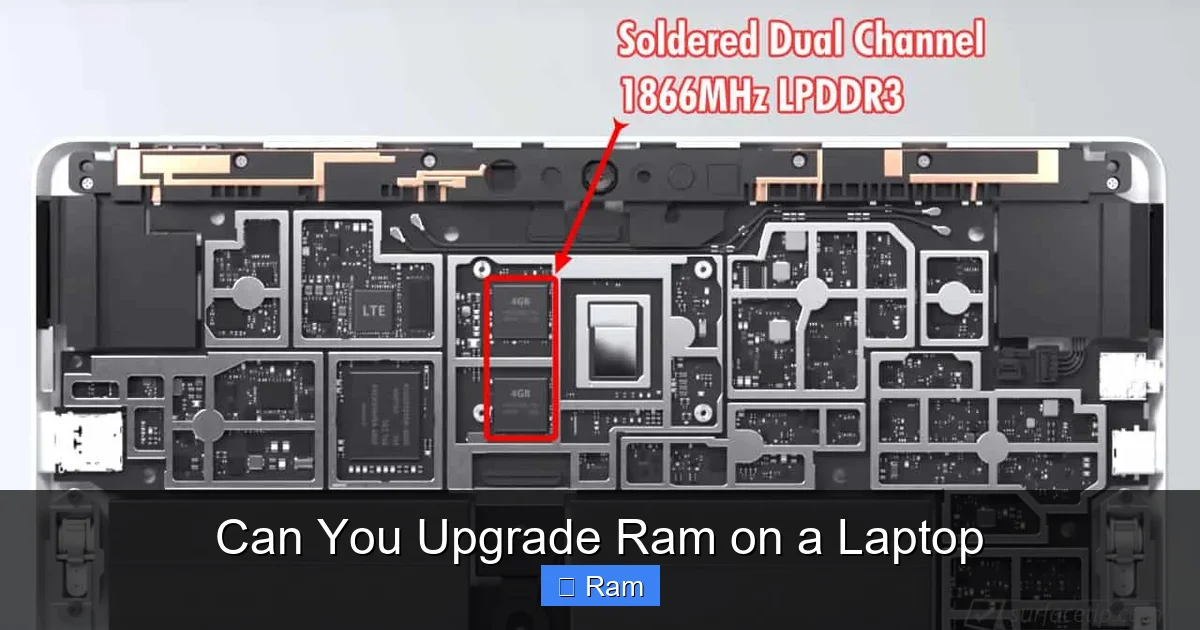
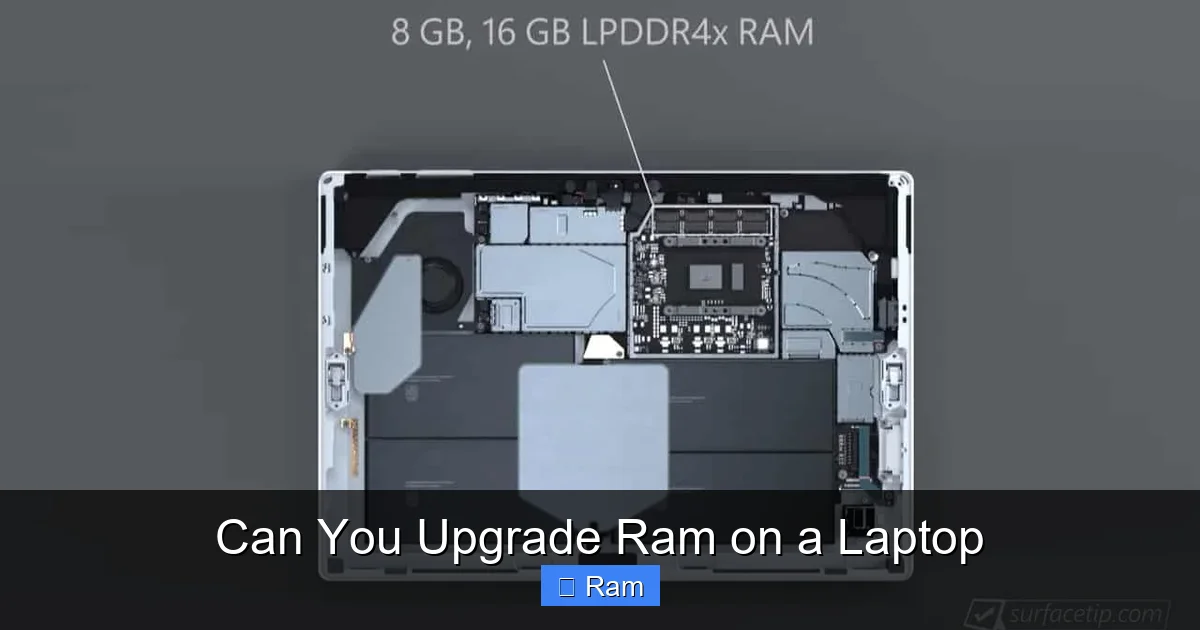
This is the roadblock. To achieve ever-thinner profiles, lighter weights, and better power efficiency, manufacturers like Apple (in most MacBooks), many ultrabook brands (Dell XPS 13, HP Spectre x360, Microsoft Surface Laptop), and numerous modern consumer laptops solder the memory chips directly onto the motherboard. There are no slots, no sticks to remove. The RAM is a permanent, non-upgradeable part of the logic board. If this is your laptop, the answer to “can you upgrade?” is a firm no. The only way to get more RAM is to replace the entire motherboard, which is almost never cost-effective.
Hybrid Approaches: One Slot, One Stick Soldered
A common compromise in mid-range laptops is a hybrid setup. One RAM module is soldered to the motherboard (often 4GB or 8GB), and there is one empty SO-DIMM slot for expansion. This is great news if you have, say, 8GB soldered and an empty slot. You can add an 8GB, 16GB, or 32GB stick (matching specs) to bring your total to 16GB, 24GB, or 40GB. However, a crucial detail: the soldered RAM runs at a fixed speed. Your new stick should ideally match that speed to avoid the system downclocking everything to the lowest common denominator. Always check your laptop’s maximum supported RAM; some hybrids have a lower max for the expandable slot.
Step 1: Diagnosing Your Laptop’s Upgradeability
Guessing is a waste of money and time. You must become a detective and gather concrete evidence about your laptop’s memory situation. Here is your systematic investigation plan.
Visual guide about Can You Upgrade Ram on a Laptop
Image source: surfacetip.com
Method 1: Check the Official Source (Manufacturer’s Specs)
This is the gold standard. Find your laptop’s exact model number. It’s usually on a sticker on the bottom or under the battery. It looks like “Dell XPS 13 9310” or “Lenovo ThinkPad T14 Gen 3”. Go to the manufacturer’s support website, enter that model number, and look for the “Specifications” or “Tech Specs” page. Scroll to the “Memory” section. It will state something like: “16GB, 3200MHz LPDDR4x (soldered)” or “Up to 64GB (2 slots), 3200MHz DDR4.” The keywords are your clues: “soldered,” “onboard,” “integrated” mean no upgrade. “Slots,” “expandable,” or a listed maximum capacity greater than the base configuration suggest upgradeability.
Method 2: Use System Information Tools (Software)
If the manufacturer’s site is unclear, your laptop itself knows the answer. On Windows, press Ctrl + Shift + Esc to open Task Manager, go to the “Performance” tab, and click “Memory.” At the bottom right, it shows “In use (Compressed)” and total “Committed” memory, but more importantly, look at the top: it often lists the speed (e.g., 3200 MHz) and the form factor. ” SODIMM ” is a very good sign. ” LPDDR ” (e.g., LPDDR4x) is often, but not always, soldered. For absolute certainty, use a free, trusted tool like CPU-Z. Open it, go to the “Memory” tab and the “SPD” tab. The “SPD” tab will list each memory slot. If you see “Empty” for a slot, you have an upgrade path! If there’s only one entry and it says “On Board” or you can’t select a second slot, it’s soldered.
Method 3: The Physical Inspection (If You’re Comfortable)
This is the final confirmation. Power down the laptop completely, unplug it, and remove the battery if it’s removable. Ground yourself by touching a metal part of the chassis or use an anti-static strap. Locate and remove all screws from the bottom panel. Some may be hidden under rubber feet or warranty stickers (opening these may void warranty—check first!). Gently pry the panel off with a plastic tool. Look for one or two small, rectangular modules about the size of a stick of gum, held down by small metal clips on the sides. If you see them, you have upgradeable RAM. If you see no modules and only a smooth area or a large heat spreader, it’s almost certainly soldered. Take a photo before you touch anything.
Step 2: Sourcing the Correct Replacement RAM
Found an empty slot or want to replace your existing sticks? Perfect. Now you must buy the right RAM. Using the wrong type simply won’t work or will cause instability.
Visual guide about Can You Upgrade Ram on a Laptop
Image source: surfacetip.com
Decoding the RAM Specs: DDR, Speed, and Capacity
Your laptop requires a specific generation of SO-DIMM: DDR3, DDR4, or DDR5. They are physically notched differently and are incompatible. Your system information tool (CPU-Z) or manufacturer specs will tell you the type. Next is speed, measured in megahertz (MHz), like 2666, 3200, or 4800. You must match the speed of your existing RAM (if upgrading one stick in a dual-channel setup) or use the speed your laptop’s chipset supports. Finally, capacity. Check your laptop’s maximum supported RAM. A system with 2 slots might support up to 64GB (32GB per slot). Never exceed this. For most users today, 16GB is the sweet spot for general use and light multitasking. 32GB is ideal for heavy content creation, engineering software, and future-proofing. 64GB+ is for extreme professional workloads.
Single vs. Dual Channel: The Performance Secret
This is critical for optimal performance. Most modern laptops use a dual-channel memory architecture, where data can be transferred between the RAM and CPU across two 64-bit pathways instead of one, nearly doubling the effective bandwidth. To enable dual-channel, you need either:
- Two identical sticks (same size, speed, brand, model) installed in the correct slots (usually color-coded).
- One stick if your laptop has only one slot (or one slot + soldered RAM—the soldered part acts as the first channel).
Practical Example: Your laptop has 8GB soldered and one empty slot. To get 16GB total in dual-channel, buy a single 8GB stick that matches the speed of the soldered RAM (e.g., 3200MHz). To get 24GB total (8GB soldered + 16GB stick), you will run in asymmetric dual-channel mode (flex mode), which is still faster than single-channel but not as optimal as matched pairs. If you have two empty slots, buying a 2x8GB kit (two 8GB sticks sold together) is always better than buying two separate 8GB sticks, as the kit is guaranteed to be a matched pair.
Where to Buy and What Brands to Trust
Buy from reputable retailers like Crucial, Kingston, Corsair, G.Skill, or TeamGroup. These brands have configurators on their websites (Crucial System Scanner, Kingston Memory Search) where you enter your laptop model, and they guarantee compatible RAM. This is the safest, easiest route. Avoid unknown, ultra-cheap brands on marketplaces; faulty RAM is a nightmare to diagnose. Also, check the return policy before purchasing.
Step 3: The Physical Upgrade Process (A Detailed Walkthrough)
Assuming you have confirmed upgradeability and purchased the correct SO-DIMM module, it’s time for surgery. Patience and care are your best tools.
Visual guide about Can You Upgrade Ram on a Laptop
Image source: wepc.com
Essential Toolkit and Safety First
Gather your tools: a set of high-quality, precision Phillips screwdrivers (sizes #0 and #00 are most common), a plastic spudger or pry tool, and optionally an anti-static wrist strap. Work on a clean, flat, well-lit surface. The cardinal rules: Never force anything. If a screw doesn’t come out easily, you’re using the wrong driver or it’s stripped. Always power off and unplug. Remove the battery if possible. Discharge static electricity by touching the laptop’s metal chassis before touching internal components. Keep screws organized in a small container, noting which hole they came from (laptop screws are often different lengths).
Accessing the Memory Bay
Flip the laptop over. Locate the service panel—it’s often a large rectangular section held by 6-10 screws, sometimes with a memory module icon (two small rectangles with a line between them) embossed nearby. Remove all screws. Some laptops have screws that won’t fully come out, staying attached to the panel—this is normal. Gently work a plastic tool around the seam of the panel. It may have hidden clips; listen for a faint click as they release. Lift the panel straight up. You should now see the motherboard and, hopefully, the RAM slots.
Removing the Old RAM (If Applicable)
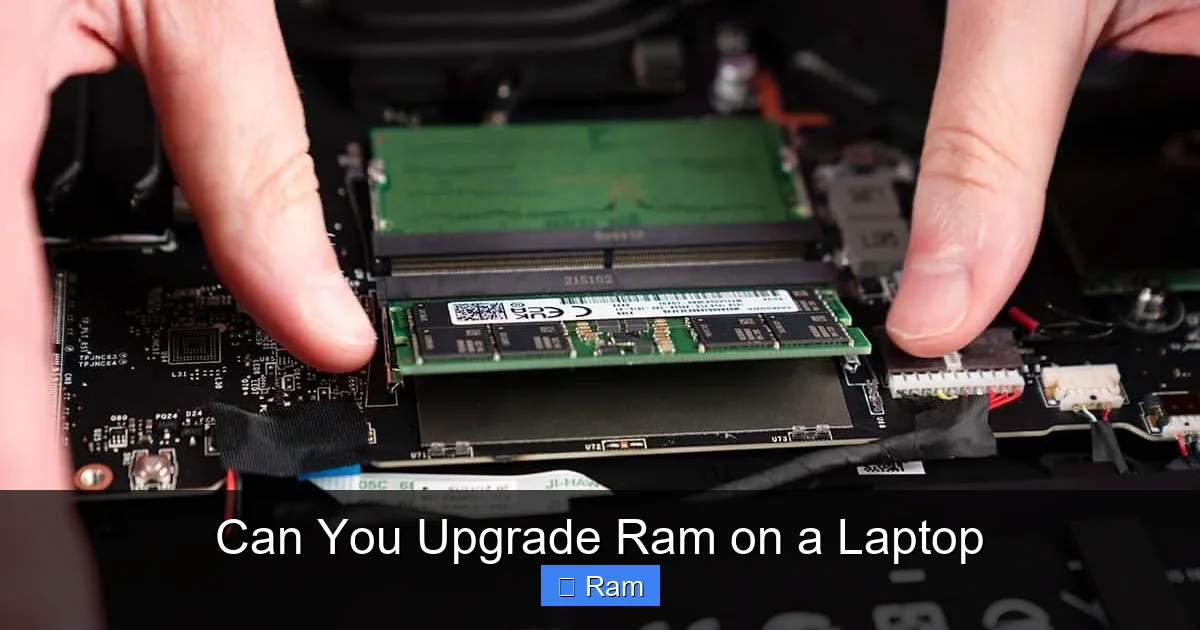
Locate the SO-DIMM module(s). They are held in place by two small, white or black plastic clips on the sides. To remove a stick, gently but firmly pry both clips outward and away from the module simultaneously. The module will pop up at about a 45-degree angle. Grasp it by the edges (avoid touching the gold contacts or the black chips) and pull it straight out. Place it on an anti-static bag or its original packaging. If you are replacing both sticks, do this for both. If you are adding to an existing stick, you only remove the old one if you’re replacing it; otherwise, leave it in and install the new one in the empty slot.
Installing the New RAM
This is the reverse process, but with a trick. Hold the new SO-DIMM by the edges. Align the notch on the bottom edge of the module with the key in the slot. This notch is off-center; it only fits one way. Insert the module into the slot at a 45-degree angle, pressing firmly and evenly until the gold contacts are fully inserted into the slot. You should feel it seat properly. Now, the crucial step: press the module straight down until the two retention clips snap into place, locking the module flat against the motherboard. You should hear/feel two small clicks. Ensure the clips are fully engaged and holding the module securely. If it’s not locked, it won’t work.
Reassembly and First Boot
Double-check that nothing is loose, no tools are inside, and the RAM is firmly seated. Replace the service panel, aligning it carefully. Press around the edges to ensure all clips engage. Reinstall all screws, tightening them in a star pattern (like a wheel) for even pressure, but do not overtighten. Snug is sufficient. Reconnect the battery if you removed it. Plug in the power adapter. Power on the laptop. It may reboot once or twice—this is normal as the system configures the new memory. Do not interrupt this process.
Step 4: Verification and Troubleshooting
Your laptop powered on! Great. But is the new RAM actually working? You must verify.
Entering the BIOS/UEFI
During boot, press the designated key (often F2, F10, F12, Del, or Esc—the screen usually flashes a prompt) to enter the system setup. Navigate to the “System Information,” “Main,” or “Memory” tab. Here, you should see the total installed RAM listed correctly (e.g., “16384MB” for 16GB) and the speed (e.g., “3200MHz”). If it shows the correct capacity, you’ve passed the first major hurdle.
Verifying in the Operating System
Boot into your operating system.
- On Windows: Right-click the Start button > System. Under “Device specifications,” it will show “Installed RAM.” For more detail, open Task Manager (Ctrl+Shift+Esc) > Performance > Memory. It shows speed, form factor (SODIMM), and in-use/available amounts.
- On macOS: Click the Apple menu > About This Mac. The memory line will show the total. For detailed channel info, go to Utilities > System Information > Memory.
The reported total should match the sum of your old and new RAM (or the new stick’s capacity if you replaced both).
Common Troubleshooting Scenarios
If the laptop powers on but shows no display (beeps or black screen), or the total RAM is wrong, try these steps in order:
- Reseat the RAM. Power off, open the case, remove the new stick, and reinstall it firmly, ensuring the clips lock. This fixes 80% of installation issues.
- Test one stick at a time. If you have two new sticks or are mixing old and new, try booting with only the new stick in the primary slot (often slot A, colored differently). Then try the other stick alone. A faulty stick will cause failure.
- Check compatibility. Did you accidentally buy DDR3 for a DDR4 system? The notch is in a different place and it physically won’t fit. If it fits but doesn’t boot, the speed or voltage may be wrong. Revert to the original RAM and verify the exact specs again.
- Clear CMOS. Some laptops require a BIOS reset after a major hardware change. Consult your manual for the procedure, which often involves holding a button while powering on with the battery removed.
- Update BIOS. An outdated BIOS may not support higher-capacity modules. Check the manufacturer’s support site for a newer BIOS version (update with the original RAM installed!).
Step 5: When Upgrading RAM Isn’t the Answer (or Isn’t Possible)
What if your laptop has soldered RAM? Or what if you upgraded and it’s still slow? You have other options.
For Soldered RAM Systems: The Alternatives
If the RAM is soldered, your hardware upgrade path is closed. Your focus must shift to software and other components.
- Maximize Existing RAM: Close unused applications and browser tabs. Use lightweight alternatives to heavy software. Disable startup programs.
- Upgrade the Storage Drive (SSD): This is the single biggest performance upgrade for any laptop with a traditional hard drive (HDD). Swapping an HDD for a SATA or NVMe SSD will make the system feel dramatically faster in boot times, app launches, and file loading—often more noticeable than a RAM upgrade for general responsiveness.
- Reinstall the Operating System: A fresh, clean install of Windows or macOS removes years of software clutter and can restore lost performance.
- Consider External Solutions: For very specific, storage-heavy tasks, a fast external SSD connected via USB 3.2/Thunderbolt can be used as scratch disk space for video editing or large datasets, but it’s a poor substitute for system RAM.
- Cloud-Based Workloads: If your tasks are web-based (Google Docs, online design tools), a faster internet connection and using a lightweight browser can mitigate local hardware limits.
Is RAM Upgrade Worth It? The Bottleneck Analysis
Don’t throw money at a problem you haven’t diagnosed. Use Task Manager (Performance tab) while doing your typical work. Is the “Memory” graph constantly at or near 100%? Are you seeing warnings about low memory? Is the hard drive (Disk) graph also at 100%? If RAM is consistently maxed, an upgrade will help. If your CPU is at 100% or your Disk is constantly active (especially on an HDD), more RAM won’t fix that. You might need a CPU-intensive task optimizations or, more likely, an SSD upgrade first.
Conclusion: Empowerment Through Knowledge
The journey to answer “Can you upgrade RAM on a laptop?” ends not with a simple yes or no, but with a confident, “Yes, if my model allows it, and here’s exactly how I’ll do it.” You now possess the diagnostic toolkit to inspect your machine, the knowledge to decode its specifications, and the roadmap to execute a safe, effective upgrade. The power to overcome the sluggish, memory-bound frustration is in your hands. Remember the golden rule: research first, buy second. A few minutes on the manufacturer’s website or with CPU-Z can save you from a costly mistake. If your laptop proves to be a sealed unit with soldered RAM, don’t despair. Redirect that upgrade energy towards a blazing-fast SSD, which will deliver a revolutionary performance leap for a similar cost. Whether you’re adding a second stick to enable dual-channel bliss or replacing a spinning hard drive with solid-state speed, you are now an active participant in your computer’s health and performance. Go forth, diagnose, and upgrade with confidence.
Frequently Asked Questions
Can I upgrade the RAM on any laptop?
No. Many modern thin-and-light laptops and all Apple MacBooks have RAM soldered directly to the motherboard, making it impossible to upgrade. You must check your specific laptop model’s specifications to determine if it has accessible RAM slots.
How much RAM do I actually need in 2024?
For most users (web browsing, office apps, streaming), 16GB is the new sweet spot for smooth multitasking. 8GB is the absolute minimum for basic use but may feel limited. 32GB is recommended for heavy tasks like video editing, 3D rendering, running virtual machines, or high-end gaming with many background applications.
Will upgrading my laptop’s RAM void the warranty?
It depends on the manufacturer and laptop model. Some have a user-accessible compartment that is explicitly warranty-safe to open. Others require breaking a warranty seal or have components (like the battery) that are not meant to be user-removed. Always check your warranty terms or contact support before opening a newer, covered laptop.
Do I have to match the brand and model of my existing RAM?
For optimal stability and dual-channel performance, it’s highly recommended to use identical modules (same brand, model, capacity, speed, and timings), especially when installing two sticks. If adding a single stick to a system with soldered RAM, you must match the speed, voltage, and type (e.g., DDR4-3200) of the soldered module. Using a mismatched stick will usually work but may force all RAM to run at the slower speed.
Can mixing RAM sizes (e.g., 8GB + 16GB) cause problems?
Technically, you can mix sizes. The system will run in asymmetric or “flex” dual-channel mode, which is still faster than single-channel. However, for best performance and to avoid potential compatibility hiccups, using a matched pair (2x8GB or 2x16GB) is always the preferred and more reliable method, especially in a system with two empty slots.
My laptop has soldered RAM. Is there any way to get more memory?
No, not without replacing the entire motherboard, which is almost never cost-effective. Your best performance investments for a soldered-RAM laptop are: 1) Ensure you have a fast SSD (NVMe if possible), 2) Perform a clean operating system install, 3) Use cloud-based or external storage for large files to reduce RAM pressure from caching, and 4) Close unnecessary applications to free up every megabyte of your existing RAM.