Want to get your touchpad working again? Enabling the mouse pad on a laptop is often just a few clicks away. This guide walks you through Windows, macOS, and Linux methods, plus common fixes and customization tips, so you can scroll, click, and swipe without a separate mouse.
Key Takeaways
- Simple toggle: Most laptops let you enable the mouse pad from the Settings or Function keys.
- Driver matters: Updating or reinstalling the touchpad driver resolves many enable/disable issues.
- BIOS check: A disabled touchpad in BIOS can override OS settings.
- Customization: Sensitivity, gestures, and tap‑to‑click are adjustable once the pad is enabled.
- Safety tip: Always create a system restore point before editing drivers or BIOS.
- Cross‑platform: Windows, macOS, and Linux each have their own enable steps.
- Quick fixes: A reboot, function‑key press, or a small registry tweak often restores the pad instantly.
📑 Table of Contents
Introduction
Imagine you’re in the middle of a video call, and the cursor vanishes. You reach for the external mouse, but it’s not plugged in. Panic? Not at all. Most of the time, the solution is simply to enable the mouse pad on your laptop. Whether you’re using a Windows notebook, a sleek MacBook, or a Linux‑based machine, the touchpad can be turned back on in a handful of steps.
In this article we’ll walk through every common method to reactivate your built‑in mouse pad. We’ll cover the quick keyboard shortcut, the detailed Settings menu, driver updates, BIOS checks, and platform‑specific tricks. Along the way you’ll pick up practical tips to keep the pad responsive, customize gestures, and avoid future hiccups.
Why a Touchpad Might Be Disabled
Accidental Function‑Key Press
Many laptops assign the Fn + F3/F7/F9 (depending on the brand) to toggle the touchpad. A stray press while adjusting volume can turn the pad off without you noticing.
Visual guide about Enable Mouse Pad on Laptop
Image source: itechtics.com
Power‑Saving Settings
To extend battery life, some power‑management tools automatically disable the mouse pad when an external mouse is connected. If the external device is unplugged, the pad may stay off.
Driver or Software Glitch
Out‑of‑date or corrupted drivers often cause the pad to stop responding. Windows Update or a recent OS upgrade can sometimes break the driver.
BIOS/UEFI Configuration
Advanced users sometimes disable the touchpad in the BIOS to free up resources or avoid accidental clicks. A BIOS setting overrides any OS‑level toggle.
How to Enable the Mouse Pad on Windows
Method 1: Using the Settings App
1. Click the Start button and select the Settings gear.
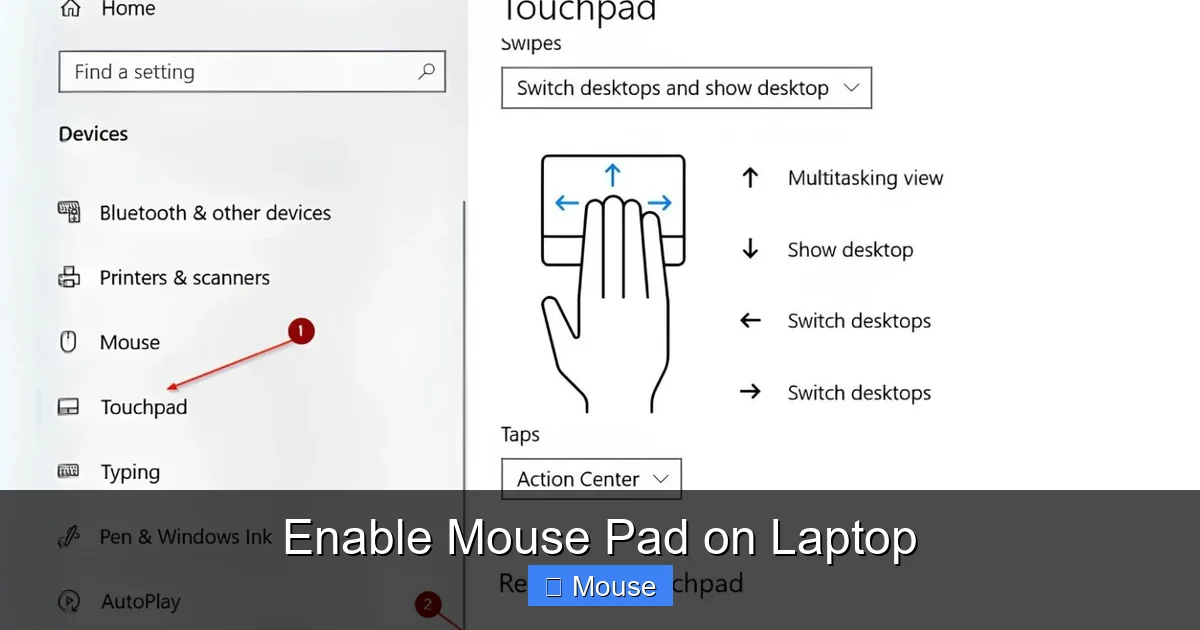
2. Go to Devices > Touchpad.
3. Flip the Touchpad switch to On.
4. Adjust sensitivity and gestures as desired.
Visual guide about Enable Mouse Pad on Laptop
Image source: robots.net
This is the fastest way for most users. If the switch is greyed out, you likely need to update the driver.
Method 2: Via the Control Panel (Older Windows Versions)
1. Open the Control Panel and choose Hardware and Sound.
2. Click Mouse, then go to the Device Settings or Touchpad tab.
3. Select your touchpad device and click Enable.
4. Click Apply and OK.
Method 3: Using the Function Key
Locate the key with a touchpad icon (often F7 or F9) and press Fn + that key. A small on‑screen notification should appear confirming the status.
Method 4: Updating or Reinstalling the Driver
1. Right‑click This PC > Manage > Device Manager.
2. Expand Mice and other pointing devices.
3. Right‑click your touchpad (e.g., “Synaptics Touchpad”) and choose Update driver – let Windows search automatically.
4. If that fails, select Uninstall device, then restart. Windows will reinstall a generic driver.
For brand‑specific drivers, visit the manufacturer’s support page. A fresh driver often restores full functionality.
Method 5: Checking BIOS/UEFI Settings
1. Shut down the laptop.
2. Power on and press the BIOS entry key (F2, Del, Esc or brand‑specific).
3. Navigate to Advanced or Peripheral settings.
4. Find Internal Pointing Device or similar and set it to Enabled.
5. Save and exit.
After the reboot, the touchpad should be active.
Enabling the Mouse Pad on macOS
System Preferences
1. Click the Apple menu > System Settings (or System Preferences on older macOS).
2. Choose Trackpad.
3. Ensure the Tap to click and other gesture boxes are checked. If the trackpad appears dimmed, click the Enable button.
Using the Keyboard Shortcut
Some MacBooks allow you to disable the trackpad when an external mouse is connected. To override this:
Open System Settings > Accessibility > Pointer Control > Trackpad Options and uncheck “Ignore built‑in trackpad when mouse or wireless trackpad is present.”
Resetting the SMC and NVRAM
If the pad is still unresponsive, resetting the System Management Controller (SMC) and NVRAM can help.
- SMC reset: Shut down, press Shift + Control + Option on the left side and the power button for 10 seconds, then release and turn on.
- NVRAM reset: Power on and immediately hold Option + Command + P + R** for about 20 seconds.
After the resets, the touchpad should respond.
Enabling the Mouse Pad on Linux
Using the Desktop Environment Settings
Most modern distros (Ubuntu, Fedora, Linux Mint) have a Settings app.
- Open Settings > Mouse & Touchpad.
- Toggle the Touchpad switch to On.
- Adjust speed, tap‑to‑click, and multi‑finger gestures.
Command‑Line Method (for advanced users)
Open a terminal and run:
xinput list                # shows device IDs
xinput enable <device‑id>   # enables the touchpad
If the device is listed as “SynPS/2 Synaptics TouchPad,” note its ID and replace <device‑id> accordingly.
Checking the Synaptics or libinput Driver
Linux uses either synaptics or libinput. Install the appropriate package if missing:
sudo apt install xserver‑xorg‑input‑synaptics   # Debian/Ubuntu
sudo dnf install xorg-x11-drv-synaptics        # Fedora
After installation, log out and back in, or reboot.
Customizing Your Touchpad After Enabling It
Sensitivity and Speed
In Windows Settings, the Touchpad sensitivity slider lets you choose between Most Sensitive and Least Sensitive. macOS offers a Tracking speed** slider, while Linux’s gsettings command can adjust org.gnome.desktop.peripherals.touchpad speed.
Gestures
Enable three‑finger swipe for switching desktops, four‑finger pinch for zoom, or tap‑to‑click for quick selection. These options reside in the same Settings pane where you enabled the pad.
Disabling Accidental Taps
If you find the pad too “touchy,” turn off Tap to click and rely on the physical buttons. On Windows, the option is called Press the touchpad to click.
Using Third‑Party Tools
Tools like Touchpad Blocker (Windows) or BetterTouchTool** (macOS) give you granular control over gestures, palm‑rejection, and custom shortcuts.
Troubleshooting Common Problems
Touchpad Not Detected
If the device doesn’t appear in Device Manager or Linux’s xinput list, try a BIOS check first. A disabled internal pointing device will hide the hardware from the OS.
Visual guide about Enable Mouse Pad on Laptop
Image source: robots.net
Cursor Jumps or Stutters
Update the driver, clean the pad surface, and reduce sensitivity. Interference from a nearby magnetic field (e.g., a speaker) can also cause jitter.
External Mouse Keeps the Pad Disabled
Windows sometimes locks the touchpad when a USB mouse is connected. Go to Settings > Devices > Touchpad and uncheck “Leave touchpad on when a mouse is connected.”
Persistent Failure After Updates
Roll back the driver:
- Device Manager → Touchpad → Properties → Driver tab.
- Click Roll Back Driver**.
If the option is greyed out, reinstall the previous version from the manufacturer’s website.
When All Else Fails
Creating a system restore point before major changes is a safety net. If the touchpad still won’t enable, consider a clean OS reinstall or hardware inspection.
For a deeper dive into why a touchpad might stay disabled, see our article on Mouse Pad Not Working On Laptop. If you need to turn the pad off temporarily, check out How To Turn Off Mouse Pad On Laptop. And if you’re curious about enabling the touch‑mouse feature specifically, read How To Enable Touch Mouse On Laptop.
Conclusion
Enabling the mouse pad on a laptop is rarely a complex task. Most issues stem from an accidental function‑key press, a driver hiccup, or a BIOS setting. By following the step‑by‑step methods for your operating system, you can get the touchpad back in action within minutes. Remember to keep drivers up to date, adjust power‑saving options, and customize the gestures to suit your workflow. With these tips, you’ll never be stuck without a cursor again.
Frequently Asked Questions
How do I quickly turn the touchpad back on with a keyboard shortcut?
Most laptops use Fn + F7 (or a similar key with a touchpad icon). Pressing this combination toggles the pad on or off instantly.
Why does my touchpad stay disabled after I disconnect an external mouse?
Windows may retain the “mouse present” setting. Open Settings → Devices → Touchpad and uncheck “Leave touchpad on when a mouse is connected.”
Can a BIOS setting permanently disable my laptop’s mouse pad?
Yes. If the BIOS/UEFI has the internal pointing device set to “Disabled,” the OS cannot enable it. Re‑enter BIOS and change the setting to “Enabled.”
Do I need to reinstall the driver every time I update Windows?
Not usually, but major Windows updates sometimes overwrite manufacturer drivers. If the pad stops working, check Device Manager and reinstall the latest driver from the laptop maker’s site.
Is it safe to use third‑party software to customize touchpad gestures?
Most reputable tools (e.g., Touchpad Blocker, BetterTouchTool) are safe, but always download from the official website and keep a restore point in case of conflicts.
Will enabling the touchpad affect battery life?
Touchpads consume minimal power. Disabling them may save a few milliwatts, but the impact on overall battery life is negligible.