How to Remove Ram Laptop
Removing RAM from your laptop is a simple process that anyone can do with the right tools and guidance. This guide walks you through each step of how to remove RAM laptop safely, from preparation to reassembly. Whether you are upgrading memory or troubleshooting, you will find clear instructions to follow.
Laptops slow down over time, and one of the easiest ways to bring them back to life is by working with the memory. If you are wondering how to remove RAM laptop modules for an upgrade or replacement, you have come to the right place. This guide covers everything from preparation to reassembly in simple, clear steps.
Removing RAM might sound intimidating, but it is actually one of the simplest laptop maintenance tasks you can perform. You do not need to be a tech expert. With a few basic tools and some patience, you can safely take out your existing memory and either upgrade or replace it. Let us walk through the process together.
Before we dive in, it helps to understand what laptop RAM does. Random Access Memory, or RAM, is the short-term memory your computer uses to handle tasks. When you open apps, browse the web, or edit documents, RAM handles the workload. More RAM generally means smoother multitasking and faster performance. That is why many people choose to remove and upgrade their laptop memory regularly.
Key Takeaways
- Power down completely: Always shut off your laptop and unplug it before removing any RAM.
- Use the right tools: A small Phillips screwdriver and an anti-static wrist strap are essential.
- Ground yourself: Discharge static electricity to protect sensitive components.
- Release clips gently: The side clips hold RAM in place and need careful pressure to release.
- Know your RAM type: Laptop RAM uses SODIMM modules, which differ from desktop RAM.
- Check compatibility: Before reinstalling, confirm the new RAM matches your laptop specifications.
- Reinsert properly: Push the RAM firmly until the clips click into place.
📑 Table of Contents
Why You Might Need to Remove Laptop RAM
There are several reasons you may need to take out your laptop RAM. Understanding your goal helps you prepare properly and avoid mistakes along the way.
Upgrading Your Memory
The most common reason is to upgrade. If your laptop feels sluggish when you open multiple browser tabs or run heavy software, adding more RAM can make a noticeable difference. Before you buy new memory, you should first remove the existing modules to check what you currently have. You can learn more about checking your current setup in our guide on how to check the RAM on my laptop.
Replacing Faulty RAM
Sometimes RAM modules fail. Signs of bad RAM include frequent crashes, blue screens, or random freezing. Removing the faulty stick and replacing it with a new one often solves these issues without needing a full repair.
Troubleshooting Performance Issues
Even if your RAM is not broken, removing and reseating the modules can fix connection problems. Dust buildup in the memory slots can cause intermittent issues. Taking the RAM out gives you a chance to clean both the sticks and the slots carefully.
Tools You Will Need
Gathering your tools before you start makes the whole process smoother. You do not need anything fancy, but having the right items ready saves time and prevents frustration.
- Small Phillips-head screwdriver: Most laptops use tiny screws to secure the bottom panel.
- Anti-static wrist strap: This protects your RAM and other components from static damage. It is cheap and worth every penny.
- Soft, clean cloth: Use this to wipe down surfaces before you work.
- Small container: Keep screws and tiny parts organized so nothing gets lost.
- Compressed air can: Helpful for blowing dust out of memory slots and other areas.
Pro tip: Work on a flat, clean surface. A large table or desk is much better than a bed or couch. A clean workspace reduces the risk of dust or debris getting inside your laptop.
Step-by-Step Guide on How to Remove RAM Laptop Modules
Now let us get into the actual process. Follow these steps carefully, and you will have your RAM out in no time.
Step 1: Power Down and Unplug
Start by shutting down your laptop completely. Do not just put it to sleep. Turn it off fully. Then unplug the power adapter and disconnect any external devices like USB drives, mice, or monitors. Removing power is the first and most important safety step.
Step 2: Ground Yourself
Static electricity can damage sensitive electronic components. Put on your anti-static wrist strap and clip it to a metal part of the laptop chassis. If you do not have a wrist strap, touch a metal surface like a doorknob or the laptop metal frame before you start handling any parts. This simple step protects your RAM and motherboard.
Step 3: Remove the Bottom Panel
Flip your laptop over and locate the screws on the bottom panel. Use your small Phillips screwdriver to remove them. Keep the screws in your small container so they do not get misplaced. Gently pry off the bottom panel using a plastic spudger or your fingernail. Avoid metal tools that could scratch the laptop.
Step 4: Locate the RAM Slots
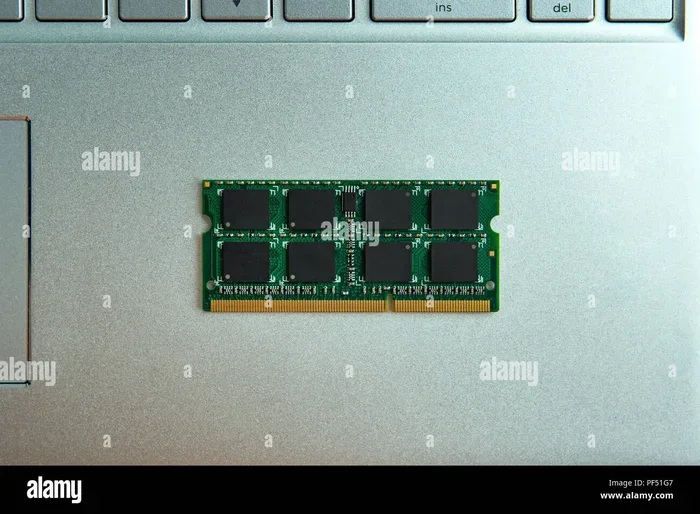
Once the bottom panel is off, you will see the internal components. The RAM sticks are long, thin modules usually located near the center or side of the motherboard. They are held in place by small clips on each end. Laptop RAM uses SODIMM modules, which are smaller than desktop RAM sticks.
Step 5: Release the Side Clips
Push the metal clips on both sides of the RAM stick outward gently. The RAM module will angle upward slightly as the clips release. Do not force anything. If the clips feel stiff, apply gentle, even pressure. The module should slide out easily once the clips are free.
Step 6: Remove the RAM Stick
Grasp the RAM stick firmly but gently. Pull it straight out of the slot at the angle it tilted upward. Avoid touching the gold connectors on the bottom of the module. Hold the RAM by the edges to keep it clean and safe from damage.
If your laptop has two RAM slots, repeat the process for the second stick. Some laptops have one soldered stick and one removable slot, so check your specific model first.
Tips for Safe RAM Removal
Safety matters when working with laptop internals. Here are some quick tips to keep in mind.
- Never remove RAM while the laptop is powered on. Always ensure the device is completely off and unplugged.
- Avoid touching the gold contacts. Oils from your fingers can corrode the connectors over time.
- Work in a well-lit area. Good lighting helps you see small components clearly.
- Take photos before disassembly. Photos help you remember how everything is connected when it is time to put things back.
- Be patient. Rushing increases the risk of damaging components or stripping screws.
These habits protect both you and your laptop. Even experienced tech users follow these precautions every time they open up a device.
What to Do After Removing RAM
Once the RAM is out, you have several options depending on your goal.
Install New RAM
If you are upgrading, align the notch on the new SODIMM module with the slot. Insert the stick at an angle and press it down firmly until the side clips click into place. The module should sit flat and snug. For a full walkthrough on putting RAM back in, check out our guide on how to put RAM in a laptop.
Clean the Memory Slots
Use compressed air to blow dust out of the empty slots. You can also gently wipe the slot contacts with a dry cloth. Clean connections help your new or existing RAM perform at its best.
Test the System
After reassembling your laptop, power it on and check that the system recognizes the RAM. You can verify this by going to your system settings or using diagnostic tools. If you want to learn how to confirm your RAM is working properly, visit our page on how to check my laptop RAM.
Common Mistakes to Avoid
Even simple tasks can go wrong if you overlook important details. Here are common mistakes people make when removing laptop RAM.
- Forcing the clips: The release clips should move smoothly. If they resist, stop and double-check that you are pushing in the right direction.
- Removing RAM from a powered laptop: This can short-circuit components and cause permanent damage.
- Touching the gold contacts: Finger oils degrade connector quality over time.
- Mixing RAM types: DDR3 and DDR4 RAM are not interchangeable. Always confirm compatibility before purchasing new memory.
- Skipping the anti-static measure: Static discharge can silently damage components, even if you do not see a spark.
Avoiding these mistakes keeps your laptop safe and your RAM working reliably for years to come.
Understanding Laptop RAM Types
Not all RAM is the same. Different laptops use different types of memory modules, and knowing which one you have helps you make the right upgrade choices.
| Type | Speed | Common In |
|---|---|---|
| DDR3 SODIMM | 1600 MHz | Older laptops (2010-2015) |
| DDR4 SODIMM | 2400-3200 MHz | Modern laptops (2016-present) |
| DDR5 SODIMM | 4800+ MHz | Latest generation laptops |
Before buying new RAM, check your laptop manual or the manufacturer website for compatible specifications. Using the wrong type will not work, even if the physical slot looks similar.
When to Seek Professional Help
Most people can remove and replace laptop RAM without any issues. However, there are situations where professional help makes sense. If your laptop is still under warranty, opening the case might void the coverage. In that case, contact the manufacturer or an authorized service center. Similarly, if you feel unsure about any step, a professional technician can handle the job safely and quickly.
For those who want to learn more about the broader upgrade process, our article on how to upgrade RAM on a laptop covers everything from removal to installation in detail.
Conclusion
Learning how to remove RAM laptop modules is a valuable skill that saves money and time. Whether you are upgrading memory, replacing a faulty stick, or simply cleaning your system, the process is straightforward when you follow the right steps. Remember to power down, ground yourself, work carefully, and handle components by the edges.
With the tools and knowledge from this guide, you are well-equipped to tackle RAM removal confidently. Do not let the idea of opening your laptop intimidate you. Start with these steps today, and you will be surprised how easy it really is. Your laptop will thank you with better speed and smoother performance.
Frequently Asked Questions
Can I remove RAM while the laptop is on?
No, never remove RAM while the laptop is powered on. Always shut down completely and unplug the power adapter. Working on a powered device risks short-circuiting the motherboard and damaging your RAM or other components.
Do I need an anti-static wrist strap to remove laptop RAM?
An anti-static wrist strap is highly recommended but not strictly required. If you do not have one, make sure to touch a grounded metal surface before handling any internal components. This discharges static electricity that could harm sensitive parts.
How do I know which RAM type my laptop uses?
Check your laptop manual or visit the manufacturer website for specifications. You can also use system information tools built into Windows or macOS to identify your current RAM type, speed, and capacity before purchasing replacements.
Is removing RAM difficult?
No, removing RAM is one of the easiest laptop maintenance tasks. It requires only a small screwdriver and a few minutes. As long as you follow the steps carefully and handle components gently, the process is simple and straightforward for most users.
Can I mix different RAM sticks in my laptop?
It is best to use matching RAM sticks for optimal performance. Mixing different speeds, sizes, or types can cause compatibility issues. If you must mix, try to match the speed and type as closely as possible to avoid system instability.
What should I do if my laptop does not recognize the RAM after reinstalling?
First, remove the RAM and reseat it firmly. Make sure the clips click into place. If the problem persists, try each RAM stick individually to identify a faulty module. Clean the gold contacts gently with a dry cloth if needed.