How to Replace Laptop Ram
Replacing your laptop RAM is one of the easiest and most affordable ways to speed up your computer. This guide walks you through everything from choosing the right RAM module to installing it safely. You will learn how to check your current RAM, find compatible replacements, and complete the upgrade in under 30 minutes.
Is your laptop running slow? Do apps take forever to open, and your browser keeps freezing? The answer might be simpler than you think. Replacing your laptop RAM can breathe new life into an aging machine and make everything feel faster.
Upgrading your memory is one of the easiest computer upgrades you can do. It costs a fraction of what a new laptop costs, and most people can finish the job in less than half an hour. Whether you use your laptop for work, school, or gaming, more RAM means smoother multitasking and better performance.
In this guide, we will walk you through every step of the process. You will learn how to check your current memory, find the right replacement, and install it safely. We also share common mistakes to avoid so you do not damage your laptop along the way. Let us get started.
Key Takeaways
- Replacing laptop RAM is simple: Most laptops let you swap RAM in minutes with just a screwdriver.
- Check compatibility first: Your laptop needs the right RAM type, speed, and max capacity to work properly.
- Safety matters: Always discharge static electricity before touching internal components.
- DDR4 and DDR5 are the current standards: Older laptops may still use DDR3 SODIMM modules.
- You can save hundreds of dollars: A RAM upgrade costs far less than buying a new laptop.
- Follow our step-by-step guide: We cover everything from opening the back panel to testing your new RAM.
📑 Table of Contents
Why Replace Laptop RAM?
Your laptop uses RAM to handle everything you do right now. Every open browser tab, every running app, and every video you stream lives in your memory. When your RAM fills up, your laptop starts swapping data to the hard drive, which slows everything down dramatically.
Here are the main reasons people replace their laptop RAM:
- Slow performance: Your laptop takes forever to start up or open programs.
- Multitasking struggles: Switching between apps causes freezing or lag.
- Upgrade for new software: Newer apps and operating systems need more memory to run well.
- Gaming performance: Games need plenty of RAM to load levels and textures quickly.
- Cost savings: A RAM upgrade is much cheaper than replacing your entire laptop.
If you are unsure whether your laptop needs more memory, you should check your current RAM first. This tells you how much you have and whether an upgrade will help.
Understanding Laptop RAM Types
Not all RAM is the same. Laptops use a specific type of memory called SODIMM, which is smaller than the RAM sticks used in desktop computers. Knowing which type your laptop needs is the most important part of this whole process.
DDR3 vs DDR4 vs DDR5
RAM technology has evolved over the years. Here is a quick look at the three main types you will encounter:
- DDR3: Older but still found in many laptops from 2010 to 2017. It runs at lower speeds and uses less power.
- DDR4: The current standard for most modern laptops. Faster than DDR3 and widely available.
- DDR5: The newest standard. It offers the best speeds and is starting to appear in high-end laptops.
RAM Speed and Capacity
RAM speed is measured in megahertz (MHz). Higher numbers mean faster data transfer. Most laptops work well with 2400 MHz to 3200 MHz RAM. Capacity is measured in gigabytes (GB). For everyday use, 8 GB is the minimum. Power users and gamers should aim for 16 GB or more.
When choosing RAM for your upgrade, make sure to match the type and speed. If your laptop uses DDR4, do not buy DDR3. Mixing types will not work and can cause errors.
How to Check Your Current RAM
Before you buy anything, you need to know what your laptop currently has. This step helps you figure out how much to buy and what type to get.
On Windows
Open the Task Manager by pressing Ctrl + Shift + Esc. Click on the Performance tab and then select Memory. You will see your total RAM, speed, and how many slots are in use. This information helps you decide whether to replace existing RAM or add more.
On macOS
Click the Apple menu and select About This Mac. You will see your total memory right on the overview screen. For more details, click System Report and then look under Memory in the sidebar.
Knowing your current setup also tells you whether your laptop has free slots for additional RAM or if you need to replace the existing modules entirely.
How to Replace Laptop RAM: Step by Step
Now for the part you have been waiting for. Replacing laptop RAM is straightforward, but you need to be careful. Follow these steps closely for a smooth upgrade.
Step 1: Gather Your Tools
You do not need much to replace RAM. Here is what you will need:
- A small Phillips-head screwdriver
- Your new RAM module (matching your laptop type)
- An anti-static wrist strap (optional but recommended)
- A clean, flat workspace
An anti-static wrist strap helps prevent static electricity from damaging your components. If you do not have one, simply touch a metal surface before handling the RAM.
Step 2: Power Down and Unplug
Shut down your laptop completely. Unplug the power cable and remove any connected peripherals. If your laptop has a removable battery, take it out. This ensures there is no power running through the system while you work.
Step 3: Open the Back Panel
Flip your laptop over and locate the screws holding the back panel. Use your screwdriver to carefully remove them. Keep the screws in a safe place. Gently lift off the panel to expose the inside of your laptop.
Some laptops have a dedicated RAM compartment. Others require you to remove the entire back panel. Check your laptop model to know what to expect.
Step 4: Remove the Old RAM
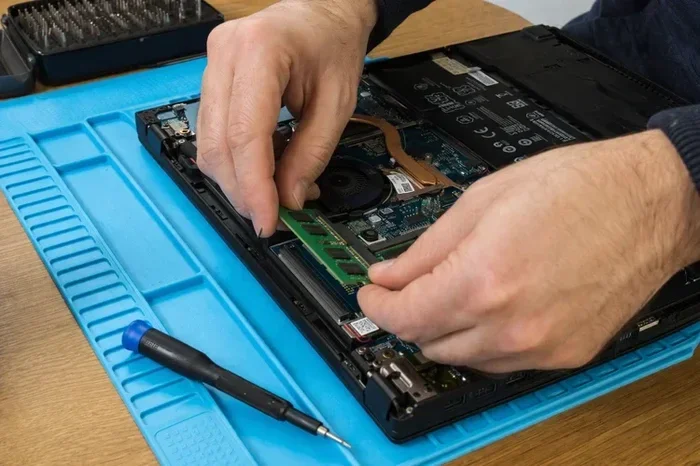
Locate the RAM sticks on your motherboard. You will see small metal clips on either side of each module. Gently push these clips outward. The RAM stick will pop up at an angle. Carefully pull it straight out of the slot.
Hold the RAM by the edges. Avoid touching the gold contacts on the bottom. These are sensitive and oils from your fingers can cause connection problems.
Step 5: Install the New RAM
Take your new RAM module and align it with the slot. The notch on the bottom of the RAM should match the ridge in the slot. Insert the RAM at a 30-degree angle and press it down firmly until the metal clips click into place.
If you are adding a second stick, repeat the process in the next available slot. Make sure both modules are fully seated and locked in.
For brand-specific guidance, check out our detailed guide on installing RAM in HP laptops if you have an HP device.
Step 6: Close Up and Test
Replace the back panel and screw it back in. Reconnect the battery if you removed it. Plug in your power cable and turn on the laptop.
Once your laptop boots up, check your RAM again using the Task Manager or About This Mac. The new amount should appear. If everything looks correct, you are all set. Your laptop should feel noticeably faster right away.
Common Mistakes to Avoid
Even though replacing RAM is simple, mistakes can happen. Here are the most common errors and how to avoid them:
- Buying the wrong RAM type: Always double-check your laptop model and its RAM requirements before purchasing.
- Forcing the RAM into the slot: If it does not go in easily, check the alignment. Forcing it can bend the pins and ruin the module.
- Skipping the anti-static precaution: Static discharge can damage your motherboard. Always ground yourself before touching internal parts.
- Not seating the RAM fully: If the clips do not click, the RAM is not fully inserted. Your laptop may not recognize it.
- Mixing incompatible RAM: Try to use matching RAM sticks from the same brand, speed, and capacity for the best results.
If you run into issues after installation, try reseating the RAM. Sometimes a loose connection is all it takes. You can also check your RAM using built-in diagnostic tools to confirm it is being recognized correctly.
How Much RAM Do You Really Need?
The right amount of RAM depends on what you use your laptop for. Here is a simple breakdown:
| Usage Type | Recommended RAM | Notes |
|---|---|---|
| Basic browsing and office tasks | 8 GB | Enough for light use and simple apps |
| Multitasking and productivity | 16 GB | Great for multiple apps and browser tabs |
| Gaming and creative work | 32 GB | Handles demanding software and games |
| Professional video editing | 64 GB | For heavy-duty content creation |
Most everyday users will find 16 GB to be the sweet spot. It handles multitasking with ease and provides room for future software updates. If you are unsure, starting with 16 GB is a safe and smart choice.
When to Replace vs Upgrade
Sometimes you do not need to replace RAM, just add more. If your laptop has empty memory slots, you can simply install a new module alongside your existing one. This is called upgrading, and it is often easier than replacing.
However, if all your slots are filled and you want to switch to a higher capacity or newer type, you will need to replace the old modules entirely. Check how many slots your laptop has before you buy anything.
If you are not sure about your laptop’s configuration, you can learn more about upgrading your laptop RAM to understand your options better.
Expert Tips for a Smooth RAM Replacement
Here are some bonus tips from experienced technicians to make your upgrade go even more smoothly:
- Take photos before disassembly: This helps you remember how everything is connected when it is time to put things back together.
- Work on a non-carpeted surface: Carpet generates static electricity, which can harm electronic components.
- Keep your old RAM: It might still be useful in another laptop or as a backup.
- Update your BIOS: After a RAM upgrade, check for BIOS updates from your laptop manufacturer. This can improve compatibility and stability.
- Run a memory test: Use Windows Memory Diagnostic or a tool like MemTest86 to verify your new RAM is working correctly.
Replacing your laptop RAM is one of the most rewarding upgrades you can do. It is fast, affordable, and delivers an immediate improvement in speed and responsiveness. Whether you are a student, a professional, or a casual user, the extra memory makes a real difference in your daily experience.
Do not let a slow laptop hold you back. With the right RAM module and a few simple tools, you can upgrade your machine in no time. Follow the steps in this guide, take your time, and enjoy the results. Your laptop will thank you.
Frequently Asked Questions
Can I replace laptop RAM myself?
Yes, replacing laptop RAM is one of the simplest DIY upgrades you can do. You only need a small screwdriver and about 15 to 30 minutes. Most laptops have an easy-to-access RAM compartment on the bottom. Just make sure you buy the right type of RAM for your model before you start.
How do I know which RAM to buy for my laptop?
Check your laptop’s manual or the manufacturer’s website for RAM specifications. You need to know the RAM type (DDR3, DDR4, or DDR5), the maximum capacity your laptop supports, and the number of available slots. Matching these details ensures your new RAM will work correctly.
Is it safe to touch RAM modules?
Yes, but you should take a few precautions. Touch a metal surface to discharge static electricity before handling RAM. Hold the module by the edges and avoid touching the gold contacts. Using an anti-static wrist strap adds an extra layer of protection.
Will adding more RAM speed up my laptop?
Adding more RAM can significantly speed up your laptop if you currently have low memory. If your RAM is already maxed out for your needs, adding more will not make much difference. Check your current usage first to see if an upgrade will help.
Can I mix different RAM brands in my laptop?
You can mix brands, but it is best to use matching sticks for optimal performance. Different brands may have varying speeds and timings, which can cause compatibility issues. If you must mix them, try to match the RAM type, speed, and capacity as closely as possible.
How long does a laptop RAM replacement take?
The entire process typically takes 15 to 30 minutes. Opening the back panel, removing old RAM, and installing new RAM is quick and straightforward. The only thing that might take longer is researching the right RAM type for your specific laptop model.