How to Remove Ram in Laptop
Learning how to remove ram in laptop is a simple skill every laptop user should have. Whether you are upgrading, replacing, or troubleshooting, this guide walks you through each step with confidence. You will learn the right tools, safety steps, and how to handle RAM sticks without damage. Follow along to make the process fast and easy.
Removing RAM from a laptop might sound intimidating, but it is actually one of the simplest hardware tasks you can do. How to remove ram in laptop is a question many users search for when they want to upgrade memory, replace a faulty stick, or simply clean their machine. This guide breaks down every step in plain language so anyone can follow along.
Before you start, it helps to understand what RAM does. Random Access Memory, or RAM, is the short-term memory your laptop uses to run programs and tasks. Over time, you may find your laptop needs more RAM to keep up with modern software demands. That is when knowing how to remove and replace laptop RAM becomes incredibly useful.
In this article, we will cover everything from preparation to reassembly. You will learn about the tools you need, the safety precautions to take, and the exact steps to pull out your RAM stick without any trouble. We will also share common mistakes to avoid and tips from experienced technicians.
Key Takeaways
- Power down and unplug: Always disconnect all power sources before touching any internal components.
- Use the right tools: A small Phillips screwdriver and an anti-static wrist strap are all you need.
- Release the clips gently: Most laptops have spring-loaded clips that hold the RAM in place.
- Handle RAM by the edges: Never touch the gold contacts or circuitry on the RAM stick.
- Check compatibility first: Make sure your new RAM matches your laptop’s specifications before purchasing.
- Ground yourself: Use an anti-static mat or wrist strap to prevent static damage to sensitive parts.
📑 Table of Contents
Why You Might Need to Remove RAM
There are several reasons why you would need to take RAM out of your laptop. Understanding your reason helps you plan the process better and choose the right replacement parts.
Upgrading Your Laptop Memory
One of the most common reasons is upgrading. If your laptop feels slow when you open multiple tabs or run heavy applications, adding more RAM can make a big difference. Many laptops come with 4GB or 8GB of RAM, which is no longer enough for today’s multitasking needs. How to remove ram in laptop is the first step toward a memory upgrade that breathes new life into an older machine.
Replacing a Faulty RAM Stick
Sometimes a RAM stick goes bad. You might notice blue screen errors, random crashes, or your laptop failing to boot. In these cases, you need to remove the faulty stick and replace it with a working one. Knowing the removal process ahead of time saves you a trip to the repair shop.
Troubleshooting and Cleaning
Dust can build up inside your laptop over time, especially around the memory slots. Removing RAM allows you to clean the area thoroughly. It also lets you test each stick individually to find out if one is causing problems. Checking your RAM before removal can help you identify which stick needs attention.
Tools and Preparation You Will Need
Gathering your tools before you start makes the entire process smoother. You do not need anything fancy, but having the right items ready prevents delays and frustration.
Essential Tools
- Small Phillips-head screwdriver: Most laptops use tiny screws to secure the bottom panel. A precision screwdriver set works great.
- Anti-static wrist strap: This protects your RAM and other components from static electricity damage. It is inexpensive and easy to use.
- Soft cloth or anti-static mat: Place your laptop on a clean, flat surface to prevent scratches and static buildup.
- Small container or magnetic tray: Use this to store screws so they do not get lost.
Safety Precautions
Safety should always come first when working inside your laptop. Follow these precautions to protect both yourself and your hardware.
- Power off completely: Shut down your laptop and unplug the charger. Remove the battery if it is removable.
- Unplug all peripherals: Disconnect USB devices, external monitors, and anything else plugged into your laptop.
- Ground yourself: Touch a metal surface or wear an anti-static wrist strap to discharge any static electricity from your body.
- Work on a clean surface: Avoid carpets and soft surfaces that can generate static. A wooden table is ideal.
Step-by-Step Guide to Remove RAM from Laptop
Now let us get into the actual process. Follow each step carefully, and you will have your RAM removed in just a few minutes.
Step 1: Back Up Your Data
Before you open up your laptop, make sure your important files are backed up. While removing RAM should not erase any data, accidents can happen. A simple backup to an external drive or cloud storage gives you peace of mind.
Step 2: Open the Laptop Bottom Panel
Flip your laptop over and locate the screws on the bottom panel. Use your small screwdriver to carefully remove each screw. Keep the screws in your magnetic tray. Gently pry off the bottom panel using a plastic spudger or your fingernail. Avoid using metal tools that could scratch the laptop casing.
Step 3: Locate the RAM Slots
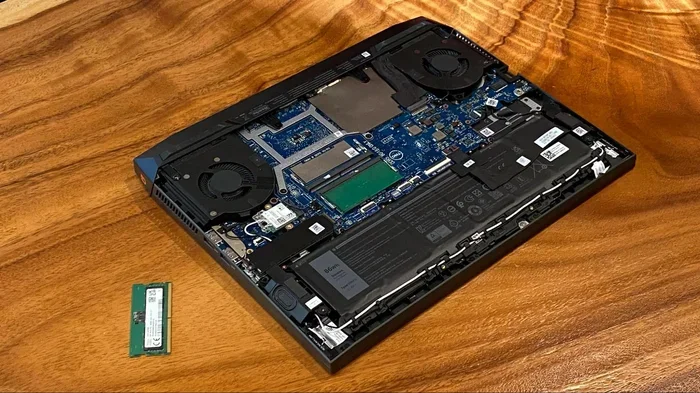
Once the bottom panel is off, you will see the internal components. The RAM sticks are long, thin modules usually located near the center or left side of the motherboard. They are held in place by small metal clips on each end. If you are unsure about what you are looking at, refer to your laptop’s manual or search online for your specific model.
Step 4: Release the RAM Clips
This is the most important step. Each RAM stick has two spring-loaded clips on either side. Gently push both clips outward toward the edges of the laptop. The RAM stick will angle upward slightly as the clips release. Do not force anything. If the clips feel stuck, double-check that you are pushing in the right direction.
For users with HP laptops, the process is very similar. If you need model-specific guidance, check out our guide on how to remove RAM in HP laptop for additional tips tailored to HP models.
Step 5: Remove the RAM Stick
Once the clips are released, the RAM stick will pop up at an angle. Hold it gently by the edges and pull it straight out of the slot. Never pull by the center or touch the gold contacts on the bottom. The gold contacts are the most sensitive part of the RAM module, and oils from your fingers can cause connection issues.
Step 6: Repeat for Additional RAM Sticks
If your laptop has more than one RAM stick, repeat steps 4 and 5 for each one. Some laptops have two slots, while others have only one. Take your time and work carefully with each stick.
Step 7: Store the RAM Safely
Place the removed RAM sticks in an anti-static bag. This protects them from static damage while they are not in use. If you are replacing the RAM, keep the old stick in a safe place until you confirm the new one works properly.
Common Mistakes to Avoid When Removing Laptop RAM
Even simple tasks can go wrong if you are not careful. Here are the most common mistakes people make when removing RAM, and how to avoid them.
Skipping the Grounding Step
Static electricity is invisible but powerful. A small shock that you do not even feel can damage your RAM or motherboard. Always ground yourself before touching any internal components. An anti-static wrist strap is the easiest way to stay protected.
Forcing the RAM Clips
The spring clips are delicate. If you push too hard or at the wrong angle, you can bend or break them. Apply gentle, even pressure on both clips at the same time. If the RAM does not release easily, stop and double-check your approach.
Touching the Gold Contacts
The gold pins on the bottom of the RAM stick are where the connection happens. Oils and dirt from your fingers can interfere with this connection. Always hold the RAM stick by the top edges and the sides. This keeps the contacts clean and safe.
Losing the Screws
It sounds obvious, but tiny screws are easy to lose. Use a magnetic tray or a small bowl to keep track of every screw you remove. Some laptops have different screw sizes for different parts, so keeping them organized matters.
Not Checking RAM Compatibility
If you are removing RAM to upgrade, make sure your new RAM is compatible. Check your laptop’s manual for the supported RAM type, speed, and maximum capacity. Using incompatible RAM can cause system instability or prevent your laptop from booting.
Tips for a Smooth RAM Removal Experience
A few extra tips can make the process even easier and safer. These come from years of experience working with laptop hardware.
- Take photos before disassembly: Snap pictures of the inside of your laptop before you remove anything. This helps you remember where everything goes when it is time to reassemble.
- Work in a well-lit area: Good lighting helps you see small screws and clips clearly, reducing the risk of accidental damage.
- Take breaks if needed: If you feel frustrated or tired, step away for a few minutes. Working while fatigued increases the chance of mistakes.
- Label your screws: If your laptop has multiple screw sizes, use small stickers or tape to label where each screw belongs.
- Reconnect the battery before testing: After reassembly, make sure the battery is properly connected before you power on your laptop.
For those who want to learn more about the broader RAM upgrade process, including installation and compatibility, check out our detailed guide on how to upgrade RAM in a laptop. It covers everything from choosing the right RAM to installing it and verifying it works.
How to Verify Your RAM After Removal
Once you have removed the RAM or installed new RAM, you should verify that everything is working correctly. This step is often overlooked but is very important.
After reassembling your laptop, power it on and check the system information. On Windows, you can right-click the Start button and select Task Manager. Go to the Performance tab and click on Memory. This shows you how much RAM is installed and whether it is running properly.
On macOS, click the Apple menu and select About This Mac. The memory section shows your RAM details. If the amount shown does not match what you expect, you may need to reseat the RAM sticks or check for compatibility issues.
Running a memory diagnostic tool is also a good idea. Windows has a built-in tool called Windows Memory Diagnostic that checks for errors. You can also use third-party tools like MemTest86 for a more thorough test. How to remove ram in laptop is only half the process. Verifying the results ensures your laptop is running at its best.
When to Seek Professional Help
Most users can remove RAM from their laptop without any issues. However, there are situations where professional help is the right choice.
If your laptop is still under warranty, opening it up might void the warranty. Check your warranty terms before attempting any internal work. In these cases, it is best to visit an authorized service center.
You should also seek help if you encounter resistance when trying to remove the RAM. Forcing a stuck RAM stick can damage the slot or the motherboard. A technician has the experience and tools to handle stubborn components safely.
Additionally, if you are uncomfortable working with internal hardware, there is no shame in asking for help. Many local repair shops offer affordable RAM removal and installation services. Your safety and the safety of your laptop matter more than saving a few dollars.
Conclusion
How to remove ram in laptop is a straightforward process that anyone can learn. With the right tools, proper safety precautions, and a little patience, you can remove your RAM stick in under ten minutes. Remember to ground yourself, handle the RAM by the edges, and release the clips gently.
Whether you are upgrading your memory, replacing a faulty stick, or simply cleaning your laptop, this guide gives you everything you need. Avoid the common mistakes we covered, and take your time with each step. A careful approach today saves you from costly repairs tomorrow.
Now that you know how to remove RAM safely, you have the confidence to tackle this task on your own. Your laptop’s performance might just improve with a fresh memory upgrade. So go ahead, open up that bottom panel, and take control of your laptop’s hardware. You will be glad you did.
Frequently Asked Questions
Can I remove RAM while the laptop is turned on?
No, never remove RAM while the laptop is powered on. Always shut down completely, unplug the charger, and remove the battery if possible. Working on a powered laptop risks damaging both the RAM and the motherboard.
Do I need any special tools to remove laptop RAM?
Not really. A small Phillips-head screwdriver is usually all you need to open the bottom panel. An anti-static wrist strap is highly recommended to protect your components from static damage, but it is not strictly required.
Is it safe to touch the RAM gold contacts?
No, you should never touch the gold contacts on the bottom of the RAM stick. Oils from your fingers can interfere with the electrical connection. Always hold the RAM by the top edges and the sides only.
How do I know if my laptop RAM is removable?
Most laptops have removable RAM, but some ultrabooks and thin models have soldered RAM that cannot be replaced. Check your laptop’s manual or search online for your specific model to confirm whether the RAM is user-replaceable.
What should I do if the RAM clips are stuck?
If the clips feel stuck, do not force them. Double-check that you are pushing outward on both clips evenly. If they still do not release, try gently wiggling the RAM stick side to side while pushing the clips. If it still does not budge, seek help from a professional technician.
Can I mix different RAM sticks in my laptop?
You can mix RAM sticks, but it is best to use matching sticks for optimal performance. Use the same brand, size, speed, and type of RAM. Mixing different specifications can cause compatibility issues or reduce performance.