Figuring out how to see the RAM in your laptop is a crucial troubleshooting and upgrade step. You can check RAM capacity, speed, and slot usage using built-in tools like Windows Task Manager or macOS System Report. For deeper hardware details, third-party software or a physical inspection (if possible) provides the full picture. Understanding your laptop’s RAM specifications helps diagnose performance issues and plan future upgrades effectively.
Ever felt your laptop dragging its feet, struggling to keep a few browser tabs and a document open? Before you blame the processor or consider a full replacement, one of the first questions you should ask is: “How much RAM do I actually have?” Random Access Memory, or RAM, is your system’s short-term memory. It’s where your laptop temporarily stores data it’s actively using. Knowing exactly what you have—its capacity, speed, and type—is the single most important piece of information for diagnosing slowdowns and planning a cost-effective performance boost. This guide will walk you through every single method, from the simplest click to opening the chassis itself, so you can confidently answer the question of how to see ram of laptop.
Key Takeaways
- Built-in OS tools are the fastest way: Use Task Manager (Windows), About This Mac (macOS), or terminal commands (Linux) to see basic RAM capacity and usage instantly.
- Third-party software offers deep specs: Tools like CPU-Z and Speccy reveal detailed information including RAM type (DDR4/DDR5), speed (MHz), timings, and slot configuration.
- Physical inspection is the ultimate check: Opening your laptop’s panel lets you see the exact modules installed, their make/model, and available slots, but only if the RAM is user-accessible.
- The BIOS/UEFI shows pre-OS details: Entering your laptop’s BIOS/UEFI during startup displays fundamental RAM information, useful if the operating system won’t load.
- Not all RAM is upgradeable: Many modern laptops solder RAM directly to the motherboard. Checking your current setup is the first step to knowing if an upgrade is even possible.
- Understanding specs is key for upgrades: Knowing your RAM’s generation (DDR4 vs. DDR5), speed, and whether slots are free is essential for purchasing compatible memory.
- Less reported RAM is normal sometimes: Integrated graphics and system reservations can cause the usable RAM to be slightly less than the total installed physical memory.
📑 Table of Contents
- Understanding Why You Need to Check Your Laptop’s RAM
- Method 1: Using Built-in Operating System Tools
- Method 2: Leveraging Third-Party System Information Software
- Method 3: The Physical Inspection
- Method 4: Checking the BIOS/UEFI
- Method 5: Interpreting Your Findings and Planning an Upgrade
- Conclusion: Knowledge is Power (and Performance)
Understanding Why You Need to Check Your Laptop’s RAM
Before we dive into the “how,” let’s quickly establish the “why.” RAM is the workspace your laptop uses to juggle all your open applications. When this workspace gets full, your system starts using the much slower solid-state drive (SSD) or hard drive as a “scratch pad,” a process called paging or swapping. This is a primary cause of that frustrating lag. By checking your RAM, you can determine if you’re hitting that limit. Furthermore, if you’re considering an upgrade, you must know what’s already installed to buy compatible sticks. You’ll need to match the generation (DDR3, DDR4, DDR5), the speed rating (e.g., 3200MHz), and ensure you have an empty slot or need to replace existing modules. Simply put, how to see ram of laptop specs is the foundational step for any performance-related decision.
RAM Basics: Capacity, Speed, and Generation
When you check, you’ll encounter three main specs. Capacity is the total amount, measured in Gigabytes (GB)—like 8GB, 16GB, or 32GB. More is generally better for multitasking and demanding applications. Speed, measured in Megahertz (MHz), indicates how fast the RAM can transfer data. A 3200MHz kit is faster than a 2666MHz kit of the same generation. Generation (DDR4, DDR5, etc.) is the architectural standard. DDR5 is newer and faster than DDR4, but they are physically incompatible. Your laptop’s motherboard dictates which generation it supports. Our methods will help you identify all three.
Method 1: Using Built-in Operating System Tools
The easiest way to learn how to see ram of laptop is to use the tools already sitting on your desktop. Every major OS has a built-in utility that provides a quick overview of your installed memory. These are perfect for a fast check without installing any extra software.
Visual guide about How to See Ram of Laptop
Image source: lapcare.com
For Windows Users: Task Manager and System Information
Windows provides at least two excellent, instant-access tools. The first, and most familiar to many, is the Task Manager.
- Task Manager: Press Ctrl + Shift + Esc or right-click the taskbar and select “Task Manager.” Go to the “Performance” tab. On the left, click “Memory.” Here you’ll see a graph and, most importantly, the total “In use (Compressed)” and “Available” memory at the top. Crucially, it also shows the “Speed” (in MHz), “Form factor” (typically SODIMM for laptops), and “Hardware reserved” memory. This is a fantastic, real-time snapshot.
- System Information: For a more detailed, static report, search for “System Information” in the Start Menu. In the window that opens, navigate to Components > Memory. This section lists each physical memory stick installed. You’ll see the “Capacity” (in bytes, but easily readable as GB), “Speed,” “Manufacturer,” “Part Number,” and “Device Locator” (which tells you which slot it’s in, e.g., “ChannelA-DIMM0”). This is one of the most comprehensive built-in views for how to see ram of laptop hardware details in Windows.
- Command Prompt/PowerShell (Advanced): For those who prefer the command line, you can get a clean summary. Open Command Prompt or PowerShell as an administrator (right-click > Run as administrator) and type:
wmic MemoryChip get BankLabel, Capacity, Speed, MemoryType. This will output the details for each memory chip. The “Capacity” is in bytes, so you’ll need to do a quick conversion (divide by ~1.07 billion to get GB).
For macOS Users: About This Mac and System Report
Apple makes it beautifully simple on MacBooks.
- About This Mac: Click the Apple menu () in the top-left corner and select “About This Mac.” The overview window that pops up immediately shows your “Memory” line, stating the total installed RAM (e.g., “8 GB 2133 MHz LPDDR3”). This is your quick answer.
- System Report for Full Details: For the nitty-gritty, click the “System Report…” button in the same About This Mac window. In the System Information utility, select “Memory” from the left-hand hardware list. Here you’ll see every slot, the type of memory (e.g., “LPDDR3”), the size of each module, the speed, and a status line. This report is the definitive answer for how to see ram of laptop specs on a Mac.
For Linux Users: Terminal Commands and GUI Tools
Linux offers powerful command-line utilities. The most common is free.
- Using the Terminal: Open your terminal application. Type
free -h. The “-h” flag makes the output “human-readable,” showing GB instead of bytes. The “total” value under “Mem:” is your installed RAM. For more detailed per-module information, usesudo dmidecode --type memory. You’ll need sudo (administrator) privileges. This dumps a lot of data; look for “Size,” “Type,” “Speed,” and “Locator” for each memory device. - GUI Alternatives: Most desktop environments have a system monitor. In GNOME, use “System Monitor” and check the “Resources” tab. In KDE Plasma, “System Settings” > “Information” > “Memory.” These provide a user-friendly view similar to Windows Task Manager.
Method 2: Leveraging Third-Party System Information Software
While OS tools are great, third-party software often provides the most polished, comprehensive, and easy-to-understand overview of all your system’s components, including RAM. These programs are invaluable when you need every last detail for an upgrade.
Visual guide about How to See Ram of Laptop
Image source: robots.net
CPU-Z: The Gold Standard for Hardware Details
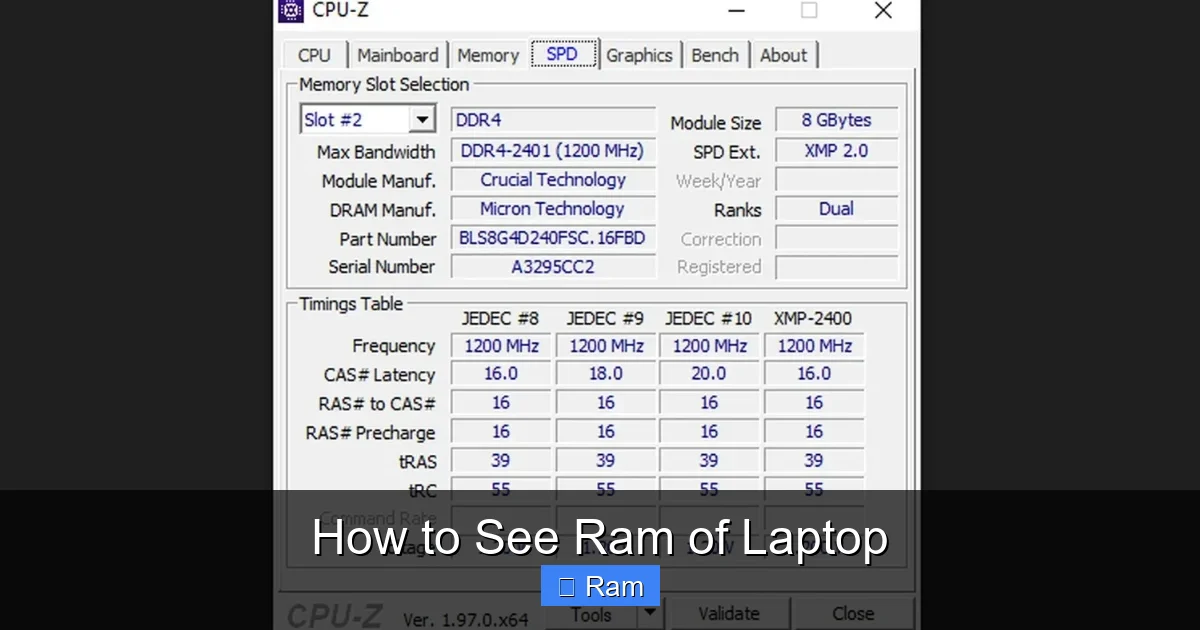
CPU-Z from CPUID is a free, lightweight, and trusted tool used by enthusiasts and technicians worldwide. It doesn’t just check RAM; it analyzes everything. After downloading and running it, navigate to the “Memory” tab and the “SPD” tab.
- Memory Tab: Shows the “Type” (e.g., DDR4), “Size” (Total), and “Channels #.” It also lists the “DRAM Frequency” (the actual speed, note it’s half the advertised “effective” MHz like 3200).
- SPD Tab: This is the masterclass. Each memory slot (Slot #1, Slot #2, etc.) gets its own sub-tab. Clicking each reveals the full specifications of the stick physically installed in that slot: Manufacturer, Part Number, Size, Type, and all the detailed timing (tCL, tRCD, tRP, tRAS). This is the ultimate answer for how to see ram of laptop module-specific data.
Speccy: The User-Friendly Overview
Developed by Piriform (makers of CCleaner), Speccy provides a beautiful, color-coded summary of your entire system. It’s perfect for users who want a quick, readable snapshot without digging through technical codes. Under the “RAM” section, it clearly lists the total capacity, type, speed, and number of channels. It also graphically shows which slots are occupied. For a simple, one-glance answer to how to see ram of laptop capacity and type, Speccy is hard to beat.
Other Notable Tools
Tools like HWiNFO offer even more sensor data and exhaustive hardware reporting, while MemTest86 is primarily for stress testing but also reports detected RAM. For most users, CPU-Z and Speccy cover all necessary bases.
Method 3: The Physical Inspection
This is the most direct method and the only way to be 100% certain of what’s physically inside your laptop. However, it comes with a major caveat: not all laptops are designed for easy user access.
Visual guide about How to See Ram of Laptop
Image source: robots.net
When and How to Open Your Laptop
First, determine if your laptop’s RAM is accessible. Many business laptops (ThinkPads, Dell Latitudes, HP EliteBooks) have a simple panel on the bottom secured by one or two screws. Many consumer laptops, especially ultrabooks and recent MacBooks, have the RAM soldered directly to the motherboard, making it impossible to upgrade or inspect without professional microsoldering.
- Research First: Before grabbing a screwdriver, search online for “[Your Laptop Model] RAM upgrade” or “[Your Laptop Model] service manual.” iFixit is an excellent resource for teardown guides. This will tell you if there’s a service panel and what tools you need (often just a Phillips-head screwdriver).
- Safety Precautions: If you proceed, power off the laptop completely, unplug the charger, and remove the battery if it’s removable. Press and hold the power button for 10 seconds to discharge residual power. Work on a non-conductive surface and use an anti-static wrist strap if possible.
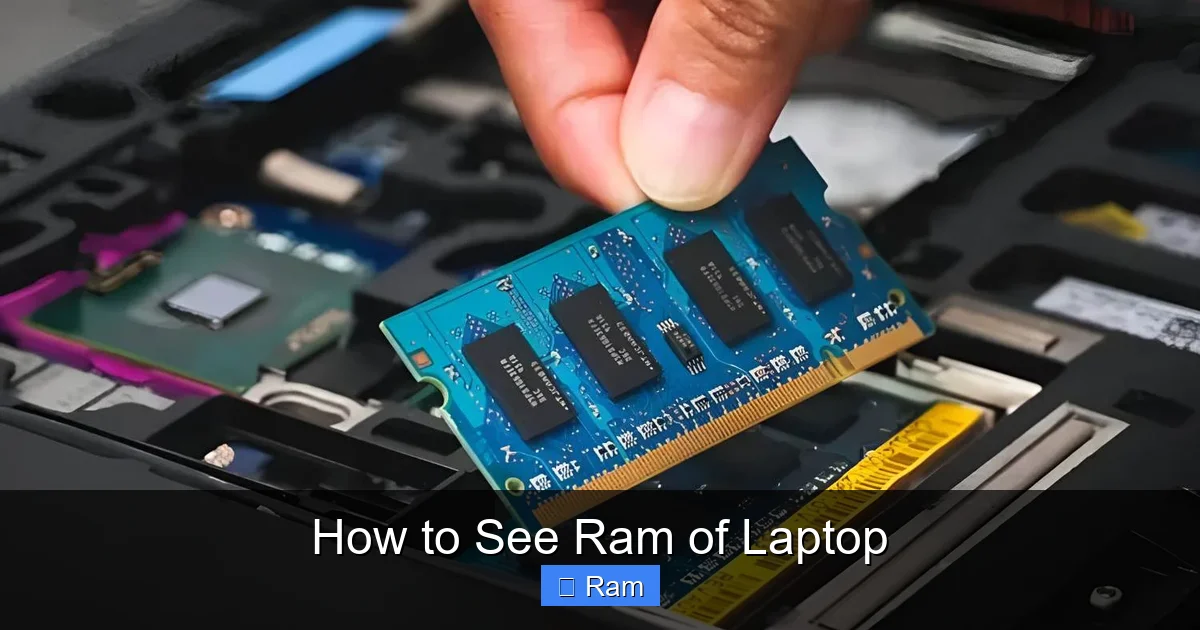
- The Process: Remove the screws from the bottom panel. It may be held by clips; gently pry with a plastic tool (like a guitar pick) starting at a corner. Once open, look for one or two long, green circuit boards (the RAM modules) held down by small metal clips on either side. To remove a module, gently pry the clips outward (they pop up), and the module will tilt up at a 45-degree angle. Pull it out straight.
What to Look For When You See the RAM
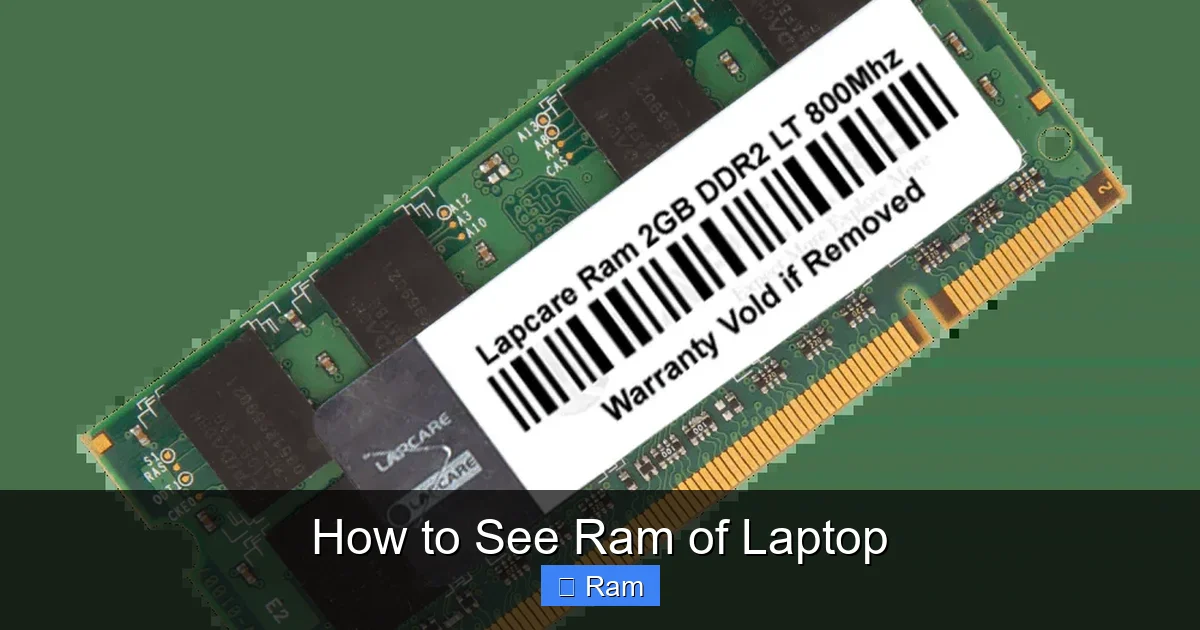
Once you have the module in hand (or can see it in the slot), the label on the stick itself tells you everything. You’ll see:
- Capacity: Usually printed prominently, like “4GB” or “8GB.”
- Generation: Look for “DDR3,” “DDR4,” or “DDR5.” Also, note the pin count: 200-pin for DDR3/DDR4 laptop RAM, 262-pin for DDR5.
- Speed: Printed as a number followed by “MHz” or a code like “PC4-25600.” The latter can be divided by 8 to get the MHz (25600 / 8 = 3200MHz).
- Manufacturer and Part Number: Useful for finding exact replacements.
Count your slots. If you have two slots and only one stick is installed, you have an empty slot for an easy upgrade. If both are full with 4GB sticks, you’d need to replace both with 8GB sticks to get to 16GB.
Method 4: Checking the BIOS/UEFI
The Basic Input/Output System (BIOS) or its modern successor, UEFI, is the firmware that starts before your operating system loads. It holds fundamental hardware information, including RAM. Checking here is useful if your OS is corrupted or won’t boot, as it doesn’t rely on the operating system at all.
How to Enter and Navigate BIOS/UEFI
The key to press varies by manufacturer (common ones are F2, F10, F12, Del, Esc). You’ll see a flash message on the screen during the very first boot-up. Tap the key repeatedly as the laptop starts. Once in the BIOS/UEFI setup utility, navigation is done with the keyboard (arrows, Enter, Esc). Look for tabs or menus labeled “System Information,” “Main,” “Advanced,” or “Boot.” The RAM details are usually listed on the main summary screen. You’ll see total memory, type, and sometimes speed. It’s a less detailed view than OS tools but is universally available and independent of your installed OS.
Method 5: Interpreting Your Findings and Planning an Upgrade
Now that you’ve found the data, what does it all mean for your upgrade plans? This is the most critical part of learning how to see ram of laptop—using that information wisely.
Decoding the Specifications
Let’s break down a typical report from CPU-Z or a physical label: “DDR4-3200 CL22 1.2V.”
- DDR4: The generation. Your motherboard only supports one generation, so this is non-negotiable for compatibility.
- 3200: The effective data rate in MHz. This is the speed. You can often install faster RAM than your motherboard’s default, and it will run at the highest common speed (e.g., installing 3200MHz RAM in a system that supports 2666MHz will run at 2666MHz). Mixing speeds usually results in all modules running at the speed of the slowest one.
- CL22: The CAS Latency, a timing delay. Lower is better (e.g., CL16 is faster than CL22), but the impact on real-world performance for most users is minimal compared to capacity and generation. Mixing different CL timings can cause instability.
- 1.2V: The voltage. RAM modules for laptops are standardized, so this is rarely an issue.
The Crucial Questions for Upgrading
Armed with your report, ask these questions:
- Is there a free slot? Check your physical inspection or the “Device Locator” from System Information. One stick in a two-slot system means you can add. Two sticks means you must replace both to increase capacity.
- What is the maximum supported RAM? Your laptop’s model specifications (from the manufacturer’s website) will state the maximum RAM it supports (e.g., 64GB). Your current modules also have a maximum density per stick (e.g., 32GB per slot). A 64GB max with two slots means you can use two 32GB sticks.
- What speed does the CPU/chipset support? Even if you buy 4800MHz DDR5 RAM, your laptop’s processor may only support up to 3200MHz. The RAM will downclock. Again, check the manufacturer’s specs.
- Is the RAM soldered? If your physical inspection showed no slots or your model’s teardown guide shows RAM chips soldered to the board, you cannot upgrade. Your only option is to replace the entire motherboard or laptop.
Conclusion: Knowledge is Power (and Performance)
You now possess the complete toolkit for answering how to see ram of laptop. You can use a quick keyboard shortcut in Task Manager for a snapshot, dive into CPU-Z for engineering-grade details, or even get your hands dirty with a physical inspection. The method you choose depends on your goal: a quick health check, planning an upgrade, or troubleshooting a boot issue. Remember, the journey doesn’t end with discovery. The true value comes from interpreting those numbers—capacity, generation, speed—and using them to make an informed decision. If you’re constantly running out of memory, a RAM upgrade is often the single most effective and affordable way to breathe new life into a sluggish laptop. So, go ahead, check your specs, and take the first step toward a faster, more responsive computing experience.
Frequently Asked Questions
Can I check my laptop’s RAM without opening it or installing software?
Yes, absolutely. All modern operating systems have built-in tools. On Windows, use Task Manager (Ctrl+Shift+Esc) or System Information. On macOS, use “About This Mac.” These provide immediate, accurate information about your total RAM capacity and speed.
Is “RAM” the same as “storage” (SSD/HDD)?
No, they are completely different. RAM is volatile, high-speed memory used for active tasks and cleared when you power off. Storage (SSD/HDD) is non-volatile, where your files, programs, and operating system are permanently saved. Confusing the two is common, but checking RAM tells you about your system’s multitasking capability, not your file storage space.
How do I know if my laptop’s RAM is upgradeable?
First, use the methods above to see how many slots are occupied. Then, search online for your exact laptop model’s technical specifications or a service manual. This will confirm if the RAM is soldered (not upgradeable) or accessible in slots. If it’s accessible, the specs will list the maximum RAM supported per slot and total.
Does the speed (MHz) of my RAM really matter?
For general tasks like web browsing and office work, the difference between, say, 2666MHz and 3200MHz is negligible. The biggest performance gains come from having enough capacity (e.g., 16GB vs. 8GB). However, for gaming, video editing, and other memory-intensive applications, faster RAM can provide a noticeable improvement, especially when paired with a capable CPU.
Can I add RAM if all my slots are already full?
Not directly. If all slots are occupied, you cannot *add* more RAM. To increase capacity, you must replace your existing modules with higher-capacity ones (e.g., replacing two 4GB sticks with two 8GB sticks to go from 8GB to 16GB). Ensure the new modules match your laptop’s supported generation (DDR4, etc.).
Why does my laptop show less RAM than I physically installed?
This is normal and usually has two causes. First, integrated graphics (like Intel UHD Graphics) reserves a portion of your system RAM to use as video memory (VRAM). Second, the motherboard and system firmware reserve a small amount for hardware operations. A system with 16GB installed might show 15.8GB as available to Windows. This is not a defect.