How to Install NVMe SSD Desktop Drive Step by Step

Our step-by-step guide shows you exactly how to install NVMe SSD desktop drives safely and quickly. You will learn about M.2 slots, BIOS setup, formatting, and cloning your old drive. Follow our simple instructions and boost your desktop storage speed today.
Upgrading your desktop storage is one of the best ways to make your PC faster. A NVMe SSD desktop drive can slash load times and make everything feel snappier. Whether you are a gamer, a creative professional, or just someone tired of slow boot times, this guide has you covered.
In this article, we walk you through every single step to install an NVMe SSD in your desktop computer. We cover everything from checking your motherboard to formatting the new drive. By the end, you will feel confident doing this upgrade yourself. No fancy tech skills needed — just follow along!
How To Install Nvme Ssd Desktop is simpler than most people think. The whole process usually takes about 15 to 30 minutes. Let us get into it and help you speed up your desktop the easy way.
Key Takeaways
- Know Your Slot Type: Check if your desktop motherboard has an M.2 NVMe slot before buying a drive.
- Gather the Right Tools: A Phillips screwdriver and your motherboard manual are all you need to get started.
- Install and Format Correctly: Proper installation and formatting ensure your new NVMe SSD works flawlessly.
- Cloning Saves Time: You can clone your old drive to avoid reinstalling your operating system and programs.
- Heatsink Matters: Adding a heatsink keeps your NVMe SSD cool and performing at top speed.
- Check BIOS Settings: Enabling the NVMe mode in BIOS is essential for the drive to work properly.
📑 Table of Contents
- What Is an NVMe SSD and Why Install One in Your Desktop?
- What You Need Before You Start
- Step-by-Step Installation Guide
- BIOS Setup and Initial Configuration
- Formatting and Setting Up the New Drive
- Common Mistakes to Avoid During Installation
- Expert Tips for Getting the Most From Your NVMe SSD
- How to Know If Your NVMe SSD Is Working Properly
- Conclusion
What Is an NVMe SSD and Why Install One in Your Desktop?
Before we jump into the steps, let us quickly understand what you are working with. NVMe stands for Non-Volatile Memory Express. It is a super-fast storage protocol that uses the PCIe lane on your motherboard. This means data moves way faster than a traditional SATA SSD or hard drive.
Most modern desktop motherboards come with at least one M.2 slot. This slot is designed specifically for NVMe drives. The M.2 form factor is small and compact. It looks like a thin stick of gum. You simply plug it in at an angle and screw it down.
There are several reasons to upgrade to an NVMe desktop storage drive:
- Blazing Fast Speeds: NVMe SSDs can reach speeds of 3,500 MB/s or more. That is many times faster than a standard hard drive.
- Better Boot Times: Your PC will start up in seconds instead of minutes.
- Quick File Transfers: Moving large files, games, or video projects becomes much faster.
- No Moving Parts: Since there are no spinning disks, NVMe drives are more durable and silent.
- Compact Size: The M.2 form factor saves space inside your desktop case.
NVMe vs SATA SSD: What Is the Difference?
Many people wonder if they really need an NVMe drive. The short answer is yes, if speed matters to you. A standard SATA SSD tops out around 550 MB/s. An NVMe drive can go five to seven times faster. The difference is very noticeable when you are loading large games or editing big video files.
If you want to learn more about how much faster NVMe really is, check out our guide on how much faster NVMe is than SSD. It breaks down the real-world speed differences in detail.
What You Need Before You Start
Preparation is key to a smooth installation. Here is everything you need before you begin the NVMe SSD desktop install process.
Tools and Materials
- Phillips Head Screwdriver: You will need this to open your case and secure the drive.
- Your Motherboard Manual: This tells you exactly where the M.2 slots are on your board.
- Anti-Static Wrist Strap (Optional): This protects your components from static electricity.
- Your New NVMe SSD: Make sure it is an M.2 NVMe drive that fits your motherboard slot.
- USB Drive (For Cloning): Only needed if you plan to clone your old drive.
Check Your Motherboard Compatibility
Not all motherboards support NVMe drives. Open your desktop case and look for the M.2 slot on the motherboard. It is usually located near the CPU socket or along the bottom edge. The slot has a small notch that matches the key on your NVMe drive.
If your desktop is older and does not have an M.2 slot, do not worry. You can use an NVMe SSD to SATA adapter or a PCIe adapter card. These let you use an NVMe drive even without a native M.2 slot. For more info on adapters, visit our NVMe SSD to SATA adapter page.
Step-by-Step Installation Guide
Now for the fun part. Follow these steps carefully to install your NVMe SSD desktop drive the right way.
Step 1: Power Down and Unplug Your PC
Turn off your computer completely. Unplug the power cable from the back of the power supply. It is also a good idea to press the power button for a few seconds to drain any leftover electricity. This keeps your components safe during the install.
Step 2: Open Your Desktop Case
Remove the side panel of your desktop case. Most cases use thumb screws or Phillips screws. Set the screws somewhere safe so you do not lose them. Lay the case on a flat surface with the open side facing you.
Step 3: Locate the M.2 Slot
Find the M.2 slot on your motherboard. Refer to your motherboard manual if you are unsure. The slot has a small retainer screw or clip on one end. Do not confuse it with other slots like PCIe x16 or SATA ports.
Step 4: Remove the Heatsink (If Present)
Some motherboards come with a pre-installed heatsink over the M.2 slot. If yours does, gently remove it. There may be a small screw holding it in place. Set the heatsink aside for now. We will put it back on later.
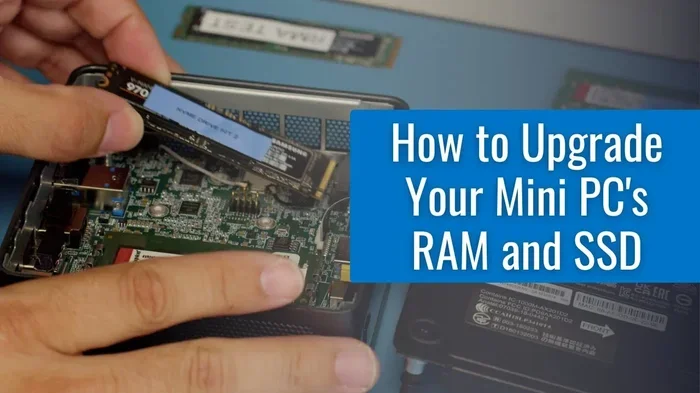
Step 5: Insert the NVMe SSD
Hold your NVMe drive by the edges. Never touch the gold connectors on the bottom. Align the notch on the drive with the key in the M.2 slot. Insert the drive at a 30-degree angle. Press it down gently until it sits flat in the slot.
Now use the retainer screw or clip to secure the drive in place. Do not overtighten the screw. A snug fit is all you need. If you removed the heatsink earlier, now is the time to put it back on. This helps keep your drive cool during heavy use.
Want to see a detailed walkthrough of this process? Our how to install an NVMe SSD guide has more visual tips and details.
Step 6: Close the Case and Reconnect Power
Put the side panel back on your desktop case. Plug the power cable back in. Make sure all cables are secure and nothing is loose inside the case.
BIOS Setup and Initial Configuration
Before you can use your new drive, you need to check a few settings in the BIOS. The BIOS is the basic software that starts up your computer before the operating system loads.
How to Enter BIOS
Turn on your PC and press the BIOS key repeatedly as it starts up. The key varies by manufacturer. Common keys include F2, Del, F10, or Esc. Look for a quick message on the screen during startup that tells you which key to press.
Enable NVMe Mode
Once inside the BIOS, look for the storage or boot settings. Find the option for the M.2 slot where you installed the drive. Make sure it is set to NVMe mode, not SATA or disabled mode. Save your changes and exit the BIOS. Your PC will restart.
Check If the Drive Is Detected
After your PC boots into Windows, open File Explorer. You should see your new NVMe drive listed. If it does not appear, do not panic. Go back to the BIOS and double-check the settings. You can also check in Disk Management by right-clicking the Start button and selecting Disk Management.
Formatting and Setting Up the New Drive
Your new NVMe SSD will likely be unformatted when you first install it. Formatting prepares the drive for use with Windows. Here is how to do it the right way.
Format Using Disk Management
- Right-click the Start button and choose Disk Management.
- Find your new NVMe drive in the list. It will show as unallocated space.
- Right-click the unallocated space and select New Simple Volume.
- Follow the wizard. Choose the drive letter and file system (NTFS is best for Windows).
- Click Format and wait for the process to finish.
Your new drive is now ready to use. You can store games, files, programs, or even use it as your main boot drive.
Clone Your Old Drive (Optional but Recommended)
If you want to keep everything exactly as it is on your old drive, cloning is the way to go. Cloning copies your entire operating system, programs, and files to the new NVMe SSD. This saves you from reinstalling everything from scratch.
You will need a cloning tool like Macrium Reflect, Clonezilla, or the software that came with your NVMe drive. Connect the new drive to your PC, open the cloning software, and follow the on-screen instructions. Once cloning is done, you can swap the drives or use both drives side by side.
For detailed instructions on preparing a new drive, you can also read our guide on how to set up a new NVMe SSD.
Common Mistakes to Avoid During Installation
Even with a simple process like this, mistakes can happen. Here are the most common ones and how to avoid them.
- Forcing the Drive Into the Slot: The M.2 drive should slide in smoothly at an angle. If it resists, stop and check the alignment. Forcing it can damage the connector.
- Overtightening the Screw: Snug is enough. Tightening too much can crack the motherboard or the drive itself.
- Skipping BIOS Checks: If you do not enable NVMe mode in BIOS, the drive will not show up in Windows. Always verify this step.
- Not Formatting Before Use: An unformatted drive will not appear in File Explorer. Always format it through Disk Management first.
- Ignoring the Heatsink: NVMe drives can get hot under heavy load. Using the heatsink that came with your motherboard helps maintain top performance and extends drive lifespan.
Expert Tips for Getting the Most From Your NVMe SSD
You have installed your new drive. Now let us make sure you get the best performance out of it.
Keep Your Firmware Updated
NVMe drive manufacturers release firmware updates from time to time. These updates can improve speed, fix bugs, and boost compatibility. Check the manufacturer’s website for the latest firmware for your specific model.
Use the Right Slot
Some motherboards have multiple M.2 slots. Not all of them may support NVMe speeds. Check your motherboard manual to confirm which slots run at full PCIe speed. Using the right slot ensures you get the fastest possible performance.
Monitor Drive Temperatures
NVMe SSDs can run warm, especially during heavy tasks. You can use free software like CrystalDiskInfo to monitor your drive temperature. If it runs too hot, consider adding an aftermarket M.2 heatsink.
Let TRIM Do Its Job
TRIM is a command that helps your NVMe SSD maintain peak performance over time. Windows 10 and 11 enable TRIM by default for NVMe drives. You do not need to do anything special. Just make sure you are running the latest version of Windows for the best results.
How to Know If Your NVMe SSD Is Working Properly
After installation, you want to confirm everything is running as it should. Open the Task Manager in Windows by pressing Ctrl + Shift + Esc. Go to the Performance tab and click on Disk. Select your new NVMe drive.
You should see the drive name and its capacity displayed correctly. You can also run a quick speed test using a free tool like CrystalDiskMark. This will show you the read and write speeds of your new drive. If the speeds match what the manufacturer advertised, you are all set.
If you notice any issues, double-check your BIOS settings and make sure the drive is properly seated in the M.2 slot. Sometimes simply removing and reseating the drive fixes connection problems.
Conclusion
Installing an NVMe SSD desktop drive is one of the easiest and most rewarding upgrades you can do for your PC. The process is straightforward, and the performance gains are enormous. From faster boot times to quicker file transfers, your new drive will transform your daily computing experience.
Remember to check your motherboard compatibility before you buy, handle the drive carefully during installation, and always format it before use. If you run into any issues, the troubleshooting tips in this guide should help you sort things out quickly.
Now that you know how to install NVMe SSD desktop drives like a pro, go ahead and give your desktop the speed boost it deserves. Your future self will thank you every time your PC boots up in seconds or your games load in a flash.
Frequently Asked Questions
Can I install an NVMe SSD in any desktop?
Not all desktops support NVMe drives natively. Your motherboard needs to have an M.2 slot that supports NVMe. Check your motherboard manual or look up your model online to confirm compatibility.
Do I need to install drivers for an NVMe SSD?
No, Windows 10 and 11 include native drivers for most NVMe drives. You do not need to download anything special. The drive should work right after you format it.
Can I use an NVMe SSD as my boot drive?
Absolutely. In fact, using an NVMe SSD as your boot drive is one of the best ways to speed up your PC. Just make sure to clone your old drive or do a fresh Windows install on the new NVMe drive.
What is the difference between M.2 SATA and M.2 NVMe?
Both fit in the same M.2 slot on the motherboard. However, M.2 NVMe drives are much faster than M.2 SATA drives. NVMe uses the PCIe bus for data transfer, while SATA is limited to older, slower speeds.
How tight should the screw be on the NVMe SSD?
The screw should be snug but not overly tight. Overtightening can damage the motherboard or the drive. A gentle quarter-turn after the drive is seated is usually enough. For more details, check our guide on how tight the screw should be for an NVMe SSD.
Can I install more than one NVMe SSD in my desktop?
Yes, if your motherboard has multiple M.2 slots. Some motherboards support two or even three NVMe drives. Just make sure each slot is set to NVMe mode in the BIOS and that you have enough cooling for all the drives.