Thermal Camera for Termite Detection
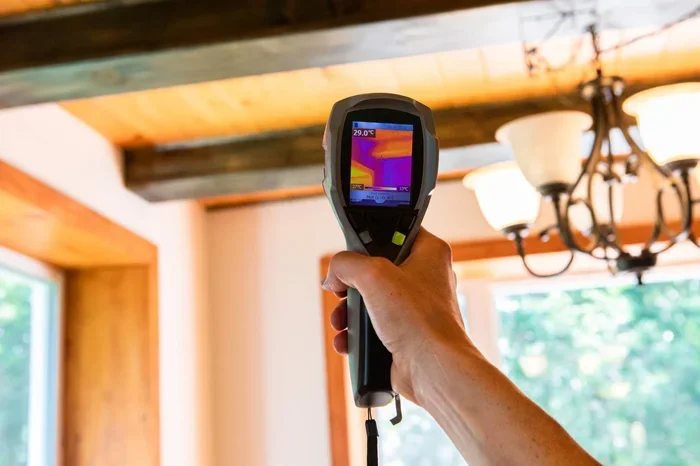
A thermal camera for termite detection helps you find hidden moisture and wood damage before it spreads. This tool reads heat patterns to reveal active colonies behind walls and under floors. Use it as part of a full inspection plan for the best results.
This is a comprehensive guide about thermal camera for termite detection.
Key Takeaways
- Early detection matters: Catching termites early saves money and limits structural damage.
- Heat shows activity: A thermal camera for termite detection highlights warm spots linked to moisture and insect movement.
- Moisture is a clue: Wet wood often appears cooler or warmer depending on the environment and insulation.
- Not a standalone tool: Combine thermal imaging with visual checks and moisture meters for accurate results.
- Know the limits: Thermal images show temperature differences, not bugs themselves, so false positives can happen.
- Best conditions help: Inspect during stable temperatures and after a temperature swing for clearer patterns.
- Professional help counts: Trained inspectors read thermal data with experience, reducing mistakes and missed signs.
[FEATURED_IMAGE_PLACEHOLDER]
Why a Thermal Camera for Termite Detection Works
Termites hide well. They stay inside walls, under floors, and behind baseboards. That makes them hard to spot with the naked eye. A thermal camera for termite detection gives you a different view. It reads temperature changes on surfaces. Those changes can point to hidden activity.
Termite colonies often change the moisture level around wood. They also create tunnels and mud tubes. These changes can affect how heat moves through a wall or floor. In simple terms, the camera shows patterns that look different from the surrounding area. This helps you narrow down where to look more closely.
Think of it like a weather map for your home. You do not see the storm itself. You see the signs that something is happening. That is the real value here. You get a fast scan of a room, and you can focus your time on the spots that matter most.
This approach works best when you understand what the camera can and cannot do. It does not magically reveal termites. It reveals temperature differences. Those differences may come from moisture, insulation gaps, airflow, or insect activity. So you still need a careful check after the scan.
Still, the tool can save time. It can guide your inspection. It can also help you catch problems sooner than you might with a casual walk-through. For homeowners, that means less stress. For property managers, it means better planning.
How Heat Patterns Connect to Termite Activity
Termites need moisture. They often travel through damp wood and soil. They also build protected paths to stay safe from dry air and predators. These habits can change the surface temperature of a wall or floor.
A wet area may cool faster at night or warm differently during the day. A hollowed-out section behind a wall may also behave differently than solid wood. The camera can show these changes as warmer or cooler patches. That is why a thermal camera for termite detection is useful as a screening tool.
You may see a streak of cooler material along a baseboard. You may notice a warm patch near a floor joist. You may spot an odd shape behind a wall that does not match the rest of the room. These signs do not confirm termites on their own. They simply tell you where to inspect next.
This is where experience matters. A beginner may see a hot spot and assume the worst. A careful inspector looks at the full picture. They check the room, the season, the building materials, and the moisture conditions. Then they decide if the pattern deserves a closer look.
What the Camera Actually Sees
A thermal camera shows surface temperature. It does not see through solid materials in a magical way. It detects the heat radiating from the surface in front of the lens. That is an important point to remember.
If termites are active behind a wall, the wall surface may show a subtle change. If the wood is damp, the moisture can affect the reading. If air moves through a gap, the temperature may shift too. The camera captures all of that as a visual heat map.
This is helpful because many termite problems start quietly. You may not see mud tubes right away. You may not hear any noise. You may only notice a pattern on a wall after damage has already started. Thermal imaging gives you another clue to work with.
It is also useful for spotting moisture issues that often go hand in hand with termite risk. Leaky pipes, poor drainage, and hidden dampness can all raise the chance of trouble. When you find those issues early, you reduce the odds of a bigger problem later.
Key Signs You Can Spot With Thermal Imaging
A thermal camera for termite detection works best when you know what to look for. You are not hunting for a bug shape. You are looking for unusual temperature patterns that deserve a closer check.
Here are some common signs that can show up during a scan:
- Unusual hot or cold streaks: Lines or patches that do not match the rest of the surface.
- Moisture-related changes: Damp areas may show up as cooler or warmer spots depending on the conditions.
- Irregular shapes behind surfaces: Areas that look different from nearby material may suggest hollow spaces or water buildup.
- Differences along edges: Baseboards, corners, and seams often reveal clues first.
- Changes after temperature swings: A room that has cooled or warmed evenly may show hidden issues more clearly.
These signs are clues, not proof. That is the key idea. A thermal scan helps you ask better questions. It helps you decide where to tap, probe, measure, or open an area for a closer look.
It also helps to compare areas. A hallway may show one pattern. An adjacent room may show another. If one wall looks very different from a similar wall nearby, that difference may matter. The camera makes those differences easier to see.
Moisture as a Major Clue
Moisture is one of the biggest reasons thermal imaging helps with termite concerns. Termites often thrive where wood stays damp. If a wall, floor, or crawl space has hidden moisture, the risk goes up.
A thermal camera can help you find those damp areas faster. Water changes how heat moves through a surface. That can create a clear temperature pattern. You may see a patch that stays cooler longer. You may see a spot that warms differently than the rest of the room.
This matters because moisture problems often appear before serious damage. A slow leak behind a wall can stay hidden for a long time. By the time you see a stain or feel a soft spot, the issue may already be advanced. Thermal scanning gives you another chance to catch it earlier.
If you find a suspicious area, do not stop at the image. Check for leaks, drainage problems, and condensation. Use a moisture meter if you have one. Look for peeling paint, warping, or soft wood. Combine the clues.
False Positives and Other Explanations
Not every strange heat pattern means termites. That is why a thermal camera for termite detection should be used carefully. Many things can create similar temperature differences.
For example, insulation gaps can change how a wall holds heat. Drafts can cool a section of a surface. Sunlight can warm one side of a room more than another. Electrical components can also create warmth. Even stored items behind a wall can affect the reading.
This does not make the tool useless. It simply means you need context. A good inspector looks at the whole room. They ask when the scan was taken. They consider the weather, the HVAC system, and the building structure. Then they decide whether the pattern is worth investigating.
The goal is not to jump to conclusions. The goal is to use the image as a guide. If a spot looks odd, check it more than once if needed. Compare it to nearby areas. Use other tools and your eyes. That is how you reduce mistakes.
How to Use a Thermal Camera for Termite Detection
Using a thermal camera well is part technique and part patience. You want a calm, repeatable process. That gives you better readings and fewer distractions.
Start with the room itself. Make sure the area is accessible. Remove items that block the wall or floor if you can. The camera needs a clear view of the surface. It also helps to let the room settle before scanning.
Next, think about timing. Temperature differences are often easier to see when the environment is stable or when there has been a noticeable change in temperature. For example, a home that has cooled down after a warm day may show patterns more clearly. The right timing depends on the space and the season.
When you scan, move slowly. Keep the camera steady. Look for patches that stand out. Then pause and compare those patches with the rest of the surface. A quick pass is not enough. You need time to notice subtle differences.
After the scan, mark the areas that need a closer look. Then inspect them with other methods. Check for mud tubes, wood damage, frass, and moisture. If you find something suspicious, investigate further before deciding what it means.
Best Conditions for Clearer Readings
Good conditions make a big difference. A thermal camera for termite detection gives better results when the environment is predictable. That means less noise in the data and clearer patterns on the screen.
Here are a few helpful conditions:
- Stable indoor temperature: A room that is not changing too quickly makes patterns easier to read.
- Moderate outdoor contrast: A noticeable temperature difference between inside and outside can help reveal hidden issues.
- Clear access to surfaces: Furniture, storage, and clutter can block the view and hide useful details.
- Low airflow during the scan: Strong drafts can blur the temperature pattern you want to see.
- Dry lens and clean surface: Smudges and dust can interfere with the image quality.
If the room is too chaotic, wait. If the HVAC system is blowing directly on the wall, move or pause. Small adjustments can improve the quality of the scan a lot.
It also helps to scan the same area more than once. A second pass can confirm what you saw the first time. It can also show whether a pattern was temporary or consistent. That extra step is simple, but it can prevent wasted effort.
Step-by-Step Inspection Flow
A simple process keeps you focused. You do not need a complicated routine for a basic scan. You just need a clear order of steps.
First, walk the area and note obvious issues. Look for stains, soft wood, mud tubes, and moisture. This gives you a baseline before you use the camera.
Second, scan the main surfaces. Start with walls, then move to floors, corners, and seams. Pay special attention to areas near foundations, plumbing, and older wood. These spots often deserve extra attention.
Third, compare the images. Look for patterns that stand out from the surrounding material. Note the location, size, and shape of each suspicious area.
Fourth, verify with a closer inspection. Tap the wood if appropriate. Check for moisture. Look behind access points if possible. Use your other tools to confirm what the thermal image suggests.
Fifth, record your findings. Write down what you saw and where you saw it. Photos and notes help you track changes over time. They also make it easier to explain the issue to others later.
Limits of Thermal Imaging for Termite Problems
A thermal camera for termite detection is helpful, but it is not a magic solution. It has real limits, and knowing those limits keeps you from making poor decisions.
The biggest limit is simple: the camera shows temperature, not insects. A suspicious patch may come from moisture, insulation, airflow, or something else entirely. You still need to confirm what is happening on the surface and behind it.
Another limit is depth. Thermal imaging works best when the surface itself reflects the issue. If the problem is buried too deeply, the surface may not show a strong enough signal. In that case, the camera may miss the issue or show only a faint hint.
Material matters too. Different surfaces hold and release heat in different ways. Paint, drywall, wood, and insulation all behave differently. A pattern that looks clear on one surface may be hard to read on another.
User skill also matters. A thermal camera is easy to hold, but it takes practice to read the images well. Beginners may overreact to normal variations. Experienced users look for context before making a call.
When Thermal Imaging Is Most Useful
This tool shines in certain situations. It is especially useful when you want a fast overview of a room or when you suspect a hidden moisture issue. It can help you decide where to focus your time.
It is also useful when you want to reduce unnecessary damage. Instead of opening every wall, you can target the most likely areas first. That saves effort and keeps inspection more organized.
Thermal imaging can be valuable in buildings with a history of moisture trouble. If a property has had leaks, poor drainage, or repeated dampness, the risk of termite problems may be higher. A scan can help you check those weak points more efficiently.
It is also helpful as part of a larger inspection routine. When you combine thermal imaging with visual checks, moisture readings, and structural knowledge, you get a fuller picture. That is the safest way to use it.
When to Call a Professional
Some situations call for experienced help. If the property is large, if the issue seems serious, or if you are unsure how to interpret the images, a pro can help.
A trained inspector brings more than a camera. They bring judgment. They know how buildings behave. They know where termite activity often hides. They also know how to avoid wasting time on false alarms.
If you already see clear signs of damage, do not rely on thermal imaging alone. Look for professional support sooner rather than later. Termite problems can grow quietly. The sooner you act, the better your options may be.
If you are buying or selling a property, a professional inspection can also give you more confidence. A thermal scan may be part of that process, but it should not be the only part. A full review is usually the smarter move.
Choosing the Right Thermal Camera for Termite Detection
Not every thermal camera is the same. Some are simple and portable. Others are more advanced and detailed. The right choice depends on how often you will use it and how much detail you need.
For occasional home checks, a basic handheld unit may be enough. You want something easy to use, with a clear display and a decent temperature range. If the camera is too complicated, you may not use it often.
For more serious inspections, better resolution and sharper sensitivity can help. More detail makes it easier to spot small differences. That can matter when you are comparing similar surfaces or looking for subtle changes.
Think about these features before you buy:
- Image clarity: More detail helps you see smaller patterns.
- Temperature range: Make sure it fits the environments you will scan.
- Ease of use: Simple controls save time in the field.
- Size and portability: A lightweight unit is easier to carry through a home.
- Battery life: Longer runtime helps on bigger inspections.
Do not chase specs alone. A camera is only useful if it helps you make better decisions. If a simpler model gives you the information you need, that may be the better fit.
Important Features to Compare
When comparing models, focus on the features that affect real-world use. Resolution matters because it changes how much detail you can see. Sensitivity matters because it affects how well the camera picks up small temperature differences.
Display quality also matters. A screen that is easy to read in different lighting makes the job smoother. Ergonomics matter too, especially if you plan to hold the camera for a while.
Some users also care about extra tools, like built-in guides, image saving, or basic reporting functions. Those features can be helpful if you want to keep records or share findings with someone else.
The best camera is the one that matches your needs. If you are a homeowner doing occasional checks, keep it simple. If you inspect properties regularly, invest in more capable gear. The tool should support your workflow, not complicate it.
Smart Ways to Combine Thermal Imaging With Other Tools
A thermal camera for termite detection works best as part of a system. The more clues you gather, the better your conclusions will be.
Moisture meters are a natural partner. If the thermal image shows a suspicious area, a moisture reading can help you judge whether dampness is involved. That is important because moisture often connects to termite risk.
Visual inspection is just as important. Look for mud tubes, damaged wood, discarded wings, and frass. These signs may appear near the areas the camera highlighted. They can also appear in places the camera did not flag, so do not ignore the rest of the room.
A flashlight, a probe, and a careful eye still matter. Thermal imaging gives you a map. Your hands and eyes help you confirm the terrain. Together, they create a stronger inspection process.
You can also use history as a tool. If a room has had leaks before, check it carefully. If a foundation area tends to stay damp, give it extra attention. Past problems often point to future risk.
Building a Practical Inspection Routine
A good routine keeps you consistent. It also makes your results easier to trust. You do not need a fancy process. You just need a repeatable one.
Start by preparing the space. Clear access where possible. Note the time of day and the current temperature conditions. Then scan the main surfaces in a steady pattern.
Next, mark the areas that look unusual. Check each one with at least one other method. If the area still looks suspicious, investigate further. If it turns out to be harmless, move on without overthinking it.
Finally, save your notes. Write down what you scanned, what you found, and what you did next. Over time, those notes help you spot patterns and track changes. They also make future inspections faster.
Conclusion
A thermal camera for termite detection can be a smart addition to your inspection toolkit. It helps you spot unusual heat patterns, find possible moisture issues, and focus your attention on the areas that need a closer look. That can save time and support earlier action.
But remember the big picture. The camera shows temperature differences, not termites themselves. It works best when you combine it with visual checks, moisture readings, and good judgment. Used wisely, it gives you another layer of insight. Used alone, it can lead to confusion.
If you take one thing from this guide, let it be this: use thermal imaging as a guide, not a final answer. Scan carefully, verify what you find, and act when the signs point to a real problem. That balanced approach gives you the best chance to protect your home and stay ahead of hidden damage.
Question?
Can a thermal camera for termite detection confirm an infestation?
No, it cannot confirm an infestation on its own. It can highlight suspicious temperature patterns, but you still need a closer inspection to verify termite activity.
Question?
What is the biggest benefit of using thermal imaging for termites?
The biggest benefit is speed and focus. It helps you find unusual areas quickly so you can inspect the most likely spots first instead of checking every surface blindly.
Question?
Do thermal cameras see through walls?
No, they do not see through walls in the way many people imagine. They detect heat patterns on the surface in front of the lens, which may reflect what is happening behind it.
Question?
Why does moisture matter so much in termite inspections?
Moisture matters because termites often favor damp wood and protected paths. A hidden moisture problem can raise the risk of activity, so finding damp areas is a useful early warning.
Question?
Can I use a thermal camera for termite detection as a homeowner?
Yes, you can use one for basic checks if you understand its limits. It works best when you combine it with simple visual inspections and other tools rather than relying on the image alone.
Question?
When should I bring in a professional inspector?
You should call a professional if you see clear signs of damage, if the property is large or complex, or if you are unsure how to interpret the thermal images. Experienced help can reduce mistakes and missed clues.
Frequently Asked Questions
What is thermal camera for termite detection?
thermal camera for termite detection is an important topic with many practical applications.