Underwater Camera Housing Nikon D750
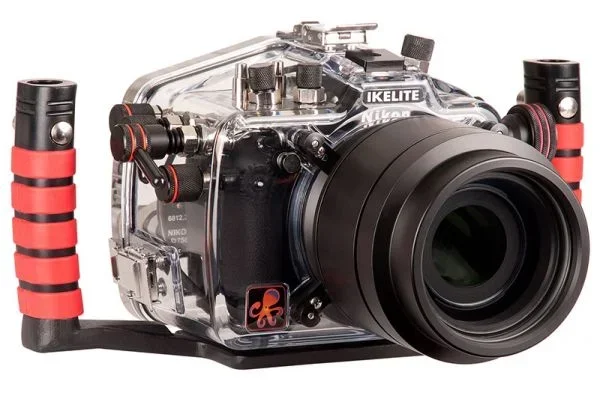
Capturing underwater photos with a Nikon D750 requires a reliable underwater camera housing. This guide covers the best housing options, setup tips, and essential maintenance advice to keep your gear safe and your images sharp beneath the waves.
Taking your Nikon D750 beneath the surface opens up a whole new world of creative possibilities. The underwater camera housing Nikon D750 combination is a favorite among serious photographers because the D750 delivers excellent image quality, fast autofocus, and reliable performance in challenging conditions. But putting a valuable camera inside a waterproof enclosure requires careful planning, proper gear selection, and ongoing maintenance.
Many photographers assume that any waterproof case will work, but that is far from the truth. A dedicated housing is engineered to match your camera model, protect delicate controls, and withstand pressure at depth. When you invest in the right setup, you gain confidence to explore reefs, wrecks, and open water without worrying about leaks or missed shots. This guide walks you through everything you need to know, from choosing the right enclosure to maintaining it after each dive.
Key Takeaways
- Choose the right housing: Select a housing specifically designed for the Nikon D750 to ensure perfect button alignment and seal integrity.
- Test before diving: Always perform a vacuum test or leak detection check before entering the water to prevent costly damage.
- Mind your depth limits: Every housing has a maximum operating depth, so know your limits to avoid pressure-related failures.
- Use underwater lighting: Water absorbs color, so adding strobes or video lights helps restore vibrant hues in your Nikon D750 underwater photography.
- Rinse after every dive: Saltwater and sand can corrode seals and ports, so fresh water rinsing is essential for longevity.
- Maintain O-rings regularly: Clean and lubricate rubber seals to keep your underwater camera housing watertight and reliable.
- Practice buoyancy control: Stable positioning reduces blur and helps you compose better shots while protecting the housing from impacts.
📑 Table of Contents
- Why the Nikon D750 Is a Strong Choice for Underwater Photography
- Choosing the Right Underwater Camera Housing for Nikon D750
- Essential Setup and Pre-Dive Checks for Your Nikon D750 Housing
- Underwater Photography Tips for Nikon D750 Owners
- Maintenance and Care for Your Underwater Camera Housing
- Common Mistakes to Avoid With Underwater Camera Housing
- Final Thoughts on Using an Underwater Camera Housing With Nikon D750
Why the Nikon D750 Is a Strong Choice for Underwater Photography
The Nikon D750 has earned a reputation for delivering professional-grade results at a reasonable price point. Its 24.3-megapixel sensor produces sharp, detailed images that hold up well when you crop or edit underwater shots. The camera also performs admirably in low-light conditions, which is crucial when you are shooting at depth where sunlight fades quickly.
Another advantage is the D750’s robust autofocus system. Underwater subjects move quickly, and capturing sharp images of fish, turtles, or divers requires fast and accurate focus tracking. The camera’s 51-point autofocus array helps you lock onto subjects even in murky water. Additionally, the D750 offers a tilting LCD screen, which proves incredibly useful when composing shots from awkward angles while floating above a reef.
Battery life is another strong point. Underwater photography often involves long sessions with continuous shooting, video recording, and reviewing images on the go. The D750’s endurance means you can spend more time in the water and less time swapping batteries between dives. When paired with a quality housing, this camera becomes a versatile tool for both stills and video.
Key Features That Matter Beneath the Surface
Several D750 features become especially valuable once you are underwater. The camera’s ability to shoot at high ISO settings without excessive noise helps when ambient light is limited. The 6 fps continuous shooting speed allows you to capture rapid sequences of moving marine life. Full HD video recording at 60 fps gives you smooth footage for editing later.
The D750 also supports RAW image capture, which is essential for underwater post-processing. Water filters out red and orange wavelengths, leaving images with a blue or green cast. Shooting in RAW gives you the flexibility to restore natural colors during editing. This flexibility is one reason why the Nikon D750 underwater photography workflow remains popular among enthusiasts and professionals alike.
Choosing the Right Underwater Camera Housing for Nikon D750
Selecting the correct housing is the most critical step in protecting your camera. Not every enclosure fits every camera model, and using the wrong housing can lead to button misalignment, seal failures, or even total equipment loss. You need a housing built specifically for the Nikon D750 that accounts for the camera’s shape, control layout, and port configuration.
Several reputable manufacturers produce housings for this camera, and each offers different features, materials, and price points. Polycarbonate housings are lighter and more affordable, making them a good choice for hobbyists. Aluminum housings provide superior durability and pressure resistance, which appeals to professionals who dive deeper or shoot in rougher conditions. Your choice should align with your diving habits, budget, and long-term goals.
Material and Build Quality Considerations
When comparing housings, pay close attention to the materials and construction. Polycarbonate models are often lighter and easier to transport, which matters if you travel frequently. Aluminum versions tend to be heavier but offer better insulation and structural strength. Both types can perform well when maintained properly, so think about your typical dive environment before deciding.
Look for housings with reinforced corners, secure latch mechanisms, and clear labeling for controls. A well-designed housing lets you access shutter buttons, dial controls, and menu functions without fumbling underwater. Ergonomic design matters because you will be operating the camera while managing buoyancy and dealing with water resistance. Comfort and functionality go hand in hand.
Port Options and Lens Compatibility
The optical port on your housing determines which lenses you can use and how light enters the camera. Dome ports are popular for wide-angle underwater work because they preserve the field of view and reduce distortion. Flat ports work better for macro photography or when you want to use specific lenses without additional refraction issues. Some housings come with interchangeable ports, giving you flexibility for different shooting scenarios.
Make sure the port matches your lens diameter and working distance. If you plan to shoot close-up images of small creatures, a macro port or diopter attachment may be necessary. For expansive reef scenes or large marine animals, a dome port typically delivers better results. Understanding your intended subjects helps you choose the right port configuration from the start.
Essential Setup and Pre-Dive Checks for Your Nikon D750 Housing
Once you have your housing, proper setup becomes the foundation of safe underwater shooting. Rushing through preparation can lead to mistakes that cost you time, money, and precious images. A careful routine before each dive ensures that your underwater camera housing performs as expected when you enter the water.
Start by installing the camera into the housing in a clean, dry environment. Dust, sand, or moisture can interfere with seals and cause problems later. Align the camera carefully, close the housing according to the manufacturer’s instructions, and double-check that all latches are secure. Take your time during this step because it sets the stage for everything that follows.
Leak Testing and Vacuum Systems
Many modern housings include vacuum or leak detection systems that give you confidence before a dive. These systems create a slight pressure differential that indicates whether the seal is intact. If the vacuum holds, you can proceed with greater peace of mind. If it drops, you know something needs attention before you ever touch the water.
Even if your housing does not have a vacuum system, perform a simple fresh water test in a sink or bucket before your first dive. Submerge the housing briefly while checking for bubbles or moisture inside. This simple step can reveal minor issues that might otherwise go unnoticed. It is far better to discover a problem on land than to find it at depth.
Camera Settings for Underwater Use
Before sealing the camera, configure settings that work well underwater. Switch to RAW format so you can adjust white balance and color during editing. Set your ISO to a range that balances noise and exposure, keeping in mind that deeper water requires higher sensitivity. Choose an appropriate shutter speed to freeze motion while avoiding excessive blur from camera movement.
Disable any features that might cause problems underwater, such as automatic lens retraction if your lens does not handle pressure well. Turn off image review settings that drain battery quickly if you prefer to wait until surfacing. Customize button assignments if your housing allows it, so you can access the most important functions without digging through menus while floating in the water.
Underwater Photography Tips for Nikon D750 Owners
Operating a camera underwater introduces challenges that do not exist on land. Light behaves differently, subjects move unpredictably, and your own movement affects stability. Learning a few key techniques will help you get better results with your Nikon D750 underwater photography setup.
Buoyancy control is one of the most important skills. If you are too buoyant, you may float upward and struggle to frame shots. If you are too heavy, you might sink into the sand or damage delicate coral. Practice neutral buoyancy so you can hover steadily and compose images without constant correction. A stable platform leads to sharper images and less stress on your housing.
Lighting and Color Restoration
Water absorbs light rapidly, especially red and orange wavelengths. As you go deeper, colors fade and images can look flat or overly blue. Adding artificial light helps restore vibrancy and reveal details that ambient light alone cannot capture. Strobes, video lights, or even a simple reflector can make a dramatic difference in your results.
Position your light sources carefully to avoid backscatter, which occurs when particles in the water reflect light back into the lens. Keep lights angled slightly outward and close to the camera to minimize this effect. Experiment with different angles to find the most flattering illumination for your subject. Good lighting transforms ordinary underwater shots into compelling images.
Composition and Subject Approach
Underwater composition requires patience and respect for the environment. Move slowly to avoid startling marine life and to give yourself time to frame the shot. Use the rule of thirds to place subjects off-center for a more dynamic image. Leave negative space when it enhances the sense of scale or isolation.
Get close to your subject when possible, because water reduces clarity and contrast over distance. A shorter shooting distance improves sharpness and color rendition. However, always maintain a safe distance from fragile organisms and never touch coral or marine animals for the sake of a photo. Responsible photography protects the underwater world you enjoy exploring.
Maintenance and Care for Your Underwater Camera Housing
Proper maintenance extends the life of your housing and keeps it performing reliably. Saltwater, sand, and UV exposure can degrade seals, corrode metal parts, and cloud optical ports over time. A consistent care routine after each dive prevents small issues from becoming major problems.
Rinse the housing thoroughly with fresh water immediately after use. Pay special attention to latches, buttons, and O-ring grooves where salt crystals can accumulate. Use a soft cloth or brush to remove debris without scratching surfaces. Allow the housing to dry completely in a shaded area before storing it, because trapped moisture can encourage mold or corrosion.
O-Ring Care and Seal Inspection
O-rings are the heart of any waterproof housing. These rubber seals keep water out, and they require regular cleaning and lubrication to function properly. Inspect O-rings before every dive for nicks, cuts, or debris. Even a tiny particle trapped in the groove can create a path for water to enter.
Clean O-rings gently with a lint-free cloth and apply a thin layer of silicone grease recommended by the manufacturer. Avoid over-applying grease, because excess can attract dirt and degrade the seal over time. Store O-rings in a cool, dry place away from direct sunlight, which can cause rubber to crack or harden. Replacing worn O-rings promptly is much cheaper than repairing water damage.
Storage and Long-Term Preservation
Store your housing in a protective case or bag when not in use. Keep it away from extreme temperatures, harsh chemicals, and direct sunlight. If you plan to leave the housing unused for an extended period, remove the camera and store both separately in a clean environment. This reduces stress on seals and prevents accidental activation of controls.
Periodically inspect the housing for signs of wear, such as faded labels, loose latches, or cloudy ports. Address minor issues early before they affect performance. Keeping a maintenance log can help you track when you last replaced O-rings, cleaned ports, or performed leak tests. Organization and attention to detail pay off in the long run.
Common Mistakes to Avoid With Underwater Camera Housing
Even experienced photographers make mistakes when transitioning to underwater work. Avoiding common pitfalls saves time, reduces stress, and protects your equipment. Learning from others’ errors is one of the fastest ways to improve your underwater camera housing Nikon D750 experience.
One frequent mistake is skipping the pre-dive check. Divers sometimes rush to enter the water without verifying seals, vacuum status, or camera settings. This haste can lead to leaks, missed shots, or corrupted images. Always take a few extra minutes to verify everything before you dive.
Ignoring Depth Ratings and Pressure Limits
Every housing has a maximum operating depth, and exceeding that limit can cause structural failure. Some photographers assume that a housing can handle any depth because it looks sturdy, but pressure increases rapidly underwater. Know your housing’s rating and stay within safe boundaries, especially if you are diving on reefs, walls, or wrecks that exceed shallow depths.
Pressure also affects ports and seals differently at various depths. A housing that performs well at ten meters may behave differently at thirty meters. If you plan to dive deeper, research your gear thoroughly and consider professional advice. Respecting limits protects both your equipment and your peace of mind.
Poor Handling and Impact Damage
Bumping the housing against rocks, coral, or boat surfaces can crack ports or misalign internal components. Even minor impacts may not show immediate damage but can weaken seals over time. Handle your housing with care, use a sturdy strap or tray, and maintain awareness of your surroundings while in the water.
Transporting the housing without proper protection also increases the risk of damage. Use a padded case during travel and avoid placing heavy items on top of the housing. Small precautions during transit prevent big problems later. Treating your gear with respect ensures it stays ready for your next adventure.
Final Thoughts on Using an Underwater Camera Housing With Nikon D750
Exploring the underwater world with a Nikon D750 is an exciting journey that rewards preparation and practice. The right underwater camera housing protects your investment while giving you the freedom to capture stunning images beneath the surface. From choosing the correct enclosure to maintaining seals and mastering lighting, each step contributes to better results and greater confidence.
Remember that underwater photography is as much about patience and respect as it is about gear. Take time to learn your equipment, test it thoroughly, and refine your technique with each dive. With careful planning and consistent care, your underwater camera housing Nikon D750 setup will serve you well for years to come. Dive safely, shoot thoughtfully, and enjoy every moment beneath the waves.
Frequently Asked Questions
What is the best underwater camera housing for Nikon D750?
The best housing depends on your budget, dive depth, and preferred materials. Polycarbonate housings are lighter and more affordable, while aluminum housings offer greater durability and pressure resistance. Choose a model specifically engineered for the Nikon D750 to ensure proper button alignment and seal compatibility.
How do I test my underwater camera housing for leaks before diving?
You can perform a fresh water test by submerging the sealed housing in a bucket or sink and watching for bubbles or moisture inside. If your housing includes a vacuum system, check that the vacuum holds steady before entering the water. Always test in a controlled environment before your first dive to catch issues early.
Can I use any lens with an underwater camera housing Nikon D750?
You can use many lenses, but the optical port must match your lens diameter and intended shooting style. Dome ports work well for wide-angle scenes, while flat ports are better for macro photography. Make sure the port is compatible with your lens and that the housing supports the focal length you plan to use.
How often should I replace O-rings on my underwater housing?
Inspect O-rings before every dive and replace them if you notice cuts, cracks, hardening, or deformation. Many photographers replace O-rings annually or after heavy use, but the exact timing depends on storage conditions and wear. Regular cleaning and lubrication also help extend their lifespan.
What camera settings work best for underwater photography with a Nikon D750?
Shoot in RAW to preserve color information for editing, and use an ISO range that balances noise with available light. Choose a shutter speed fast enough to freeze motion, and adjust white balance or shoot in a format that allows later correction. Disable features that may cause problems underwater, such as automatic lens movements that are not pressure-safe.
How do I clean and maintain my underwater camera housing after a dive?
Rinse the housing thoroughly with fresh water immediately after each dive, focusing on latches, buttons, and O-ring grooves. Dry it completely in a shaded area before storage, and inspect seals for debris or damage. Apply a thin layer of recommended silicone grease to O-rings and store the housing in a cool, dry place away from direct sunlight.