Does Usb to Hdmi Work on Macbook Air
Yes, USB to HDMI can work on MacBook Air, but it depends on your model and the type of USB port you have. This guide walks you through everything you need to know about USB-C to HDMI adapters, compatibility, setup, and common fixes when your connection fails.
Key Takeaways
- USB to HDMI adapters work on MacBook Air: Most modern MacBook Air models support USB-C to HDMI connections for external displays.
- Check your port type first: Older MacBook Airs with USB-A ports need a different adapter than newer USB-C models.
- Resolution matters: Not all adapters support the same resolution or refresh rate for your external monitor.
- Troubleshooting is straightforward: Most issues can be fixed with simple steps like resetting display settings or updating macOS.
- Docking stations add versatility: A USB docking station can provide HDMI output along with extra ports for peripherals.
- Apple Silicon changes the game: M1 and later MacBook Air models have native HDMI support through USB-C with the right adapter.
Does USB to HDMI Work on MacBook Air?
The short answer is yes. You can connect a USB to HDMI adapter to a MacBook Air and use an external monitor. But the details matter a lot. Whether you want to extend your screen, mirror your display, or just hook up a bigger monitor for work, the right adapter makes all the difference.
Not every USB to HDMI adapter works the same way on every MacBook Air. The port type, the macOS version, and the adapter quality all play a role. In this guide, we will break down exactly how it works, what to look for, and how to fix problems when they come up.
MacBook Air users often need external displays. Maybe you work from home and want a second screen. Maybe you present at meetings and need to connect to a projector. Whatever the reason, understanding how USB to HDMI works on your MacBook Air saves time and frustration.
Understanding USB Ports on MacBook Air
MacBook Air models come with different types of USB ports. The port type determines what kind of HDMI adapter you need. Let us look at the main types you will encounter.
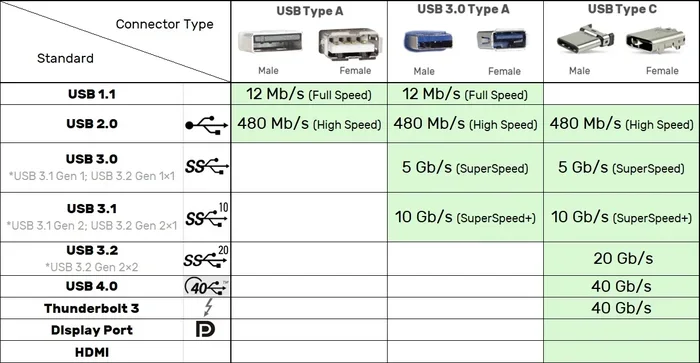
Older MacBook Air models from before 2018 usually have USB-A ports. These are the classic rectangular USB plugs. You cannot plug a USB-C to HDMI adapter directly into these ports. You would need a USB-A to HDMI adapter instead. These adapters are less common and often have lower performance.
Newer MacBook Air models, especially those with M1, M2, or M3 chips, use USB-C ports. These are the small oval-shaped ports. USB-C supports video output, which means you can use a USB-C to HDMI adapter to connect an external monitor. This is the most common setup for MacBook Air users today.
Some MacBook Air models also have Thunderbolt 3 or Thunderbolt 4 ports. These look the same as USB-C but offer faster data transfer and better video support. A Thunderbolt to HDMI adapter works great here too.
How USB to HDMI Adapters Work
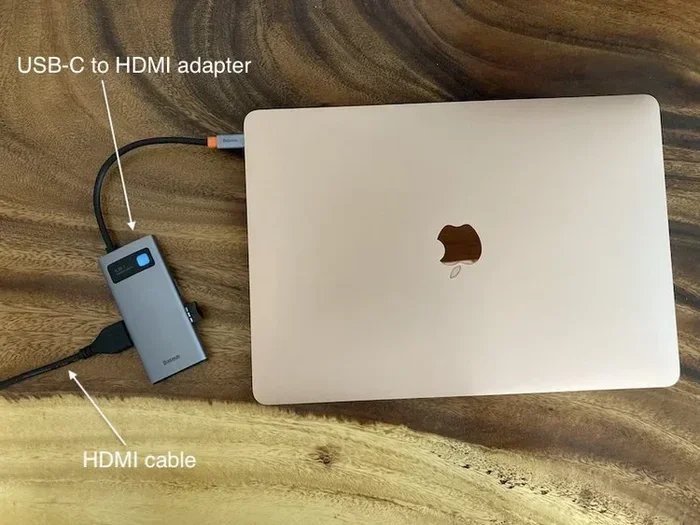
A USB to HDMI adapter converts the digital signal from your MacBook Air into an HDMI signal that a monitor or TV can understand. The adapter has a USB connector on one end and an HDMI connector on the other. You plug the USB end into your MacBook Air and the HDMI end into your display.
Inside the adapter, a small chip handles the signal conversion. Better adapters use higher-quality chips that support higher resolutions and smoother frame rates. Cheap adapters might only support 1080p or even lower. If you want 4K output, you need an adapter that explicitly supports it.
Most USB-C to HDMI adapters are plug-and-play. That means you do not need to install any software. macOS recognizes the adapter automatically and sets up the display. You can then go to System Settings > Displays to arrange your screens or choose mirroring mode.
Compatibility by MacBook Air Model
Not all MacBook Air models are the same. Here is a quick look at which models work with USB to HDMI adapters.
MacBook Air M1 (2020) and later models support external displays through USB-C. The M1 chip can drive one external display natively. If you use a USB-C to HDMI adapter, you can connect one external monitor. This works for most users who need a second screen for work.
MacBook Air M2 (2022) and M3 (2023) models also support external displays through USB-C. Apple states these chips can support one external display natively as well. Some users report success with two external displays when using a docking station, but this is not officially supported by Apple for all models.
Older Intel-based MacBook Air models from 2018 to 2020 also work with USB-C to HDMI adapters. These models use Thunderbolt 3 ports, which handle video output well. Just make sure your adapter supports the resolution you need.
If you have a very old MacBook Air with only USB-A ports, you can still connect an external monitor. You just need a USB-A to HDMI adapter. These adapters are less common and may not support high resolutions. Check the adapter specifications before buying.
Setting Up Your USB to HDMI Connection
Setting up a USB to HDMI connection on your MacBook Air is simple. Follow these steps and you will be up and running in minutes.
First, plug the USB end of the adapter into your MacBook Air. If you have a USB-C model, make sure the adapter fits snugly into the port. A loose connection can cause flickering or no signal at all.
Next, connect an HDMI cable to the adapter. Plug the other end of the HDMI cable into your monitor or TV. Make sure the HDMI cable is fully seated in both ports.
Turn on your external display. Your MacBook Air should recognize it automatically. If you do not see anything, go to System Settings > Displays and check if the external display is listed. You may need to click “Detect Displays” to force recognition.
Once the display is detected, you can choose your setup. Click “Extend Display” to use the external monitor as a second screen. Click “Mirror Display” to show the same content on both screens. You can also adjust the resolution and arrangement in the display settings.
Quick Tip: If your external monitor looks blurry, check the resolution settings. Set the resolution to the native resolution of your monitor for the sharpest image.
Common Problems and How to Fix Them
Sometimes USB to HDMI adapters do not work right away. Here are the most common issues and how to solve them.
No Signal on External Monitor is the most common problem. This usually means the adapter is not being recognized. Try unplugging the adapter and plugging it back in. If that does not work, restart your MacBook Air. Sometimes macOS needs a fresh start to detect new display hardware.
Flickering or Distorted Image often points to a loose connection or a low-quality adapter. Make sure all cables are firmly plugged in. If the problem continues, try a different HDMI cable or a different adapter. Cheap adapters often struggle with stable video output.
Low Resolution or Refresh Rate means your adapter may not support the resolution you want. Check the adapter specifications for maximum supported resolution. A good USB-C to HDMI adapter should support at least 4K at 60Hz. If your adapter only supports 1080p, that is likely the bottleneck.
Adapter Not Recognized After macOS Update can happen sometimes. Apple updates macOS regularly, and these updates can occasionally cause compatibility issues with adapters. Try resetting your NVRAM or SMC. You can also check for adapter firmware updates from the manufacturer’s website.
If your USB peripherals like a mouse or keyboard stop working when you connect the adapter, the issue may be power-related. Some USB hubs draw too much power from your MacBook Air. Try using a powered USB hub or a different adapter.
Choosing the Right USB to HDMI Adapter for MacBook Air
Not all adapters are created equal. Here is what to look for when buying one for your MacBook Air.
First, check the connector type. If your MacBook Air has USB-C ports, buy a USB-C to HDMI adapter. If it has USB-A ports, you need a USB-A to HDMI adapter. Getting the wrong type means the adapter will not fit your laptop.
Second, check the resolution support. If you want 4K output, make sure the adapter supports it. Many adapters only support 1080p or 4K at 30Hz. For smooth video and gaming, look for 4K at 60Hz support.
Third, consider build quality. Metal adapters tend to perform better and last longer than plastic ones. They also dissipate heat better, which helps with long gaming or video editing sessions.
Fourth, look for brand reputation. Brands like Anker, Belkin, and Cable Matters make reliable adapters. Avoid no-name brands from unknown sellers. They may be cheaper, but they often have compatibility issues and poor build quality.
Fifth, think about extra features. Some adapters come with USB ports for charging or data transfer. Others include SD card readers or Ethernet ports. These extras can be handy if you want a compact setup without multiple dongles.
USB Docking Stations as an Alternative
If you need more than just an HDMI connection, consider a USB docking station. A docking station connects to your MacBook Air through a single USB-C cable and provides multiple ports. Most docking stations include HDMI output, USB-A ports, Ethernet, and sometimes even SD card readers.
Docking stations are great for desk setups. You connect everything once and then just plug or unplug your MacBook Air when you need to move it. This keeps your workspace clean and reduces cable clutter.
Popular docking station brands include CalDigit, OWC, and Anker. These brands offer reliable products with good macOS support. When shopping, make sure the docking station explicitly lists MacBook Air compatibility.
One thing to watch out for is power delivery. Some docking stations can charge your MacBook Air through the same USB-C cable that connects to the display. This is very convenient because you only need one cable for video and charging.
Expert Tips for Best Performance
Here are some tips from experienced MacBook Air users to get the best performance from your USB to HDMI setup.
Always use certified adapters. Look for adapters that are certified by USB-IF (USB Implementers Forum). Certified adapters meet quality standards and are more likely to work reliably with macOS.
Keep your macOS updated. Apple regularly releases updates that improve display compatibility. If you are having issues with your external monitor, check for macOS updates before troubleshooting further.
Use short, high-quality HDMI cables. Long cables can lose signal quality, especially at higher resolutions. A 3 to 6 foot cable is usually ideal for most setups.
Avoid daisy-chaining adapters. Plugging one adapter into another can cause signal loss and compatibility problems. Use a single adapter for the best results.
If you are having persistent issues, try the adapter on another computer. This helps you determine if the problem is with the adapter or your MacBook Air. If the adapter works on another computer, the issue is likely with your MacBook Air settings or hardware.
Final Thoughts
So does USB to HDMI work on MacBook Air? The answer is a clear yes. With the right adapter and a compatible MacBook Air model, connecting an external monitor is straightforward and reliable. Whether you use a USB-C to HDMI adapter or a full docking station, the setup process is simple and works with minimal fuss.
The key is choosing the right adapter for your specific MacBook Air model. Check your port type, confirm resolution support, and buy from a reputable brand. These small steps save you from hours of frustration and compatibility headaches.
If you run into problems, most issues have simple fixes. Reset your display settings, check your cables, and keep your macOS updated. And if nothing works, a different adapter or docking station usually solves the problem.
Connecting an external monitor to your MacBook Air opens up new possibilities. You get more screen space for multitasking, a bigger display for creative work, and a better setup for presentations and entertainment. With the right USB to HDMI adapter, all of this is within reach.
Take a moment to check your current setup. If you have not tried connecting an external monitor yet, now is a great time. The process is easier than most people think, and the productivity gains are well worth it. Your MacBook Air can do so much more than its built-in screen allows.
Frequently Asked Questions
Can I connect two external monitors to a MacBook Air using USB to HDMI adapters?
Most MacBook Air models support only one external display natively. However, some users with M1 or M2 MacBook Airs have found workarounds using multiple adapters or docking stations. Results vary, so check your specific model’s capabilities before buying multiple adapters.
Do I need to install drivers for a USB to HDMI adapter on MacBook Air?
Most USB to HDMI adapters are plug-and-play on macOS. You do not need to install any drivers. However, some advanced adapters from specific manufacturers may require a driver or firmware update for full functionality. Always check the manufacturer’s website for macOS compatibility.
Why does my external monitor show no signal when connected via USB to HDMI?
This is usually caused by a loose connection, an incompatible adapter, or a macOS glitch. Try unplugging and replugging the adapter, restarting your MacBook Air, or resetting your NVRAM. If the problem persists, test the adapter on another computer to rule out hardware failure.
What resolution can I expect from a USB to HDMI adapter on MacBook Air?
Resolution depends on your adapter quality. Most good USB-C to HDMI adapters support 4K at 60Hz. Budget adapters may only support 1080p or 4K at 30Hz. Check the adapter specifications before purchasing to make sure it meets your needs.
Can I use a USB hub with my USB to HDMI adapter on MacBook Air?
Yes, you can use a powered USB hub alongside your adapter. This is helpful if you need to connect multiple USB devices while using an external monitor. Just make sure the hub is powered, as unpowered hubs may not provide enough current for all connected devices.
Are USB to HDMI adapters safe for MacBook Air?
Yes, USB to HDMI adapters are safe to use with MacBook Air. They do not damage your laptop or void your warranty. Just make sure you buy adapters from reputable brands to avoid cheap counterfeit products that could cause compatibility issues or even safety hazards.
=== CONCLUSION ===
Using a USB to HDMI adapter with your MacBook Air is a practical and reliable way to expand your display setup. Whether you are working from home, presenting in a meeting, or just want a bigger screen for creative projects, the right adapter gets the job done. The process is simple, the setup is fast, and the results are impressive.
Remember to check your MacBook Air model, choose the right adapter type, and buy from trusted brands. These small steps make a big difference in your experience. If you run into issues, the troubleshooting steps above will help you get back on track quickly.
External displays unlock new levels of productivity and convenience. Your MacBook Air is capable of so much more than its built-in screen suggests. With a quality USB to HDMI adapter, you can turn any monitor or TV into an extension of your workspace. Start exploring your options today and see how much more you can accomplish with a dual-screen setup.