
How to Build a Computer Step by Step Infographic
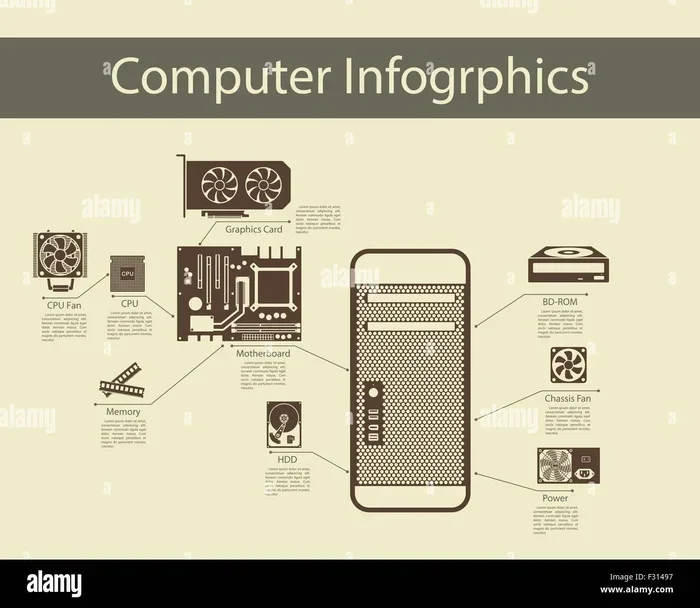
Building a computer step by step is easier than you think with the right infographic guide. This article walks you through every stage of PC building using clear visuals and simple instructions. You will learn how to choose parts, assemble your system, and get your new machine running smoothly.
Have you ever wanted to build your own computer but felt overwhelmed by the process? A how to build a computer step by step infographic changes everything. Instead of reading long, confusing guides, you get a visual roadmap that shows you exactly what to do. Whether you are a complete beginner or someone who has built a few PCs before, an infographic makes the whole process feel manageable and even fun.
In this guide, we break down every part of the PC building process into simple, easy-to-follow steps. You will learn what tools you need, how to install each component, and how to test your finished build. We also share tips that save time and prevent common mistakes. By the end, you will feel confident enough to start your own computer assembly project today.
Key Takeaways
- An infographic makes PC building simple: Visual guides help you follow each step without confusion.
- You need the right tools and parts: A screwdriver, anti-static wrist strap, and compatible components are essential.
- Cable management matters: Clean cable routing improves airflow and keeps your build looking professional.
- Testing comes after assembly: Always power on your build and check for errors before closing the case.
- First-time builders save money: Building your own PC costs less and teaches valuable skills.
- Patience is key: Rushing leads to mistakes, so take your time with each step.
📑 Table of Contents
Why Use an Infographic to Build a Computer?
Building a computer involves many small steps. Each part connects to another in a specific order. A step by step guide with pictures helps you understand the flow much better than text alone. When you can see where each piece goes, you feel less stressed and more in control.
Infographics also help you remember the process. Studies show that people retain visual information better than written instructions. So when you need to build or upgrade a PC in the future, the image stays in your mind. This makes a computer building tutorial with visuals one of the best investments of your time.
Visual Learning Makes a Big Difference
Not everyone learns the same way. Some people prefer reading long paragraphs. Others learn best by looking at pictures. A PC building guide with an infographic combines both approaches. You get short descriptions paired with clear images that show you the exact placement of each part.
For example, installing the CPU onto the motherboard can feel scary if you only read about it. But when you see a diagram showing the alignment pins and the gentle placement, it suddenly feels simple. This is the power of visual learning in system building.
What You Need Before You Start
Before you dive into building, you need to gather everything. Preparation is one of the most overlooked steps in computer assembly. Skipping this phase leads to frustration and delays.
Essential Tools
You do not need many tools to build a PC. Here is what you should have ready:
- Phillips head screwdriver – This is the main tool you will use for almost every connection.
- Anti-static wrist strap – This protects your components from static electricity damage.
- A clean, flat workspace – A large table with good lighting works best.
- Your component box manuals – Keep each manual handy for specific instructions.
- Cable ties or Velcro straps – These help with cable management later.
Choosing Compatible Components
Not all computer parts work together. Before you buy anything, check component compatibility. Your motherboard must support your CPU. Your RAM must match the motherboard type. Your power supply must provide enough wattage for your GPU and all other parts.
Many websites offer PC building checklist tools that verify compatibility for you. Use these tools before purchasing. They save you from costly mistakes and return trips to the store.
Step-by-Step Computer Building Process
Now comes the fun part. Here is the PC building process broken down into clear stages. Each stage builds on the last, so follow them in order.
Step 1: Prepare the Motherboard
Start by placing the motherboard on its anti-static bag or box. This is your main workspace. First, install the CPU. Open the CPU socket on the motherboard, align the gold triangle on the CPU with the triangle on the socket, and gently place it in. Do not force it.
Next, apply a small dot of thermal paste to the center of the CPU. Then attach the CPU cooler. Each cooler has its own mounting method, so refer to the cooler manual. Finally, install the RAM into the correct slots. Check your motherboard manual for the recommended slot configuration for dual-channel memory.
Step 2: Install the Power Supply
Slide the power supply unit into the PSU bay of your case. Make sure the fan faces the correct direction, usually down or toward the rear vent. Secure it with four screws. The power supply provides electricity to every part of your build, so make sure it is seated firmly.
Step 3: Mount the Motherboard into the Case
Install the I/O shield into the back of the case first. Then align the motherboard with the standoffs and screw holes. Gently lower it in and secure it with screws. Do not overtighten. Hand-tight is usually enough.
Step 4: Install Storage Drives
Now you add your storage. If you are using an NVMe M.2 SSD, locate the M.2 slot on the motherboard. Insert the drive at an angle and press it down flat, then secure it with the small screw. If you need help installing a second NVMe M.2 SSD, you can follow a detailed guide on how to install a second NVMe M.2 SSD for extra clarity.
For SATA SSDs or hard drives, slide them into the drive bays and connect the SATA data and power cables from the power supply.
Step 5: Install the Graphics Card
Remove the necessary PCIe slot covers from the back of the case. Align the GPU with the top PCIe x16 slot and press it down firmly until it clicks. Secure it with a screw at the rear bracket. The graphics card is one of the most important parts of your build, so make sure it is fully seated.
Step 6: Connect All Cables
This step requires patience. You need to connect the following cables:
- 24-pin motherboard power cable – This powers the motherboard itself.
- 8-pin CPU power cable – This provides power to the processor.
- GPU power cables – Modern cards often need one or two 8-pin connectors.
- SATA power cables – These power your storage drives.
- Front panel connectors – These connect the power button, reset button, and USB ports to the motherboard.
- Fan cables – Connect case fans to the motherboard or fan hub.
Good cable management improves airflow inside your case. Route cables behind the motherboard tray when possible and use cable ties to bundle them together. Clean cable routing also makes future upgrades easier.
Understanding Your Infographic Guide
A good infographic for building a PC organizes information visually. Each section of the infographic corresponds to a building stage. You move from one image to the next, following the arrows and labels.
Most infographics use color coding. For example, the CPU installation step might be blue, the RAM step green, and the cable management step orange. This color system helps you quickly find the section you need. It also makes the guide feel less intimidating for beginners.
When using an infographic, do not rush through it. Study each image carefully before moving on. If something looks unclear, pause and re-read the label. The beauty of a visual guide is that you can review any step without reading a long paragraph. This makes computer hardware assembly feel much more approachable.
Where to Find Quality Infographics
Many websites and YouTube channels offer free PC building infographics. Look for ones that are recent, since motherboard layouts and connector types change over time. Manufacturer websites often include build guides with their products. These guides are tailored to specific parts and can be very helpful.
Common Mistakes to Avoid
Even with a great step by step guide, mistakes can happen. Here are the most common ones and how to avoid them.
Forgetting to Install Standoffs
The standoffs are small brass screws that go between the motherboard and the case. They prevent the motherboard from touching the metal case directly. Forgetting them can cause a short circuit and damage your motherboard. Always check that all standoffs are in place before lowering the motherboard.
Applying Too Much Thermal Paste
More thermal paste does not mean better cooling. A small pea-sized dot in the center of the CPU is all you need. Too much paste can overflow onto the motherboard and cause connectivity issues. Keep it simple and clean.
Forcing Components Into Place
If a part does not fit easily, stop and check the alignment. Forcing components can bend pins or break sockets. The CPU should drop in with zero force. RAM should click firmly when pressed down evenly on both sides. The GPU should slide in smoothly into the PCIe slot.
Skipping the Power-On Test
Before you close the case, always do a quick power-on test. Plug in the power supply, connect a monitor, and press the power button. Check that fans spin and the BIOS screen appears. If something does not work, you can still open the case and fix it easily. Skipping this test and closing the case first can trap a problem inside.
Tips for First-Time Builders
Building a computer for the first time is a rewarding experience. Here are some tips that make the process smoother.
Take Breaks When Needed
Do not try to finish everything in one sitting. Build in stages and take short breaks. This keeps your focus sharp and reduces the chance of mistakes. A PC building tutorial is not a race.
Watch Video Tutorials Alongside Your Infographic
Pairing a visual infographic with a video guide gives you the best of both worlds. You see the infographic on your screen while watching someone physically do each step. This combination reinforces your understanding and builds confidence.
Keep Your Workspace Organized
Place each component in its box or a small tray when not in use. Label the parts if needed. A clean workspace prevents lost screws and confused moments. It also makes the whole experience more enjoyable.
Do Not Be Afraid to Ask for Help
Online communities are full of experienced builders who love helping newcomers. Forums, Reddit threads, and Discord servers are great places to ask questions. If a step feels confusing, someone has likely faced the same challenge and can offer advice.
Final Assembly and Testing
Once all the parts are installed and cables are connected, it is time for the final checks. Close the case side panel. Connect your monitor, keyboard, and mouse. Plug in the power cable and press the power button.
If everything goes well, you will see the BIOS screen appear. This means your computer assembly was successful. Enter the BIOS and check that all components are detected. Your RAM should show the correct amount. Your storage drives should appear in the boot menu. Your GPU should be recognized by the system.
Next, install your operating system. Use a USB drive with your OS installer and follow the on-screen prompts. After the OS is installed, install your drivers, especially for the motherboard and GPU. Then update Windows or your chosen OS to the latest version.
Finally, run a stress test or benchmarking tool to make sure everything runs stable. Monitor temperatures during the test to ensure your cooling solution is working properly. If everything checks out, congratulations, you have built a computer from scratch.
Remember, every builder learns something new with each project. Your first build might take a few hours, but future builds will go much faster. The skills you gain from this experience are valuable and last a lifetime.
Frequently Asked Questions
Do I need any special tools to build a computer?
A basic Phillips head screwdriver is the only tool you truly need. An anti-static wrist strap is helpful but not required if you touch a grounded metal surface regularly. Most people build a PC successfully with just a screwdriver and a clean workspace.
How long does it take to build a computer for the first time?
Most first-time builders finish their build in 2 to 4 hours. This includes reading the guide, installing each part, and testing the system. Do not rush the process. Taking extra time ensures everything is connected properly and reduces the chance of mistakes.
Can I reuse parts from my old computer?
Yes, you can reuse many parts like the hard drive, power supply, or case. However, check compatibility with your new motherboard and CPU. Older RAM or GPUs may not work with newer components, so always verify before assuming a part will fit.
What should I do if my computer does not turn on after building?
First, check that the 24-pin motherboard cable and the 8-pin CPU cable are fully seated. Make sure the power supply switch is turned on at the back. Verify that the front panel power button connector is attached correctly. These simple checks solve most first-time build issues.
Is building a computer cheaper than buying a pre-built PC?
Building your own PC often costs less because you choose each part individually. You avoid paying for pre-built markup and labor. You also get the freedom to pick exactly the parts you need, which means better value for your budget.
Do I need to install drivers after building a PC?
Yes, installing drivers is an important step. Start with the motherboard chipset drivers, then install your GPU drivers from the manufacturer’s website. Windows Update will also install many drivers automatically, but checking manually ensures you have the latest versions.
=== CONCLUSION ===
Building a computer step by step with an infographic guide is one of the most satisfying projects you can tackle. The visual format removes the guesswork and makes each stage clear and achievable. From preparing your workspace to powering on your finished build, every step matters.
Take your time, follow the guide carefully, and enjoy the process. Each component you install brings you closer to a fully functional machine that you built with your own hands. Whether you are building for gaming, work, or learning, the experience of PC building gives you skills and confidence that last forever. Start your build today and discover how rewarding it can be.


