How To Install Desktop Ssd 2 With These Easy Steps

Installing a desktop SSD 2 is one of the best upgrades you can make for faster boot times and smoother performance. This guide walks you through every step from choosing the right drive to formatting and transferring your data. Whether you are a beginner or a seasoned PC user, these easy steps will get your new solid state drive up and running in no time.
Upgrading your desktop with a second solid state drive can transform your computing experience. Whether you need more storage space or want to separate your games from your work files, adding a desktop SSD 2 is a smart move. The process is simpler than most people think, and you do not need to be a tech expert to pull it off.
In this guide, we will walk you through every single step. From picking the right SSD upgrade for your system to formatting the drive and moving your data over, we have you covered. You will learn about M.2 NVMe drives, SATA SSD options, and how to make sure everything works perfectly after installation.
By the end of this article, you will feel confident enough to install your own desktop SSD 2 without calling a technician. Let us get started with what you need before you begin.
Key Takeaways
- Choose the right SSD type: Pick between M.2 NVMe and 2.5-inch SATA SSDs based on your desktop motherboard and needs.
- Preparation matters: Back up your data, gather the right tools, and check your BIOS settings before starting the install.
- Physical installation is simple: Mounting a desktop SSD 2 takes only a few minutes with basic screwdrivers.
- Setup and formatting are essential: Initialize the drive, create partitions, and format it properly through Windows Disk Management.
- Data transfer keeps everything intact: Use cloning software to move your files, apps, and OS to the new drive seamlessly.
- Troubleshooting is straightforward: Most common issues have simple fixes like checking connections or updating drivers.
📑 Table of Contents
- What You Need Before Installing a Desktop SSD 2
- Preparing Your Desktop for SSD Installation
- Step-by-Step Desktop SSD 2 Installation
- Setting Up and Formatting Your New SSD
- Transferring Data to Your New SSD
- Optimizing Your Desktop SSD 2 for Best Performance
- Common Mistakes to Avoid When Installing a Desktop SSD 2
- Expert Insights on Desktop SSD Upgrades
- Conclusion
What You Need Before Installing a Desktop SSD 2
Before you touch any hardware, make sure you have everything ready. Skipping this step can cause delays or even damage your new drive. Here is a quick checklist of what you need.
Tools and Materials
- A Phillips-head screwdriver: Most desktop cases use standard Phillips screws for drive mounting.
- Your new SSD: Decide between a 2.5-inch SATA SSD or an M.2 NVMe drive based on your motherboard slots.
- A SATA cable (if needed): Some 2.5-inch drives require a SATA data and power cable.
- A USB external enclosure: Useful if you want to set up the drive outside your PC first.
- Cloning software: Programs like Macrium Reflect or Clonezilla help with disk cloning.
Check Your Motherboard Compatibility
Not all desktops support every type of SSD. Open your case and look at your motherboard. If you see a small slot labeled M.2, you can use a NVMe drive. If you only have standard SATA ports, a 2.5-inch SATA SSD is your best bet. Check your motherboard manual for the exact PCIe interface and slot type supported.
Preparing Your Desktop for SSD Installation
Proper preparation prevents problems. Take a few minutes to set up your workspace and your PC before you start the actual SSD upgrade.
Back Up Your Existing Data
This is the most important step. Before you install a desktop SSD 2, make sure all your important files are backed up. Use an external hard drive or cloud storage. Even though the installation process is safe, accidents can happen. A quick backup saves you from potential data loss.
Power Down and Unplug
Turn off your computer completely. Unplug the power cable from the back of the power supply. Press the power button for a few seconds to discharge any remaining electricity. This keeps you and your components safe during the installation.
Ground Yourself
Static electricity can damage sensitive components like SSDs. Touch a metal part of your case to discharge any static. You can also wear an anti-static wrist strap if you have one. This simple step protects your new solid state drive from electrostatic damage.
Step-by-Step Desktop SSD 2 Installation
Now comes the fun part. Installing a desktop SSD 2 is straightforward and takes about 10 to 15 minutes. Follow these steps carefully and you will be done in no time.
Step 1: Locate the Drive Bay
Open your desktop case side panel. Look for an empty drive bay. If you are installing a 2.5-inch SATA SSD, you need a 3.5-inch bay adapter or a dedicated 2.5-inch slot. For an M.2 NVMe drive, locate the M.2 slot on your motherboard. It usually looks like a small horizontal slot with a screw hole nearby.
Step 2: Mount the SSD
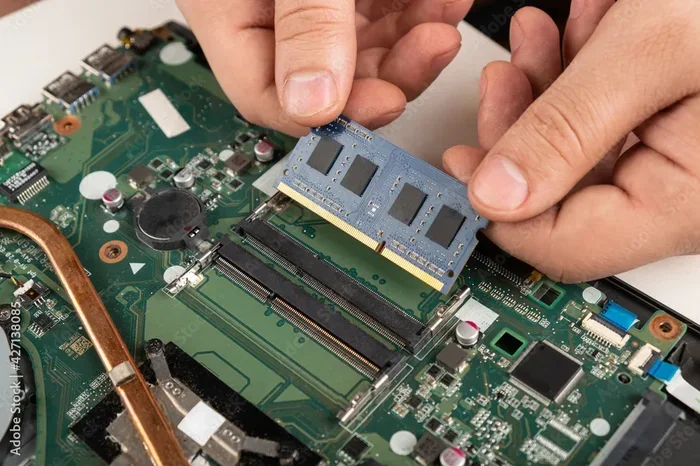
For a 2.5-inch drive, slide it into the bay and secure it with four screws. Make sure it sits flush and does not wiggle. For an M.2 drive, insert it at a 30-degree angle into the slot and press it down gently. Then secure it with the small screw that holds it in place. Do not overtighten the screw.
Step 3: Connect Cables (For SATA SSDs Only)
If you are using a 2.5-inch SATA SSD, connect the SATA data cable from the drive to a SATA port on your motherboard. Then connect the SATA power cable from your power supply to the drive. Make sure both connections are firm and secure.
Step 4: Close the Case
Once the drive is mounted and connected, put the side panel back on. Make sure no cables are resting on the fan or blocking airflow. Good airflow keeps your system cool and helps your storage expansion perform at its best.
For a more detailed walkthrough of the physical installation process, check out our guide on how to install an NVMe SSD for additional tips and visual references.
Setting Up and Formatting Your New SSD
After you have physically installed the desktop SSD 2, you need to set it up in your operating system. This step is crucial because a brand new drive will not work until it is initialized and formatted.
Boot Into Windows
Plug your power cable back in and turn on your PC. If everything is connected properly, your system should boot up normally. You may see a message asking you to initialize the new drive. If not, you can access the setup through Windows Disk Management.
Initialize the Drive
Right-click the Start button and select Disk Management. Windows will prompt you to initialize the new disk. Choose GPT (GUID Partition Table) for modern systems. This is the standard partition style for NVMe protocol drives and most new PCs. MBR (Master Boot Record) works too but is older and has limitations.
Create a New Partition
Once initialized, you will see unallocated space on your new drive. Right-click that space and select New Simple Volume. Follow the wizard to assign a drive letter and format the partition. Choose NTFS for Windows systems. This format offers the best storage speed and compatibility for a desktop SSD.
If you want a more detailed walkthrough of this setup process, our guide on how to set up a new NVMe SSD covers this in greater detail with screenshots and tips.
Verify the Drive Is Working
After formatting, your new desktop SSD 2 should appear in File Explorer. Try saving a test file to it. If the file saves without errors, your drive is working correctly. You can also check the drive properties in Disk Management to confirm the capacity and format are correct.
Transferring Data to Your New SSD
Now that your new drive is set up, you probably want to move your files, programs, or even your entire operating system over. There are two main approaches to this.
Option 1: Manual File Transfer
The simplest method is to copy and paste your files directly. Connect an external drive or use your existing drive as a source. Drag your documents, photos, videos, and other files to the new desktop SSD 2. This works great for personal files but does not move your applications or Windows system files.
Option 2: Clone Your Existing Drive
If you want an exact copy of your current drive, use drive cloning software. Programs like Macrium Reflect, EaseUS Todo Backup, or Clonezilla let you clone your entire drive, including the operating system, to the new SSD. This is the best method if you want a seamless storage expansion without reinstalling Windows.
For detailed instructions on preparing and formatting your drive before cloning, see our guide on how to format a new NVMe SSD. It covers the best practices to ensure a smooth cloning process.
Quick Tips for Data Transfer
- Use a reliable cable: A cheap or damaged USB cable can corrupt data during transfer.
- Be patient: Cloning a large drive can take several hours. Let the process finish without interruption.
- Verify the clone: After cloning, check that all your files are accessible on the new drive.
- Keep the old drive: Do not erase your old drive until you confirm everything works on the new one.
Optimizing Your Desktop SSD 2 for Best Performance
Once your new desktop SSD 2 is installed and running, there are a few things you can do to get the best performance out of it.
Enable TRIM Support
TRIM is a command that helps your SSD maintain peak performance over time. It tells the drive which blocks of data are no longer in use and can be wiped. Windows 10 and 11 usually enable TRIM automatically for NVMe drives. You can check by opening Command Prompt and typing fsutil behavior query DisableDeleteNotify. A result of 0 means TRIM is active.
Update Your Drivers
Make sure your storage drivers and chipset drivers are up to date. Visit your motherboard manufacturer website and download the latest drivers for your PCIe interface and SATA controllers. Updated drivers improve PC performance and fix known compatibility issues.
Adjust BIOS Settings
Enter your BIOS by pressing the appropriate key during boot (usually Del or F2). Look for the storage configuration section. Make sure your new drive is detected and that the SATA mode is set to AHCI for best performance with SATA SSD drives. For M.2 drives, ensure the PCIe mode is set correctly in the BIOS settings.
Move Heavy Applications to the New Drive
Games and video editing software benefit the most from the fast storage speed of a solid state drive. Use Steam or your game launcher to move installed games to the new drive. You can also change default save locations for large applications through Windows settings.
If you are looking for recommendations on which desktop SSD 2 to buy, check out our article on the best NVMe M.2 SSD for top-rated options across different budgets and use cases.
Common Mistakes to Avoid When Installing a Desktop SSD 2
Even though installing a desktop SSD 2 is relatively simple, some common mistakes can cause problems. Here is what to watch out for.
- Forgetting to back up data: Always back up before any hardware change. A single mistake can erase important files.
- Using the wrong screw: M.2 drives need specific screws. Using the wrong size can damage the drive or the motherboard.
- Overtightening screws: Tightening screws too much can strip threads or crack the drive PCB. Snug is enough.
- Ignoring BIOS settings: If your drive does not show up, check the BIOS first. Many issues are simply a matter of incorrect configuration.
- Skipping the format step: A new drive will not appear in File Explorer until it is formatted and partitioned. Do not skip this step.
- Mixing up SATA and NVMe: Make sure you are using the right type of drive for your motherboard slot. An M.2 NVMe drive will not work in a standard SATA port and vice versa.
Expert Insights on Desktop SSD Upgrades
Experienced PC builders and technicians agree that adding a second SSD is one of the most impactful upgrades you can make. According to hardware experts, the difference between a mechanical hard drive and a solid state drive is night and day. Boot times drop from minutes to seconds, and file transfers happen in a fraction of the time.
Storage speed is the biggest factor in overall system responsiveness. An M.2 NVMe drive using the PCIe 4.0 interface can deliver read speeds over 7,000 MB/s. Even a basic SATA SSD is five to ten times faster than a traditional hard drive. This means your system feels noticeably faster for everyday tasks like opening apps, loading games, and booting Windows.
Experts also recommend keeping your operating system and frequently used programs on the SSD while storing large files like photos and videos on a separate drive. This setup balances performance with practical storage capacity.
Conclusion
Installing a desktop SSD 2 is a rewarding project that anyone can do. You do not need expensive tools or advanced technical knowledge. With the right preparation, a few basic tools, and this step-by-step guide, you can upgrade your storage and enjoy faster performance in under an hour.
Remember to back up your data before you start, choose the right type of drive for your system, and take your time during the installation process. Once your new desktop SSD 2 is up and running, you will wonder why you did not do it sooner. The speed and responsiveness improvement is truly noticeable from the moment you boot up.
Take action today. Gather your tools, pick the right SSD for your needs, and follow the steps in this guide. Your PC will thank you with faster load times, smoother multitasking, and a much better overall experience.
Frequently Asked Questions
Can I install a desktop SSD 2 myself without professional help?
Absolutely. Installing a desktop SSD 2 is one of the simplest PC upgrades you can do. All you need is a screwdriver, about 15 minutes, and this guide to walk you through each step. Thousands of beginners do this every day with great results.
What is the difference between an M.2 NVMe SSD and a 2.5-inch SATA SSD?
An M.2 NVMe drive plugs directly into the motherboard and uses the PCIe interface for much faster speeds. A 2.5-inch SATA SSD connects with cables and is limited by the SATA interface. M.2 NVMe drives are faster but both types offer a huge improvement over old hard drives.
Do I need to format a new desktop SSD 2 before using it?
Yes. A brand new drive needs to be initialized and formatted through Windows Disk Management before you can save files to it. The process takes just a few minutes and Windows walks you through it step by step.
Can I clone my old drive to the new desktop SSD 2?
Yes. Using free or paid cloning software like Macrium Reflect or Clonezilla, you can create an exact copy of your existing drive on the new SSD. This transfers your operating system, applications, and all your files without needing to reinstall anything.
Will installing a second SSD void my computer warranty?
In most cases, no. Installing an SSD yourself typically does not void your warranty as long as you do not damage other components. However, check your specific manufacturer terms to be sure. Some pre-built systems may have specific rules about internal modifications.
How do I know if my motherboard supports an NVMe M.2 SSD?
Check your motherboard manual or look at the motherboard itself for an M.2 slot. Most modern motherboards from the last five years include at least one M.2 slot that supports NVMe drives. If you do not see an M.2 slot, a 2.5-inch SATA SSD is your best option for a desktop SSD 2 upgrade.
=== END ===