How To Completely Disable Mouse Scroll on Windows 10
Disabling mouse scroll on Windows 10 is simpler than you think. Whether you want to stop accidental scrolling or customize your mouse wheel settings, this guide covers every method. You will learn how to disable mouse scroll through Windows Settings, Device Manager, and the Registry Editor in just a few clicks.
Key Takeaways
- Multiple methods available: You can disable mouse scroll using Windows Settings, Device Manager, or the Registry Editor.
- No technical skills needed: Each method uses simple steps anyone can follow on their Windows 10 laptop.
- App-specific control: You can turn off scrolling for certain programs while keeping it active for others.
- Reversible changes: Every method can be undone easily if you change your mind later.
- Prevents accidental scrolling: Disabling the scroll wheel helps avoid unwanted page jumps during work or play.
- Touchpad scroll can also be disabled: You have full control over both mouse and touchpad scrolling behavior.
📑 Table of Contents
- Why Would You Want to Disable Mouse Scroll on Windows 10?
- How to Disable Mouse Scroll Using Windows Settings
- How to Disable Mouse Scroll Through Device Manager
- Using the Registry Editor to Stop Mouse Scrolling
- Disabling Scroll for Specific Apps and Programs
- Preventing Accidental Scrolling on Your Laptop
- Expert Tips for Managing Mouse Scroll on Windows 10
- Common Mistakes When Disabling Mouse Scroll
- Conclusion
Why Would You Want to Disable Mouse Scroll on Windows 10?
Mouse scrolling is something most people use every single day. But sometimes, it becomes more of a problem than a help. Accidental scrolling can jump your page unexpectedly. It can disrupt your workflow and cause frustration during important tasks.
Maybe you are sharing your laptop with a child. Perhaps your touchpad is too sensitive and scrolls when you do not want it to. Or you might be working on a design project where precise control matters more than anything else. Whatever the reason, disabling mouse scroll on Windows 10 is a valid and useful thing to do.
Many users also want to learn how to mouse scroll on a laptop in a controlled way. They want the ability to turn it on or off whenever needed. This guide gives you that power. You will find clear instructions for every method available.
If you have ever accidentally scrolled past an important section while trying to click a button, you know how annoying this can be. Disabling mouse scroll solves this problem completely. Let us dive into the different ways you can do this on your Windows 10 device.
How to Disable Mouse Scroll Using Windows Settings
The easiest and most common way to disable mouse scroll is through Windows Settings. This method works for most users and does not require any advanced tools. You can complete it in just a few minutes.
Step-by-Step Guide
- Click the Start menu on your taskbar.
- Select the Settings gear icon.
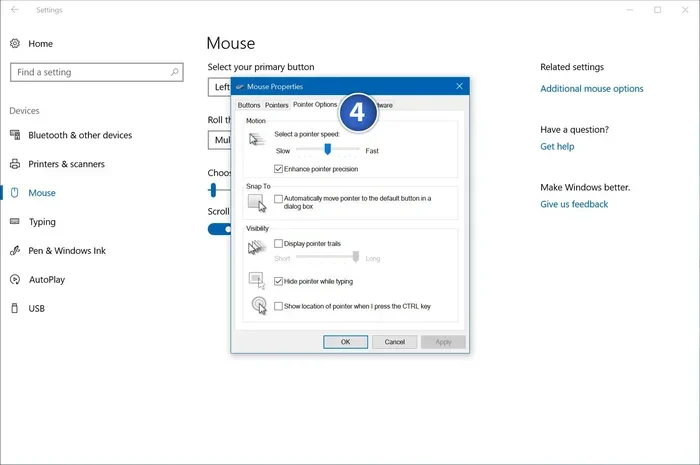
- Click on Devices.
- Choose Mouse from the left sidebar.
- Look for the scroll options section.
- Adjust the number of lines to scroll at a time.
You can also visit the Mouse properties window for more options. Right-click on your desktop and select Display Settings. Then navigate to the Mouse section. Here you will find additional controls for your scroll wheel settings.
One thing to keep in mind is that this method may not completely stop all scrolling behavior. It mainly controls the speed and number of lines scrolled. For a full disable mouse scroll experience, you may need to try other methods below.
If you are using an external mouse, make sure it is selected as your primary device. You can check this in the Mouse settings page. Some laptops let you switch between a built-in mouse and an external one easily.
How to Disable Mouse Scroll Through Device Manager
The Device Manager gives you deeper control over your hardware. This method is great if you want to completely turn off your mouse scroll function. It works well for both USB mice and built-in laptop touchpads.
Accessing Device Manager
First, you need to open Device Manager. Right-click on the Start button and select Device Manager from the menu. A new window will appear with a list of all your hardware devices.
Look for the Mice and other pointing devices section. Click the arrow next to it to expand the list. You will see your mouse listed there. Right-click on your mouse device and select Properties.
Disabling the Scroll Wheel
In the Properties window, go to the Driver tab. Click on Disable Device. A confirmation popup will appear. Click Yes to proceed.
This will turn off your mouse entirely, not just the scroll function. If you want to keep the mouse moving but only stop the scroll, this method might be too strong. In that case, try the Registry Editor method described below.
You can always re-enable the device by going back to Device Manager. Right-click on the disabled mouse and select Enable Device. This makes it easy to toggle your settings whenever you need to. If you ever want to turn off the mouse on a laptop completely, this is a great approach.
Using the Registry Editor to Stop Mouse Scrolling
The Registry Editor is a powerful tool built into Windows 10. It lets you change deep system settings. Using it to disable mouse scroll gives you precise control. But be careful. Always create a backup before making changes.
Opening the Registry Editor
Press the Windows key and R at the same time. Type regedit in the box that appears. Press Enter. The Registry Editor window will open.
Navigate to the following path:
HKEY_CURRENT_USER\Control Panel\Desktop
Look for a value called WheelScrollLines in the right panel. Double-click on it to edit the value. Change the number to zero. This will completely stop your mouse wheel from scrolling.
Saving Your Changes
After you change the value, click OK. Close the Registry Editor. Restart your computer for the changes to take effect. When you log back in, your mouse scroll will be disabled.
This method is one of the most effective ways to stop mouse scrolling completely. It works even if other methods fail. Many power users prefer this approach because it is permanent and reliable.
If you ever want to undo this change, simply go back to the same Registry path. Change the WheelScrollLines value back to a number like 3 or 5. This will restore normal scrolling behavior. Always be careful when editing the Registry. A wrong change can affect your system.
Disabling Scroll for Specific Apps and Programs
Sometimes you do not want to turn off scrolling everywhere. Maybe you only want to stop scrolling in one particular app. Windows 10 lets you do this in some cases.
App-Specific Scroll Control
Some programs have their own scroll settings built in. For example, web browsers like Chrome and Firefox let you adjust scroll speed. You can find these settings in the browser preferences or options menu.
For design tools like Adobe Photoshop or Illustrator, check the preferences section. Many creative apps have options to disable scroll wheel zoom or scrolling entirely. This lets you work without unexpected page jumps.
If you want to learn how to use a laptop without a mouse, controlling scroll settings is very important. You can use keyboard shortcuts to navigate instead. The arrow keys and page up/down keys work great as alternatives.
Some third-party tools also let you manage scroll behavior per app. These tools give you fine-grained control. They are worth exploring if you need different settings for different programs.
Preventing Accidental Scrolling on Your Laptop
Accidental scrolling is one of the most common laptop frustrations. A light touch on the touchpad can send you flying across a page. Here are some tips to prevent this from happening.
Adjust Touchpad Sensitivity
Go to Settings and then Devices. Select Touchpad from the menu. Look for sensitivity options. Set the sensitivity to low or medium. This reduces the chance of accidental scrolling.
Use a Mouse Pad Cover
A simple mouse pad cover can help. It prevents unintended touches on the touchpad while you type. This is a cheap and effective solution for many users.
Turn Off Scroll Inertia
Some laptops have a feature called scroll inertia. This makes the page keep scrolling after you lift your finger. Turning this off can help reduce accidental scrolling. You can find this option in your touchpad settings or mouse properties.
If you are tired of dealing with scroll issues, you might want to explore how to turn mouse off on laptop when you are typing. This is a common habit among many users. It prevents accidental clicks and scrolls while you work.
Expert Tips for Managing Mouse Scroll on Windows 10
Here are some extra tips from experienced users. These will help you get the most out of your mouse settings.
- Update your mouse drivers regularly. Outdated drivers can cause unexpected scroll behavior. Visit your laptop manufacturer’s website for the latest drivers.
- Use keyboard shortcuts as alternatives. The arrow keys, page up, and page down keys work well for navigation without a mouse.
- Clean your touchpad regularly. Dirt and oils can cause erratic scrolling. A clean touchpad responds better to your intentional inputs.
- Consider a vertical mouse. A vertical mouse gives you more control and reduces wrist strain. It also makes scroll management easier.
- Back up your system before Registry edits. Always create a restore point before changing Registry values. This protects your system if something goes wrong.
If you ever need to use a laptop without a mouse entirely, there are many great alternatives. Keyboard navigation, voice commands, and on-screen keyboards all work well. Windows 10 has built-in accessibility features that make this easy.
You can also learn how to use laptop without mouse through touch gestures. The touchpad supports many gestures that replace mouse functions. Swiping with two fingers can scroll, zoom, and more. These gestures are customizable in your settings.
Common Mistakes When Disabling Mouse Scroll
Many users make avoidable mistakes when trying to disable mouse scroll. Here are the most common ones and how to avoid them.
- Editing the wrong Registry key: Always double-check the path before making changes. A wrong key can cause system issues.
- Forgetting to restart: Many changes require a restart to take effect. Do not skip this step.
- Disabling the entire mouse instead of just scroll: Be clear about what you want to disable. Scroll-only changes are different from disabling the whole device.
- Not creating a backup: Always back up your system or Registry before making changes. This gives you a safety net.
- Ignoring driver updates: Sometimes scroll issues come from outdated drivers. Update them before trying advanced methods.
By avoiding these mistakes, you can disable mouse scroll safely and effectively. Each method has its own benefits. Choose the one that fits your needs best.
Conclusion
Disabling mouse scroll on Windows 10 is a straightforward process with several reliable methods. Whether you use Windows Settings, Device Manager, or the Registry Editor, you have full control over your scrolling experience. Each method offers different levels of control, so you can choose what works best for you.
Remember that you can always reverse these changes. Your settings are not permanent unless you want them to be. Feel free to experiment and find the setup that works for your workflow.
Take some time today to adjust your mouse scroll settings. You will be surprised how much smoother your computing experience becomes. Once you stop dealing with accidental scrolls, you will wonder why you did not do it sooner.
Share this guide with friends who struggle with mouse scrolling issues. Helping others solve common tech problems is always a great idea. Now you have all the tools you need to take control of your mouse scroll on Windows 10.
Frequently Asked Questions
Can I disable mouse scroll without using the Registry Editor?
Yes, you can. The Windows Settings method and Device Manager method both work without touching the Registry. The Settings method is the simplest and safest option for most users. It lets you adjust or reduce scroll behavior easily.
Will disabling mouse scroll affect my mouse clicking?
No, it will not. Disabling scroll only stops the wheel function. Your mouse buttons and cursor movement will continue to work normally. You can still click, double-click, and right-click without any issues.
How do I re-enable mouse scroll after disabling it?
If you used Windows Settings, simply go back and adjust the scroll lines to a number greater than zero. If you used Device Manager, right-click the mouse device and select Enable Device. For Registry changes, change the WheelScrollLines value back to a positive number and restart your computer.
Can I disable scroll on my laptop touchpad while keeping the external mouse scroll active?
Yes, you can. Windows 10 lets you manage touchpad and external mouse settings separately. Go to Settings, then Devices, and then Touchpad. You can adjust or disable touchpad scrolling while your external mouse continues to scroll normally.
Is it safe to edit the Registry Editor to disable mouse scroll?
It is safe as long as you follow the instructions carefully. Always create a system restore point before editing the Registry. Only change the specific values mentioned in this guide. Avoid editing other Registry keys unless you are sure of what they do.
What is the difference between disabling scroll and disabling the mouse entirely?
Disabling scroll stops only the wheel function. Your mouse can still move the cursor and click. Disabling the mouse entirely turns off all functions including movement and clicking. Choose the method that matches what you want to accomplish.