How to Install Laptop Ram
Installing laptop RAM is one of the easiest and most affordable ways to boost your computer’s performance. Whether your laptop feels slow or you want to run more programs at once, adding more memory can make a huge difference. This guide walks you through every step of how to install laptop RAM, from choosing the right memory to powering up your upgraded machine. No technical experience needed.
Key Takeaways
- Check compatibility first: Not all RAM works with every laptop. Always verify the type, speed, and maximum capacity your laptop supports before buying.
- Power down completely: Always shut down your laptop, unplug it, and remove the battery if possible before opening the back panel.
- Ground yourself: Static electricity can damage sensitive components. Touch a metal surface or use an anti-static wrist strap before handling RAM.
- Align the notch correctly: Laptop RAM modules have a small notch that must line up with the slot. Forcing it in the wrong direction can break the module or the slot.
- Press firmly until it clicks: RAM should be inserted at an angle, then pressed down until the side clips snap into place automatically.
- Verify the upgrade: After installation, boot up your laptop and check system properties to confirm the new RAM is recognized.
- Dual-channel performance: Installing two matching RAM sticks instead of one can significantly improve performance through dual-channel memory architecture.
📑 Table of Contents
- How to Install Laptop RAM: A Complete Step-by-Step Guide
- Understanding Laptop RAM Before You Buy
- Checking Your Laptop’s RAM Compatibility
- Gathering Your Tools and Preparing for Installation
- Step-by-Step Guide to Installing Laptop RAM
- Verifying Your RAM Installation
- Common Mistakes to Avoid When Installing Laptop RAM
- Troubleshooting Common RAM Installation Issues
- Maximizing Your RAM Upgrade Benefits
- When to Seek Professional Help
- Conclusion
How to Install Laptop RAM: A Complete Step-by-Step Guide
Is your laptop running slower than it used to? Do programs take forever to open, or does everything freeze when you have too many browser tabs open? The answer might be simpler than you think. Learning how to install laptop RAM is one of the most cost-effective upgrades you can make to breathe new life into your machine.
RAM, or Random Access Memory, is your laptop’s short-term memory. It stores the data your computer is actively using so the processor can access it quickly. When you don’t have enough RAM, your laptop has to rely on slower storage like your hard drive or SSD, which causes everything to feel sluggish. Adding more RAM gives your laptop the breathing room it needs to handle multiple tasks smoothly.
The good news is that installing laptop RAM is surprisingly easy. You don’t need to be a computer expert or have fancy tools. In most cases, all you need is a small screwdriver and about 15 minutes of your time. This guide will walk you through everything from choosing the right RAM to completing the installation and verifying that everything works perfectly.
Understanding Laptop RAM Before You Buy
What Does RAM Actually Do?
Think of RAM like a desk where you do your work. The bigger the desk, the more papers and projects you can spread out at once. When your desk is small, you constantly have to put things away and pull them back out, which slows you down. RAM works the same way for your laptop. More RAM means more space for your computer to work with active data, which translates to faster performance and better multitasking.
Visual guide about How to Install Laptop Ram
Image source: image.shutterstock.com
Every time you open a web browser, run a program, or load a file, that data gets pulled from your storage drive and placed into RAM. The processor then reads from RAM because it’s incredibly fast compared to even the best SSDs. If your RAM fills up, your laptop starts using a portion of your storage drive as “virtual memory,” which is much slower and causes that frustrating lag you’ve probably experienced.
Types of Laptop RAM
Not all RAM is created equal, and using the wrong type can cause serious problems. Here are the main types you’ll encounter:
- DDR4: The most common type in laptops from 2015 to 2023. It offers great speeds and is widely available at affordable prices.
- DDR5: The newest generation found in modern laptops. It’s faster and more power-efficient but requires a compatible motherboard.
- DDR3: Found in older laptops. It’s slower than DDR4 but still functional for basic tasks.
- SODIMM: This is the physical form factor for laptop RAM. It’s smaller than the DIMM modules used in desktop computers. Always make sure you’re buying SODIMM, not DIMM.
Mixing different types of RAM won’t work. DDR4 won’t fit in a DDR3 slot, and DDR5 won’t fit in a DDR4 slot. The notches on the connectors are placed differently to prevent accidental installation of incompatible memory.
How Much RAM Do You Actually Need?
The amount of RAM you need depends on how you use your laptop. Here’s a general guide:
- 4GB: Bare minimum for basic web browsing and document editing. Not recommended for modern use.
- 8GB: Good for everyday tasks, light multitasking, and casual use. This is the sweet spot for most people.
- 16GB: Ideal for power users, content creators, and gamers. Handles heavy multitasking with ease.
- 32GB or more: Best for professional video editing, 3D rendering, running virtual machines, and heavy development work.
If you’re currently running 4GB, upgrading to 8GB will feel like getting a brand new laptop. Going from 8GB to 16GB is also a noticeable improvement if you regularly push your system with demanding applications.
Checking Your Laptop’s RAM Compatibility
Finding Your Current RAM Specifications
Before you buy new RAM, you need to know exactly what your laptop currently has and what it can support. There are several ways to check this information.
Visual guide about How to Install Laptop Ram
Image source: image.slidesharecdn.com
Using Windows Task Manager: Press Ctrl + Shift + Esc to open Task Manager. Click on the Performance tab, then select Memory. Here you’ll see your current RAM amount, speed (measured in MHz), and how many slots are being used.
Using System Information: Press Windows Key + R, type “msinfo32,” and hit Enter. Look for “Installed Physical Memory” to see your current RAM. For more detailed specs, you can use free tools like CPU-Z, which shows the exact type, speed, and timing of your installed memory modules.
Checking your laptop manufacturer’s website: Look up your exact laptop model on the manufacturer’s support page. They’ll list the maximum RAM capacity, supported speeds, and the number of available slots. This is the most reliable way to ensure compatibility.
Understanding RAM Speed and Timing
RAM speed is measured in megahertz (MHz) and indicates how fast the memory can transfer data. Common speeds include 2400MHz, 2666MHz, 3200MHz, and 4800MHz for DDR5. Your laptop’s motherboard determines the maximum speed it can support.
When mixing new RAM with existing modules, the system will run all sticks at the speed of the slowest module. For example, if you have a 2666MHz stick and add a 3200MHz stick, both will run at 2666MHz. For the best performance, try to match the speed of your existing RAM or replace all modules with a matched set.
How Many RAM Slots Does Your Laptop Have?
Most laptops have two RAM slots, but some ultrabooks and thin laptops have RAM soldered directly to the motherboard, meaning it cannot be upgraded. Gaming laptops and business laptops typically offer two accessible slots. Check your laptop’s service manual or manufacturer specifications to confirm how many slots are available and whether they’re user-accessible.
If you want to learn more about checking your current memory setup, our guide on how to check RAM on a laptop provides detailed instructions for every method.
Gathering Your Tools and Preparing for Installation
What You’ll Need
Before you start the installation process, gather these items:
Visual guide about How to Install Laptop Ram
Image source: docs.oracle.com
- Compatible RAM module(s): Make sure you’ve purchased the correct type, speed, and capacity for your laptop.
- Small Phillips-head screwdriver: Most laptops use small Phillips screws on the back panel. Some may require a Torx screwdriver.
- Anti-static wrist strap (optional but recommended): This prevents static electricity from damaging your laptop’s internal components.
- Clean, flat workspace: A desk or table with good lighting works best. Avoid carpeted areas where static buildup is more likely.
- Small container for screws: Laptop screws are tiny and easy to lose. Keep them in a small bowl or magnetic tray.
Safety Precautions
Taking a few simple precautions can prevent damage to your laptop and ensure a smooth installation:
- Shut down completely: Don’t just put your laptop to sleep or hibernate. Perform a full shutdown.
- Unplug the power adapter: Remove the charging cable from your laptop.
- Remove the battery if possible: Some laptops have removable batteries. If yours does, take it out before proceeding.
- Ground yourself: Touch a metal object like a door frame or filing cabinet before handling RAM. This discharges any static electricity from your body.
- Work in a dry environment: Avoid working in humid conditions or near liquids.
Step-by-Step Guide to Installing Laptop RAM
Step 1: Remove the Back Panel
Flip your laptop over so the bottom is facing up. Locate the screws that secure the back panel. Some laptops have a dedicated RAM access panel, which is a smaller section with one or two screws. Others require removing the entire bottom cover.
Visual guide about How to Install Laptop Ram
Image source: docs.oracle.com
Carefully remove each screw and place them in your container. Keep track of which screws came from which holes, as they may be different lengths. Gently pry off the back panel using a plastic spudger or your fingernail. Start from a corner and work your way around the edges. Avoid using metal tools that could scratch or damage the laptop’s casing.
Step 2: Locate the RAM Slots
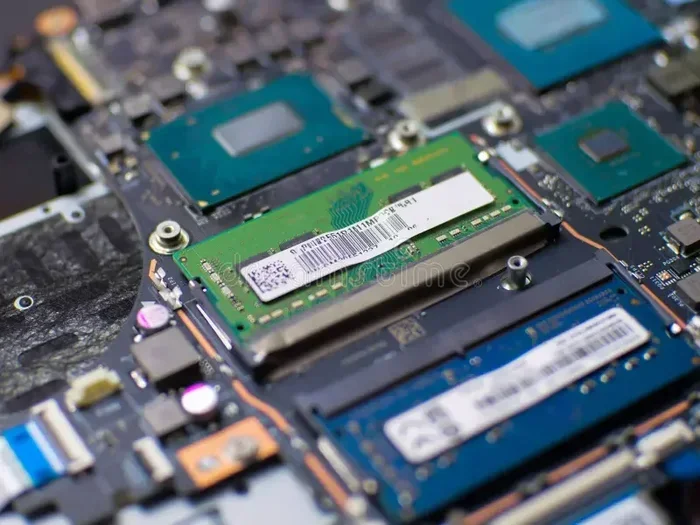
With the back panel removed, look for the RAM slots. They’re usually easy to spot. Laptop RAM slots are typically long, thin connectors with small metal clips on each end. You may see one or two slots, and one might already have a RAM module installed.
If you’re adding RAM to an empty slot, you can skip to Step 4. If you’re replacing existing RAM, you’ll need to remove the old module first.
Step 3: Remove Existing RAM (If Replacing)
To remove an existing RAM module, gently push the metal clips on both ends of the slot outward. The RAM stick will pop up at an angle, usually about 30 to 45 degrees. Once it’s angled up, carefully pull the module straight out of the slot. Hold it by the edges and avoid touching the gold connectors on the bottom.
Place the old RAM on an anti-static surface or in an anti-static bag if you plan to keep it. Never touch the gold contact pins with your fingers, as oils from your skin can cause corrosion over time.
Step 4: Install the New RAM Module
Take your new RAM module out of its packaging. Hold it by the edges and locate the small notch along the gold connectors on the bottom. This notch is keyed to match a ridge inside the RAM slot, ensuring the module can only be inserted one way.
Align the notch on the RAM module with the ridge in the slot. Insert the module at an angle, about 30 to 45 degrees, with the gold connectors going in first. Gently slide it into the slot until the gold pins are mostly hidden and the module is seated at an angle.
Once the module is angled into the slot, press down firmly on the top edge until the module lies flat. The metal clips on both sides should snap into place automatically, locking the module in position. You should hear or feel a satisfying click when the clips engage.
Important: If the module doesn’t slide in easily, don’t force it. Double-check that the notch is aligned correctly and that you’re using the right type of RAM. Forcing a module into the wrong slot or at the wrong angle can permanently damage both the RAM and the motherboard.
Step 5: Install a Second Module (Optional)
If you’re installing two RAM modules for dual-channel performance, repeat the process for the second slot. For optimal performance, use two identical modules with the same capacity, speed, and timings. Dual-channel mode effectively doubles the memory bandwidth, which can significantly improve performance in memory-intensive tasks.
Many laptops have the RAM slots stacked on top of each other or placed side by side. The installation process is the same regardless of the slot arrangement.
Step 6: Reassemble Your Laptop
Once the new RAM is securely installed, it’s time to put your laptop back together. Carefully place the back panel over the bottom of the laptop and press it into place around the edges. Make sure all the clips and tabs are properly aligned before pressing down.
Reinsert all the screws you removed earlier. Tighten them gently but firmly. Don’t overtighten, as this can strip the threads or crack the plastic housing. If you removed the battery, reinsert it now.
Verifying Your RAM Installation
First Boot After Installation
Plug in your power adapter and press the power button. Your laptop should boot up normally. The first boot after a RAM upgrade might take slightly longer than usual as the system detects and configures the new memory. This is completely normal.
Visual guide about How to Install Laptop Ram
Image source: manuals.supernaeyeglass.com
If your laptop doesn’t turn on, don’t panic. First, double-check that the RAM modules are fully seated in their slots. Remove and reinstall them if necessary. Also verify that the battery is properly connected and the power adapter is plugged in.
If the laptop powers on but you hear beeping sounds or see a black screen, this usually indicates a RAM compatibility issue or improperly seated module. Power off, remove the RAM, and try reinstalling it. Make sure the clips are fully engaged on both sides.
Checking That Your System Recognizes the New RAM
Once your laptop has booted into Windows, verify that the new RAM is being recognized. Right-click on the Start button and select “System.” Under the Device Specifications section, look for “Installed RAM.” It should show the total amount of memory including your new upgrade.
You can also open Task Manager (Ctrl + Shift + Esc), go to the Performance tab, and click on Memory. This will show the total installed RAM, the speed, the form factor, and how many slots are in use. If the numbers match what you installed, congratulations, your upgrade was successful!
For Mac users, click the Apple menu and select “About This Mac.” The Memory section will show your total installed RAM and the configuration of your memory slots.
Running a Memory Test
After confirming that your system recognizes the new RAM, it’s a good idea to run a memory test to ensure everything is working correctly. Windows has a built-in tool called Windows Memory Diagnostic. To use it, press Windows Key + R, type “mdsched.exe,” and hit Enter. Choose to restart and check for problems.
The test will run during the reboot process and may take several minutes. If any errors are found, it could indicate a defective RAM module or a compatibility issue. In that case, try removing and reinstalling the module, or test each stick individually to identify the problematic one.
Common Mistakes to Avoid When Installing Laptop RAM
Forgetting to Check Maximum Supported RAM
Every laptop has a maximum RAM limit determined by the motherboard and processor. Installing more RAM than your laptop supports won’t cause damage, but the extra memory simply won’t be recognized. For example, if your laptop supports a maximum of 16GB and you install 32GB, only 16GB will be usable. Always check your laptop’s specifications before purchasing.
Visual guide about How to Install Laptop Ram
Image source: umr-amap.github.io
Mixing Incompatible RAM Modules
While it’s technically possible to mix different RAM brands or speeds, it’s not recommended. Mismatched modules can cause system instability, crashes, and reduced performance. The system will default to the speed and timings of the slowest module, negating the benefits of your faster stick. For the best results, use identical modules from the same manufacturer.
Not Grounding Yourself
Static electricity is a silent killer of computer components. A static discharge that you can’t even feel can damage sensitive RAM chips and motherboard circuits. Always ground yourself before handling internal components. If you don’t have an anti-static wrist strap, simply touch a grounded metal object like a radiator or the metal case of a plugged-in desktop computer.
Forcing the RAM Into the Slot
RAM should slide into place with moderate pressure. If you’re having to push hard, something is wrong. The most common issue is that the notch isn’t aligned with the slot ridge. Another possibility is that you’re trying to insert the module upside down. Never force RAM into a slot, as this can break the module, damage the slot, or crack the motherboard.
Troubleshooting Common RAM Installation Issues
Laptop Won’t Boot After Installation
If your laptop refuses to start after installing new RAM, try these steps. First, power off completely and remove the battery and power adapter. Press and hold the power button for 30 seconds to discharge any residual power. Remove the RAM modules and reinstall them, making sure they’re fully seated and the clips are engaged. Try booting with just one module at a time to isolate any defective sticks.
Visual guide about How to Install Laptop Ram
Image source: help.easypower.com
System Shows Less RAM Than Installed
If your laptop recognizes less RAM than you installed, there are a few possible causes. A 32-bit version of Windows can only address about 3.5GB of RAM regardless of how much is installed. Make sure you’re running a 64-bit operating system. Also check your BIOS settings, as some systems reserve a portion of RAM for integrated graphics. Updating your BIOS to the latest version can sometimes resolve memory recognition issues.
Blue Screen Errors After Upgrade
Blue screen errors after a RAM upgrade usually indicate a compatibility problem or defective module. Try running Windows Memory Diagnostic to check for errors. If errors are found, test each RAM module individually to identify the faulty one. Also ensure that the RAM speed and timings are compatible with your laptop’s specifications.
If you’re looking for more detailed upgrade instructions, check out our comprehensive guide on how to upgrade RAM on a laptop for additional tips and troubleshooting advice.
Maximizing Your RAM Upgrade Benefits
Enable XMP in BIOS (If Available)
Some laptops, especially gaming models, allow you to enable XMP (Extreme Memory Profile) in the BIOS. This feature automatically configures your RAM to run at its advertised speed rather than the default speed set by the motherboard. Access your BIOS by pressing the appropriate key during boot (usually F2, F10, or Delete), and look for XMP or memory profile settings.
Optimize Your Operating System
After upgrading your RAM, take a few steps to optimize your system. Disable unnecessary startup programs that consume memory in the background. In Windows, open Task Manager, go to the Startup tab, and disable programs you don’t need running at boot. This frees up RAM for the tasks that actually matter to you.
Also consider adjusting your virtual memory settings. With more physical RAM, you can reduce the size of your page file or let Windows manage it automatically. This reduces unnecessary writes to your storage drive and can improve overall system responsiveness.
Consider a Full System Upgrade
While adding RAM is a great upgrade, it works best when paired with other improvements. If your laptop still has a traditional hard drive, upgrading to an SSD will dramatically improve boot times and application loading speeds. The combination of more RAM and an SSD is the single most impactful upgrade you can make to an older laptop.
Our guide on how to increase RAM on a laptop covers additional strategies for getting the most out of your memory upgrade.
When to Seek Professional Help
While installing laptop RAM is generally straightforward, there are situations where professional help might be the better choice. If your laptop has a warranty that could be voided by opening the case, consider having the upgrade done by an authorized service center. Some manufacturers, like Apple with certain MacBook models, use proprietary components or require specialized tools for RAM access.
If you’ve followed all the steps and your laptop still isn’t recognizing the new RAM, a professional technician can diagnose whether the issue is with the RAM modules, the motherboard slots, or a deeper hardware problem. They can also test with known-good modules to isolate the issue quickly.
Additionally, if your laptop’s RAM is soldered to the motherboard, no amount of DIY effort will allow an upgrade. In this case, you’ll need to either live with the existing memory or consider purchasing a new laptop with more RAM. Check your laptop’s service manual or contact the manufacturer to determine if your RAM is upgradeable before purchasing new modules.
Conclusion
Learning how to install laptop RAM is a valuable skill that can save you money and extend the life of your computer. With just a screwdriver and a few minutes of your time, you can dramatically improve your laptop’s performance, multitasking ability, and overall responsiveness. The process is simple enough for beginners but rewarding enough for experienced users.
Remember the key steps: check your laptop’s compatibility, purchase the right type and amount of RAM, ground yourself before handling components, align the notch correctly, press firmly until the clips engage, and verify the installation after booting up. Following these guidelines will ensure a smooth and successful upgrade every time.
Whether you’re upgrading from 4GB to 8GB for basic tasks or maxing out your laptop’s memory for professional work, the performance improvement will be immediately noticeable. Your laptop will handle more programs simultaneously, switch between tasks faster, and feel snappier in everyday use. Don’t let a slow computer hold you back when such an affordable and easy solution is available.
Frequently Asked Questions
How do I know what type of RAM my laptop needs?
Check your laptop’s user manual or the manufacturer’s website for exact specifications. You can also use free software like CPU-Z to identify your current RAM type, speed, and form factor. Most modern laptops use DDR4 SODIMM, but always verify before purchasing.
Can I mix different brands of RAM in my laptop?
While it’s technically possible, mixing different RAM brands, speeds, or sizes can cause instability and reduced performance. For the best results, use identical modules from the same manufacturer with matching speed and timing specifications.
Is it safe to install laptop RAM myself?
Yes, installing laptop RAM is completely safe if you follow basic precautions. Always power off your laptop, unplug it, and ground yourself before handling internal components. The process requires no technical expertise and takes about 15 minutes.
What happens if I install too much RAM?
If you install more RAM than your laptop supports, the extra memory simply won’t be recognized by the system. It won’t cause any damage, but you’ll have spent money on memory you can’t use. Always check your laptop’s maximum supported RAM before buying.
Will adding RAM make my laptop faster?
Adding RAM improves multitasking and overall system responsiveness, especially if you currently have 4GB or 8GB. However, RAM won’t improve tasks that are limited by your processor or storage speed. For the best results, pair a RAM upgrade with an SSD if you don’t already have one.
How long does it take to install laptop RAM?
The entire process typically takes 10 to 15 minutes. Removing the back panel takes about 5 minutes, installing the RAM takes 2 to 3 minutes, and reassembly takes another 5 minutes. Verifying the installation in your operating system adds a few more minutes.