Which Is the Best Bootable Usb Creator
Creating a bootable USB drive is one of the simplest ways to install or repair your operating system. The right bootable USB creator saves you time, hassle, and frustration. In this guide, we break down the top tools, compare their features, and help you pick the best option for your needs.
Have you ever needed to install a fresh operating system or rescue a computer that won’t start? A bootable USB drive makes all of that possible. But before you can do any of that, you need the right bootable USB creator to get the job done.
Whether you are a student setting up a new laptop, a tech enthusiast troubleshooting an old machine, or someone who just wants to keep a portable operating system on hand, knowing how to make a bootable USB is an essential skill. In this guide, we will walk you through everything you need to know about choosing and using the best bootable USB creator tools available today.
We will compare the top options, share step-by-step instructions, and highlight the mistakes most people make. By the end, you will feel confident creating your own bootable USB drive in just a few minutes.
Key Takeaways
- Rufus remains the most popular and reliable bootable USB creator for Windows users.
- Free tools like BalenaEtcher and UNetbootin offer great alternatives for different needs.
- Choosing the right USB drive matters just as much as picking the right software.
- Creating a bootable USB is a simple process that takes only a few minutes.
- Avoiding common mistakes like using the wrong file system prevents boot failures.
- The best bootable USB creator depends on your operating system and use case.
📑 Table of Contents
What Is a Bootable USB Creator and Why You Need One
A bootable USB creator is a software tool that writes an operating system image to a USB flash drive. Once the image is written, the USB drive can start a computer and run or install an operating system. Think of it like a digital installation kit that fits on a tiny stick.
Here is why this matters. Most computers today do not even come with a CD or DVD drive anymore. A bootable USB is the go-to method for installing Windows, Linux, or even creating a recovery drive. It is fast, portable, and works on almost any modern computer.
You might need a bootable USB in several situations:
- Fresh OS installation on a new or reformatted computer.
- System recovery when your computer fails to boot.
- Trying out a new operating system without changing your main setup.
- IT troubleshooting and system repair tasks.
- Creating a portable workspace that you can carry anywhere.
Without a reliable bootable USB creator, none of these tasks would be as simple as they are today. The right tool turns a plain USB flash drive into a powerful system installer in minutes.
Top Bootable USB Creators Compared
Not all bootable USB creators are the same. Some are simple and fast. Others offer advanced features for power users. Below we compare the most popular options so you can find the best fit.
Rufus
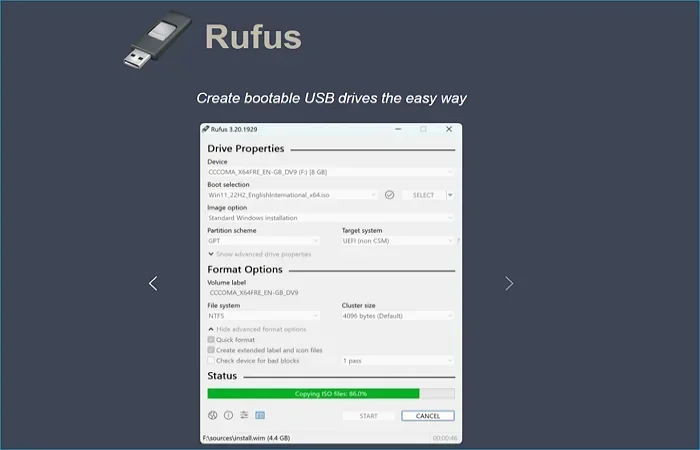
Rufus is widely considered the gold standard for creating bootable USB drives. It is a free, lightweight tool that works with Windows. Rufus supports ISO files for Windows, Linux, and many other operating systems. It is fast, reliable, and regularly updated.
One of the best things about Rufus is its simplicity. You select your USB drive, choose the ISO file, and click Start. That is it. Rufus handles the rest. It also supports advanced features like persistent storage for Linux distributions and partition scheme options.
BalenaEtcher
BalenaEtcher is a great choice if you want a tool that works across multiple platforms. It supports Windows, macOS, and Linux. The interface is clean and very beginner-friendly. You simply drag and drop your ISO file, select your drive, and click Flash.
BalenaEtcher also includes a safety feature that prevents you from accidentally writing to your hard drive instead of the USB. This alone makes it a popular choice for people who are new to creating bootable media.
UNetbootin
UNetbootin has been around for a long time and remains a solid option. It supports both Linux and Windows distributions. One unique feature is that UNetbootin can download certain distributions directly instead of requiring you to have the ISO file ready.
However, UNetbootin can sometimes be slower than Rufus, and its interface feels a bit dated. It is still a good choice, especially for Linux users who want a straightforward tool.
Ventoy
Ventoy takes a different approach. Instead of writing a single ISO to a drive, Ventoy lets you put multiple ISO files on one USB drive. When you boot, you get a menu to choose which operating system you want to install. This is incredibly useful if you work with multiple systems or need to test different Linux distributions.
Ventoy is open source and supports a wide range of ISO files. It is a powerful tool for anyone who frequently creates bootable media or troubleshoots different systems.
| Tool | Platform | Price | Best For |
|---|---|---|---|
| Rufus | Windows | Free | Quick single-ISO creation |
| BalenaEtcher | Windows, Mac, Linux | Free | Cross-platform beginners |
| UNetbootin | Windows, Linux | Free | Linux ISO downloads |
| Ventoy | Windows, Linux | Free | Multiple ISOs on one drive |
How to Choose the Right Bootable USB Creator
With so many options available, picking the right bootable USB creator can feel overwhelming. Here are the key factors to consider before you decide.
Check Your Operating System
First, check what operating system you are currently using. Some tools only work on Windows, while others support Mac and Linux too. If you are on a Mac, Rufus will not work for you directly, but BalenaEtcher will. Make sure the tool you choose is compatible with your current setup.
Consider the ISO File Type
Not all ISO files are created equal. Some bootable USB creators handle Windows ISO files better than Linux ones. If you are working with a specific operating system, check that the tool supports it. Rufus and BalenaEtcher both handle the most common ISO types with ease.
Think About Your Experience Level
If you are new to this, choose a tool with a simple and intuitive interface. BalenaEtcher is probably the easiest to use. If you are more experienced and want advanced options like partition schemes and persistent storage, Rufus or Ventoy might be better suited for you.
Look for Safety Features
Accidentally writing an ISO to the wrong drive can wipe your data. Some tools include safety checks to prevent this. BalenaEtcher is especially good at this. Always make sure you are writing to the correct USB drive before you start the process.
If you are planning to upgrade your hardware alongside your software setup, check out our guide on what is the best investment for the lifespan of a PC to make sure your entire setup is future-proof.
Step-by-Step Guide to Creating a Bootable USB
Now that you have chosen your tool, let us walk through the actual process. We will use Rufus as our example since it is the most widely used bootable USB creator, but the steps are very similar across all tools.
Step 1: Download Your Tool
Go to the official website of your chosen tool and download the latest version. Always download from the official source to avoid malware. For Rufus, the official site is rufus.ie. For BalenaEtcher, it is balena.io/etcher.
Step 2: Prepare Your USB Drive
Plug in a USB flash drive with at least 8 GB of storage. Note that this process will erase everything on the drive, so back up any important files first. A larger drive is better if you plan to store multiple ISO files, especially if you are using Ventoy.
Make sure your USB drive is in good condition. A drive with bad sectors can cause the bootable USB to fail. If you are using an older drive, consider replacing it before you start.
Step 3: Select Your ISO File
Open your bootable USB creator tool. Click the SELECT or CHOOSE button and locate the ISO file you want to write. The ISO file is typically a single file that contains the entire operating system image.
If you do not have an ISO file yet, you can download one from the official website of the operating system you want to install. For example, Microsoft offers Windows ISO files on their website, and Ubuntu provides Linux ISO files directly.
Step 4: Configure Settings and Start
Select your USB drive from the device dropdown. Check the partition scheme. For most modern computers, GPT is the right choice. For older BIOS systems, MBR works better. Click START and wait for the process to finish.
The entire process usually takes between 5 and 15 minutes depending on the size of the ISO and the speed of your USB drive. Once it is done, you will see a confirmation message. Your bootable USB is ready to use.
Common Mistakes to Avoid When Making a Bootable USB
Even with the best bootable USB creator, mistakes can happen. Here are the most common errors and how to avoid them.
Using the Wrong USB Drive
Always double-check that you have selected the correct USB drive before clicking Start. Writing to the wrong drive can erase your main hard drive. This is the number one mistake people make, and it can be devastating.
Ignoring the Partition Scheme
Choosing the wrong partition scheme can cause boot failures. If your computer uses UEFI (most computers made after 2012), use GPT. If it uses legacy BIOS, choose MBR. When in doubt, check your computer’s manual or look up your model online.
Using a Low-Quality USB Drive
Cheap USB drives with slow write speeds or poor reliability can cause problems. They may fail during the writing process or not boot properly. Invest in a reputable brand with at least 8 GB of storage and USB 3.0 speeds for the best results.
Skipping the Verification Step
Some tools offer a verify option after writing the ISO. Always turn this on if available. It checks that the data was written correctly and can save you from a non-booting USB drive later.
Forgetting to Change the Boot Order
Even with a perfect bootable USB, your computer will not boot from it unless you change the boot order in your BIOS or UEFI settings. Restart your computer, enter the BIOS (usually by pressing F2, F12, DEL, or ESC during startup), and set the USB drive as the first boot device.
If you are running into hardware compatibility issues, you might want to check how to check which RAM is compatible with your laptop to rule out memory-related boot problems.
Expert Tips for the Best Bootable USB Experience
Here are some pro tips that will help you get the most out of your bootable USB creator and drive.
Use USB 3.0 or Higher
USB 3.0 drives are significantly faster than USB 2.0. The writing process takes less time, and the boot experience is smoother. If your computer supports USB 3.0, use it. Your future self will thank you.
Keep Multiple Bootable USBs Ready
Having a few pre-made bootable USB drives on hand is incredibly handy. One for Windows recovery, one for Linux troubleshooting, and one for your preferred operating system installation. Label them clearly so you always know which is which.
Update Your ISO Files Regularly
Operating systems get updates frequently. Always download the latest ISO file from the official source before creating a new bootable USB. An outdated ISO can cause compatibility issues or miss important security patches.
Store Your ISO Files Separately
Keep your ISO files saved on your computer or an external hard drive. This way, you can quickly create a new bootable USB whenever you need one without re-downloading large files.
If you are looking to upgrade your storage alongside your software setup, you might also want to read about the best NVMe M.2 SSD options to keep your system running smoothly.
Conclusion
Finding the best bootable USB creator does not have to be complicated. Whether you choose Rufus for its speed and reliability, BalenaEtcher for its simplicity, or Ventoy for its multi-ISO support, you really cannot go wrong with any of these top tools. The key is to pick the one that matches your needs and follow the steps carefully.
Creating a bootable USB is a skill that everyone should have. It saves money, time, and gives you control over your own system. With the right bootable USB creator in hand, you can install any operating system, recover a broken system, or carry a portable workspace wherever you go.
Start with one of the tools we covered today. Practice the process a couple of times. Soon, you will be able to create a bootable USB in minutes without thinking twice. The confidence that comes with this skill is well worth the small effort it takes to learn.
Frequently Asked Questions
What is the easiest bootable USB creator for beginners?
BalenaEtcher is the easiest bootable USB creator for beginners. Its drag-and-drop interface makes the process simple, and it works on Windows, Mac, and Linux. You do not need any technical experience to use it.
Can I use Rufus on a Mac computer?
No, Rufus only works on Windows. If you are on a Mac, you should use BalenaEtcher or another cross-platform tool to create your bootable USB drive.
What size USB drive do I need to create a bootable USB?
You need at least 8 GB of storage for most operating systems. Some Linux distributions may work with 4 GB, but Windows ISO files typically require 8 GB or more. Always check the size requirements of the ISO file you are using.
Is it free to use these bootable USB creators?
Yes, all of the tools we reviewed are completely free. Rufus, BalenaEtcher, UNetbootin, and Ventoy are all open-source or free-to-use tools. You do not need to pay anything to create a bootable USB drive.
Can I put more than one ISO on a single USB drive?
Yes, you can. Ventoy is specifically designed for this purpose. You can store multiple ISO files on one USB drive and choose which one to boot from when you start your computer.
Will creating a bootable USB erase my USB drive?
Yes, the process will completely erase all data on the USB drive. Always back up any important files before you start. The bootable USB creator will format the drive as part of the writing process.