4 Channel Amp 4 Speakers
Setting up a 4 channel amp 4 speakers system is one of the best ways to upgrade your car audio experience. You get clear sound, better power, and more control over your music. This guide walks you through wiring, impedance matching, and common mistakes to avoid. You will learn exactly how to connect everything safely and efficiently. By the end, you will have the confidence to build a system that sounds amazing every time you drive.
Upgrading your car audio system can feel overwhelming at first. There are so many parts, wires, and settings to think about. But the truth is simple. A well-planned 4 channel amp 4 speakers setup delivers clean power, balanced sound, and reliable performance. You do not need a complicated system to hear a real difference. You just need the right match between your amplifier and your speakers.
Many drivers start with factory audio and quickly realize it lacks punch and clarity. That is where a dedicated amplifier changes everything. Instead of sharing weak power from the head unit, each speaker gets its own clean signal. The result is tighter bass, clearer vocals, and better control at higher volumes. If you want to upgrade without overcomplicating things, this configuration is a smart starting point.
In this guide, we will break down everything you need to know. We will cover wiring basics, impedance matching, gain settings, and common pitfalls. You will also learn how to avoid damage and get the best sound possible. Whether you are a beginner or someone who wants a refresher, this information will help you build a system that works the right way from day one.
Key Takeaways
- Perfect match: A 4 channel amp 4 speakers setup gives each speaker its own dedicated power channel for cleaner sound.
- Wiring matters: Proper wiring prevents impedance mismatches that can damage your amplifier or speakers over time.
- Impedance check: Always verify speaker ohm ratings before connecting them to your amplifier channels.
- Gain setting: Correct gain adjustment prevents distortion and protects your audio equipment from overheating.
- Placement counts: Speaker location and wiring route affect sound quality and system reliability significantly.
- Safety first: Disconnect your battery before installing any car audio equipment to avoid short circuits.
- Test gradually: Start with low volume and increase slowly to catch wiring issues before they become problems.
📑 Table of Contents
Why a 4 Channel Amp 4 Speakers Setup Works So Well
The main advantage of this configuration is simplicity with excellent performance. You have four amplifier channels and four speakers. That means each speaker receives its own dedicated power source. There is no sharing, no splitting, and no unnecessary signal loss. This direct connection gives you cleaner audio and better control over each driver in your system.
Factory head units often lack the power needed to drive speakers properly. They may sound fine at low volumes, but they struggle when you turn things up. A separate amplifier solves that problem by delivering steady, clean power. You also gain more control over tone and volume balance. If one speaker needs a different power level, you can adjust it without affecting the others.
Another benefit is flexibility. You can use this setup for front and rear speakers, component systems, or even a simple stereo pair with dedicated subwoofer channels later. The layout leaves room for future upgrades. You are not locked into a rigid design. You can grow your system as your needs change.
Better Sound Clarity and Control
Dedicated channels mean each speaker gets a clean signal path. This reduces crosstalk and interference between channels. You hear more detail in vocals, instruments, and percussion. The soundstage also improves because each speaker operates independently. You can position them for better imaging and a more natural listening experience.
Power control matters too. A quality amplifier delivers consistent voltage and current. That stability helps speakers perform within their designed range. You avoid the strain that comes from underpowered setups. The result is smoother bass, less distortion, and longer component life.
Room for Future Upgrades
One of the best things about this configuration is its scalability. You can start with four speakers and add a subwoofer later. Many amplifiers include extra features like crossover settings and bass boost controls. Those tools make it easier to integrate new components without rebuilding your entire system.
You can also experiment with speaker placement and tuning. If you want more focus on the front stage, you can adjust levels accordingly. If rear passengers need better sound, you can balance the output. This flexibility makes the setup practical for daily driving, road trips, and long commutes.
Understanding Impedance and Power Matching
Impedance is one of the most important concepts in car audio. It measures how much resistance a speaker presents to the amplifier. Most car speakers fall between two and eight ohms. Amplifiers are designed to work best within a specific range. If the load is too low, the amplifier may overheat or shut down. If the load is too high, you may not get the power you expect.
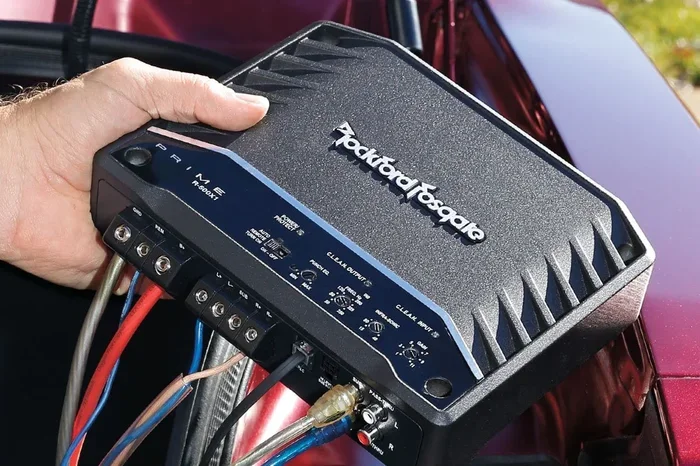
Visual guide about Car audio amplifier wiring
Image source: i.pinimg.com
When you connect a 4 channel amp 4 speakers system, each channel typically drives one speaker. That makes impedance matching straightforward. You just need to check the ohm rating on each speaker and compare it to the amplifier specifications. If your speakers are four ohms and your amp supports four ohms per channel, you are in a safe zone. If your speakers are two ohms, you need an amplifier that can handle that lower load.
Power matching also matters. You do not need to push maximum power all the time. In fact, most listeners prefer clean moderate power over distorted maximum output. Focus on getting an amplifier that can deliver enough clean power for your speakers. Look at RMS ratings rather than peak numbers. RMS reflects continuous performance, which is what you actually use in real listening conditions.
How to Check Speaker Ohm Ratings
Check the label on your speakers or the product manual. You will usually see a rating like four ohms or two ohms. Some speakers list a range, which means impedance changes with frequency. That is normal. For practical purposes, use the nominal rating as your guide. If you are unsure, a multimeter can help you measure resistance, though it will not show the full impedance curve.
Keep in mind that wiring method affects total load. If you ever connect multiple speakers to one channel, the combined impedance changes. That is why many people choose a one speaker per channel approach. It keeps things simple and predictable. You avoid complex calculations and reduce the risk of overloading the amplifier.
Choosing the Right Amplifier Power
Match the amplifier RMS power to your speaker RMS handling. A good rule is to stay within a reasonable range rather than aiming for exact numbers. If your speakers handle fifty watts RMS, an amplifier that delivers forty to sixty watts per channel is a solid match. You want enough headroom for dynamic peaks without pushing the system into distortion.
Also consider your listening habits. If you enjoy loud music often, choose an amplifier with extra headroom. If you mostly listen at moderate levels, a smaller amplifier may be enough. The goal is balanced performance, not maximum numbers on paper. Clean power always sounds better than strained power.
Wiring Basics for a 4 Channel Amp 4 Speakers System
Wiring is where many installations succeed or fail. A clean, secure connection makes the whole system perform better. A sloppy connection causes noise, weak output, or even damage. The good news is that wiring a 4 channel amp 4 speakers setup is straightforward when you follow a logical process.
Start by planning your route. Decide where the amplifier will sit and how the wires will travel. Keep signal cables away from power cables to reduce interference. Use quality speaker wire with the right gauge for your setup. Thicker wire reduces resistance, which helps with longer runs and higher power levels.
Next, connect the speakers to the amplifier channels. Each speaker gets its own channel. Match the positive terminal to the positive wire and the negative terminal to the negative wire. Polarity matters because reversing it can cause phase issues. When speakers are out of phase, bass can sound weak and the soundstage may feel confused.
Step by Step Connection Process
Here is a simple process you can follow:
- Disconnect the battery before starting any installation work.
- Mount the amplifier in a well-ventilated area away from heat sources.
- Run power wire from the battery to the amplifier with proper fusing.
- Connect the ground wire to a clean metal surface near the amplifier.
- Route the remote turn-on wire to the head unit or fuse box.
- Connect RCA signal cables from the head unit to the amplifier inputs.
- Attach each speaker to its own channel using correct polarity.
- Double-check every connection before powering the system.
After everything is connected, start with low volume and test each channel. Listen for distortion, noise, or uneven output. If something sounds wrong, power down and inspect the wiring. A careful check now saves time and prevents damage later.
Wire Gauge and Signal Quality Tips
Wire gauge matters more than many people realize. For most car audio setups, fourteen gauge or sixteen gauge speaker wire works well. Longer runs may benefit from thicker wire. The goal is to keep resistance low so the amplifier can deliver power efficiently. Poor quality wire can also introduce noise, so choose reliable materials.
Signal quality is just as important. Use shielded RCA cables and keep them tidy. Avoid sharp bends and tight pinches. Secure the wires with loom or tape where needed. A clean installation looks better and performs more reliably over time.
Gain Settings and Tuning for Best Sound
Many people confuse gain with volume. Gain is not about making things louder. It is about matching the input signal to the amplifier so it operates cleanly. If gain is set too high, you get distortion and heat. If it is set too low, you waste potential performance. Proper gain adjustment is one of the most important tuning steps in any 4 channel amp 4 speakers installation.
Start with the head unit volume at a normal listening level. Turn the amplifier gain down before you begin. Play a familiar track and slowly increase the gain until you hear clean output. Stop before distortion appears. You want a strong signal without clipping. If your amplifier has individual channel controls, set them evenly unless you have a specific reason to adjust one channel differently.
Balancing Channels and Crossovers
Channel balance helps create a smooth soundstage. If the front speakers sound louder than the rear ones, adjust the levels to suit your preference. Some systems benefit from a slight front bias for better imaging. Others need more rear output for passenger comfort. Trust your ears and make small adjustments.
Crossovers are another useful tool. High-pass filters protect smaller speakers from deep bass they cannot handle well. Low-pass filters can be used if you add a subwoofer later. Setting crossovers properly reduces strain on your speakers and improves clarity. You do not need to overcomplicate it. Start with gentle settings and refine them based on what you hear.
Avoiding Distortion and Overheating
Distortion is a warning sign. It means the signal is being pushed beyond clean limits. Continued distortion can damage speakers and stress the amplifier. If you notice crackling, buzzing, or harsh mids, lower the gain or reduce volume. Give the system room to breathe.
Heat is another factor to watch. Amplifiers generate heat during operation, especially at higher power levels. Make sure the unit has airflow and is not buried under cargo or upholstery. Good ventilation helps the amplifier stay stable and last longer. A cool-running system is a more reliable system.
Common Mistakes to Avoid
Even a simple setup can go wrong if you rush or skip important checks. Here are some of the most common mistakes people make when installing a 4 channel amp 4 speakers system.
- Ignoring impedance ratings and overloading the amplifier.
- Reversing speaker polarity and causing phase problems.
- Setting gain too high and creating distortion.
- Running signal cables too close to power wires.
- Using weak or poorly secured connections.
- Skipping the battery disconnect before installation.
- Choosing an amplifier that is too weak or too powerful for the speakers.
These mistakes are easy to avoid with a little planning. Take your time, read the manuals, and verify each step. A careful installation pays off in better sound and fewer problems down the road.
Quick Tips for a Smooth Installation
Keep a checklist nearby. Verify wire lengths, terminal types, and fuse ratings before you start. Use proper tools and quality connectors. If you are unsure about a step, pause and review the instructions. A methodical approach is always better than guessing.
Also test the system in stages. Power up once the basic wiring is complete. Check each channel individually. Then fine-tune gain and crossovers. This gradual process helps you catch issues early and build confidence as you go.
Expert Insights for Long Term Performance
Experienced installers often say the best systems are the ones that are tuned for real listening, not just maximum output. That means focusing on clarity, balance, and reliability. A 4 channel amp 4 speakers setup can sound excellent when it is matched well and installed carefully. The goal is to build something you enjoy every day, not just on the day of installation.
Regular checks also help. Inspect connections occasionally for looseness or corrosion. Keep the amplifier area clean and ventilated. If you notice changes in sound quality, investigate early. Small issues are easier to fix before they become bigger ones.
When to Consider a Different Configuration
This setup works beautifully for many drivers, but it is not the only option. If you want stronger bass, you may eventually add a subwoofer and redirect some channels. If you want more surround sound, you might explore additional amplifiers or a different speaker layout. The right choice depends on your goals, budget, and vehicle space.
If you are curious about expanding beyond four speakers, you can learn more about how to wire 6 speakers on a 4 channel amp or explore other multi-speaker configurations. Understanding your options helps you plan smarter upgrades later.
Final Thoughts on Building Your System
A well-built setup is about balance. Match the amplifier to the speakers. Wire everything cleanly. Set the gain properly. Tune the system for the way you actually listen. When you do that, you get a setup that sounds clear, plays reliably, and holds up over time.
Take it step by step. Do not rush the installation. Test carefully and adjust thoughtfully. With the right approach, your 4 channel amp 4 speakers system will deliver the kind of sound that makes every drive more enjoyable.
Frequently Asked Questions
Can I connect 4 speakers to a 4 channel amp easily?
Yes, this is one of the simplest car audio configurations because each speaker gets its own dedicated channel. You just need to match impedance, use proper wiring, and set the gain correctly for clean performance.
Do I need to worry about speaker impedance with a 4 channel amp 4 speakers setup?
Absolutely. Impedance affects how much load the amplifier sees on each channel. If the speaker ohm rating is too low for the amplifier, it can overheat or shut down, so always check the specifications before connecting everything.
What wire gauge is best for this kind of installation?
Sixteen gauge or fourteen gauge speaker wire works well for most car audio systems. If your wire runs are long or you expect higher power, thicker wire can help reduce resistance and improve sound quality.
How should I set the gain on my amplifier?
Start with the gain turned down, then slowly increase it while playing music at a normal volume. Stop when the sound is clean and strong, before any distortion appears, because too much gain can damage speakers and waste power.
What happens if I reverse speaker polarity during wiring?
Reversed polarity can cause phase issues that make bass sound weak and the soundstage feel less focused. It is important to connect positive to positive and negative to negative on every channel for the best results.
Can I add a subwoofer later if I start with 4 speakers and a 4 channel amp?
Often yes, depending on your amplifier features and wiring plan. Many people begin with four speakers and later add a subwoofer by using extra channels or adjusting the system design for a future upgrade.