How to Remove Ram from a Laptop
Removing RAM from a laptop is a simple task you can do at home with just a few basic tools. This guide walks you through every step safely, from powering down your laptop to gently releasing the RAM sticks. Whether you are upgrading, troubleshooting, or replacing your laptop memory, you will find clear instructions here.
Key Takeaways
- Safety First: Always power off your laptop and disconnect all cables before removing RAM.
- Right Tools Matter: A small Phillips screwdriver and an anti-static wrist strap are all you need.
- Know Your RAM Type: Most laptops use SO-DIMM modules, and understanding yours helps avoid damage.
- Gentle Handling: RAM sticks are delicate, so handle them by the edges only.
- Check Compatibility: Before purchasing new RAM, verify the type and speed your laptop supports.
- Reset After Removal: Reseating RAM correctly ensures your laptop recognizes the new or existing module.
📑 Table of Contents
How to Remove RAM from a Laptop: A Complete Step-by-Step Guide
So you need to remove RAM from your laptop? Maybe you are upgrading your memory, troubleshooting a performance issue, or replacing a faulty stick. Whatever the reason, the process is easier than most people think. You do not need to be a tech expert. With the right tools and a little patience, you can pull out your laptop memory in under ten minutes.
In this guide, we will walk you through every single step. We will cover what tools you need, how to find your RAM slots, how to safely remove the modules, and what to do afterward. By the end, you will feel confident tackling this job yourself. Let us get started.
Before you touch anything inside your laptop, let us talk about safety. Working on laptop hardware requires some basic precautions. A small mistake can damage your RAM or other components. But do not worry. If you follow these steps carefully, everything will go smoothly.
Why Remove RAM from a Laptop?
There are several reasons you might need to take out your RAM. Some people want to upgrade their laptop memory for better performance. Others are trying to fix a system that keeps crashing or freezing. Sometimes, a RAM stick goes bad and needs replacement. Whatever your reason, knowing how to remove RAM properly is an essential laptop maintenance skill.
Here are the most common reasons people remove RAM:
- Upgrading memory: Adding more RAM or replacing old modules with faster ones.
- Troubleshooting: Testing individual sticks to find a faulty one.
- Replacing damaged RAM: A broken module can cause boot failures or blue screens.
- Cleaning: Dust buildup on RAM contacts can cause connection issues.
- Selling or recycling: Removing components before disposing of an old laptop.
No matter your reason, the removal process is the same. Let us move on to what you will need.
Tools You Will Need
You do not need fancy equipment to remove RAM. A few simple household items will do the job perfectly. Here is your checklist:
- Small Phillips-head screwdriver: Most laptops use tiny screws to hold the bottom panel in place.
- Anti-static wrist strap: This protects your RAM from static electricity. It is cheap and worth every penny.
- Soft, clean workspace: A flat surface with good lighting makes the job much easier.
- Small container: Use this to keep track of your screws so they do not get lost.
- Soft cloth or microfiber towel: This helps keep your laptop clean and scratch-free.
That is it. You do not need a full tool kit. Just these basics will get the job done safely.
Step-by-Step Guide to Removing RAM
Now let us get into the actual process. Follow each step carefully, and you will have your RAM out in no time.
Step 1: Power Off and Unplug Your Laptop
This is the most important step. Never work on a laptop that is powered on or even plugged in. Shut your laptop down completely. Then unplug the power adapter from the wall and from the laptop itself. If you have a wireless mouse or any USB devices connected, remove those too.
Next, hold down the power button for about ten seconds. This drains any remaining electrical charge from the motherboard. It is a simple step, but it protects your components from static discharge.
Step 2: Remove the Bottom Panel
Flip your laptop over so the bottom faces up. Look for screws along the edges. Most laptops have around eight to twelve small screws holding the bottom panel in place. Use your Phillips screwdriver to carefully remove each one.
Put all the screws in your small container. It is easy to lose them, and you will need every one of them later. Once all screws are out, gently pry the bottom panel off. Use a plastic spudger or your fingernail. Avoid metal tools, as they can scratch the laptop casing.
Set the panel aside in a safe place.
Step 3: Locate the RAM Slots
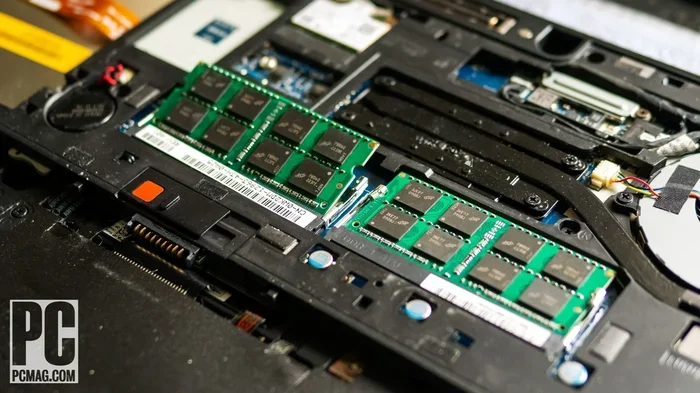
Now you should be able to see inside your laptop. Look for the long, thin slots near the center of the motherboard. These are your RAM slots. Most laptops have one or two slots. The RAM modules themselves are called SO-DIMM sticks. They are about the size of a stick of gum and have small metal clips on each end.
If you are not sure which module is which, you can refer to your laptop manual or check the labels on the sticks themselves. Some laptops also have a metal shield covering the RAM area. If yours does, you may need to remove a few more screws to access it.
Before touching anything, touch a metal part of the laptop chassis to discharge any static electricity from your body. Or better yet, wear your anti-static wrist strap at this point.
Step 4: Release the RAM Clips
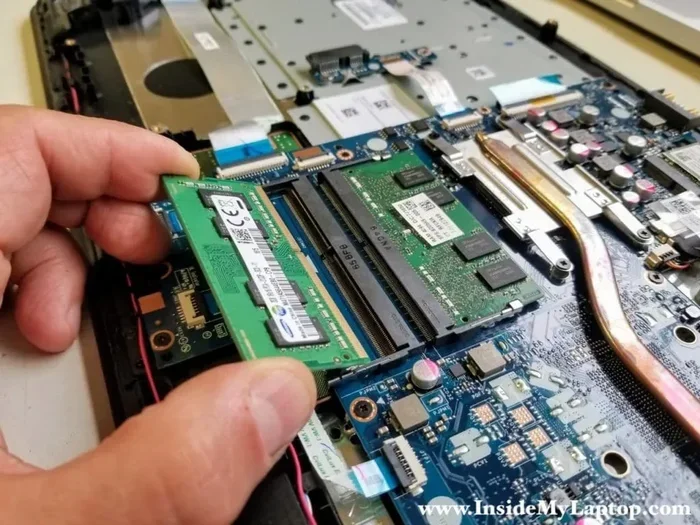
Each RAM stick is held in place by two small metal clips, one on each side. Look closely at the clips. They should be angled slightly outward, holding the RAM in place. To remove the stick, you need to push these clips outward at the same time.
Here is how to do it:
- Use both thumbs to push the clips on either side of the RAM stick outward.
- The RAM module will tilt upward at an angle on its own.
- Once it tilts enough, gently pull it straight out of the slot.
- Place the removed RAM on a soft cloth.
Do not force the RAM out. If it does not move easily, double-check that you have pushed the clips far enough outward. A little gentle pressure is all you need.
Step 5: Handle the RAM Stick Properly
Once the RAM is out, hold it by the edges only. Never touch the gold contacts on the bottom. Oils from your fingers can cause connection problems later. If you are planning to clean the RAM, use a soft, dry cloth to gently wipe the contacts.
If you are removing the RAM because it is faulty, inspect the stick for any visible damage. Look for burn marks, bent pins, or cracked chips. This information can help you when purchasing a replacement.
Step 6: Reassemble or Install New RAM
If you are done removing RAM and are not installing anything new, simply reverse the process. Put the bottom panel back on, replace all the screws, and plug in your power adapter. Your laptop should boot up normally.
If you are installing new RAM, make sure the notch on the RAM module aligns with the ridge in the slot. Press the stick firmly and evenly until the clips click into place. For more detailed instructions on this part, you can check out our guide on how to install RAM into a laptop.
Understanding RAM Types and Compatibility
Not all RAM is the same. Before you remove or replace your laptop memory, it helps to understand what type your laptop uses. This knowledge saves you money and prevents compatibility headaches.
DDR3 vs DDR4 vs DDR5
RAM technology has evolved over the years. Here is a quick comparison:
- DDR3: Older but still common in many laptops. Slower speeds but perfectly fine for basic tasks.
- DDR4: The current standard for most modern laptops. Faster and more efficient than DDR3.
- DDR5: The newest standard. Found in high-end laptops. Offers the best performance.
You can check which type your laptop uses by looking up your model number online or checking your laptop manual. You can also use system information tools to find this out. If you want to learn how to check your current RAM details, read our article on how to check the RAM of a laptop.
SO-DIMM vs DIMM
Laptops use a smaller form factor called SO-DIMM (Small Outline Dual In-Line Memory Module). Desktop computers use full-size DIMMs. Do not mix these up. A SO-DIMM will not fit into a DIMM slot and vice versa. Always double-check before purchasing new RAM.
Common Mistakes to Avoid When Removing RAM
Even though removing RAM is straightforward, people still make mistakes. Here are some common errors to watch out for:
- Skipping the power-off step: Working on a powered laptop can damage components and even hurt you.
- Forcing the RAM out: If it does not come out easily, stop and check your approach. Forcing it can break the clips or damage the slot.
- Touching the gold contacts: This can leave oils that interfere with the connection. Always hold RAM by the edges.
- Losing screws: Keep track of every screw. A missing screw can prevent proper reassembly.
- Ignoring static discharge: Static electricity can fry your RAM or motherboard. Always ground yourself before touching internal components.
- Not checking RAM compatibility: Buying the wrong type of RAM wastes time and money. Verify specs before purchasing.
Avoiding these mistakes will save you frustration and keep your laptop in great shape.
What to Do After Removing RAM
Once your RAM is out, you have a few options depending on your goal.
Testing Without RAM
If you removed RAM to test your laptop without it, you will notice the system will not boot. This is normal. A laptop needs at least one RAM stick to start up. This test helps confirm whether your RAM is the source of a problem.
Cleaning Your RAM
Dust can accumulate on RAM contacts over time. Use a soft, dry cloth or a specialized electronics cleaner to wipe the gold connectors. Do not use water or any liquid cleaner. Let the RAM dry completely before putting it back in.
Installing New RAM
If you are replacing old RAM with new modules, make sure the new RAM matches your laptop’s specifications. Check the type (DDR3, DDR4, or DDR5), speed, and capacity. For a detailed walkthrough on adding RAM back in, see our guide on how to add RAM to a laptop.
After installing new RAM, your laptop may run faster and handle multitasking more smoothly. Many users notice an immediate improvement in laptop performance after a memory upgrade.
When to Seek Professional Help
Removing RAM is simple for most people. But there are times when you should call in a professional. If your laptop has a sealed bottom panel that requires special tools, it might be best to visit a repair shop. Similarly, if you are uncomfortable opening your laptop, there is no shame in asking for help. A professional technician can handle the job quickly and safely.
Also, if you remove RAM and your laptop still has issues, the problem might be elsewhere. A technician can run deeper diagnostics to find the root cause.
Final Thoughts
Knowing how to remove RAM from a laptop is a valuable skill. It saves you money on repair costs and gives you confidence when upgrading your laptop memory. The process is straightforward, safe, and surprisingly quick once you know what to do.
Remember to always power off your laptop first, handle RAM sticks by the edges, and push the clips gently. Whether you are upgrading, troubleshooting, or replacing a faulty module, this guide has you covered.
If you are planning to put new RAM back in, we have detailed guides that walk you through the full process. Check out our article on how to upgrade RAM on a laptop for more tips and recommendations. Happy upgrading!
Frequently Asked Questions
Can I remove RAM while the laptop is turned on?
No, absolutely not. Always power off your laptop completely and unplug it from the power source before opening the case or touching any internal components. Working on a powered laptop risks damaging your motherboard and RAM modules.
Do I need an anti-static wrist strap to remove RAM?
While not strictly required, an anti-static wrist strap is highly recommended. It prevents static electricity from your body from damaging sensitive components. If you do not have one, make sure to touch a metal part of the laptop chassis before handling RAM.
How do I know which type of RAM my laptop needs?
You can check your laptop manual, look up your model number online, or use a system information tool. Most modern laptops use DDR4 SO-DIMM modules, but older or budget models may use DDR3. Always verify the type, speed, and maximum capacity before purchasing new RAM.
Is it safe to touch the gold contacts on a RAM stick?
No, you should avoid touching the gold contacts. Oils from your skin can interfere with the electrical connection and cause performance issues. Always hold RAM sticks by the edges and the top surface only.
Can I mix different RAM brands or speeds in my laptop?
It is possible, but not always recommended. Mixing RAM can sometimes cause compatibility issues or reduce performance. Ideally, use matching RAM sticks from the same brand, type, speed, and capacity for the best results.
What happens if I remove all the RAM from my laptop?
Your laptop will not boot up. A laptop needs at least one RAM stick to start. If you remove all modules, the system will either show a blank screen or display an error message when you try to power it on.