How to Do Hp Laptop Power Cord Replacement
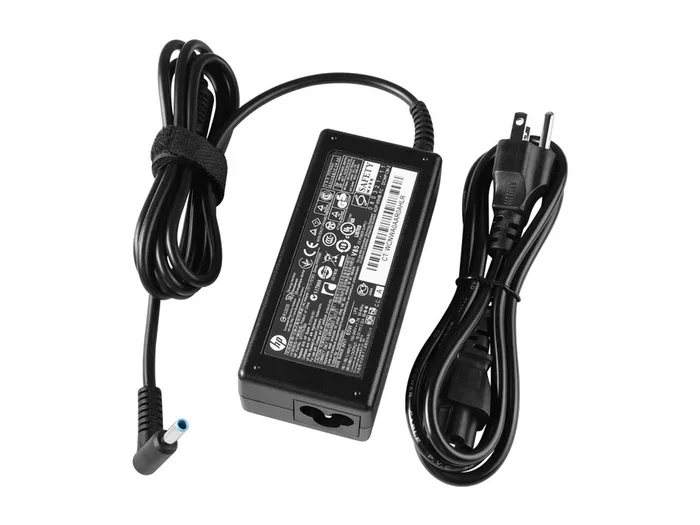
Replacing your HP laptop power cord is simpler than you think. You can save money and avoid trips to the repair shop by doing it yourself. This guide walks you through every step, from picking the right replacement cord to testing your new setup. We also share expert tips to keep your HP laptop charger working longer.
Your HP laptop power cord takes a beating every day. It gets bent, folded, stepped on, and pulled from awkward angles. Over time, this wear and tear can cause serious problems. A frayed cable or a loose connector can lead to inconsistent charging or even stop your laptop from powering on altogether.
Replacing the HP laptop power cord might seem intimidating, but it is one of the easiest repairs you can do at home. You do not need to be a tech expert. With the right tools and a little patience, you can have your laptop charging again in no time. This guide covers everything you need to know, from choosing the correct replacement to testing your new setup.
We will walk you through each step in plain language. No jargon, no confusing terms. Whether your HP power supply is completely dead or just showing signs of wear, you will find practical advice here. Let us get started.
Key Takeaways
- Know the signs: Frayed cables, loose connectors, and inconsistent charging mean it is time for a replacement.
- Pick the right cord: Match the voltage, amperage, and connector tip to your specific HP laptop model.
- Safety first: Always unplug the old cord before starting and handle internal components with care.
- DIY is doable: With basic tools and patience, most people can complete the replacement in under 30 minutes.
- Avoid common mistakes: Using the wrong wattage or forcing connectors can damage your laptop.
- Test before use: Always verify the new cord works properly before relying on it daily.
📑 Table of Contents
Why Your HP Laptop Power Cord Might Need Replacement
Before you dive into the replacement process, it helps to understand what goes wrong. Power cords fail for several reasons, and recognizing the problem early can save you from bigger issues down the road.
Frayed or Damaged Cable
The most common sign is visible damage to the cable itself. Look for cuts, exposed wires, or kinks near the connector ends. A damaged cable is not just an annoyance. It is a safety hazard that can cause sparks or short circuits.
Loose or Wobbly Connector
If the tip of the cord does not fit snugly into your laptop, you have a loose connector. This often happens when the plastic housing around the tip cracks or wears down. A loose connection means your laptop charges intermittently, which can harm the battery over time.
Laptop Not Charging at All
Sometimes the problem is obvious. Your laptop simply will not charge when plugged in. Before assuming the cord is dead, try a different outlet. But if the issue persists, the HP ac adapter is likely the culprit.
Burning Smell or Overheating
This is a serious warning sign. If your power brick or cable smells like it is burning or feels unusually hot, stop using it immediately. These are clear indicators that the cord needs to be replaced right away.
How to Choose the Right Replacement Power Cord
Not all power cords are the same. HP laptops use different connectors and power requirements depending on the model. Picking the wrong cord can cause damage or simply not work at all.
Check Your Laptop Model Number
Flip your laptop over and look for the model number. It usually starts with “HP” followed by a series of letters and numbers. Write this down. You will need it when shopping for a replacement HP laptop charger.
Match the Voltage and Amperage
Every power cord has a voltage (V) and amperage (A) rating. Your original cord’s specs are printed on the power brick. The replacement must match these numbers exactly. Here is a quick comparison:
- Voltage (V): Must match exactly. Using a different voltage can fry your laptop.
- Amperage (A): Should match or be slightly higher. A higher amperage is generally safe.
- Wattage (W): Calculated as V x A. This tells you the total power the cord delivers.
Choose the Right Connector Tip
The connector tip is the part that plugs into your laptop. HP uses several different tip sizes and shapes. The replacement tip must match your laptop’s charging port exactly. Measure the inner and outer diameter of the tip to be sure.
Where to Buy Replacement Cords
You have several options for purchasing a new HP power cord:
- HP Official Store: Guaranteed compatibility but often more expensive.
- Amazon or Retailers: Wide selection and competitive prices. Look for brands with good reviews.
- Third-Party Brands: Companies like Targus and Tylt make reliable alternatives at lower prices.
Tools You Will Need for the Replacement
You do not need a lot of tools for this job. Most people already have everything at home. Here is what you will need:
- Phillips head screwdriver: For opening the laptop case if needed.
- Flathead screwdriver: Helpful for prying open the power jack housing.
- Soldering iron and solder: Only needed if you are replacing the DC power jack on the motherboard.
- Multimeter: Useful for testing the new cord before full installation.
- Isopropyl alcohol and cotton swabs: For cleaning the charging port.
- Heat shrink tubing: For insulating any soldered connections.
You might also want to check how much power your laptop uses when plugged in. Understanding your laptop’s power draw helps you choose a cord that can handle the load. You can learn more about how much power a laptop uses when plugged in in our related guide.
Step-by-Step Guide to Replacing Your HP Laptop Power Cord
Now for the main event. Follow these steps carefully and you will have a working replacement cord in no time.
Step 1: Unplug and Power Down
Start by unplugging the old cord from both the wall outlet and your laptop. Shut down your laptop completely. This is the most important safety step. Never work on a power connection while the device is still running.
Step 2: Inspect the Old Cord
Take a close look at the old cord. Note where the damage is. Is it near the tip? Near the power brick? Or is the cable itself frayed? Understanding the failure point helps you avoid the same problem with the new cord.
Step 3: Remove the Old Connector Tip (If Replaceable)
Some HP laptops use a removable connector tip. If yours does, gently pull the old tip off the cable. It may be held in place by a small set screw. Use your flathead screwdriver to loosen it, then slide the tip off.
Step 4: Replace the DC Power Jack (If Needed)
If the problem is with the charging port on the laptop itself, you will need to replace the DC power jack. This requires opening the laptop case. If you have ever upgraded the RAM on your HP laptop, you already have the basic skills needed for this step.
Here is how to do it:
- Remove the bottom panel screws with your Phillips head screwdriver.
- Carefully lift off the panel.
- Locate the DC power jack on the motherboard.
- Desolder the old jack and solder the new one in place.
- Use heat shrink tubing to insulate the connections.
Step 5: Connect the New Power Cord
Plug the new connector tip into your laptop. Then connect the other end to the power brick. Finally, plug the brick into the wall outlet. Listen for any clicking sounds that indicate a secure connection.
Step 6: Test the New Cord
Turn on your laptop. Check if the charging light comes on. Let it charge for at least 15 minutes and then check the battery indicator. If everything looks good, you are all set.
Step 7: Cable Management Tips
To extend the life of your new cord, try these simple habits:
- Avoid tightly wrapping the cable around the power brick.
- Do not run the cable under heavy furniture or where people walk.
- Use a cable organizer or Velcro tie to keep things neat.
- Unplug by gripping the plug, not pulling the cable.
Common Mistakes to Avoid During Power Cord Replacement
Even simple repairs come with pitfalls. Here are the most common mistakes people make when replacing their HP laptop power cord:
Using the Wrong Wattage
This is the number one mistake. A cord with too low a wattage will overheat. A cord with too high a wattage is usually fine, but it is best to match the original specs as closely as possible.
Forcing the Connector Tip
If the tip does not fit, do not force it. You might damage the charging port on your laptop. Double-check the tip size and shape before inserting it.
Skipping the Multimeter Test
Testing the new cord with a multimeter before full installation can save you a lot of trouble. It confirms the cord is delivering power correctly.
Ignoring the Power Brick
Sometimes the cable looks fine but the power brick is the real problem. If your new cord still does not charge your laptop, the brick itself might be defective.
Not Grounding Yourself
When working inside the laptop, static electricity can damage sensitive components. Touch a metal surface before handling the motherboard or any internal parts.
When to Seek Professional Help
DIY repairs are rewarding, but they are not always the right choice. Here are situations where you should call in a professional:
- Damaged motherboard: If the power issue has damaged other components, a professional can diagnose the full scope of the problem.
- Complex soldering: If you are not comfortable with a soldering iron, leave the DC jack replacement to an expert.
- Warranty concerns: Opening your laptop might void the warranty. Check with HP before attempting any internal repairs.
- Persistent issues: If you have replaced the cord and your laptop still will not charge, there may be a deeper issue at play.
For more related guides, check out our article on how to install an M 2 NVMe SSD in your laptop if you are planning any upgrades alongside your repair.
Final Thoughts
Replacing your HP laptop power cord is a straightforward task that anyone can do. You save money, learn a valuable skill, and get your laptop back up and running quickly. The key is to take your time, use the right tools, and never rush through the safety steps.
Remember to choose a replacement cord that matches your laptop’s voltage, amperage, and connector type. Test everything before relying on it for daily use. And if something feels beyond your comfort level, there is no shame in seeking professional help.
Your laptop is a significant investment. Taking care of the power connection is one of the simplest ways to protect that investment. With the new cord in place, you can work, play, and create without worrying about battery life or charging issues.
Keep these tips in mind, and your HP power supply will serve you well for years to come. Happy repairing!
Frequently Asked Questions
How do I know if my HP laptop power cord is bad?
Look for visible damage like frayed wires, a loose connector, or a burning smell. If your laptop will not charge even with a different outlet, the cord is likely the problem. You can also test the cord with a multimeter to check for power output.
Can I use any power cord for my HP laptop?
No. The replacement cord must match your laptop’s voltage, amperage, and connector tip. Using the wrong specifications can damage your laptop or simply not work. Always check your original cord’s specs before buying a replacement.
How much does it cost to replace an HP laptop power cord?
Replacement cords range from $15 to $60 depending on the brand and model. Official HP cords tend to cost more, while third-party options offer great value. The DIY approach saves you the cost of a repair shop visit.
Is it safe to use a laptop with a damaged power cord?
It is not recommended. A damaged cord can cause short circuits, overheating, or even fire. If you notice frayed wires or exposed copper, replace the cord immediately. It is a small fix that prevents a big problem.
How long does it take to replace an HP laptop power cord?
For most people, the entire process takes about 15 to 30 minutes. If you need to replace the DC power jack inside the laptop, it may take longer, especially if you are new to soldering. Practice on old equipment first if possible.
Where can I find the exact specs for my HP laptop power cord?
The specs are printed on the power brick itself. Look for the voltage (V), amperage (A), and wattage (W) ratings. You can also find this information in your laptop’s user manual or on the HP support website by entering your model number.