How to Wire for Security Cameras
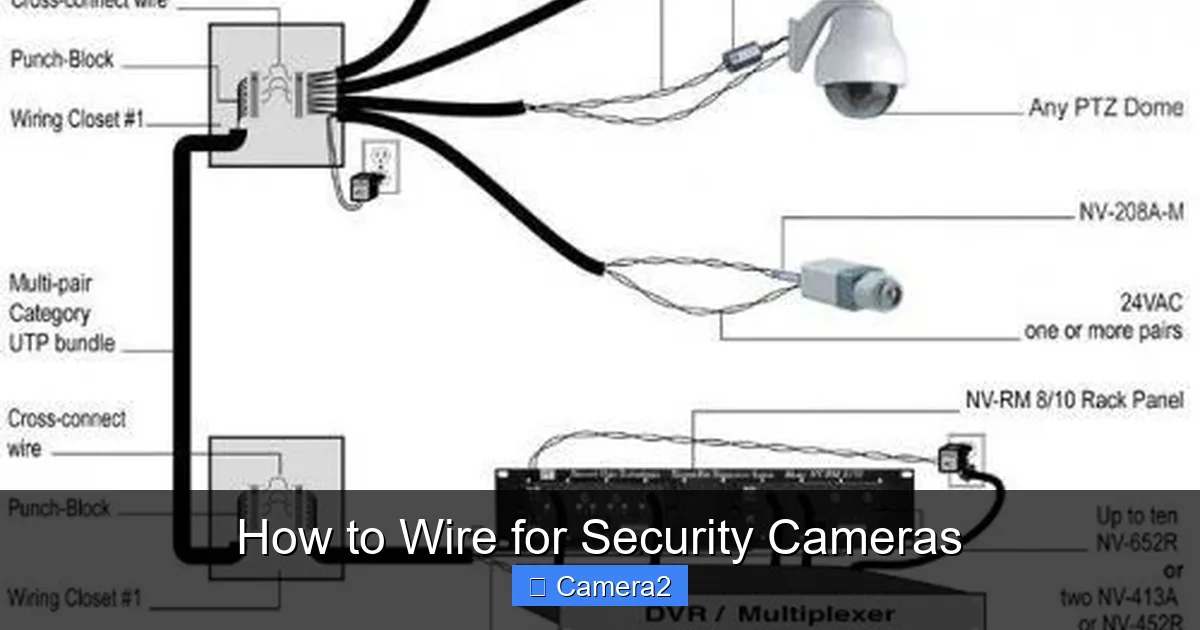
Want a safe home without the guesswork? This guide shows you how to wire for security cameras, covering power, cable choices, and simple tricks for a tidy install. Follow the clear steps and get peace of mind fast.
Key Takeaways
- Plan before you pull: Sketch a layout, count cameras, and mark power sources to avoid surprises.
- Choose the right cable: Use Ethernet (Cat5e/Cat6) for PoE cameras and coaxial for older analog models.
- Power matters: Calculate total wattage and match it to a suitable power‑over‑ethernet (PoE) injector or switch.
- Keep it tidy: Run cables through conduit or PVC pipes for protection and a professional look.
- Test before you seal: Verify video feed and power at each camera before closing walls or mounting brackets.
- Future‑proof your system: Leave extra slack and consider higher‑grade cables for upgrades.
- Safety first: Turn off circuit breakers, use proper grounding, and follow local electrical codes.
📑 Table of Contents
- Introduction: Why Proper Wiring Is the Heart of Your Surveillance
- 1. Planning Your Camera Layout
- 2. Selecting the Right Cable
- 3. Powering Your Cameras
- 4. Running the Cables
- 5. Connecting to the Recorder and Configuring the System
- 6. Finishing Touches and Maintenance
- Conclusion: Wire Right, Rest Easy
Introduction: Why Proper Wiring Is the Heart of Your Surveillance
Imagine buying a top‑of‑the‑line security camera, mounting it on the porch, and then discovering it keeps losing power or dropping the video signal. Frustrating, right? The truth is, the most reliable security system starts with good wiring. Whether you’re protecting a small apartment or a sprawling property, knowing how to wire for security cameras saves you time, money, and headaches.
In this friendly guide we’ll walk through everything you need—from picking the perfect cable type to finishing touches that make your setup look professional. Think of it as a chat with a tech‑savvy friend who’s already done the work for you.
1. Planning Your Camera Layout
Map the coverage zones
Before you even touch a wire, draw a simple floor plan. Mark doors, windows, and any blind spots. Decide how many cameras you need and where they’ll face. This visual helps you spot the nearest power source and decide if a wired or wireless solution makes sense.

Visual guide about How to Wire for Security Cameras
Image source: smile966.com
Determine power requirements
Most modern IP cameras use Power over Ethernet (PoE). Check the camera’s specs—typical power draw is 5‑15 W. Multiply by the number of cameras to get total wattage. For example, eight cameras at 10 W each need 80 W total. Choose a PoE switch or injector that exceeds this number by at least 20 % to allow for future expansion.
Choose a central hub
Your network video recorder (NVR) or digital video recorder (DVR) will be the brain of the system. Place it in a cool, secure area near your router and power outlet. Running all cables back to this hub keeps troubleshooting simple.
2. Selecting the Right Cable
Ethernet (Cat5e, Cat6, Cat6a)
For PoE cameras, Ethernet is king. Cat5e supports up to 100 m runs and 1 Gbps speeds—perfect for most home setups. If you anticipate higher bandwidth (4 K streams) or longer runs, go with Cat6 or Cat6a.
Visual guide about How to Wire for Security Cameras
Image source: i.pinimg.com
Coaxial for analog cameras
Older analog cameras use RG59 or RG6 coaxial cable with a separate power line. While still viable, coaxial is bulkier and limits resolution. If you’re upgrading, consider swapping to IP cameras to simplify wiring.
Choosing conduit vs. surface mount
Running cables inside walls gives a clean look but requires drilling and fish‑tape. Surface‑mount raceways or PVC conduit are quicker, especially in rentals. They also protect cables from physical damage.
3. Powering Your Cameras
Understanding PoE standards
There are two main PoE standards: IEEE 802.3af (up to 15.4 W) and IEEE 802.3at (up to 30 W, also called PoE+). Match the standard to your camera’s power needs. Using a PoE+ switch for a low‑power camera is fine; the extra capacity just sits idle.

Visual guide about How to Wire for Security Cameras
Image source: 9ketsuki.info
Using PoE injectors
If you only have a few cameras and don’t want a full switch, a PoE injector adds power to a single Ethernet run. Connect the injector between your router and the camera, then plug the Ethernet cable into the camera’s PoE port.
Power budgeting example
Let’s say you have six cameras rated at 12 W each. Total = 72 W. Choose a 48 V PoE switch rated for at least 90 W (48 V × 1.9 A). This gives you headroom for future cameras or a slightly higher‑power device.
4. Running the Cables
Tools you’ll need
- Fish tape or cable puller
- Cable crimper and RJ45 connectors (for Ethernet)
- Wire stripper
- Drill with long bits (if pulling through walls)
- Label maker or masking tape
Step‑by‑step cable routing
- Turn off power. Shut off the breaker for any outlet you’ll work near.
- Measure and cut. Add 10 % extra length for slack and future moves.
- Pull the cable. Feed the fish tape from the hub to the camera location, attach the cable, and gently pull.
- Secure and protect. Staple the cable every 12‑18 in, but avoid crushing it. Use conduit where the cable passes through walls or outdoors.
- Terminate. Crimp RJ45 connectors on both ends of Ethernet runs, following the T568B wiring standard.
- Label. Mark each end with camera location for easy troubleshooting.
Outdoor considerations
For exterior runs, choose UV‑rated, outdoor‑grade Cat6. Add a weatherproof bulkhead connector where the cable enters the camera housing. Seal any gaps with silicone caulk to keep moisture out.
5. Connecting to the Recorder and Configuring the System
Hooking up the NVR/DVR
Plug each Ethernet cable into the PoE switch, then connect the switch to the NVR via a regular Ethernet patch cable. If you’re using a DVR with analog cameras, run the coaxial cables to the DVR’s BNC inputs and connect the power wires to a 12 V adapter.
Initial testing
Power on the system and open the NVR’s web interface or mobile app. You should see a live feed from each camera. If a camera shows “no signal,” double‑check the cable connections, PoE status lights, and that the camera’s IP address is within the same subnet as the NVR.
Fine‑tuning settings
Adjust motion detection zones, resolution, and frame rate to balance clarity and storage space. Most NVRs let you set recording schedules, so you can save bandwidth by only recording when motion is detected.
6. Finishing Touches and Maintenance
Concealing cables for a clean look
Once everything works, cover any exposed runs with paintable raceway or run the cable behind baseboards. This not only looks better but also protects the wires from accidental snags.
Regular checks
Every few months, inspect each camera’s lens for dirt and verify that the video feed is still clear. Test the PoE switch’s LEDs to ensure each port is delivering power.
Future upgrades
Because you’ve left extra slack in the conduit, adding a new camera later is a breeze. Just pull a new Ethernet line, terminate it, and plug it into an open port on the PoE switch.
Helpful related reads
If you’re interested in other wiring projects, check out How To Wire Speakers To Amp for tips on clean cable management, and learn How To Set Up Lighting For Streaming to improve any video you might capture with your new cameras.
Conclusion: Wire Right, Rest Easy
Knowing how to wire for security cameras turns a daunting task into a manageable weekend project. By planning your layout, picking the right cable, budgeting power, and following systematic installation steps, you’ll enjoy a reliable surveillance system that looks professional and lasts for years. Remember to test early, label everything, and keep a little slack for future upgrades. Now you’re ready to protect your home with confidence.
Frequently Asked Questions
What type of cable is best for PoE security cameras?
Cat5e works for most home installations, but Cat6 or Cat6a is recommended for longer runs or higher‑resolution video because they handle more bandwidth and reduce interference.
Can I use the same cable for power and video?
Yes. That’s the advantage of PoE—one Ethernet cable carries both power and data, eliminating the need for separate power wires.
Do I need a professional electrician to install security camera wiring?
For most DIY setups you can safely run Ethernet and low‑voltage power yourself. Only involve an electrician if you’re tapping into high‑voltage circuits or need to add new outlets.
How far can I run an Ethernet cable before the signal degrades?
The standard limit is 100 meters (328 ft) for a single run. If you need longer distances, use a PoE extender or fiber optic cable.
What should I do if a camera keeps losing power?
Check the PoE switch’s LED for that port, verify the Ethernet cable isn’t damaged, and make sure the camera’s power rating matches the PoE standard you’re using.
Is it legal to install security cameras inside private rooms?
Legal restrictions vary by location. Generally, you must obtain consent from anyone who has a reasonable expectation of privacy, such as in bathrooms or bedrooms. Review local laws and consider posting signs.