How to Wire Speakers to Amp
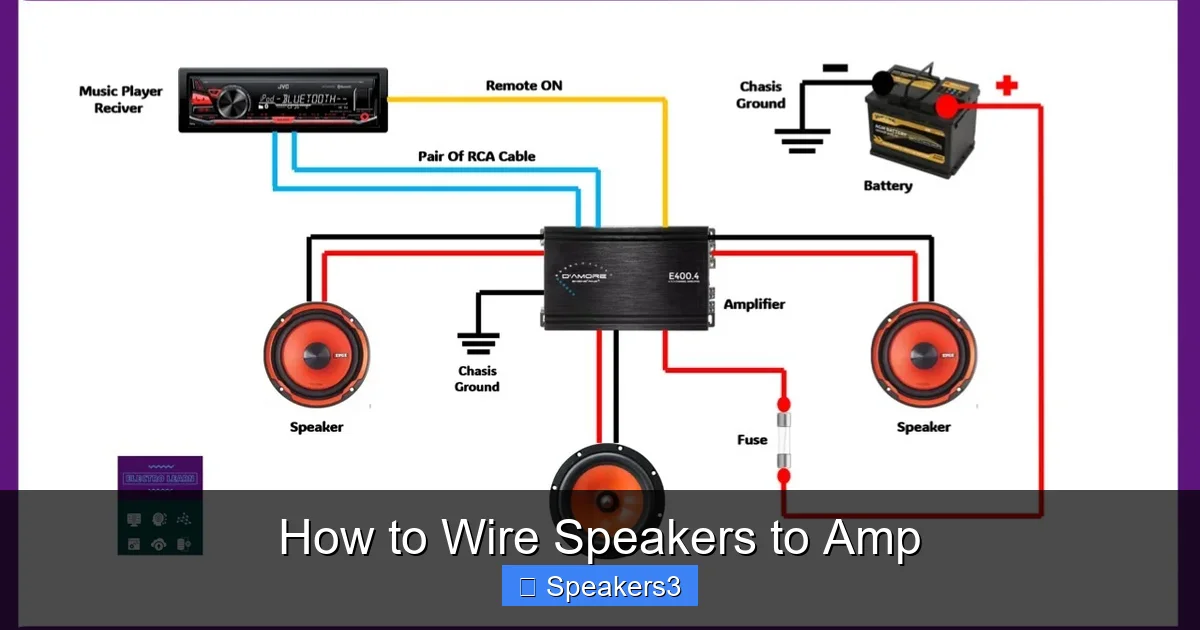
Always match your speaker impedance (Ohms) to your amplifier’s stable rating to prevent overheating or damage. Use the correct gauge speaker wire for your run length to maintain signal integrity. Secure all connections tightly and double-check polarity (+/-) to avoid phase cancellation. Follow a methodical, powered-off approach for a clean, distortion-free setup.
So, you’ve just unboxed a shiny new amplifier and a pair (or more!) of beautiful speakers. The promise of rich, powerful sound is humming in the air. But then you open the terminal cups and see those little red and black posts, and the speaker wire is just… there. A vague sense of dread sets in. “What if I wire this wrong? Will I break something expensive?” Take a deep breath. Wiring speakers to an amp is a fundamental skill for any audio enthusiast, and it’s far simpler than it looks. This guide will walk you through every single step, from the core concepts you must understand to the final tightening of a binding post. By the end, you’ll wire your system with confidence, ensuring safety, protecting your gear, and unlocking the best possible sound.
The process isn’t just about connecting point A to point B. It’s about understanding the electrical relationship between your amplifier and your speakers. It’s about choosing the right path for the electricity to flow. Get it right, and you have a stable, powerful foundation for your audio. Get it wrong, and you might be shopping for a new amp. But don’t worry—we’re going to get it right, together. We’ll demystify impedance, decode the series vs. parallel debate, and give you a foolproof, step-by-step wiring checklist. Let’s turn that anxiety into expertise.
Key Takeaways
- Impedance Matching is Critical: Never connect speakers with a total impedance lower than your amp’s minimum stable rating. Mismatched impedance is the fastest way to destroy an amplifier.
- Wire Gauge Matters: Use thicker (lower gauge number) wire for longer runs or higher-power systems. For most home setups under 20 feet, 14-16 gauge is sufficient.
- Series vs. Parallel Wiring: Series adds impedance (Z_total = Z1 + Z2) and is safe but reduces volume. Parallel reduces impedance (1/Z_total = 1/Z1 + 1/Z2) and increases volume but must stay above the amp’s minimum.
- Polarity Must Be Consistent: Always connect amp positive (+) to speaker positive (+) and amp negative (-) to speaker negative (-). Reversing one speaker causes phase cancellation, weakening bass and stereo imaging.
- Secure, Clean Connections: Strip wire carefully, twist strands tightly, and ensure no stray wires touch adjacent terminals. Loose connections cause intermittent sound, arcing, and damage.
- Test Before Final Mount: With everything powered off, perform a continuity test with a multimeter to check for shorts. Play low-volume test tones before securing speakers or routing wires.
- Power Down and Double-Check: Always turn off and unplug the amplifier before making or adjusting any connections. This is the single most important safety rule.
📑 Table of Contents
- Understanding the Core Concepts: Impedance, Power, and Why They Matter
- Essential Tools and Materials: Setting Up Your Workspace
- Wiring Configurations: The Heart of the Matter (Series vs. Parallel)
- Step-by-Step: Wiring Your Speakers to the Amplifier
- Testing, Troubleshooting, and Fine-Tuning
- Advanced Setups and Special Considerations
- Conclusion: Enjoy the Fruits of Your Labor
Understanding the Core Concepts: Impedance, Power, and Why They Matter
Before we touch a single tool, we need to speak the language of amplifiers and speakers. The two most critical concepts are impedance and power handling. Think of impedance (measured in Ohms, Ω) as the electrical resistance your speaker presents to the amp. It’s not a fixed number; it varies with frequency, but the rating on the back (e.g., 8Ω, 4Ω) is a crucial average. Your amplifier is designed to deliver its power most efficiently and safely into a specific impedance range, usually stated as “8Ω stable” or “4-8Ω stable.”
What Happens When Impedance Drops Too Low?
An amplifier is essentially a voltage source. According to Ohm’s Law (Power = Voltage² / Resistance), if the resistance (impedance) goes down, the amp tries to push more current to maintain power. This forces the amp’s output transistors to work harder, generating immense heat. If the impedance is too low for too long, the amp will overheat, go into protection mode (shutting down), or suffer permanent, catastrophic failure. Connecting two 8Ω speakers in parallel to an amp rated only for 8Ω (resulting in 4Ω total) is a classic mistake that kills amps. Always check your amplifier’s manual for its minimum stable impedance.
Power Handling: RMS vs. Peak
Speakers have a power rating, typically in Watts (W). You’ll see “RMS” (Root Mean Square, the continuous power) and “Peak” (short bursts). The RMS rating is the meaningful one. Your goal is to have an amplifier that can cleanly deliver power equal to or slightly greater than your speaker’s RMS rating. An underpowered amp driven into clipping (distortion) to reach loud volumes can damage speakers through overheating. An overpowered amp, if used recklessly, can physically tear a speaker’s voice coil. For a healthy system, aim for amp RMS power per channel ≈ 75-150% of speaker RMS. A 100W RMS speaker is happy with a 75W to 150W RMS per channel amp.
Essential Tools and Materials: Setting Up Your Workspace
You don’t need a professional workshop, but having the right tools makes the job clean, safe, and quick. Gather these items before you start:
Visual guide about How to Wire Speakers to Amp
Image source: i.ytimg.com
- Speaker Wire: Oxygen-Free Copper (OFC) is ideal but not mandatory. For typical home use, 14 or 16 gauge (AWG) is perfect for runs up to 50 feet. For longer runs or high-power car audio, use 12 or 10 gauge. Get a two-conductor wire (one conductor for +, one for -), usually with a clear or white stripe on one to denote polarity.
- Wire Strippers/Cutters: A dedicated tool that cleanly strips insulation without nicking the copper. Avoid using scissors or a knife.
- Multimeter (Highly Recommended): For checking continuity (to ensure you didn’t accidentally short + and -) and verifying impedance. A basic $20 model is fine.
- Screwdrivers: The correct size for your amplifier’s and speakers’ binding posts or terminals. Often a small flathead or Phillips.
- Needle-Nose Pliers: Helpful for twisting wire strands and reaching into tight spaces.
- Electrical Tape or Heat-Shrink Tubing: For insulating any exposed wire after stripping, especially if you have spade connectors.
- Labels or Masking Tape: To mark your wires if running multiple pairs (e.g., “Front L,” “Front R”).
Choosing the Right Speaker Wire Gauge: A Simple Guide
Wire gauge (AWG) refers to the thickness of the conductor. Lower numbers are thicker. Thicker wire has less resistance, which preserves power over distance. Here’s a quick rule-of-thumb for 8-ohm systems:
- Up to 20 feet: 16 AWG is acceptable.
- 20 to 50 feet: Use 14 AWG.
- 50+ feet or very high-power systems: Use 12 AWG or thicker.
- For 4-ohm systems (which draw more current), go one gauge thicker than the above recommendations.
Remember, using wire that’s too thin is like drinking a thick milkshake through a narrow straw—the amp has to work harder to push the signal through.
Wiring Configurations: The Heart of the Matter (Series vs. Parallel)
This is the pivotal decision. How you connect multiple speakers to a single amplifier channel changes the total impedance the amp “sees.” There are two primary methods: Series and Parallel. You can also combine them for complex setups (series-parallel), but we’ll stick to the basics for now.
Visual guide about How to Wire Speakers to Amp
Image source: toolsweek.com
Series Wiring: Adding Impedance
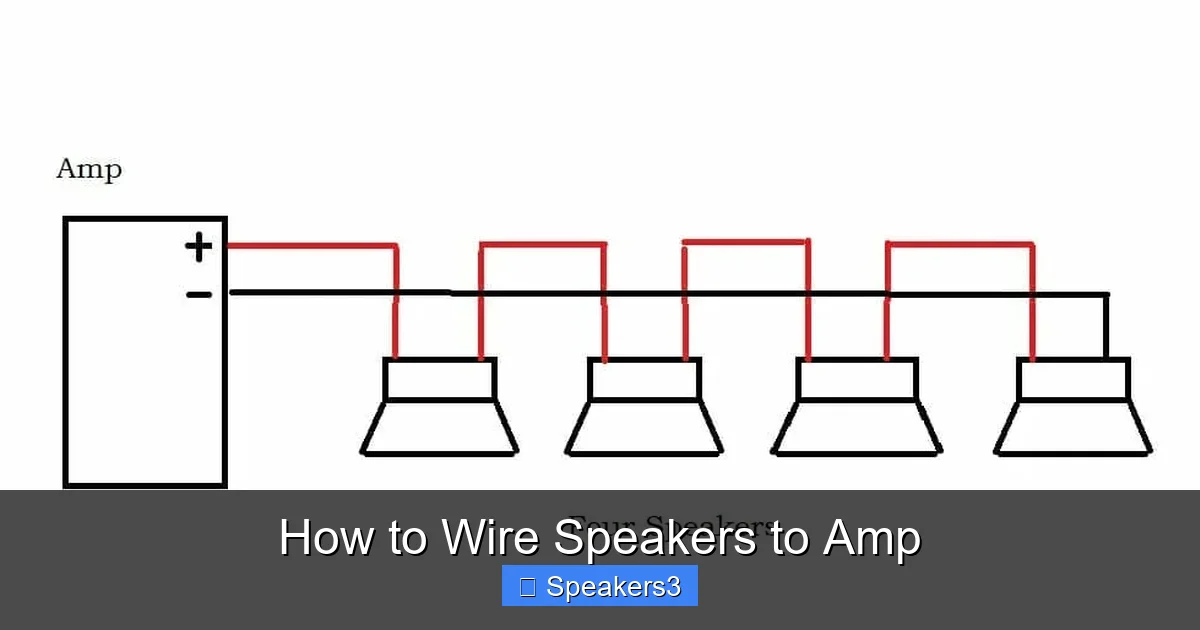
In a series circuit, you daisy-chain the speakers. The positive output from the amp goes to the positive terminal of Speaker A. The negative terminal of Speaker A then connects to the positive terminal of Speaker B. Finally, the negative terminal of Speaker B connects to the negative output of the amp. The path is one continuous loop: Amp (+) -> SPK A (+) -> SPK A (-) -> SPK B (+) -> SPK B (-) -> Amp (-).
Total Impedance Formula: Z_total = Z1 + Z2. Two 8Ω speakers in series = 16Ω total. This is very safe for your amp (higher impedance is never a problem for a voltage-source amp), but it drastically reduces the power delivered to each speaker. Your volume will be much lower. Series wiring is rarely used in multi-speaker home setups except for specific commercial installations or when you need to raise impedance to match a delicate vintage amp.
Parallel Wiring: The Common Choice for Volume
In a parallel circuit, you connect all the positive terminals together and all the negative terminals together, then run a single pair of wires from that “lump” to the amp. It’s like giving each speaker its own direct path from the amp.
Total Impedance Formula: 1/Z_total = 1/Z1 + 1/Z2. Two 8Ω speakers in parallel = 4Ω total. This is the most common method for connecting multiple speakers to a single amp channel (e.g., two front speakers to one stereo channel? No—stereo amps have separate channels. Parallel is used when you want to connect multiple speakers to a single channel, like two subwoofers to a mono sub amp, or four ceiling speakers to a single distributed audio channel). It yields maximum power and volume, but you must ensure your amp is stable at the resulting lower impedance.
Practical Example: The Stereo Pair Dilemma
For a standard two-channel stereo amplifier, you wire one speaker to the left channel outputs and the other to the right channel outputs. You are not wiring them together in series or parallel; each is a separate load. The series/parallel discussion becomes critical when you have: 1) More than one speaker per channel (e.g., two bookshelf speakers on each side of a room, both fed from the same amp channel), or 2) A single-channel (mono) amplifier powering multiple speakers. For this guide’s core “how to wire speakers to amp” for a basic stereo setup, you will be making two independent connections. The series/parallel knowledge is vital for expanding your system later.
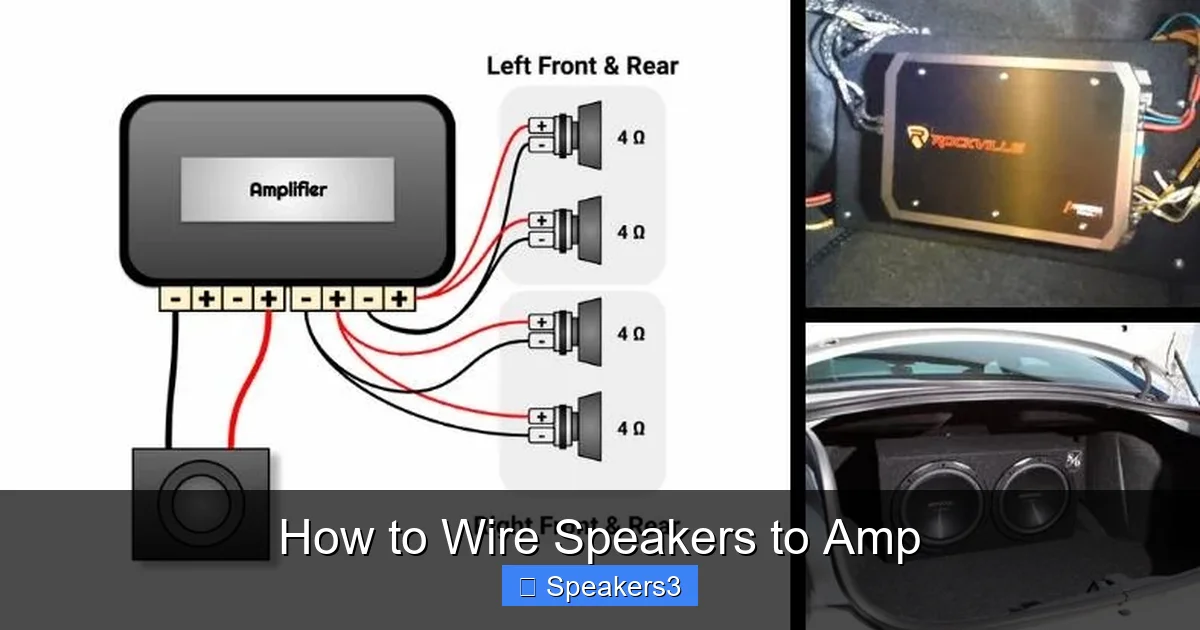
Step-by-Step: Wiring Your Speakers to the Amplifier
Now, let’s get hands-on. We’ll assume a standard two-channel amp and two speakers. The principles apply to any channel and speaker count.
Visual guide about How to Wire Speakers to Amp
Image source: soundcertified.com
Step 1: Preparation and Safety First
UNPLUG THE AMPLIFIER. Turn off the power switch and unplug it from the wall outlet or disconnect the car battery’s ground terminal. This is non-negotiable. Working on a live amp risks short circuits, blown components, and electric shock. Place your amp on a stable, non-conductive surface. Lay out your speaker wire from the amp location to each speaker. Estimate the length needed and add 1-2 feet of slack for maneuvering and future adjustments. Cut two equal lengths for left and right channels.
Step 2: Preparing the Speaker Wire
Using your wire strippers, strip about ½ inch (12-13mm) of insulation from both ends of each wire length. Be careful not to cut into the copper strands. You should see neat, untinned copper wires. Twist the strands tightly between your fingers to form a single, solid bundle. If your wire has a stripe on one conductor, designate that as your “negative” (-) wire consistently for the entire run. From here on, the striped wire is always negative.
Step 3: Connecting to the Amplifier
Locate the output terminals for your left channel (often labeled “L” or “FL”) and right channel (“R” or “FR”). Most modern amps use binding posts. Loosen the knob or screw on the post until the hole or clamp is fully open. There are two common types:
- Spring-Loaded (Pin-Proof) Terminals: Push the button, insert the bared wire, and release. Ensure enough wire is inside for a solid grip.
- Binding Posts with Knobs: Lift the knob, insert the wire through the hole in the post, and tighten the knob firmly. For better contact, you can bend the wire end into a hook shape with pliers before inserting.
Procedure: Take your prepared left channel wire pair. Insert the solid (or non-striped) conductor into the red (+) terminal and secure it. Insert the striped conductor into the black (-) terminal and secure it. Give each wire a gentle tug to ensure it’s clamped securely. Repeat for the right channel wire pair on the right channel terminals. Never cross-connect (left + to right -).
Step 4: Connecting to the Speakers
Move to your first speaker. Remove its grille if necessary to access the terminals. These are usually on the back or bottom. Identify the + and – terminals, often marked with a red dot (+) and black dot (-) or the symbols. Follow the exact same process as Step 3: insert the amp-end’s solid wire to the speaker’s (+) terminal, and the striped wire to the speaker’s (-) terminal. Tighten securely. Repeat for the second speaker, connecting the other end of the right channel wire pair to it. Consistency is key: If you used the striped wire for negative at the amp, it must go to negative at the speaker. This maintains correct polarity across the entire system.
Step 5: Securing, Routing, and Final Inspection
Once both ends are connected, gently push the wires back into the terminal cups or along the speaker’s back to avoid them being pinched or pulled. If running wires along baseboards or under carpets, use cable staples (but don’t puncture the wire) or raceway. Leave a little slack at both the amp and speaker ends. Now, perform a visual and tactile inspection. Are any strands of wire poking out that could touch the other terminal? Are the connections tight? Is there any chance a wire could be pulled out by accident? Ensure the amp is still unplugged. This is your last chance to fix a mistake before power.
Testing, Troubleshooting, and Fine-Tuning
With everything connected, it’s time for the moment of truth. But don’t crank it up yet.
The Initial Power-On Test
- Double-Check Everything: Re-verify amp is unplugged. Confirm all connections are to the correct terminals (+ to +, – to -).
- Set Everything to Minimum: Turn your amplifier’s volume/gain controls to their lowest setting. power off any connected source components (receiver, DAC, phone).
- Power On: Plug the amplifier back in and turn it on. You should hear a very faint, almost inaudible click from the speakers as the relay engages (if it has one). No sound is normal at this stage.
- Apply a Low-Level Signal: Play a familiar, well-recorded track from your source at a moderate listening volume. Start with the amp volume at 25% and slowly increase.
Listen for clear, balanced sound from both speakers. There should be no hum, buzz, crackling, or distortion at moderate volumes.
Common Issues and Diagnosing Them
- No Sound from One Speaker: Check the connection at both the amp and speaker for that channel. Is the wire fully inserted and clamped? Is the speaker’s internal crossover or wiring faulty? Swap the speaker wires at the amp (connect left channel wire to right channel output). If the problem moves to the other speaker, the issue is at the amp or wire. If it stays, the speaker is faulty.
- Bass is Weak or “Hollow” Sound: This is classic out-of-phase wiring. Your speakers are fighting each other instead of reinforcing bass. Ensure you haven’t accidentally reversed the polarity on one speaker. The quick fix is to swap the + and – wires on just one speaker at its terminal. This will correct the phase relationship.
- Distortion or “Crackling” at Higher Volumes: Could be a loose connection (wiggle the wires at the terminals), an amp being overdriven (turn volume down), or a speaker being overdriven (check power matching). Also, a shorted wire (strands touching both + and -) will cause this.
- Constant Hum or Buzz: Often a ground loop issue in complex systems. For a simple amp-to-speaker setup, this is rare. Check that your speaker wire isn’t running parallel and close to AC power cables for long distances, which can induce noise.
Using a Multimeter for Confidence
If you have a multimeter, set it to the continuity setting (often a diode symbol). With the amp unplugged, touch one probe to the amp’s + terminal and the other to the corresponding speaker’s + terminal. You should get a beep and a very low resistance reading (0.1-0.5Ω). Repeat for the – terminals. Then, check between + and – on the same wire pair at the amp—there should be no continuity (infinite resistance or “OL”). This confirms you haven’t shorted the wire. You can also measure the total impedance of your wired speaker load by measuring resistance across the speaker terminals (with the speaker wire disconnected from the amp). An 8Ω speaker will read around 6-7Ω due to the voice coil’s DC resistance, which is normal.
Advanced Setups and Special Considerations
Once you’ve mastered the basic stereo hookup, you might want to expand. Here’s what to keep in mind.
Wiring Multiple Speakers to a Single Channel
This is where series/parallel math is essential. You have two goals: keep total impedance above the amp’s minimum, and ensure all speakers in the channel have the same impedance rating for balanced power distribution. For two identical speakers (both 8Ω): parallel gives 4Ω (check amp stability!), series gives 16Ω (safe, quiet). For four identical 8Ω speakers: a series-parallel “ring” (two series pairs wired in parallel) results in 8Ω total—often the perfect solution. Always calculate the final load before connecting.
Bi-Wiring and Bi-Amping
Some speakers have two sets of terminals (for high and low frequency drivers). Bi-wiring uses two separate wire runs from the same amp channel to the two terminal sets. It can offer subtle improvements in clarity by reducing intermodulation distortion. Bi-amping uses two separate amp channels (or dedicated high/low amplifiers) to power the two driver sets directly. This is more effective but requires an amp with a built-in crossover or an external electronic crossover. For basic wiring, you simply connect your single wire pair to both sets of terminals using the provided jumpers (or bridge them yourself with short wires).
Car Audio Specifics
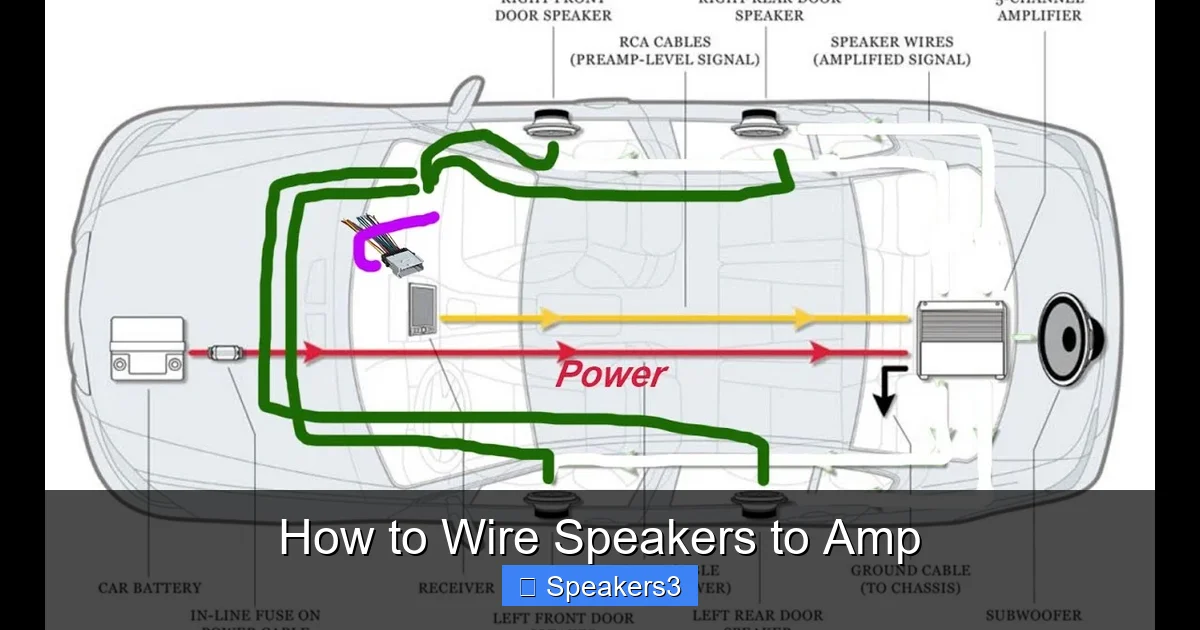
Car amps are almost always lower impedance stable (often 2Ω or even 1Ω). Wiring is similar but uses different terminals (often quick-disconnect or set-screw). The biggest difference is grounding. The amp must have a solid, paint-free metal connection to the car’s chassis. Also, run the power wire (from battery to amp) on the opposite side of the car from the speaker wires to avoid noise pickup. Use marine-grade OFC wire for corrosion resistance.
Professional Tip: The “Pigtail” Method for Clarity
In complex installations with many wires, it’s easy to lose track. After stripping your speaker wire, solder small spade connectors onto the ends. Then, you can plug these spades directly into the binding posts or use them with banana plugs. This creates a permanent, reliable connection that won’t fray and is easy to connect/disconnect. It’s a pro move that eliminates a major failure point: loose, untwisted strands.
Conclusion: Enjoy the Fruits of Your Labor
Wiring speakers to an amplifier is not a mysterious art; it’s a logical, step-by-step process grounded in a few simple rules. You now understand that matching impedance is your top priority for amp safety. You know the difference between series and parallel and when each might apply. You have a checklist of tools and a clear, safe procedure for making connections. You’ve learned how to test your work and diagnose the most common hiccups.
Take your time. The most satisfying part of any audio project is the first moment you hear your system come to life, perfectly in phase, cleanly amplified, and doing exactly what you designed it to do. That satisfaction is built on the solid foundation of correct wiring. So, unplug that amp one last time, follow the steps, double-check your polarity, and then, with confidence, flip the switch. Your music is waiting.
Frequently Asked Questions
What happens if I connect speakers with the wrong impedance to my amp?
If you connect speakers with a total impedance lower than your amp’s minimum stable rating, the amp will be forced to deliver excessive current, causing it to overheat rapidly. This can trigger protection shutdowns or, with sustained use, cause permanent damage to the amp’s output transistors. Always calculate your speaker load’s impedance before connecting.
Can I mix and match different speaker models or brands on the same amp channel?
Technically yes, but it’s not recommended for a stereo channel. Different speakers have different impedance curves and sensitivity (dB) levels. The amp will deliver the same voltage to both, but one will play louder and may have a different tonal balance. For a multi-speaker setup on a single channel (like a whole-home audio zone), all speakers should ideally be the same model and impedance for balanced sound and even power distribution.
Do I need to use special “audiophile” speaker wire?
For most standard home setups with runs under 50 feet, good-quality, reasonably thick (14-16 AWG) OFC or even standard copper-clad aluminum (CCA) wire is perfectly adequate. Extremely expensive, hyper-marketed speaker wire provides negligible audible benefit in typical systems. Focus your budget on better speakers or a better amp first. Just ensure the wire gauge is appropriate for the distance and power.
My amp has both “speaker” outputs and “pre-out” RCA jacks. Which do I use?
Use the speaker outputs (binding posts) to connect passive speakers directly. This is the standard method. The “pre-out” RCA jacks are used to send a low-level (line-level) signal to an external amplifier or powered subwoofer. You would use these if you were bypassing this amp’s internal amplifier section and using it only as a preamp/processor.
How tight should the binding post connections be?
Tight enough that a firm tug on the wire does not pull it out. You should feel solid resistance. Overtightening can damage the post or strip the wire’s copper. For binding posts with knobs, hand-tighten until the wire is firmly clamped, then give it an extra 1/4 to 1/2 turn with a screwdriver if needed for extra security. Do not use tools to overtighten the knob itself.
Is it normal for my amp to get warm when playing music?
Yes, it is normal for an amplifier to generate heat during operation. However, it should not become scalding hot to the touch within a few minutes at moderate listening volumes. If the amp becomes excessively hot, shuts down, or you smell burning, immediately turn it off and re-check your speaker impedance and wiring for a possible short or dangerously low load. Ensure the amp has adequate ventilation space.