Check Laptop Specs Windows
Checking your laptop specs on Windows is the fastest way to understand what your computer can handle, from processor speed and RAM to storage and graphics capabilities. Whether you need this info for upgrading hardware, troubleshooting performance issues, or buying compatible software, knowing your system details saves time and prevents costly mistakes. This guide walks you through multiple simple methods to check laptop specs on Windows so you can get the answers you need in minutes.
Key Takeaways
- Know your specs to plan upgrades, troubleshoot issues, and ensure software compatibility.
- Use System Information for a complete overview of your hardware and software details.
- Open Task Manager to check real-time CPU, memory, and disk performance instantly.
- Run systeminfo in Command Prompt for a quick and detailed spec summary.
- Try CPU-Z for in-depth hardware analysis beyond what built-in tools offer.
- Check specs before buying software to avoid compatibility and performance problems.
- Review specs regularly to track performance and plan future upgrades.
📑 Table of Contents
- Why Checking Your Laptop Specs Matters
- How to Check Laptop Specs Windows Using Built-In Tools
- Using System Information for Detailed Laptop Specs
- Checking Specific Hardware Components
- Third-Party Tools to Check Laptop Specs Windows
- What Your Laptop Specs Tell You About Performance
- Quick Tips for Checking and Understanding Your Specs
- Conclusion
Why Checking Your Laptop Specs Matters
Knowing how to check laptop specs Windows is one of the simplest yet most valuable skills you can learn. Whether you are buying a new laptop, troubleshooting a slow computer, or trying to run a specific program, understanding your hardware makes everything easier.
Many people use their laptops for years without ever looking at what is inside the machine. This can lead to frustration when a game won’t load or software throws an error message. A quick check of your laptop specifications solves most of these mysteries in seconds.
When you know your system details, you can make smarter decisions. You will understand what upgrades are possible, what software your machine can handle, and whether a laptop meets the requirements for your favorite apps. It really is that simple.
In this guide, we walk you through every method you can use to check laptop specs Windows without installing anything extra. We also cover what each spec means and why it matters for everyday use.
How to Check Laptop Specs Windows Using Built-In Tools
Windows comes with several free tools that let you view your hardware details instantly. You do not need to download anything or pay for software. Here are the easiest methods.
Method 1: Use the Settings App
This is the fastest way to see your basic laptop specifications. Follow these steps:
- Click the Start menu and select Settings.
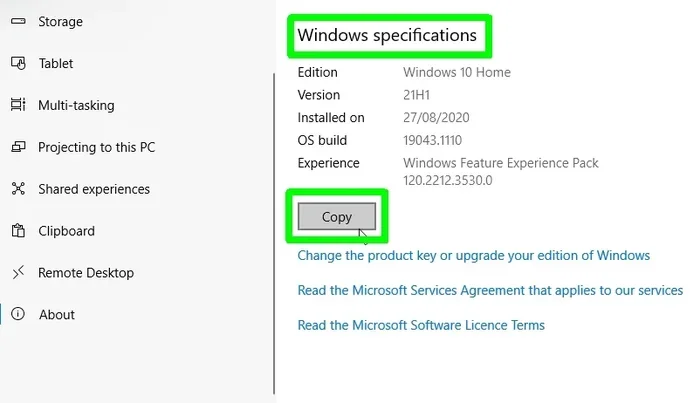
- Go to System and then click About.
- You will see your device name, processor, installed RAM, and Windows edition.
This method gives you a quick hardware overview in seconds. It is perfect when you just need a fast answer.
Method 2: Open System Information
For a more detailed look, use the built-in System Information tool:
- Press the Windows key and type “System Information.”
- Open the app and browse through the sections.
- You will find details about your CPU, RAM, BIOS version, and more.
This tool provides a comprehensive hardware overview that covers almost every component in your machine. It is especially helpful when you need to share your specs with tech support.
Method 3: Use Device Manager
Device Manager shows every piece of hardware connected to your laptop:
- Right-click the Start button and choose Device Manager.
- Expand each category to see your display adapter, sound cards, network adapters, and more.
- If any device has a problem, you will see a yellow warning icon.
This is a great way to check laptop specs Windows when something is not working properly. You can quickly identify outdated drivers or missing hardware.
Using System Information for Detailed Laptop Specs
The System Information tool is one of the most powerful built-in options for viewing your system specifications. It organizes everything in a clear tree structure that is easy to navigate.
When you open the tool, look for these key sections:
- System Summary — Shows your operating system, processor, total physical RAM, and product ID.
- Components — Displays details about your display, sound, network, and storage devices.
- Software Environment — Lists installed drivers and system services.
One of the best things about this tool is that you can export all your specs to a text file. This makes it easy to save or share your laptop hardware details whenever you need them.
If you want to dig even deeper, you can also use the command prompt. Simply type systeminfo and press Enter. This displays a detailed report of your operating system, network settings, and installed hotfixes. It is a quick way to check system specs Windows without clicking through menus.
Checking Specific Hardware Components
Sometimes you need to check just one part of your laptop. Here is how to find details on the most important components.
How to Check Your Processor
Your processor, also called the CPU, is the brain of your laptop. To find its details:
- Open Settings, go to System, and click About.
- Look for the “Processor” line item.
- You will see the model name and speed.
Knowing your processor helps you understand how fast your laptop can handle tasks. A newer processor with more cores will run programs smoother than an older model.
How to Check Your RAM
RAM, or memory, determines how many programs you can run at the same time. To check RAM in laptop systems:
- Go to Settings, then System, and click About.
- Look for “Installed RAM.”
- This number tells you your total memory capacity.
If your laptop has 8GB of RAM, you can handle everyday tasks like browsing and word processing with ease. For heavier work like video editing or gaming, 16GB or more makes a big difference. If you want to learn more about upgrading or checking RAM compatibility, you can read our guide on how to check RAM on your laptop for detailed steps.
How to Check Your Graphics Card
Your graphics card handles everything you see on screen. To check it:
- Right-click on your desktop and select Display Settings.
- Scroll down and click Display Adapter Properties.
- A popup will show your GPU name and driver version.
Alternatively, open Device Manager and expand “Display adapters.” This method works well when you want to check laptop specs Windows for gaming or graphic design purposes.
How to Check Your Storage
Storage determines how many files, apps, and games you can keep on your laptop:
- Open File Explorer and click on This PC.
- You will see your drives and how much space is used versus available.
- For more details, open Settings, go to System, and click Storage.
If your storage is nearly full, your laptop will slow down. Consider moving files to an external drive or upgrading to a larger SSD for better performance.
Third-Party Tools to Check Laptop Specs Windows
While Windows has great built-in tools, sometimes a third-party app gives you even more detail. These programs scan your entire system and present the results in a clean, easy-to-read format.
Here are some reliable options:
- CPU-Z — A lightweight tool that shows detailed CPU, RAM, and motherboard information. It is free and very popular among tech users.
- Speccy — Developed by CCleaner, this tool provides a colorful overview of every hardware component in your laptop.
- HWiNFO — A comprehensive diagnostic tool that monitors temperatures, voltages, and performance metrics in real time.
These tools are especially useful when you are buying a used laptop or trying to diagnose a hardware problem. They give you a level of detail that the built-in tools simply cannot match. Just make sure to download them from the official websites to avoid any security risks.
What Your Laptop Specs Tell You About Performance
Understanding what your specs mean is just as important as knowing how to find them. Here is a quick breakdown of how each component affects your experience.
| Component | What It Does | Minimum for Everyday Use | Recommended for Heavy Use |
|---|---|---|---|
| Processor (CPU) | Handles all calculations and tasks | Intel Core i5 or AMD Ryzen 5 | Intel Core i7 or AMD Ryzen 7 |
| RAM | Temporary memory for running apps | 8GB | 16GB or more |
| Storage | Where your files and apps are saved | 256GB SSD | 512GB SSD or 1TB SSD |
| Graphics Card (GPU) | Handles visuals and display output | Integrated graphics | Dedicated GPU with 4GB+ VRAM |
| Operating System | Software that runs everything | Windows 10 or 11 | Windows 11 with latest updates |
Use this table as a quick reference when evaluating a laptop. If your current machine falls below the “minimum” column for your needs, it may be time to consider an upgrade or a new device.
For students looking for a reliable machine, we have put together a list of the best Windows laptops for students that balance performance and affordability. These recommendations are based on real-world testing and user feedback.
Quick Tips for Checking and Understanding Your Specs
Here are some practical tips to keep in mind when you are reviewing your laptop specifications:
- Write your specs down. Keep a note with your processor, RAM, and storage details. You will need this when downloading software or asking for help online.
- Check for updates regularly. Windows updates can change how your system reports specs. Always use the latest version of Windows for the most accurate information.
- Compare before you buy. When shopping for a new laptop, compare the specs against the requirements of the software you plan to use.
- Do not ignore the operating system version. Some programs only work on Windows 11, while others still run best on Windows 10. Knowing your OS version prevents compatibility headaches.
- Use multiple tools for verification. If a spec seems unusual, cross-check it with a second tool like CPU-Z or the System Information app.
These simple habits will save you time and confusion. They also help you get the most out of your current laptop and make better purchasing decisions in the future.
Common Mistakes People Make When Checking Specs
Even when people know how to check laptop specs Windows, they sometimes make avoidable mistakes:
- Confusing storage size with RAM. These are two different things and serve completely different purposes.
- Ignoring the bit version of their operating system (32-bit vs 64-bit). This affects how much RAM your system can actually use.
- Relying on only one tool. Different tools sometimes report specs slightly differently, so using two sources is always a good idea.
- Forgetting to check the GPU when buying software for creative work. Many people focus only on CPU and RAM and overlook the graphics card.
Avoiding these simple mistakes will give you a much clearer picture of what your laptop can actually do.
Conclusion
Learning how to check laptop specs Windows is a skill that pays off every day. Whether you use the Settings app, System Information, Device Manager, or a third-party tool, you now have multiple ways to understand exactly what is inside your machine.
Your laptop specifications tell a story about what your computer can handle. From the processor that powers your apps to the RAM that keeps everything running smoothly, each component plays a role in your daily experience. When you know your specs, you can troubleshoot problems faster, choose the right software, and decide when it is time for an upgrade.
Start by using the built-in tools we covered today. They are free, fast, and already on your computer. Once you get comfortable with them, you can explore third-party tools for even deeper insights. The more you know about your machine, the better you can use it.
Take a few minutes right now to check your laptop specs. You might be surprised by what you find, and it could save you a lot of headaches down the road.
Frequently Asked Questions
How do I check my laptop specs on Windows?
You can check your laptop specs on Windows by right-clicking the Start button and selecting System. This will show you key details like your processor, RAM, and Windows version instantly.
What is the easiest way to check laptop specs on Windows?
The easiest method is pressing the Windows key + Pause/Break key on your keyboard. This opens the System window where you can see all your essential hardware and software details at a glance.
Can I check laptop specs Windows without downloading any software?
Yes, you can check laptop specs on Windows without any third-party tools using the built-in System Information app. Simply search for “System Information” in the Start menu to access detailed reports on your hardware components.
What information do I see when I check laptop specs on Windows?
When you check laptop specs on Windows, you typically see your processor type, installed RAM, system type, and Windows edition. You can also find details about your display adapter, storage drives, and network capabilities.
How do I check my RAM and processor details on a Windows laptop?
To check your RAM and processor, go to Settings > System > About on your Windows laptop. This section clearly displays your installed memory and processor name, making it simple to verify your system’s performance capabilities.
Why is it important to check laptop specs on Windows before installing new software?
Checking your laptop specs on Windows helps you confirm whether your system meets the minimum requirements for any new software. This prevents compatibility issues, slow performance, and wasted time on installations that won’t work properly.