How Do You Increase Ram on a Laptop
Increasing your laptop’s RAM is one of the most effective ways to improve its speed and multitasking ability. First, you must check your laptop’s specific model to determine its maximum supported RAM, the type of RAM it uses (e.g., DDR4, DDR5), and how many slots are available. Once you have this information, you can purchase compatible RAM modules. The physical installation typically involves opening the laptop’s back panel, removing the old RAM sticks, and securely inserting the new ones. After installation, your operating system should automatically recognize the new memory, leading to a noticeably faster and more responsive system for demanding applications like video editing, gaming, and running multiple programs at once.
Is your once-speedy laptop now struggling to keep up? Do you sigh as your browser with a dozen tabs open crawls, or does your video editing software grind to a halt? Before you consider an expensive new machine, there’s a powerful and often cost-effective upgrade that can breathe new life into your portable computer: increasing its Random Access Memory (RAM). Think of RAM as your laptop’s short-term workspace. The more workspace you have, the more tasks it can juggle at once without getting overwhelmed. This comprehensive guide will walk you through every single step of how to increase RAM on a laptop, from the initial detective work to the final screw-tightening, ensuring you make the right choice and install it correctly.
Key Takeaways
- Check Compatibility First: Never buy RAM without confirming your laptop’s exact model supports the type, speed, and maximum capacity. Use tools like Crucial System Scanner or your manufacturer’s manual.
- Understand RAM Types: Laptops use SO-DIMM modules, not desktop DIMMs. Ensure you match the generation (DDR3, DDR4, DDR5) and that the speed (MHz) is supported by your laptop’s chipset.
- Slots Matter: Identify if you have empty slots to add RAM or if you must replace existing modules. Most modern laptops have 1-2 accessible slots.
- Installation is Simple but Requires Care: The process is straightforward but involves static safety, proper alignment, and firm seating. A small Phillips screwdriver is usually all you need.
- Verify After Installation: Enter BIOS/UEFI and check your OS’s system information to confirm the new RAM is recognized at the correct speed and capacity.
- RAM Upgrades Have Limits: A RAM upgrade cannot fix a slow processor or a traditional hard drive. For the best boost, pair a RAM upgrade with an SSD if you still use an HDD.
- When in Doubt, Seek Help: If you are uncomfortable opening your laptop, many local computer shops offer quick, affordable installation services.
📑 Table of Contents
- Understanding RAM: The Heart of Multitasking
- Phase 1: The Detective Work – Assessing Your Laptop’s Upgrade Potential
- Phase 2: Choosing the Right RAM – Compatibility is King
- Phase 3: Gathering Tools & Preparing for Installation
- Phase 4: The Installation – A Step-by-Step Visual Guide
- Phase 5: Post-Upgrade – Optimization and Verification
- What If My Laptop’s RAM Isn’t Upgradeable?
- Conclusion: A Simple Upgrade for a Dramatic Difference
Understanding RAM: The Heart of Multitasking
Before we dive into the “how,” let’s quickly clarify the “what” and “why.” RAM is volatile memory. This means it holds data temporarily while your laptop is powered on—data that your processor needs to access immediately for running applications and the operating system itself. When you open a program, it loads from your storage drive (SSD/HDD) into the much-faster RAM. The more RAM you have, the more programs and data can reside in this fast-access zone simultaneously.
Signs Your Laptop Needs More RAM
How do you know if low RAM is your bottleneck? The symptoms are frustratingly familiar:
- Constant Sluggishness: The system feels slow even with just one or two apps open.
- Excessive Hard Drive Activity: You hear the HDD (if you have one) churning constantly, or your SSD activity light is solid. This is your system using the storage drive as “virtual memory” (a swap file) because the RAM is full—a process thousands of times slower than real RAM.
- Programs Freezing or Crashing: Applications become unresponsive, especially when switching between them.
- “Low Memory” Warnings: Your operating system (Windows or macOS) explicitly tells you that memory is running low.
- Inability to Run Modern Software: New applications, especially creative suites, development environments, and games, list higher RAM requirements.
If these sound like your daily experience, a RAM upgrade is a prime suspect for the solution. But first, you must play detective.
Phase 1: The Detective Work – Assessing Your Laptop’s Upgrade Potential
This is the most critical phase. Jumping to buy RAM without this research is the #1 reason for failed upgrades or wasted money. You need three key pieces of information: your laptop’s exact model, its maximum supported RAM, and its current RAM configuration.
Visual guide about How Do You Increase Ram on a Laptop
Image source: i0.wp.com
Step 1: Identify Your Exact Laptop Model
You cannot use generic information. A “Dell Inspiron 15” is not enough. You need the specific model number, often found on a sticker on the bottom of the laptop or within the system information.
- On Windows: Press Windows Key + R, type msinfo32, and hit Enter. Look for “System Model” in the System Summary.
- On macOS: Click the Apple menu > About This Mac. The model name and year are displayed. For more detail, go to System Report > Hardware > Model Identifier (e.g., MacBookPro18,3).
Write this exact model name/number down. This is your key to all further research.
Step 2: Discover Maximum RAM & Current Configuration
With your model in hand, you have several excellent resources:
- Manufacturer’s Website: Go to the support page for your specific model. Look for “Specifications,” “Tech Specs,” or “Upgrade Instructions.” This document will list the maximum RAM capacity (e.g., “Up to 64GB”), the type of RAM (e.g., “DDR4 SDRAM”), the speed (e.g., “3200MHz”), and the number of slots.
- Crucial System Scanner: This is a favorite tool for many. Visit the Crucial website and run their free scanner. It will analyze your system and show your current RAM and recommended upgrade options that are 100% guaranteed compatible. It’s an incredibly fast and reliable starting point.
- Third-Party System Info Tools: Free utilities like CPU-Z (check the “Memory” and “SPD” tabs) or Speccy provide detailed information about your installed RAM modules, including type, size, speed, and manufacturer.
Step 3: Physically Inspect (If Possible)
If you’re comfortable, power off the laptop, unplug it, remove the battery if possible, and open the back panel (usually secured by 6-10 screws). Look at the RAM slots. You’ll see one or two small circuit boards (RAM sticks) held down by small side clips. This visual confirms the number of slots and whether one or both are occupied. Note: On many ultra-thin laptops and recent MacBooks, the RAM is soldered directly to the motherboard and is not upgradeable. This inspection will confirm if you even have accessible slots.
Phase 2: Choosing the Right RAM – Compatibility is King
Armed with your laptop’s specs, you now know what to buy. The wrong RAM simply won’t work or will cause instability. Here’s what you must match.
Form Factor: SO-DIMM
Laptops use a smaller form factor called SO-DIMM (Small Outline DIMM). It is physically shorter than desktop RAM. Do not attempt to use standard desktop DIMMs; they will not fit.
Generation: DDR3, DDR4, or DDR5
This is the most fundamental compatibility check. DDR generations are not backward or forward compatible. A DDR4 slot will only accept DDR4 RAM, and the same for DDR3 and DDR5. The notches are in different positions to prevent physical mismatches. Your laptop’s documentation or the Crucial scanner will tell you which generation you need. DDR4 is most common in laptops from ~2015-2021, while DDR5 is found in newer high-end models (2021+).
Speed (MHz)
RAM is rated in megahertz (e.g., 2666MHz, 3200MHz, 4800MHz). Your laptop’s chipset will support a range of speeds. You can usually install faster RAM than the base spec, and it will simply run at the highest speed your system supports (the “JEDEC” speed). For the best performance and stability, match the speed of your existing RAM if you are adding to it, or use the speed listed as the “optimal” in your manufacturer’s docs.
Capacity per Module & Total
Check the maximum per-slot capacity. Some older laptops max out at 8GB per slot, even if the total is 16GB. Modern laptops often support 16GB, 32GB, or even 64GB per slot. Calculate your desired total. A common and cost-effective upgrade path is to replace existing modules with two identical new sticks (e.g., two 16GB sticks for 32GB total) to enable dual-channel mode, which significantly improves performance. If you have one empty slot, you can often add a matching stick to your existing one.
Voltage
Standard laptop RAM runs at 1.2V or 1.35V. This is almost always automatically handled, but it’s another spec listed in your system info. Ensure your new RAM matches the standard voltage for your generation (DDR4 is typically 1.2V, DDR3L is 1.35V).
Pro Tip: When in doubt, buy RAM from a reputable brand (Crucial, Kingston, Corsair, Samsung) using their configurator tool for your exact laptop model. They guarantee compatibility and often offer excellent warranties.
Phase 3: Gathering Tools & Preparing for Installation
With your compatible SO-DIMM RAM module(s) in hand, it’s time to prepare for the physical upgrade. This process is simple but requires a methodical approach to avoid damaging your laptop.
Essential Tools
- A small Phillips-head screwdriver (#0 or #1). This is almost always the only tool needed. Some newer laptops use security Torx screws (T5, T6), so check your laptop’s screw heads first.
- An anti-static wrist strap (highly recommended). This grounds you and prevents static electricity from discharging into and damaging the sensitive RAM chips. If you don’t have one, frequently touch the laptop’s bare metal chassis (with the battery removed) to discharge any static.
- A clean, flat, well-lit workspace. Keep screws organized in a small container.
- Your new RAM module(s). Handle them by the edges, avoiding the gold contacts and chips on top.
Safety First: Power Down Completely
This cannot be stressed enough:
- Shut down your laptop completely through the operating system. Do not just sleep or hibernate it.
- Unplug the AC adapter/power cable.
- If your laptop has a removable battery, take it out. For laptops with internal batteries, this step is skipped, but you must be extra cautious about holding the power button for 10-15 seconds after unplugging to drain residual power.
- Press the power button once after unplugging to ensure all residual power is gone.
Now you are ready to open the case.
Phase 4: The Installation – A Step-by-Step Visual Guide
The process is remarkably similar for 99% of laptops with upgradeable RAM. Let’s walk through it.
Step 1: Open the Laptop’s Back Panel
Flip the laptop over. Locate all the screws securing the bottom cover. They may all be the same size, or some might be slightly longer (often near the display hinge). Keep track of where each screw came from; putting a long screw in a short-screw hole can damage the motherboard. Gently pry off the plastic cover using a plastic spudger or your fingernail, starting at a corner. It may have clips around the edge; work your way around carefully. The panel should come off, revealing the internal components.
Step 2: Locate the RAM Slots
You are looking for one or two small, rectangular slots, usually near the center or a corner of the motherboard. They are often covered by a small piece of metallic shielding (a heat spreader) or left exposed. Each slot has two small, usually silver, metal clips on the sides that hold the RAM stick in place.
Step 3: Remove the Old RAM (If Replacing)
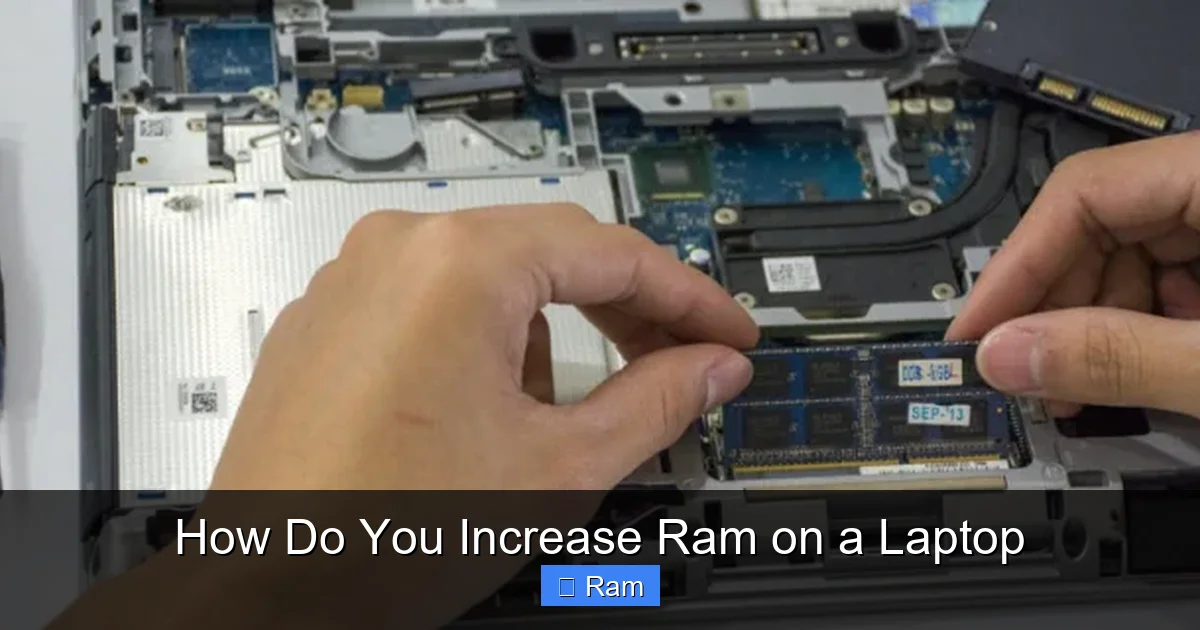
To remove an existing RAM stick, gently but firmly push the two side clips outward and away from the module. They will pop up slightly, and the RAM stick will tilt up at about a 45-degree angle. Grasp the stick by the edges and pull it straight out. Avoid touching the gold contacts. Place it aside on an anti-static bag if you plan to keep it.
Step 4: Insert the New RAM
This is the crucial part. Hold the new RAM module by the edges. Notice the notch on the bottom edge (the gold contacts). This notch is key—it must align perfectly with the raised block (the “key”) in the RAM slot. Do not force it. The alignment is directional.
- Align the notch on the RAM with the key in the slot.
- Insert the module into the slot at a 45-degree angle, just like the old one came out. Push it in firmly and evenly until the gold contacts are fully seated in the slot. You should feel a solid resistance.
- Now, press the module down flat until the two side clips automatically snap into place, locking the stick horizontally. You should hear/feel a small click. Ensure the clips are fully engaged on both sides. The RAM should now be parallel to the motherboard and not move at all when gently wiggled.
If you are adding a second stick to an empty slot, repeat this process in the other slot. For optimal dual-channel performance, if you have two slots, install matching sticks (same brand, model, size, speed) in both.
Step 5: Reassemble and Test
Before closing the laptop, do a “bench test” if possible:
- Reconnect the battery (if removable) and plug in the AC adapter.
- Power on the laptop. It should boot normally. If it beeps repeatedly or shows a black screen, power it off immediately—the RAM is likely not seated properly. Recheck the installation.
- If it boots, enter the BIOS/UEFI (usually by pressing F2, Del, or F12 during startup). Navigate to the system information or memory page. It should list the total installed RAM correctly (e.g., 32GB).
- Boot into your operating system (Windows/macOS).
- In Windows: Go to Settings > System > About. Under “Device specifications,” “Installed RAM” should show your new total. For more detail, open Task Manager (Ctrl+Shift+Esc) > Performance > Memory. It will show speed, form factor, and in-use/available memory.
- In macOS: Click Apple menu > About This Mac. The memory line will show the new total.
If everything looks good, power down, unplug, and screw the back panel back on in the correct screw locations. You’re done!
Phase 5: Post-Upgrade – Optimization and Verification
Your new RAM is installed and recognized. Now, let’s ensure it’s running optimally and verify the performance gain.
Verifying Speed and Timings
Sometimes, RAM may default to a lower speed (like 2133MHz) if the BIOS doesn’t automatically set the XMP/DOCP profile. For most users, this is fine—the system is stable. For enthusiasts, you can enter the BIOS/UEFI and look for memory settings (often under “AI Tweaker,” “Overclocking,” or “Advanced Memory Settings”). There may be an option for an “XMP Profile” or “DOCP” that you can enable to run the RAM at its advertised speed. Only change this if you are comfortable in BIOS; incorrect settings can prevent booting.
Running a Memory Test
While rare, faulty RAM can cause random crashes. It’s good practice to test your new modules. Use the free, thorough MemTest86. You’ll create a bootable USB drive with the tool, boot from it, and let it run several passes (at least 4). If it reports zero errors, your RAM is solid.
Experiencing the Performance Boost
Now, use your laptop as you normally would. Open all the applications you typically run. You should notice:
- Switching between browser tabs and applications is instantaneous.
- Large files in programs like Photoshop or Premiere Pro load and save faster.
- You can have dozens of Chrome tabs, a Word document, Spotify, and a video call running simultaneously with no lag.
- The system feels more “snappy” and responsive overall.
Remember, a RAM upgrade will not make a slow CPU faster or make an old HDD perform like an SSD. It removes a specific bottleneck related to multitasking and data-heavy applications.
What If My Laptop’s RAM Isn’t Upgradeable?
What if your detective work revealed that your RAM is soldered to the motherboard with no free slots? All is not lost. You have several alternative strategies to improve performance that work synergistically with or instead of a RAM upgrade.
1. The SSD Imperative
If your laptop still has a traditional mechanical hard drive (HDD), replacing it with a SATA or NVMe SSD is the single greatest performance upgrade you can make for overall system feel. It will make booting, launching programs, and loading files dramatically faster, often more noticeable than a RAM upgrade for general use. Many laptops with soldered RAM still have a replaceable SSD.
2. External RAM Solutions? (The Reality)
There is no such thing as a practical, fast “external RAM” for a laptop. Some experimental Thunderbolt 3/4 solutions exist, but they are incredibly niche, expensive, and offer negligible real-world benefit due to bandwidth limitations. Do not consider this a viable path.
3. Optimize Your Current Workflow
- Close Unused Apps: Get in the habit of quitting applications you aren’t using, don’t just minimize them.
- Manage Startup Programs: Disable unnecessary programs from launching at startup (Task Manager > Startup in Windows). This frees up RAM immediately after boot.
- Use Lightweight Alternatives: Swap a heavy browser like Chrome for a more memory-efficient one like Microsoft Edge (with efficiency mode on) or Firefox with strict settings. Use simpler image viewers or text editors for basic tasks.
- Increase Virtual Memory (Page File): You can manually increase the size of your system’s page file (Settings > System > Advanced system settings > Performance > Settings > Advanced > Virtual memory). This gives your system more “fake” RAM to use on your SSD, but it’s still far slower than real RAM. It’s a last-resort band-aid, not a cure.
4. Consider a Cloud-Focused or Light OS
For very old or low-spec laptops, consider installing a lightweight Linux distribution like Lubuntu or Xubuntu. These operating systems use a fraction of the RAM that Windows 11 or modern macOS versions do, making an otherwise struggling laptop perfectly usable for web browsing and document work.
5. The Nuclear Option: A New Laptop
If your laptop has a very old, slow dual-core CPU, an HDD, and soldered RAM, the cumulative upgrades (RAM+SSD) may approach the cost of a new, budget-friendly modern laptop with a fast quad-core CPU, 8-16GB of soldered RAM, and a built-in NVMe SSD. Sometimes, the most efficient path is a fresh start.
Conclusion: A Simple Upgrade for a Dramatic Difference
Increasing the RAM on your laptop is a straightforward, user-friendly hardware upgrade that delivers an immediate and tangible improvement in everyday computing. The secret to success lies not in the screwdriver work, but in the preliminary research. By accurately identifying your laptop model and its specifications, you guarantee that the RAM you purchase will be compatible. The physical installation, while requiring care and a static-safe environment, is a simple process of aligning, inserting, and clicking. For the vast majority of laptops with accessible slots, this is a perfect DIY project that saves you money and deepens your understanding of your machine. If your laptop’s RAM is soldered, focus your efforts and budget on the transformative power of an SSD and software optimization. Ultimately, a memory upgrade is about giving your laptop the breathing room it needs to perform the tasks you ask of it, turning a frustrating, chugging companion back into the efficient tool it was meant to be.
Frequently Asked Questions
Can I increase RAM on any laptop?
No. Many modern ultrabooks, thin-and-lights, and all Apple Silicon MacBooks have their RAM soldered directly to the motherboard, making it impossible to upgrade. You must first check your specific laptop model to see if it has accessible SO-DIMM slots.
What happens if I install RAM that’s too fast for my laptop?
In most cases, nothing bad happens. The RAM will simply run at the highest speed your laptop’s chipset supports (its JEDEC profile), which is often lower than the module’s advertised XMP speed. It will work perfectly, just not at its maximum potential.
Should I mix different sizes of RAM (e.g., 8GB + 16GB)?
You can mix sizes, and your system will still use all the RAM in a flexible “flex mode.” However, for optimal performance in dual-channel mode (which doubles the data throughput to the memory controller), matched pairs (e.g., two 8GB or two 16GB sticks) are ideal. Mixing may result in a portion of the RAM running in single-channel mode.
Is there a big difference between DDR3, DDR4, and DDR5 for everyday use?
DDR5 is significantly faster and more efficient than DDR4, which is much better than DDR3. However, the real-world difference for tasks like web browsing and office work between DDR4 and DDR5 is often minimal. The biggest jump is felt when moving from very low amounts of RAM (e.g., 4GB) to 16GB or more, regardless of the generation.
My laptop shows 4GB RAM but has a 64-bit OS. Can I still upgrade?
Yes, but you must check your motherboard’s maximum support. A 64-bit OS can theoretically address far more RAM than you’ll ever need. The limit is almost always the physical hardware (chipset and slots), not the OS. A 32-bit OS is limited to about 3.5GB, so if you’re still on 32-bit, upgrading RAM beyond 4GB is pointless without first installing a 64-bit OS.
Do I need to reinstall my operating system after adding RAM?
No. The operating system automatically detects and uses the new memory upon the next boot. There is no driver installation or OS reinstallation required for a standard RAM upgrade. Your files, programs, and settings remain completely untouched.