How to Remove Laptop Ram
Learning how to remove laptop ram is a simple skill that every laptop owner should have. Whether you are upgrading memory, replacing faulty modules, or troubleshooting issues, removing RAM the right way keeps your laptop safe and your data secure. This guide walks you through every step with clear instructions and practical tips.
Removing RAM from a laptop might sound intimidating, but it is actually one of the simplest hardware tasks you can do at home. How to remove laptop ram is a question many people search for, and the answer is easier than you think. Whether you want to upgrade your memory, replace a broken module, or just clean your laptop, knowing how to handle RAM properly makes all the difference.
Laptop RAM, also known as computer memory, plays a huge role in how fast your machine runs. When you open too many apps or work with large files, your RAM handles the load. Over time, you might need to remove or replace these modules to keep your laptop performing at its best. This guide will show you exactly how to do it without any hassle.
Key Takeaways
- Power down completely: Always shut off your laptop and unplug it before touching any internal components.
- Ground yourself: Use an anti-static wrist strap or touch a metal surface to prevent static damage to RAM modules.
- Locate the right slots: Most laptops have accessible RAM slots on the bottom panel or under a dedicated cover.
- Release clips gently: The side clips on memory slots hold the RAM in place and must be pressed outward to free the module.
- Handle with care: Hold RAM by the edges only to avoid damaging the gold contacts or circuitry.
- Know when to seek help: If your laptop design makes access difficult, consider professional assistance to avoid damage.
📑 Table of Contents
Why You Might Need to Remove Laptop RAM
There are several reasons why you would need to take RAM out of your laptop. Understanding these reasons can help you feel more confident about the process. Here are the most common scenarios where how to remove laptop ram becomes necessary:
- Upgrading memory: Your laptop is running slowly and needs more RAM to handle modern tasks.
- Replacing faulty modules: One of your RAM sticks has gone bad and is causing crashes or blue screens.
- Troubleshooting issues: You want to test individual RAM sticks to find out which one is causing problems.
- Cleaning or maintenance: Dust has built up around the memory slots and you need to clean the area.
- Selling or repurposing: You are passing on your laptop and want to remove the RAM for the next user.
No matter the reason, the process is basically the same across most laptop brands. The key is to be patient and follow each step carefully. Rushing through the removal process can damage your RAM or even your laptop’s motherboard.
Tools and Safety Precautions Before You Start
Before you dive into how to remove laptop ram, you need to gather a few basic tools and take some safety steps. Skipping these precautions is the number one mistake people make when working with laptop hardware.
What You Will Need
- A small Phillips-head screwdriver (usually size #1 or #0)
- An anti-static wrist strap (optional but recommended)
- A clean, flat workspace with good lighting
- A soft cloth or anti-static mat to place your laptop on
- A small container to keep track of screws
Safety First
Static electricity is the biggest enemy of computer components. Even a tiny shock that you cannot feel can fry a RAM module or damage your motherboard. Here is how to protect yourself:
- Power off completely. Shut down your laptop and do not just put it to sleep.
- Unplug everything. Remove the power adapter and disconnect any USB devices or peripherals.
- Remove the battery if possible. Some laptops let you take out the battery easily. If yours does, this adds an extra layer of safety.
- Ground yourself. Touch a metal part of the laptop chassis or wear an anti-static wrist strap.
- Work on a non-conductive surface. Avoid carpets or surfaces that generate static electricity.
Taking these few minutes to prepare will save you from costly mistakes. How to remove laptop ram safely starts with proper preparation.
Step-by-Step Guide to Remove Laptop RAM
Now that you are prepared, let us walk through the actual process of removing RAM from your laptop. Follow each step in order and do not skip ahead.
Step 1: Find the RAM Access Panel
Flip your laptop over and look at the bottom panel. Many laptops have a dedicated cover specifically for the RAM slots. It is usually labeled with a small memory icon or marked with “RAM” in tiny text. If you cannot find a dedicated cover, you may need to remove the entire bottom panel.
Some laptops, especially ultrabooks, have RAM soldered to the motherboard and cannot be removed. If your laptop falls into this category, you will not be able to remove the RAM. Check your laptop model specifications before proceeding.
Step 2: Remove the Screws
Use your small screwdriver to remove the screws holding the access panel in place. Put each screw in a safe spot. A magnetic tray or a small bowl works great for this. Losing screws is an easy mistake to make and can be frustrating.
Be gentle when removing the panel. If it does not come off easily, do not force it. Check if there are any additional screws you might have missed.
Step 3: Locate the RAM Modules
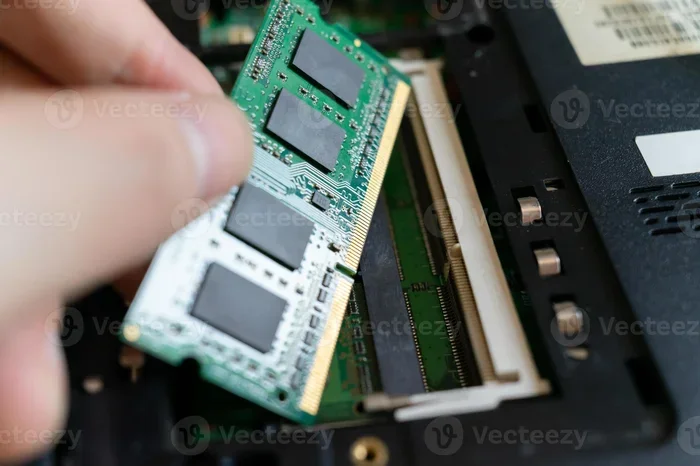
Once the panel is off, you will see the RAM slots. Laptop RAM modules are called SODIMM sticks and they look like long, thin rectangles with gold connectors on one side. Most laptops have one or two RAM slots. If both slots are filled, you will see two modules sitting side by side.
Before touching anything, take a moment to look at how the RAM is seated. Notice the small metal clips on each side of the module. These clips are what hold the RAM in place.
Step 4: Release the Side Clips
This is the most important step in how to remove laptop ram. Look at both sides of the RAM module. You will see small plastic clips that are pressed inward, holding the module securely.
Take your fingers and gently push both clips outward at the same time. The clips will move outward and the RAM module will tilt up at an angle. Do not pull on the module yet. Let the clips do the work.
If you only push one side, the module will not release properly. Make sure both clips move freely before you try to remove the stick.
Step 5: Remove the RAM Module
Once both clips are pushed outward, the RAM module will pop up at about a 30-degree angle. Now you can gently pull the module straight out of the slot. Hold it by the edges only. Never touch the gold contacts on the bottom of the module.
Set the removed RAM on a safe, flat surface. If you are replacing it, keep the old module somewhere you will not lose it.
Step 6: Repeat if Needed
If your laptop has two RAM modules and you need to remove both, repeat steps 4 and 5 for the second module. Always work on one module at a time to avoid confusion.
Common Mistakes to Avoid When Removing RAM
Even though removing laptop RAM is straightforward, people still make avoidable mistakes. Here are the most common errors and how to prevent them:
- Forcing the clips: The clips should move smoothly with gentle pressure. If they resist, stop and check your approach. Forcing them can break the clip mechanism.
- Touching the gold contacts: Oils from your fingers can damage the connectors on the RAM module. Always hold the module by the top and sides.
- Removing RAM while the laptop is powered: This is a serious safety risk. Always power off and unplug your laptop first.
- Mixing up screws: Different screws may have different lengths. Keep track of which screw goes where.
- Ignoring your laptop manual: Every laptop model is slightly different. Check your user manual for specific instructions before opening your device.
Avoiding these mistakes will keep both you and your laptop safe. How to remove laptop ram goes smoothly when you take your time and stay careful.
What to Do After Removing Laptop RAM
Once you have successfully removed the RAM, you have a few options depending on why you took it out in the first place.
If You Are Upgrading
If your goal was to increase your laptop’s memory, now is the time to insert new RAM. Make sure the new modules are compatible with your laptop. Check the DDR generation (DDR3, DDR4, or DDR5) and the speed rating before purchasing. Insert the new module at a 30-degree angle and press it down until the side clips click into place.
For a detailed walkthrough on adding new memory, check out our guide on How To Upgrade Laptop Ram.
If You Are Replacing Faulty RAM
If you removed a broken module, you can install a replacement stick. Before you do, test the old module in another compatible laptop if you can. This confirms whether the RAM itself was the problem or if something else caused the issue.
For help with replacement procedures specific to HP laptops, visit our guide on How To Replace Ram In Hp Laptop.
If You Are Troubleshooting
After removing RAM for testing, reinsert it carefully and power on your laptop. Check if the issue you were experiencing has been resolved. If problems persist, the RAM may not be the cause. You can also run a memory diagnostic tool in Windows to check for errors.
To verify your current memory status after reinstalling, our guide on How To Check The Ram On My Laptop can help you confirm everything is working correctly.
Expert Tips for Handling Laptop RAM
Here are some extra tips from experienced technicians that will make your RAM removal experience smoother:
- Take photos before you start. Photos help you remember exactly where everything was and how it was oriented.
- Work in a well-lit area. Good lighting helps you see the small clips and screws clearly.
- Keep your laptop on a stable surface. Working on a bed or couch can make the process awkward and risky.
- Label your screws. Use small tape pieces to label screws if your laptop has different screw sizes.
- Be patient. If something does not fit or move easily, stop and reassess. Do not apply too much force.
These small habits make a big difference. Handling RAM with care extends the life of your components and keeps your laptop running smoothly for years.
When to Seek Professional Help
Most people can handle how to remove laptop ram on their own with the steps above. However, there are situations where professional help makes sense:
- Your laptop has a sealed or glued bottom panel that is difficult to open.
- The RAM is soldered to the motherboard and cannot be removed.
- You are uncomfortable working with internal laptop components.
- You have tried removing RAM but your laptop still has issues.
There is no shame in asking for help. A qualified technician can handle the job quickly and safely, especially if you are worried about damaging your device.
Conclusion
How to remove laptop ram is a straightforward process that anyone can learn with a little patience and the right guidance. From gathering your tools to safely releasing the side clips, each step is simple and manageable. The key takeaways are to always power down, ground yourself, handle the modules by the edges, and take your time.
Whether you are upgrading your memory, replacing a faulty stick, or troubleshooting an issue, knowing how to remove RAM gives you more control over your laptop’s performance. With the tips and steps in this guide, you are well equipped to handle RAM removal like a pro. Apply what you have learned, and your laptop will thank you with better speed and reliability.
Frequently Asked Questions
Can I remove laptop RAM while the computer is on?
No, you should never remove RAM while the laptop is powered on. Always shut down completely, unplug the power adapter, and remove the battery if possible. Working on powered components can damage both the RAM and the motherboard.
Do I need any special tools to remove laptop RAM?
Not really. A small Phillips-head screwdriver is usually all you need. An anti-static wrist strap is helpful but not required. The most important tool is your patience and careful handling.
How do I know if my laptop RAM is removable?
Check your laptop’s user manual or look up your specific model online. Some laptops have soldered RAM that cannot be removed. Most traditional laptops and gaming models have at least one removable RAM slot.
Is it safe to touch the gold contacts on a RAM stick?
No, you should avoid touching the gold contacts. Oils from your skin can corrode the connectors over time. Always hold the RAM module by the top edges and the plastic sides.
What happens if I break the side clips while removing RAM?
Breaking the clips can make it difficult to secure the RAM module properly. If a clip breaks, the RAM may not seat correctly, leading to boot failures or performance issues. In this case, seek professional repair help.
How often should I remove and clean my laptop RAM?
There is no set schedule. However, if you notice performance issues or you have not cleaned your laptop in over a year, it is a good time to inspect and clean the RAM modules. Regular maintenance every 12 to 18 months is a good practice.