Types of Alignment in Ms Excel
Mastering Types Of Alignment In Ms Excel transforms cluttered data into a polished, easy-to-read layout. Correct alignment not only improves visual appeal but also speeds up data entry and analysis. Explore the key alignment settings—horizontal, vertical, and orientation—to give your spreadsheets a professional finish.
Key Takeaways
- Master horizontal alignment: instantly improve how your data looks and reads.
- Use vertical alignment: control spacing and readability within your Excel cells.
- Apply text orientation: fit long labels into tight column spaces effectively.
- Combine merge and center: with alignment for cleaner, more professional spreadsheets.
- Enable wrap text: prevent data overflow and keep cells looking tidy.
- Adjust indentation: organize content hierarchy inside individual Excel cells.
- Use distribute alignment: evenly spread content across rows or columns.
📑 Table of Contents
- Understanding the Different Types of Alignment in Ms Excel
- What Is Alignment in Excel and Why Does It Matter?
- Horizontal Alignment Options in Excel
- Vertical Alignment Options in Excel
- How to Apply and Customize Alignment in Excel
- Alignment for Merged Cells and Special Cases
- Common Alignment Mistakes and How to Avoid Them
- Quick Tips for Mastering Excel Alignment
Understanding the Different Types of Alignment in Ms Excel
Have you ever opened an Excel spreadsheet and noticed how some text sits perfectly in the middle of a cell while other text hugs the left edge? That’s all because of alignment. Knowing the types of alignment in Ms Excel is one of those small things that make a huge difference in how your data looks and feels. Whether you’re building a budget tracker, a report for your boss, or a simple to-do list, getting alignment right helps people read your data faster and with fewer headaches.
In this guide, we’ll walk through every major alignment option available in Excel. We’ll cover horizontal alignment, vertical alignment, and some lesser-known tricks that even experienced users sometimes miss. By the end, you’ll know exactly how to position your data so it looks clean, professional, and easy to scan.
Before we dive in, keep in mind that Excel runs best when your system has enough RAM to handle heavy workloads. If your laptop struggles with large spreadsheets, it might be worth checking your hardware setup. You can learn how to check the RAM on your laptop to see if an upgrade might help Excel run more smoothly.
What Is Alignment in Excel and Why Does It Matter?
Alignment simply refers to where your text or numbers sit inside a cell. Think of a cell as a tiny box. Alignment decides whether the content sits on the left side, the right side, or dead center. It also controls vertical positioning — whether your content sits at the top, middle, or bottom of that box.
You might wonder why this matters so much. Well, imagine receiving a report where names are aligned left, numbers are aligned right, and headings are centered. It instantly becomes easy to read. Now imagine everything crammed to the left with no structure. Your eyes would glaze over in seconds. Proper alignment improves readability, enhances data presentation, and gives your spreadsheets a polished, professional look.
Excel offers several built-in alignment options through the Alignment tab in the Format Cells dialog box and the Home ribbon. Let’s break them all down one by one.
Horizontal Alignment Options in Excel
Horizontal alignment controls where your content sits from left to right within a cell. This is the most commonly used alignment type, and Excel actually applies some of these by default. For instance, text automatically aligns to the left, while numbers align to the right. Let’s explore each option.
Left Alignment
Left alignment pushes your content to the left edge of the cell. This is the default for text entries like names, labels, and descriptions. It creates a clean starting line that makes columns of text easy to scan.
You can set left alignment by selecting the cell or range, then clicking the “Align Left” button on the Home ribbon. Alternatively, press Ctrl + 1 to open the Format Cells dialog, navigate to the Alignment tab, and choose Left under Horizontal.
Right Alignment
Right alignment does the opposite — it pushes content to the right edge of the cell. Numbers, dates, and financial figures typically use right alignment. This makes columns of numbers line up neatly, which is critical when you’re comparing values or doing calculations.
Right alignment is also the default for numeric data in Excel, so you usually don’t need to set it manually. But if you ever need to right-align text for design reasons, simply select the cells and click the “Align Right” button.
Center Alignment
Center alignment places your content right in the middle of the cell horizontally. This works great for headings, titles, and short labels where symmetry matters. Center alignment is popular in reports, dashboards, and summary tables.
Here’s a quick tip: avoid centering long paragraphs of text. It creates uneven edges on both sides and makes the text harder to read. Center works best for short, concise content.
Justify Alignment
Justify alignment stretches your text so it fills the entire width of the cell. Both the left and right edges line up evenly, similar to what you see in newspapers or books. This option is useful when you have longer text blocks inside merged cells.
However, justify alignment can create awkward spacing between words, especially in narrow columns. Use it carefully and always preview the result before sharing your file.
Fill Alignment
Fill alignment repeats your text across the cell until it runs out of space. This is a niche option, but it can be handy for creating simple patterns or filling cells with repeated labels. Keep in mind that if your text is too long, Excel will truncate it — the text won’t wrap or shrink, it simply gets cut off.
Vertical Alignment Options in Excel
While horizontal alignment gets most of the attention, vertical alignment is just as important. It controls where your content sits from top to bottom inside a cell. Excel provides several vertical alignment choices that work independently from horizontal settings.
Top Alignment
Top alignment places your content at the very top of the cell. This is the default vertical setting in Excel. It works well when all your cells have the same row height, but problems appear when row heights vary. If one row is taller than the others, top-aligned content in shorter rows will look disconnected from content in taller rows.
Middle Alignment
Middle alignment centers your content vertically within the cell. This creates a balanced look, especially in tables where row heights differ. If you’re building dashboards or layouts with mixed row heights, middle alignment keeps everything visually centered and tidy.
Bottom Alignment
Bottom alignment pushes content to the bottom of the cell. It’s less common than top or middle alignment, but it has its uses. For example, if you’re building a form or layout where you want labels at the top and input areas below, bottom-aligned values sit neatly at the base of each cell.
Wrap Text and Shrink to Fit
These aren’t traditional alignment options, but they work closely with alignment to improve how your data displays. Wrap Text forces long text to break into multiple lines within the same cell, adjusting the row height automatically. Shrink to Fit reduces the font size so all your content fits on one line. Both options pair well with vertical alignment to create clean, readable cells.
How to Apply and Customize Alignment in Excel
Now that you know what each alignment type does, let’s talk about how to actually apply these settings. Excel gives you multiple ways to customize alignment, so you can pick whichever method feels most comfortable.
Using the Home Ribbon
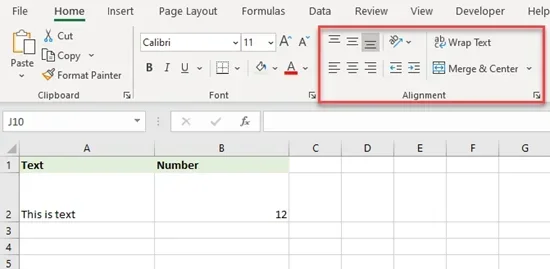
The quickest way to change alignment is through the Home tab. Look for the Alignment group on the right side of the ribbon. You’ll see buttons for left, center, and right alignment, plus options for top, middle, and bottom alignment. There’s also a “Wrap Text” button and a “Format” dropdown for more options.
Simply select the cells you want to change, then click the alignment button that matches what you need. It’s fast, intuitive, and works for most everyday tasks.
Using the Format Cells Dialog
For more control, use the Format Cells dialog box. Press Ctrl + 1 after selecting your cells, then click the Alignment tab. Here you’ll find every horizontal and vertical alignment option in one place, plus settings for text direction, indentation, and orientation.
This dialog is especially useful when you need to combine settings. For example, you can set horizontal alignment to center while simultaneously setting vertical alignment to middle and rotating the text at a 45-degree angle. All of this lives in one convenient spot.
Using Keyboard Shortcuts
If you like working with keyboard shortcuts, Excel has you covered. Here are a few useful ones for alignment:
- Ctrl + L — Align Left
- Ctrl + E — Center Align
- Ctrl + R — Align Right
- Alt + H, A, A — Toggle Wrap Text
- Alt + H, A, C — Clear All Formatting
These shortcuts can speed up your workflow significantly, especially when you’re formatting large spreadsheets with many cells.
Alignment for Merged Cells and Special Cases
Merged cells behave differently from regular cells, and alignment works a bit differently too. When you merge multiple cells into one, Excel combines the content and applies alignment across the entire merged area. This creates opportunities for some nice visual effects.
Centering Across Columns
One of the most underrated alignment tricks in Excel is centering across columns without actually merging cells. This lets your heading span multiple columns visually while keeping each individual cell intact. It’s better than merging because it doesn’t cause issues with sorting, filtering, or formulas later on.
To do this, select the range of cells where you want the heading to appear. Open the Format Cells dialog (Ctrl + 1), go to the Alignment tab, and choose “Center Across Selections” from the Horizontal dropdown. Your text will appear centered across the entire range, but each cell remains independent.
Alignment in Tables and PivotTables
When you’re working with Excel Tables or PivotTables, alignment tends to follow different rules. Excel usually applies consistent formatting across entire columns in tables, which is great. However, PivotTables sometimes reset alignment when you refresh or rearrange data. Keep an eye on your alignment settings after making changes to PivotTables to make sure everything still looks right.
Text Orientation and Rotation
Excel also lets you rotate text at custom angles. This is useful for creating compact column headers in narrow columns or for designing visually interesting layouts. You can find rotation settings in the Format Cells dialog under the Alignment tab. Try setting headers to 45 or 90 degrees when you have lots of columns and limited horizontal space.
Common Alignment Mistakes and How to Avoid Them
Even experienced Excel users make alignment mistakes sometimes. Here are a few common pitfalls and how to fix them.
Mixing Up Alignment Styles Across Columns
One of the biggest eyesores in a spreadsheet is inconsistent alignment. Imagine a table where some columns have left-aligned numbers and others have right-aligned text. It looks messy and confusing. To avoid this, establish a standard for your entire workbook. A good rule of thumb is: text on the left, numbers on the right, headings centered. Stick to this consistently and your spreadsheets will always look organized.
Forgetting to Check Vertical Alignment
Most people focus on horizontal alignment and forget about the vertical dimension. If your row heights vary, top-aligned content can look disconnected and uneven. Setting vertical alignment to middle for most data cells creates a more balanced, uniform appearance throughout your sheet.
Overusing Merged Cells
Merged cells feel tempting for making headers look nice, but they cause real problems. You can’t sort or filter properly with merged cells, and formulas that reference merged areas often break. Whenever possible, use center across columns instead of merging. Your data will stay functional and still look great.
Ignoring Wrap Text in Data-Heavy Sheets
If you have long descriptions or notes inside cells, don’t let them overflow into adjacent columns. Turn on Wrap Text so the content stays contained within its cell. This keeps your layout tidy and prevents data from being hidden or cut off. Remember to adjust row heights afterward so all the wrapped text remains fully visible.
Not Using Indentation Wisely
Indentation shifts your content slightly to the right or left without changing the cell itself. It’s a subtle tool, but it works wonders for creating visual hierarchy. Use indentation to nest subcategories under main categories or to create a cleaner look in label columns. You’ll find indentation controls in the Format Cells dialog under the Alignment tab, and also as quick buttons on the Home ribbon.
Quick Tips for Mastering Excel Alignment
Let’s wrap up with some actionable tips you can apply right away.
- Use consistent alignment across entire columns. Pick one style per column and stick with it throughout your workbook.
- Preview before sharing. Always switch to Page Layout view (View > Page Layout) to see how your alignment looks on printed pages. What looks fine on screen might not translate well to paper.
- Pair horizontal and vertical alignment. Combining center horizontal with middle vertical alignment creates a polished, balanced look for headers and key figures.
- Use conditional formatting with alignment. You can set rules that change alignment based on cell values. For example, center positive numbers and right-align negative ones for quick visual distinction.
- Save alignment as a style. If you use a specific combination of alignment settings frequently, create a custom cell style. This lets you apply all your preferred settings with one click in the future.
- Check alignment after importing data. When you paste or import data from external sources, alignment often resets to defaults. Review your settings and adjust as needed to maintain a consistent look.
Mastering the types of alignment in Ms Excel might seem like a small skill, but it truly transforms how your spreadsheets communicate. Clean alignment makes data easier to read, reduces confusion, and shows attention to detail. Start applying these techniques today, and you’ll notice your spreadsheets looking sharper and more professional with every project.
The next time you open an Excel file, take a moment to review your alignment settings. Adjust what needs fixing, apply consistent formatting across your sheets, and watch your data come alive. A well-aligned spreadsheet isn’t just easier on the eyes — it’s easier to work with, easier to share, and easier to understand at a glance.
Frequently Asked Questions
What are the types of alignment in Ms Excel?
In Ms Excel, alignment options let you control how text and numbers sit inside a cell. The main types include left, center, and right alignment for horizontal positioning, along with top, middle, and bottom for vertical placement. There is also merge and center, wrap text, and fill alignment that help you format your spreadsheets more effectively.
How do I change horizontal alignment in Excel?
You can change horizontal alignment by selecting your cells and using the alignment buttons on the Home tab. Choose left align to push content to the left edge, center to place it in the middle, or right align to push it to the right side of the cell.
What is the difference between horizontal and vertical alignment?
Horizontal alignment controls where your content sits left to right inside a cell, such as left, center, or right. Vertical alignment controls the top-to-bottom positioning, giving you options like top align, middle, or bottom align within the cell.
How do I merge cells and center the content in Excel?
The merge and center option combines multiple selected cells into one larger cell and places the content right in the middle. You can find this feature on the Home tab under the alignment group, and it is very useful for creating table headers and titles.
Can I align text vertically in Excel cells?
Yes, Excel offers vertical alignment options that let you position text at the top, middle, or bottom of a cell. This is especially helpful when your cells have different heights or when you want to create a cleaner and more organized layout in your worksheet.
Why is text wrapping important for cell alignment?
Text wrapping keeps all your content visible inside a cell by moving it to the next line instead of spilling over into neighboring cells. This works hand in hand with alignment settings to make sure your data stays neat and easy to read, no matter how long the text is.